Google has its own simplified way to install stock firmware on Nexus smartphone/tablets. These stock firmware files are available in the form of factory images, officially available through the Google Developers website. We are thankful to Google for keeping an eye out for its users, and we’re also here for you. Today, we will be guiding our Nexus users on how to flash factory image on Nexus devices. The procedure is simple and only requires you to have basic command-line knowledge.
Google Nexus smartphones and tablets are popular for their AOSP nature, and also the heights to which they can be customized in every possible way. If you would ask me, I have always unlocked and rooted my Nexus first-hand, mostly the same day when I have grabbed it in my hands. I do this because I am always confident about it. But, there are extreme situations when even experienced people like me or you, can soft-brick your Nexus by flashing an incompatible mod/tweak. There also might be a case that you want to restore back just for delivering your phone to the service center, for repairs or updating.
These instructions will work on every old and new Nexus device – Nexus S, Galaxy Nexus, Nexus 4, Nexus 5, Nexus 6, Nexus 7, Nexus 9, Nexus 10, Nexus 6P, and Nexus 5X. But before we proceed, it’s necessary to complete a set of pre-requirements.
Prior to the instructions, we assume that you have already unlocked bootloader and have a custom ROM installed if it is so you should skip STEP 1. If you’re still locked and want to reinstall the same firmware, you should follow all the stated steps.
This tutorial can also be used to update your Nexus device by manually flashing the factory image.
Disclaimer
Flashing wrong factory image may soft-brick your Nexus device, so make sure to cross check the files and proceed as stated. We shall not be held responsible for any damage to your device. However, we are more than willing to help you get out of any such situation.
Table of Contents
Prerequisites
- Backup your device’s storage, SMS, contacts, calendars, etc. Unlocking the bootloader will erase everything off the device.
- Charge your phone to at least 60% battery level to avoid any interruptions during the process.
- Enable USB debugging on your Nexus smartphone or tablet. If you’re a newbie, you can follow our guide here.
- Download the platform tools package and extract its content so you will have the ADB and fastboot binaries. You will need to copy these files to the folder where the factory image files will be extracted.
Flash Factory Images on Nexus Devices
STEP 1: Unlock Bootloader
To unlock the Nexus device’s bootloader, it is necessary for fastboot commands to be able to work properly and write device partitions.
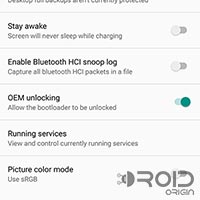
- If you are using Nexus 5X, or Nexus 6P, it is necessary to first enable OEM Unlocking in Settings > Developer options.
- Now, connect your Nexus device to the PC.
- Open a new command-line window and enter the command below to boot into bootloader mode:
adb reboot bootloader
- Use the following command to unlock the phone’s bootloader:
fastboot flashing unlock
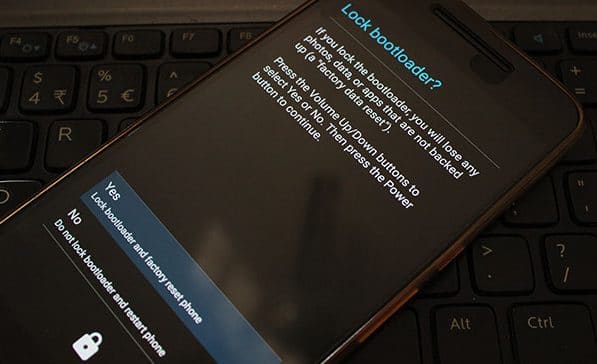
- Now, a warning shall be prompted over the device’s screen. Using the volume keys, highlight “Yes”, and select it using the power button.
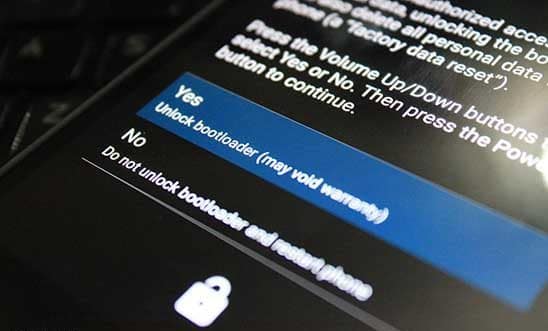
This is it! You have just unlocked your Nexus device’s bootloader.
STEP 2: Download and Extract Factory Image
- Download the factory image corresponding to your Nexus model and extract it to a suitable location on your PC (preferably on Desktop).
- You will have the complete factory image extracted inside the folder. Example: angler-mmb29m
- All the files to be used specifically are bootloader image, radio image, vendor image and the partition image zip file.
- Next, extract the partitions zip file (image-angler-mmb29m.zip) and move all its content files (boot.img, system.img, userdata.img, cache.img, recovery.img) to the parent directory – “angler-mmb29m”.
STEP 3: Erase All Partitions
Now that everything is ready, it is time to start the flashing. But we will first need to erase all the current partitions.
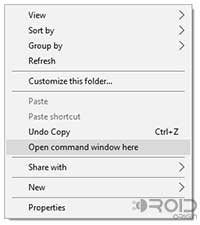
- Open the folder (e.g. angler-mmb29m) where the complete factory image has been extracted. Now press SHIFT key and right-click on an empty space inside this folder, and select Open command window here from the pop-up menu.
- First and foremost, reboot into bootloader mode:
adb reboot bootloader
- Erase all the partitions by entering the following commands one after the other:
fastboot erase recovery
fastboot erase boot
fastboot erase system
fastboot erase cache
fastboot erase system
fastboot erase vendor
- When the erasing is done, reboot the bootloader:
fastboot reboot-bootloader
STEP 4: Flash Factory Image on Nexus
Okay, so now we are done with everything. It’s time to flash factory image on your Nexus smartphone or tablet.
- Once your Nexus has booted into the bootloader mode, you can start off by flashing the bootloader:
fastboot flash bootloader bootloader.img
Example:
fastboot flash bootloader bootloader-angler-angler-02.45.img
- Reboot your Nexus to the bootloader:
fastboot reboot-bootloader
- Flash the radio using the following command:
fastboot flash radio radio.img
Example:
fastboot flash radio radio-angler-angler-02.50.img
- Reboot bootloader, again:
fastboot reboot-bootloader
- Finally, flash all the partitions:
fastboot flash recovery recovery.img
fastboot flash boot boot.img
fastboot flash system system.img
fastboot flash cache cache.img
fastboot flash userdata userdata.img
fastboot flash vendor vendor.img
- Reboot your Nexus now:
fastboot reboot
- Finally, if you are willing to go completely stock, you can also re-lock the bootloader:
fastboot flashing lock
The device shall prompt you to confirm the locking process. So, use the power button to select “Yes”.
Voila! You have successfully flashed factory image on your Nexus device. If you have any issues during or after the process, you can ask us directly by commenting below.