How to Install Android Q GSI on Project Treble Devices
Google has officially released Android Q Generic System Images (GSI) for Project Treble devices. With this available users can easily install Android Q

On this page
Google has officially released Android Q Generic System Images (GSI) for Project Treble devices. With this available users can easily install Android Q Developer Preview on any Android device that supports Project Treble. This guide explains the process of determining whether your device is Project Treble compatible or not. Furthermore, it explains the steps required for Installing Android Q GSI on it.
In recent years, the launch of Project Treble is among the most significant event surrounding the Android OS. It was released in 2017 alongside Android Oreo (8.1), with the objective to separate the Android Framework from vendor implementation. With this, every time a new Android OS version is launched, the OEMs and developers only need to work on the software component, whereas the lower base consisting of vendor code no longer needs to be updated that frequently.
The advantages of this are aplenty. For example, the user not only receives faster updates from the OEMs but in this specific case, it also makes several non-Google devices capable of running Android Q Developer Preview using the GSI.

A Generic System Image or GSI is a pure Android implementation with unmodified Android Open Source Project (AOSP) code that any Android device running Android 8.1 or higher can run successfully. Installing this GSI on supported devices allow developers to test the new Android Q system with the Vendor Test Suite (VTS) and the Compatibility Test Suite (CTS) to ensure that the device implements vendor interfaces correctly with the latest version of Android. (Source: Google)
So, with the required knowledge in hand, follow the below guide to install Android Q Generic System Image on Project Treble Devices.
Warning & Disclaimer
Android Q has not been made official yet and is still in the beta stage - even on Pixel devices. Expect it to have lots of bugs.
If you still want to go ahead, note that thecustomdroid.com or any of its members will take no responsibility whatsoever regarding any damage caused to your device by following this process. Proceed with caution!
Prerequisites
- Your device should be running Android Pie (9.0) out of the box.
- Also, make a backup of all your data stored on the phone. This guide will completely erase all the data including the internal storage.
- Make sure to unlock the bootloader of your device. You can check our bootloader unlocking archive to check if instructions are available for your device.
- Keep your device adequately charged so that it remains switched on during the entire installation process.
- In order to use this procedure, you must install Android SDK Tools on your PC.
- Make sure to enable USB Debugging on your device.
- Before downloading the GSI images, Google your device’s architecture. You could also download CPU-Z app. Then under the ‘System’ tab look for ‘Kernel Architecture’.
Download Android Q Generic System Image (GSI)
Among the two GSI files for ARM64, if you want the core Google apps and services then download the ARM64+GMS (Google Mobile Services) version. Otherwise, if you would like to stick with the bare minimum, go with the ARM64 version.
- Android Q GSI Image: File Information-
- Date: June 2019
- Build: QPP4.190502.019
- Build Type: Experimental
- Security Patch Level: June 2019
- Google Play Services: 17.4.55
- Android Q GSI Image: Download Links-
Known Issues:
Following are the issues that you might face (as mentioned on the official Android Developer’s blog):
- Q GSI on Q beta - GSI plus GMS (images named gsi_gms_arm64-exp-*) could not be flashed to the current Android Q Beta OS due to dynamic partition size limitations. Developers who want to experiment with Q GSI on a Q Beta OS should instead flash a GSI version that excludes GMS.
- Power Cycle - Rebooting GSI might fail on some devices. To fix, put the device into recovery mode, erase user data and perform a factory reset, and then reboot the device.
- Phone Audio - When using the integrated dialer, you may not hear any audio on the phone. This is due to a change in the telephony service installation location in Android Q.
- Bluetooth Connectivity for Pixel devices - After flashing GSI, Pixel Bluetooth connectivity might not function correctly. Developers encountering any Bluetooth-related issues should use future Q GSI releases to validate Bluetooth connectivity on Pixel devices.
How to Install Android Q GSI File on Project Treble Devices
Installing Android Q GSI on Project Treble devices may seem to be a complex procedure, especially for those users who are having very little knowledge regarding all these. As a result, we have split the guide into two steps. The first one checks for the Project Treble compatibility of the device. Whereas the second step lays down the instruction for installing the Android Q GSI file on your device.
Step 1: Check Project Treble compatibility of your device
- Connect your device to PC via USB Cable.
- Go to the ADB and Fastboot folder.
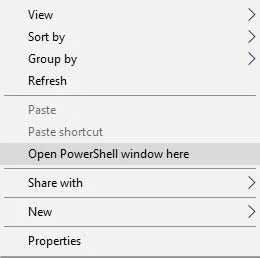
- Inside the folder, right-click in an empty area while keeping the Shift key pressed.
- Select ‘Open PowerShell window here’.
-
Type in the following command:
adb shell getprop ro.treble.enabled

-
If the result is true, proceed further. Otherwise, your device is not Project-Treble compatible and hence installation of Android Q GSI is not possible.
-
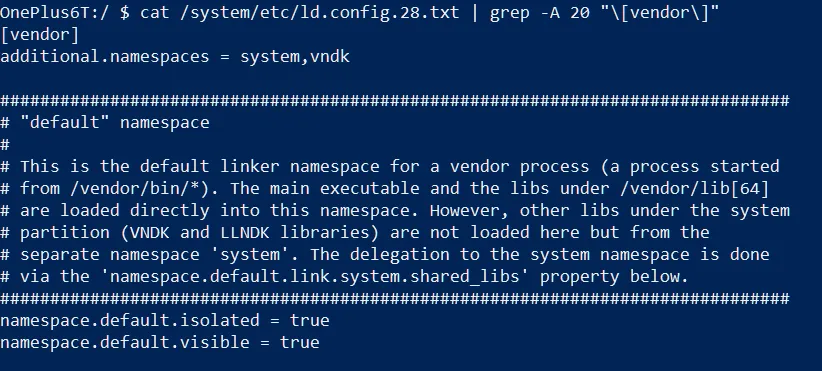
Now check for the cross-version compatibility by running the below commands:
adb shell cat /system/etc/ld.config.28.txt | grep -A 20 ”\[vendor\]”
-
Look for namespace.default.isolated. If the value is true, then it means the device would support booting the Android Q GSI on top of the Android Pie 9.0 Vendor Image. If the result comes out to be false, then the device will only use GSI for the same on-device version of OS.
-
Confirm whether your device is ‘system-as-root’ or not. Type in below code:
adb shell
cat /proc/mounts | grep -q /dev/root && echo “system-as-root” || echo “non-system-as-root”
System-as-root is necessary to support system-only OTA such as in flashing a new OS version via GSI.
So these were the steps to determine whether your device is compatible with Project Treble or not. If it qualifies to be so, then follow the second part of the guide below to install the Android Q Generic System Image on your device.
Step 2: Install Android Q GSI on your Project Treble device
- Download the Android Q GSI file corresponding to your CPU architecture.
- Extract the downloaded GSI File.
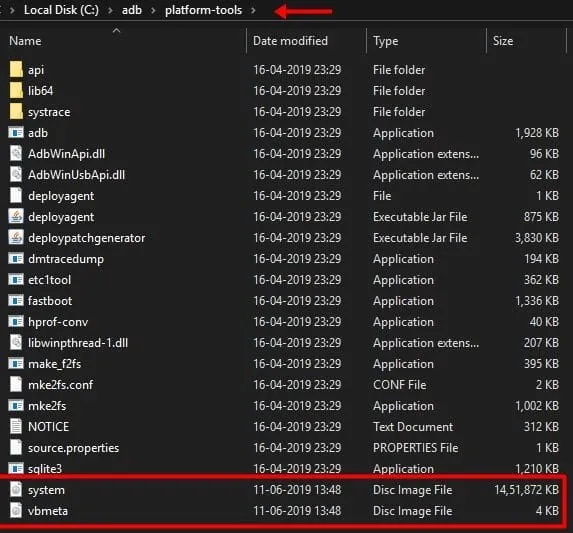
- You will find two files: system.img and vbmeta.img.
- Move these 2 extracted files inside the Android SDK Tools folder. *
-
Connect your device to the PC using the USB cable and ensure that USB debugging is enabled on it.
-
Reboot your device to fastboot mode by typing the command provided below:
adb reboot bootloader
-
Now we have to disable Android Verified Boot (AVB). Type in the command:
fastboot —disable-verification flash vbmeta vbmeta.img
-
Next, wipe the system partition through the following command:
fastboot erase system
-
At this stage, we have to install the Android Q GSI file. Enter the following code:
fastboot flash system system.img
-
Wipe the userdata partition and reboot your device by entering the following commands:
fastboot -w
fastboot reboot
That’s it. We have successfully installed the Generic System Image on your Project Treble compatible device. If you tried this build and want to give feedback regarding the same or if you face any issues apart from the one mentioned above, use the official feedback section.
So this was our guide on how to Install Android Q GSI on Project Treble devices. If you have any doubts regarding the same, feel free to ask in the comment section below.
Source: developer.android.com
Comments
Comments are moderated, and published only if they are relevant to the topic and add value in a constructive way. If you disagree with something, please be polite and respectful. We suggest you read our comment policy before commenting.