How to Enable Verified Calls Feature in Google Phone App on Android
Google's 'Verified Calls' is a new feature that helps users by presenting them with calls from legitimate businesses by displaying their identity,

On this page
Google’s ‘Verified Calls’ is a new feature that helps users by presenting them with calls from legitimate businesses by displaying their identity, verification, and call reasons. In this post, we will talk more about this feature, and show you how to enable the ‘Verified Calls’ feature in the Google Phone app on Android.
In the past few years, Google has taken countable measures to prevent its users from falling into online frauds and scams. The company introduced a new Verified SMS feature in its Messages app, ‘See caller and spam ID’ feature in the Google Phone app, as well as another feature to automatically ‘Filter Spam Calls’.
According to Google, consumers receive a hefty number of calls from businesses every day. Seeing an increase in spam call rates, consumers are often hesitant in picking up calls from unknown numbers. Of course, with this, there is always a chance that a user may sometimes skip important calls from legitimate businesses.
And as a solution, Google has released the ‘Verified Calls’ feature in its native Phone app on Android devices.
What is ‘Verified Calls’?
Verified Calls in the Google Phone app is a feature that allows users to make informed decisions about incoming calls from unsaved numbers. The feature builds user’s trust by confirming the identity of the business in real-time so they can be confident when picking up the call.
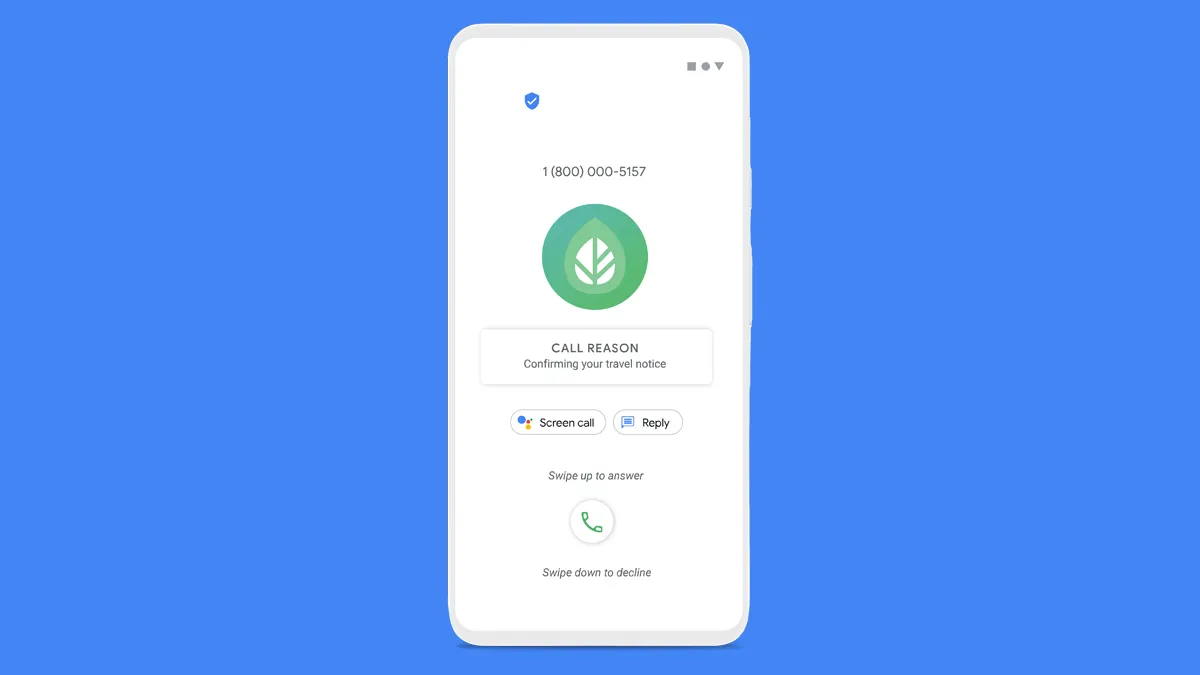
To further enhance the user experience, the Verified Calls feature displays the following information when a call is being made by a verified business:
- A verification badge
- The business’s name
- The business’s branding/logo
- Reason for calling
Here’s how the call screen looks like when an incoming call is from a verified business:
How does the ‘Verified Calls’ feature work?
In its official documentation, Google has been very transparent and detailed how the Verified Calls feature in the Phone app works in real-time to protect users from spam call frauds.
- Before a Business makes a call, they send their phone number, your phone number, and a calling reason like “Flight time changes”, “Your food delivery”, etc to Google’s servers.
- Google then sends this provided information to the Google Phone app on your Android device.
- When the business calls, the Phone app verifies the information provided by the business with the incoming call information.
- If the information matches, the call is displayed as a Verified Call in the Phone app.
- Within the next few minutes, Google deletes your phone number, as well as the business’s calling reason from their Verified Calls servers.
They further mention that a user’s data like their phone number, device identifiers, and associated Google account are not stored any further than the verification process.
Businesses can register themselves with Google by going through the information provided on this page.
It’s worth noting that incoming phone calls from businesses without Google’s ‘Verified Call’ badge could still be legit. These could be valid calls from businesses who haven’t provided their Verified Call information.
How to Enable Verified Calls Feature in Google Phone App on Android
As of early September, Google started rolling out this feature in the Google Phone app starting with users in the US, Mexico, Brazil, Spain, and India.
Google Pixel, Android Go, and Android One devices come preloaded with the Google Phone app. But if you’re using a non-Pixel device, you will need to download and install the Phone app, available on the Play Store. You could alternatively download the Google Phone APK from here and sideload the app by following the instructions here.
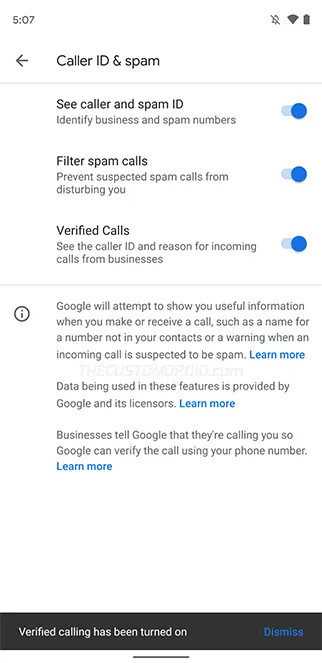
Now follow the steps below to enable the ‘Verified Calls’ feature on Android:
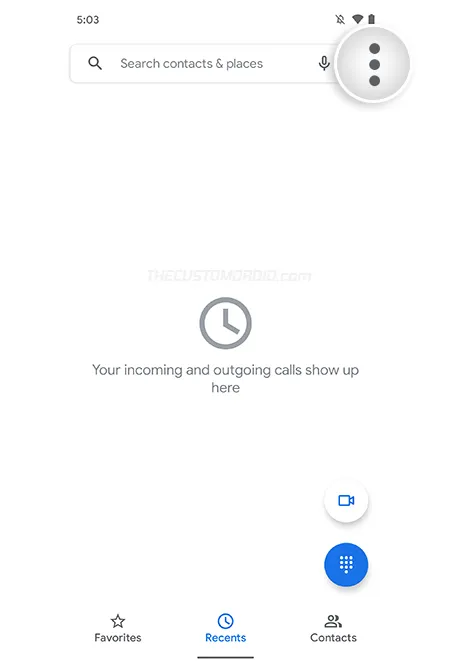
- Open the app drawer on your device and launch the Phone app by Google.
- Press the 3-dot menu icon on the top-right of the app’s screen.
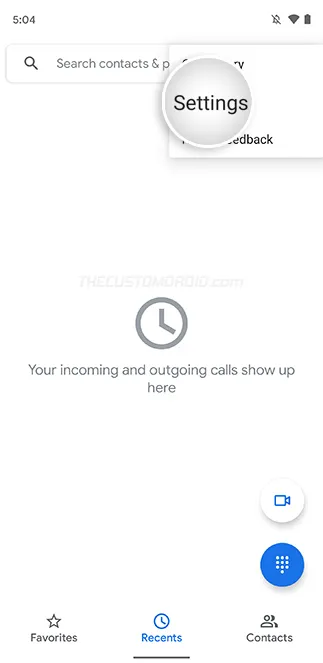
- Select ‘Settings’ from the menu.
- Tap ‘Caller ID & spam’ (or ‘Spam and Call Screen’) from the list of settings.
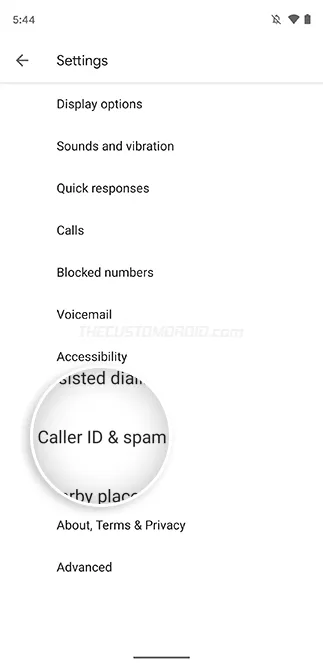
- Turn ON the ‘Verified Calls’ toggle.
- If you do not have a phone number associated with your Google account, you would be prompted to add one.

- That’s it! You should now see the ‘Verified calling has been turned on’ message at the bottom of the screen.
Wrapping Up
By now, you have learned almost everything about Google’s Verified Calls feature in the Phone app, how it works, and also how to enable it.
There’s no doubt that this new feature is extremely useful, it builds trust between consumers and businesses, and should also effectively reduce spam call rates.
If you ever wish to, you can always turn off/disable the Verified Calls feature by going to ‘Settings’ → ‘Caller ID and spam’ in the Google Phone app.
It’s worth mentioning that the feature is currently in the midst of its rollout. So it may not be able on your device yet, in which case you might have to wait for a few days/weeks. It’s something that is switched on for your device from Google’s end. Nonetheless, keep the Google Phone app updated to the latest version at all times and keep an eye on the feature.
Source: Google, Via: 9to5Google
Comments
Comments are moderated, and published only if they are relevant to the topic and add value in a constructive way. If you disagree with something, please be polite and respectful. We suggest you read our comment policy before commenting.