In this guide, I will show you how to get the stock boot image for your Google Pixel device by extracting it from the factory image. You will need a copy of the stock boot image for installing Magisk and rooting your phone.
Advertisement
Page Contents
Overview
If you wish to mod the software of your Google Pixel device to your own needs and liking, you might have thought of rooting your Pixel with Magisk.
Traditionally, installing Magisk involved flashing the Magisk installer through a custom recovery such as TWRP. However, that method isn’t recommended anymore and is slowly being deprecated as more complicated changes are being introduced with every major Android update. Developer John Wu has discussed some of these “shenanigans” in the Magisk’s documentation if you want to know more.
The preferred way to install Magisk and root your Google Pixel device, or most other Android device for that matter, is by patching the stock boot image with Magisk and finally flashing the resultant patched boot image to the phone through fastboot. The method is simple and doesn’t rely on an external utility such as TWRP. In order to use this method, you will first need to acquire the stock boot image for your Google Pixel device.
Advertisement
Thankfully, Google provides factory images of all the firmware/software versions that are released for their Pixel devices. You can easily extract the boot image file from the factory image and I will show you just how to do that.
Before kicking off with the instructions, below are a couple of important things to note:
- On the Pixel 7 and Pixel 7 Pro (and devices launched with Android 13 in general), the ramdisk resides inside the
init_boot.imgand not the traditionalboot.img, which now only contains the GKI kernel. If you want to know more about this change, developer Chris Renshaw (a.k.a osm0sis) did some analysis of the boot images and Google has also updated their documentation for the same. So for these two devices, you will need to pull theinit_boot.imgfor rooting purpose. - It’s extremely important that the stock boot image must be extracted from the same software/firmware version that is currently installed on your Google Pixel. Using a boot image from a different software version will cause unexpected issues.
And with that, let’s now move onto the instructions.
Supported Devices
While this method will work for all Pixel devices, below is a complete list of all the supported devices just for the sake of clarity.
| Device | Codename |
|---|---|
| Google Pixel 7 Pro | cheetah |
| Google Pixel 7 | panther |
| Google Pixel 6a | bluejay |
| Google Pixel 6 Pro | raven |
| Google Pixel 6 | oriole |
| Google Pixel 5a | barbet |
| Google Pixel 5 | redfin |
| Google Pixel 4a (5G) | bramble |
| Google Pixel 4a | sunfish |
| Google Pixel 4 XL | coral |
| Google Pixel 4 | flame |
| Google Pixel 3a XL | bonito |
| Google Pixel 3a | sargo |
| Google Pixel 3 XL | crosshatch |
| Google Pixel 3 | blueline |
| Google Pixel 2 XL | taimen |
| Google Pixel 2 | walleye |
| Google Pixel XL | marlin |
| Google Pixel | sailfish |
How to Extract Stock Boot Image from Pixel Factory Image
As I mentioned earlier, you can extract the stock boot image from the factory images provided by Google, which can easily be done on your computer or on the phone itself.
I personally do it on my computer, because the internet is relatively fast and without any data caps. If you prefer, you can extract the boot image directly on your Pixel as well. This will also eliminate the additional step of transferring the boot image from your computer to your phone during the rooting process.
That said, the instructions below includes steps for both the scenarios. So, let me walk you through the process in a step-by-step manner.
Step 1: Verify Build Number
The boot image that you need for rooting must match the software version that’s installed on your Google Pixel device. This is extremely important since using a boot image from a different software version will cause unexpected results.
So, the first step is to verify the build number, which is also sometimes referred as the “software version”. To do this, go to “Settings” > “About phone” on your Pixel. Then scroll down to the very bottom and locate the “Build number” entry. The text just below the label is the software’s build number. For example, the build number for my Pixel 7 Pro is TQ1A.230205.002, as you can see in the figure below.
Advertisement
Note down the build number as you will need it in the next step.
Step 2: Download Factory Image for your Google Pixel
Now, the second step is to download the factory image for your particular Google Pixel device. To do this, visit the official Google portal using your choice of web browser on your computer or on your phone.
Scroll down through the page and find the section for your Pixel device. For instance, it is the Pixel 7 Pro in my case. The table below the device label includes download links of factory images for corresponding Android versions and their build numbers.
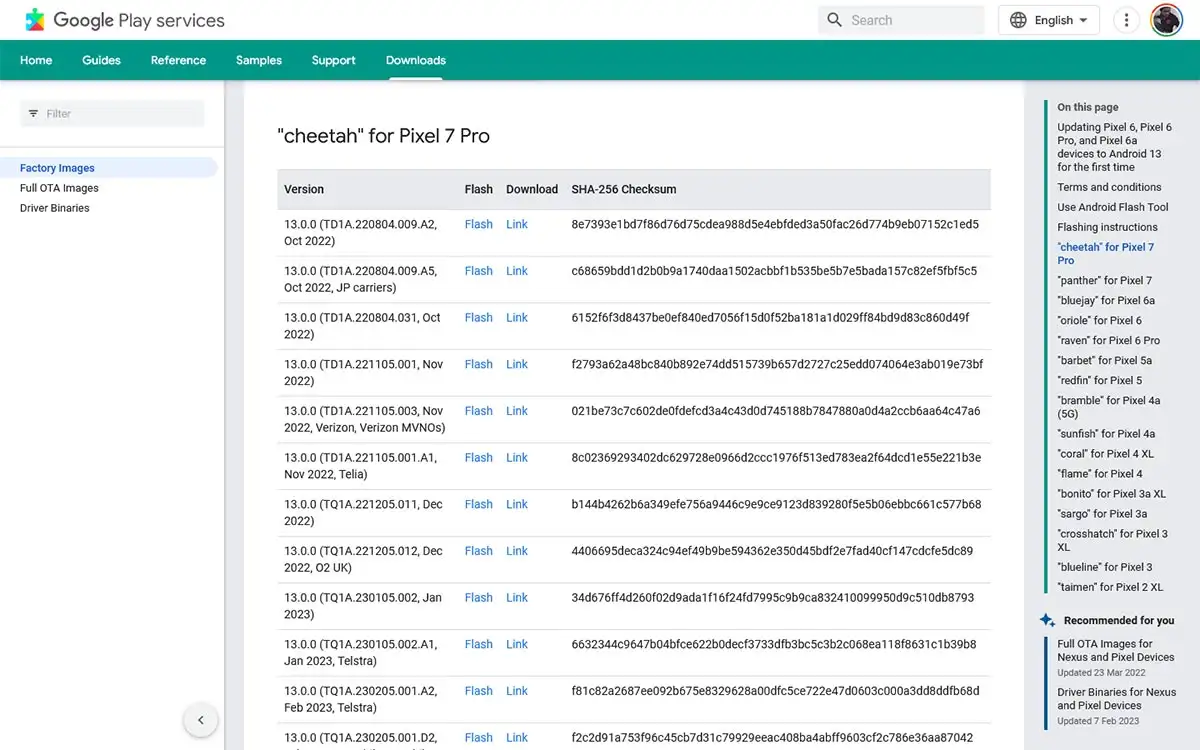
You need to find the factory image for the build number that you noted down at the end of step #1. You can look it up manually or use the search function of your web browser. Once you have found it, click on the “Link” to start downloading the factory image that corresponds to your build number.
For example, since my Pixel 7 Pro is running firmware with TQ1A.230205.002 build number, I will download the factory image that corresponds to the 13.0.0 (TQ1A.230205.002, Feb 2023) version within the table.
Step 3: Extract the Stock Boot Image from the Pixel Factory Image
So now that you have the correct factory image according to the installed software build number, it is time to finally extract the boot image from it.
Advertisement
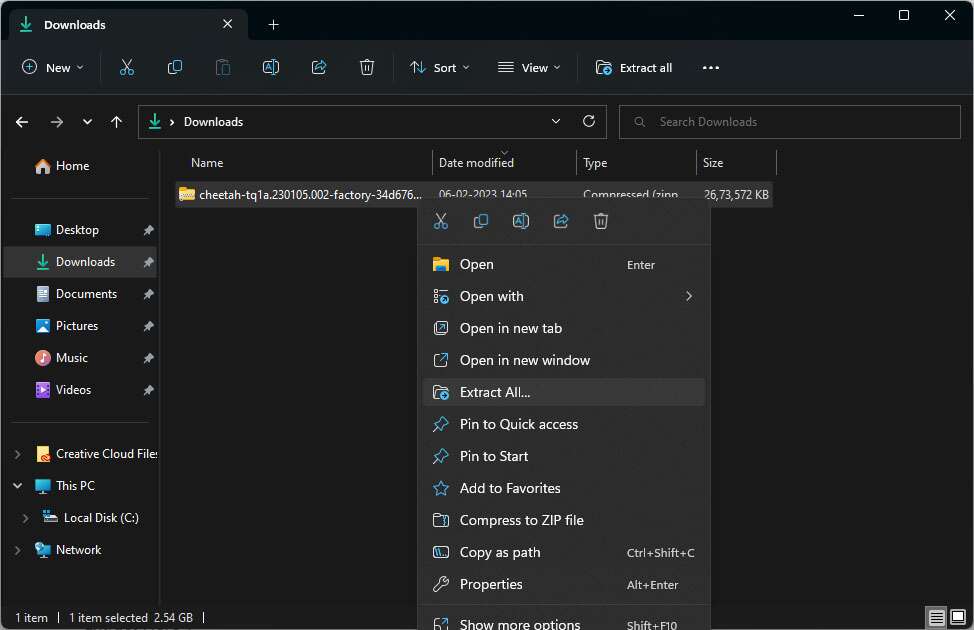
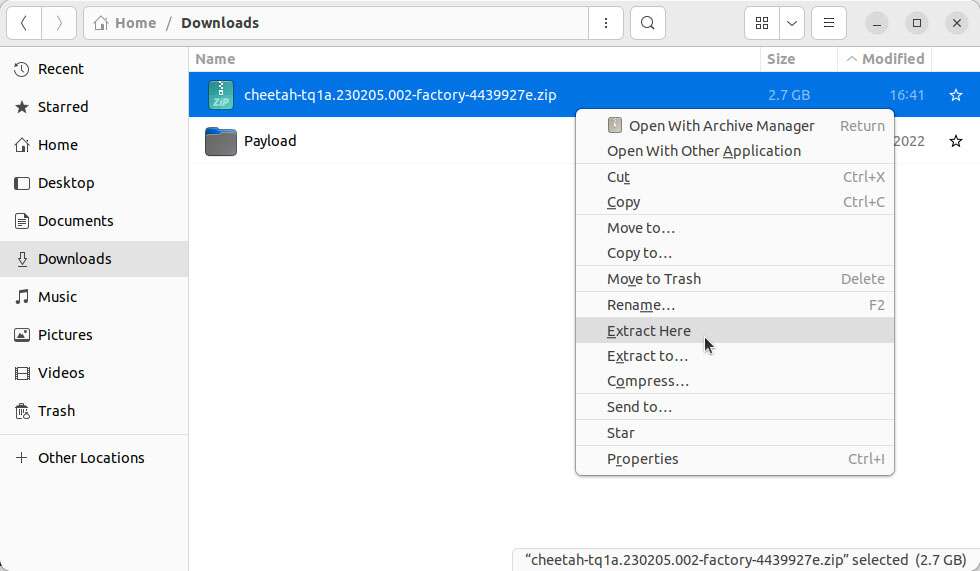
The factory image is a compressed ZIP archive and the file uses the following naming convention: <device codename>-<build number>-factory-<random string>.zip. For example, the factory image for the Pixel 7 Pro with the TQ1A.230205.002 build number is named: cheetah-tq1a.230105.002-factory-34d676ff.zip.
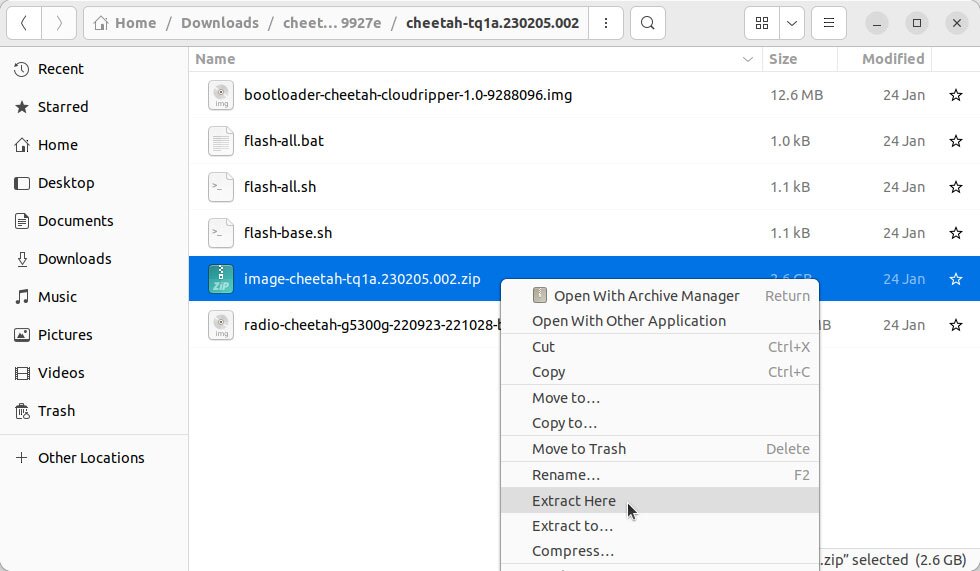
The factory image archive contains a couple of flash-scripts, the image files for the bootloader and radio partitions, and another ZIP archive. The ZIP archive (image-<device codename>-<build-number>.zip) among the extracted files contains the stock boot image along with other partition image files. For reference and demonstration, let us call this file the “partition image archive“.
Now, I’d assume that most of you already know how to unzip archives and if so, I think you know what to do next. If not, you can follow the instructions below depending on whether you’re performing the process on your computer or on your Google Pixel device.
Option 1: On your Computer
First, use the file explorer on your computer and locate the downloaded factory image. Then:
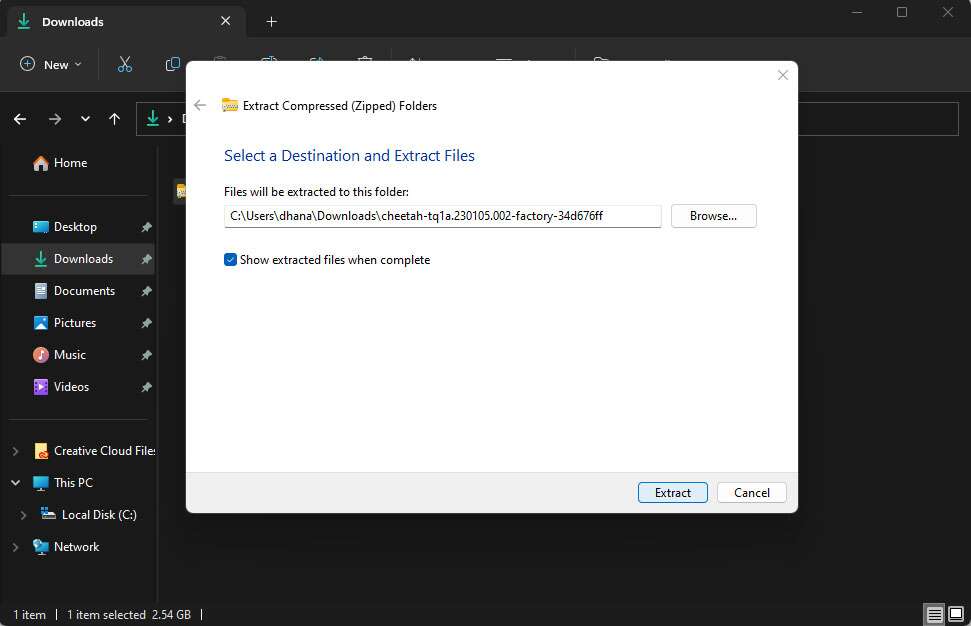
- On Windows: Right-click on the factory image archive, select “Extract all” from the contextual menu and then click “Extract”. Open the extracted folder and repeat the same process again for the partition image archive.
- On Linux: Right-click on the factory image archive and select “Extract Here” from the context menu. Then open the extracted directory, right-click on the partition image archive and select “Extract Here”.
- On macOS: Double-click the factory image archive, then open the extracted folder and finally double-click the partition image archive.
After you have decompressed the partition image archive (e.g. image-cheetah-tq1a.230105.002.zip in case of Pixel 7 Pro with TQ1A.230205.002 build number), you will find the stock boot image within the extracted directory (e.g. image-cheetah-tq1a.230105.002).
Advertisement
Option 2: On your Google Pixel
To extract the boot image from the factory image on your Google Pixel device:
- Open the app drawer and launch the “Files” application.
- Select “Browse” from the app’s bottom nav menu, scroll down to the bottom and tap “Internal storage”.
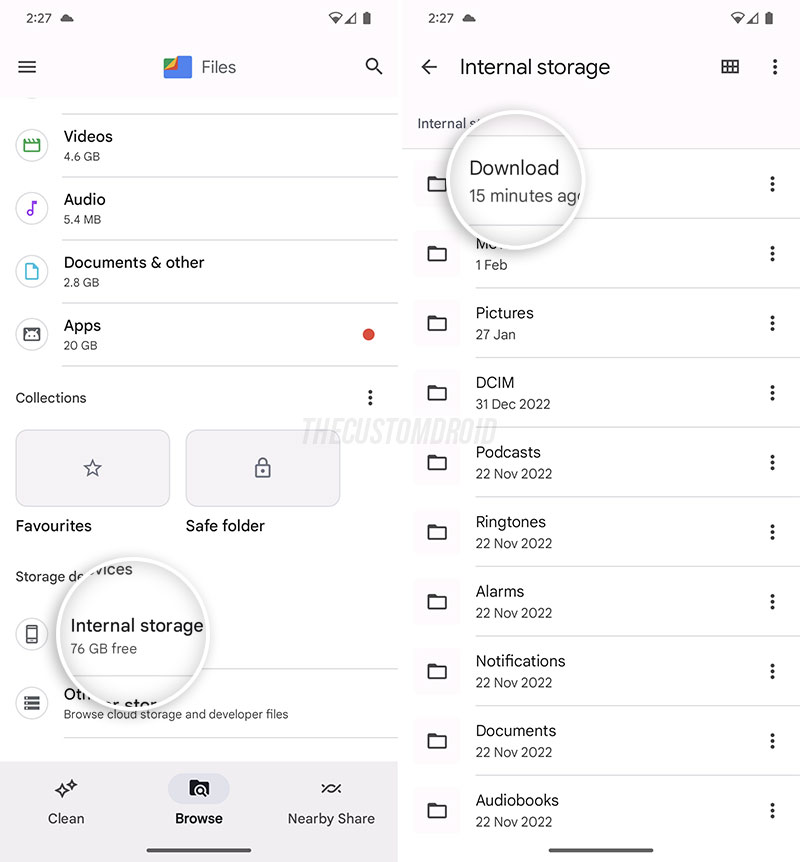
- Navigate to the
Downloaddirectory in the phone’s internal storage. - Locate the downloaded factory image ZIP archive and tap on it. As soon as you tap, a prompt should appear on the screen.
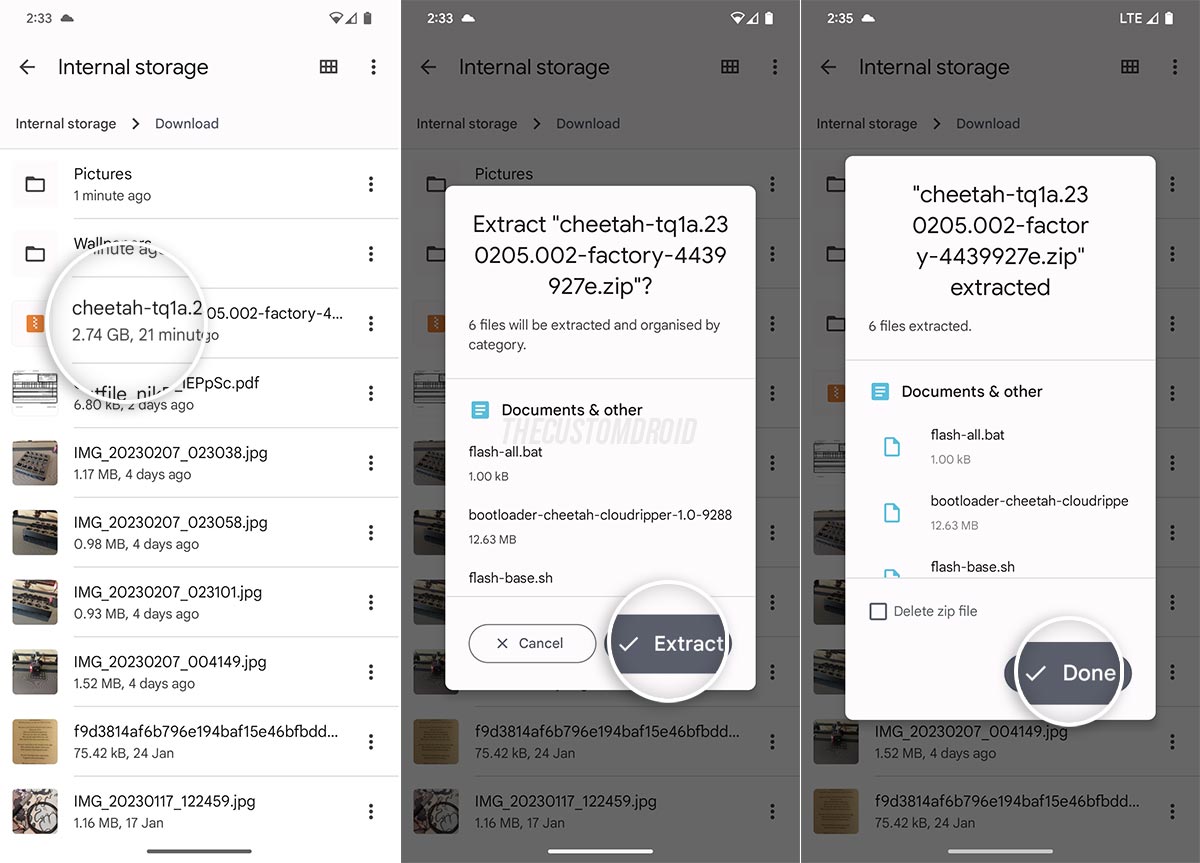
- Press “Extract” to extract the contents of the factory image and then press “Done” once the extraction finishes.
- Open the extracted directory and tap on the partition image archive (e.g.
image-cheetah-tq1a.230105.002.zipin case of Pixel 7 Pro withTQ1A.230205.002build number).
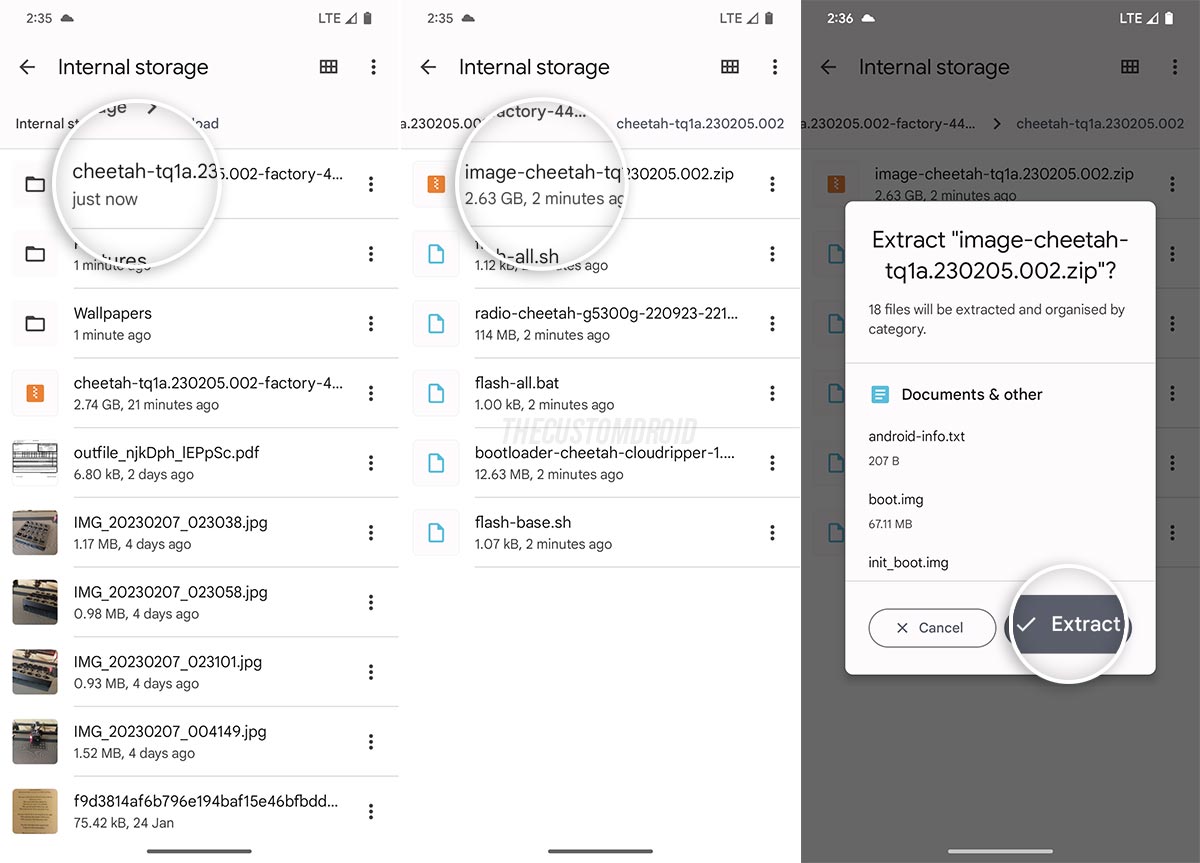
- Again, press “Extract” when prompted to extract the contents of the file and then finally press “Done” once it finishes.
That’s it! The extracted directory (e.g. image-cheetah-tq1a.230105.002) will contain the stock boot image for your Google Pixel device.
Alternative Method: Dumping the Payload.bin File from OTA Package
The great thing about factory images is that you can easily decompress the archive to pull out the stock boot image. However, there’s another method that I would like to share.
This alternative method involves dumping the payload.bin file from the OTA update package using a dedicated program such as Payload Dumper. Users rely on this method because some Android OEMs do not provide factory images (or fastboot-flashable firmware files) for their devices.
While you do need to use this method since you already have a much simpler one available at your disposal, I still wanted to mention it for the sake of documentation. If you want to try it, just follow the guide linked below and you might learn a few things along the way.
You can grab the full OTA package for your Google Pixel device from the official OTA download portal.
Wrapping Up
So by now, you have learnt how to get the stock boot image for your Google Pixel device by extracting it from the factory image. As seen, the process is extremely simple and all you have to do is unzip archives, it doesn’t get easier than that.
Now that you have the boot image, you can go ahead and root your Google Pixel by installing Magisk.
And again, it’s worth mentioning that if you have the Pixel 7 or 7 Pro, the stock boot image that you require for rooting will be init_boot.img file instead of the regular boot.img file.
For the rest of the Pixel lineup, the init_boot.img does not exist because the ramdisk still resides within the /boot partition, even on the latest Android 13 firmware. So, you will just need the good old boot.img for rooting the older Pixel devices.
If you have any questions regarding the instructions or the process as a whole, or have feedback regarding this tutorial, please do let me know by posting a comment.
