Android OTA packages now come with a Payload.bin file that contains the individual image files of different firmware partitions. In this tutorial, we will show you how to extract the Android OTA Payload.bin file to get the individual device partition/firmware images. This could be done using the Payload Dumper Tool, either on a PC or on an Android device.
Table of Contents
What is a Payload.bin File?
Google introduced the concept of A/B (Seamless) System Updates back with Android Oreo. Of course, the new update mechanism offers several benefits. For one, the updates are installed seamlessly without rebooting the phone into the recovery mode. Also, it drastically reduces post-OTA failures that could make the device unusable. XDA posted a detailed write-up on A/B partitions and how it affects the custom development scene.

This new A/B update mechanism also introduced a new format for the Android OTA/Firmware update files. Earlier, these update files or packages came with partition images, which could easily be extracted and used for manual flashing. But now, these update packages come with a single ‘Payload.bin‘ file that contains the individual partition images.
Using Payload Dumper Tool to Extract Payload.bin
Extracting the individual device partition images from an Android OTA file could come in handy in various situations. For example, if you want to grab the stock boot image for installing Magisk and rooting your phone. Or, if you want to manually upgrade your phone to the latest software by flashing the firmware images via fastboot.
In any of these cases, you can use the Payload Dumper tool. The tool is basically a Python script/program created by developer ius that allows users to easily extract the Android OTA Payload.bin file on any Windows, macOS, or Linux PC, and even on an Android device (since Android uses the Linux kernel).
It could be used for OTA packages for various A/B devices including but not limited to OnePlus 8 (Pro), OnePlus 7/7T (Pro), OnePlus 6/6T, Xiaomi Mi A3, Xiaomi Mi A2/A2 Lite, Xiaomi Mi A1, and more. Basically any Android device that supports seamless updates.
How to Extract Android OTA Payload.bin File
The easiest way to make use of the Payload Dumper Tool to extract the Payload.bin is on a computer. However, some users might want to do it on-the-go, skipping the need for a PC completely. If so, then there’s a way to use the Payload Dumper tool on an Android device as well.
While the latter does require a bit of extra effort than the former, but it’s still quite easy. So, depending on how you want to do it, follow the instructions below.
1. On a Computer
Step 1: Payload Dumper Tool is a Python program, so the first step is to download and install Python on your system. The tool requires Python 3 or above, which can be downloaded from the official page.
When installing Python, make sure that it’s added to the PATH on your PC. For Windows PC, this could be easily done by checking the ‘Add Python to PATH’ option within the installer. For Linux/macOS, you can use the instructions provided on this page.
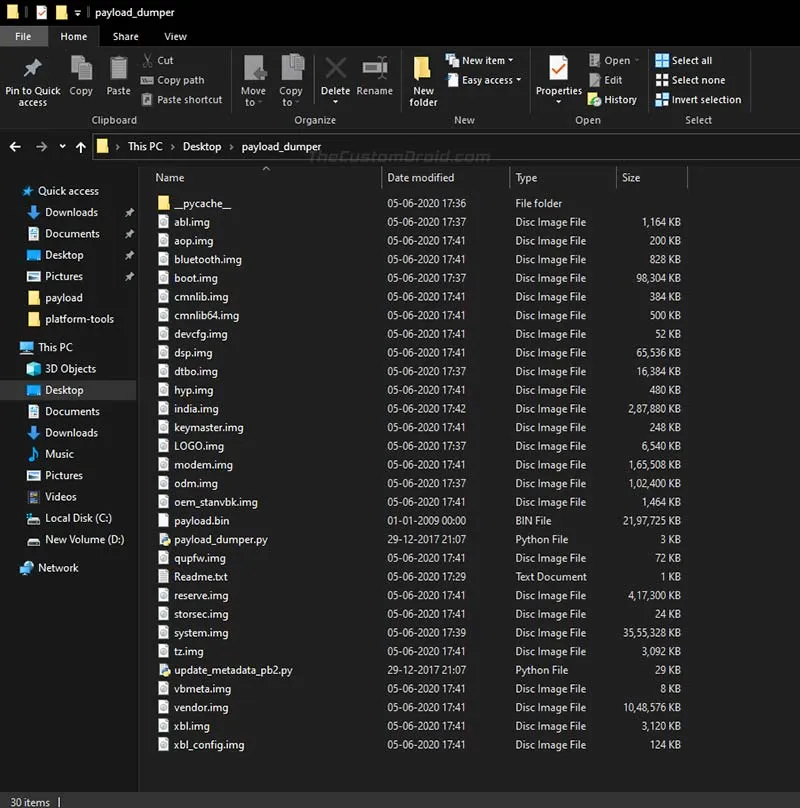
Step 2: Download the latest version of the Payload Dumper Tool on your PC from this link and extract its contents to a suitable location. Upon extracting you should have a new folder named “payload_dumper”.
Step 3: Now, download the full OTA ZIP package for your Android device. Extract the downloaded ZIP file to your PC using an archive tool (WinRAR, 7Zip, etc). The extracted contents will include the “Payload.bin” file, which is what you’d need to extract. Copy the Payload.bin file inside the “payload_dumper” folder.
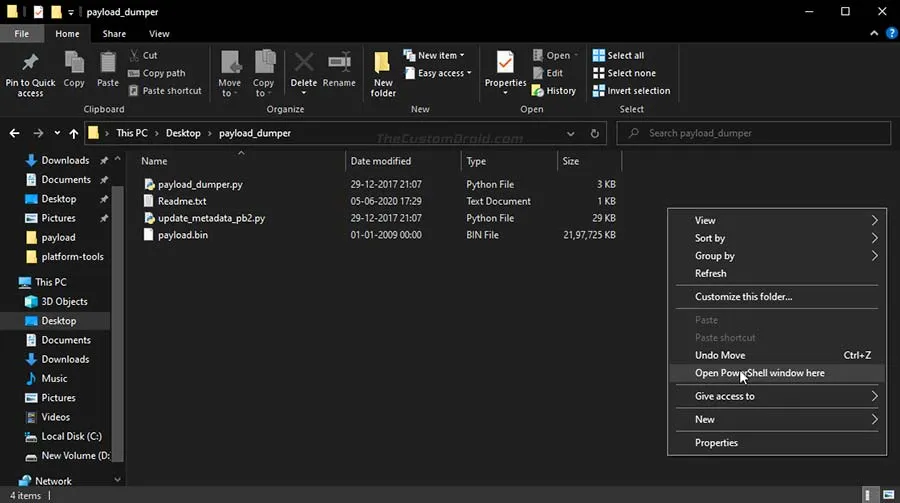
Step 4: Open the command-line window on your PC in the ‘payload_dumper’ folder, where the tool and the payload.bin files are present. To do this
- On a Windows PC: Hold the SHIFT key and right-click on an empty space inside the folder, then select the ‘Open PowerShell window here’ option.
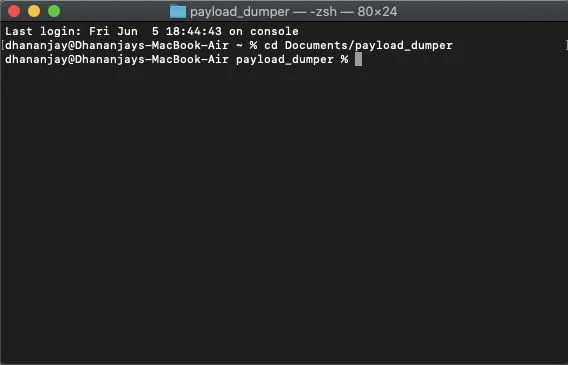
- On a macOS/Linux PC: Launch the Terminal and change its directory to the ‘payload_dumper’ folder using the ‘cd’ command. For example: If the ‘payload_dumper’ folder is located in the ‘Documents’ directory, then the command should look like:
cd Documents/payload_dumper
Step 5: In order to use the tool on your PC, you must first install ‘Protobuf‘ (Google’s data interchange format) which is basically a dependency. To install it, enter the following command.
- On Windows (in PowerShell):
python -m pip install protobuf
- On Linux/macOS (in Terminal):
python3 -m pip install protobuf
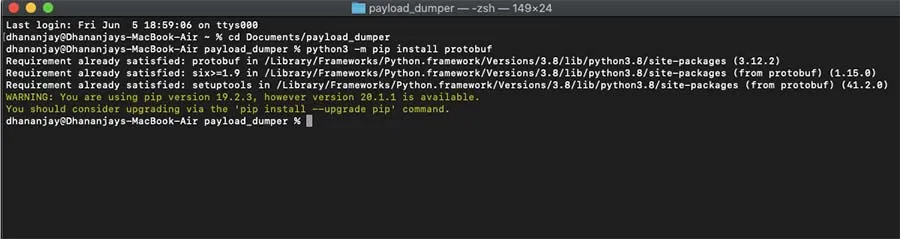
As soon as you enter the command, Protobuf will be downloaded and installed on your PC. If it’s already installed on your system, you will be notified of the same.
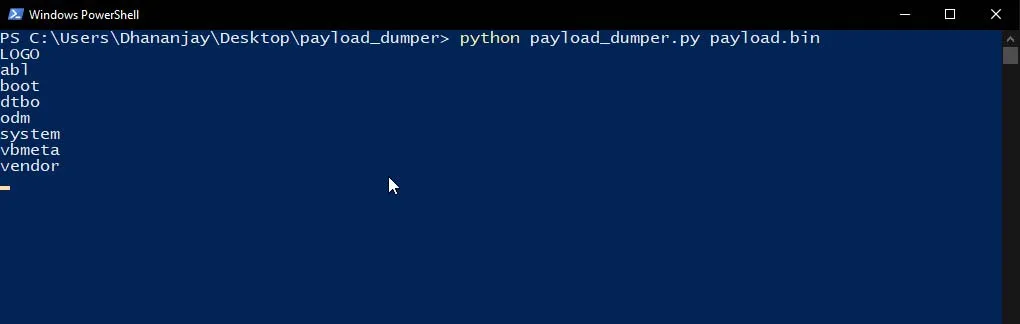
Step 6: Now to finally extract the Android OTA payload.bin file, enter the following command.
- On Windows (in PowerShell):
python payload_dumper.py payload.bin
- On Linux/macOS (in Terminal):
python3 payload_dumper.py payload.bin
The tool will now start extracting the individual partition images from the Payload.bin file. Once finished, you will find the extracted files inside the same “payload_dumper” folder.
2. On an Android Device
Since Android uses the Linux kernel and so, you can use the Payload Dumper Tool to extract the Payload.bin on your Android device itself. The process is very similar to the one that’s followed on a PC but requires a few additional steps.
Now follow the instructions below.
Step 1: Download the Payload Dumper Tool from here. Once downloaded, extract the contents of the ‘payload_dumper_tool_by_ius.zip’ file to the root of your phone’s internal storage. You could extract it anywhere, however, the root directory is more convenient.
The extracted ‘payload_dumper’ folder will contain the tool’s Python scripts as shown in the figure below.
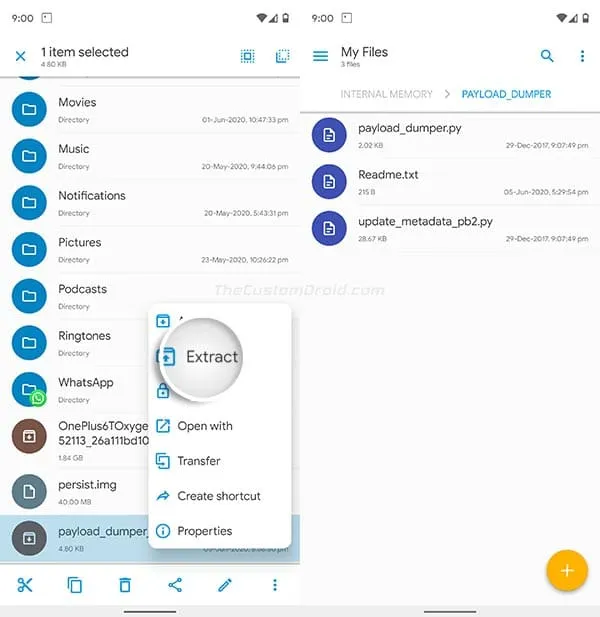
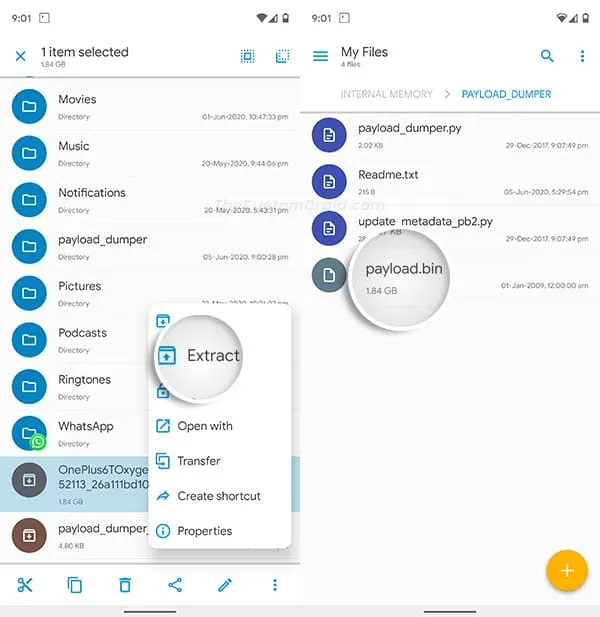
Step 2: Now, download the OTA package from which you want to extract the firmware images. Once downloaded, extract the OTA package on your device to get the ‘payload.bin’ file. Then copy the extracted ‘payload.bin’ file inside the ‘payload_dumper’ folder that you extracted during step #1.
Step 3: Download and install the ‘Termux‘ app (a Terminal Emulator) on your Android device. Once installed, launch the app from your phone’s app drawer.
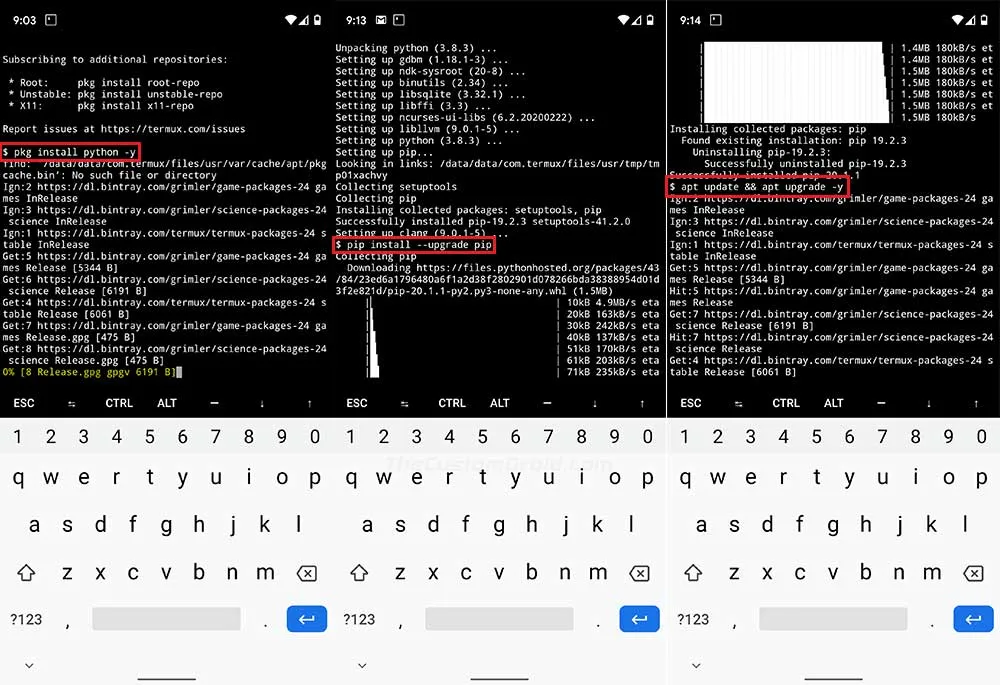
Step 4: To use the tool, you must first install and set up Python on your Android device. To do this, enter the following commands in Termux one after the other:
pkg install python -y pip install --upgrade pip pip install protobuf apt update && apt upgrade -y
These commands will basically configure Python, upgrade its native package manager (pip), install the required ‘Protobuf’ dependency, and also upgrade all other program packages on your Android device.
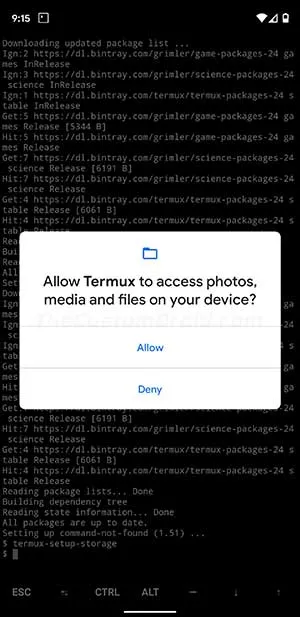
Step 5: Now, use the following command to grant storage permissions to ‘Termux’:
termux-setup-storage
As soon as you enter the command, you’ll see a prompt to “Allow Termux to access photos, media and files on your device”. Simply press “Allow” to grant the permissions.
At this point, you have your Android device completely ready to use Python programs (The Payload Dumper Tool in this case).
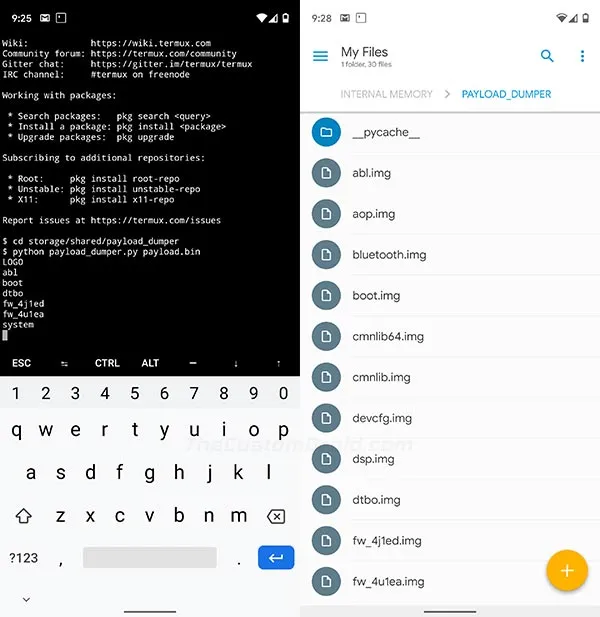
Step 6: Change Termux’s directory to the “payload_dumper” folder using the following command, provided that you have the folder placed on the root of your phone’s internal storage.
cd storage/shared/payload_dumper
Step 7: Finally, enter the following command in Termux to extract the Android OTA Payload.bin bile on your Android device:
python payload_dumper.py payload.bin
Once finished, the extracted firmware images will be placed inside the same ‘payload_dumper’ tool.
You can now copy these files and flash them manually on your device using fastboot. You can even grab the stock boot image and patch it to install Magisk and root your Android device.
So there you go! You have just learned how to extract an Android OTA payload.bin file on a PC or on an Android device. If you have any questions or feel stuck anywhere while performing the instructions in this guide, then please do let us know.
Source: Github | Credits: Developer ius
Mike
Thanks for another great guide, Dhananjay!
I haven’t actually done the dumping process, but was able to get Python up and running on Android. I’ve never actually learned or used Python, but I already had it set up on Windows 10, so I made sure to get it up to date.
For the Android installation, I had one possible issue. All the commands worked, but the one to upgrade its native package manager (pip) seemed to not work (pkg install –upgrade pip). I got the following result:
Checking availability of current mirror: OK
Reading package lists… Done
Building dependency tree
Reading state information… Done
E: unable to locate package PIP
Is this OK? I even tried it after doing the “termux-setup-storage” command, but still get the same result.
Also, I know you have the boot images on your site, but where would we go to download the full OTA ZIP packages? I’m guessing it’s the manufacturer’s page where we would look, but I’m used to getting them from Google for my Nexus and Pixel phones, and now I’m on OnePlus.
(P.S. Are there any formatting tags we can use in this comment section such as
code
or bold? I know some sites use asterisks to make *bold* or **italics** or ***both***.)Dhananjay Bhardwaj
Hi Mike, good to see you drop by on this one.
The error you posted indicates that the
pip
package wasn’t installed. It’s generally installed when you install Python using the first command.To confirm whether anything has changed in Termux or package installation, I just ran all the mentioned commands and it went through without any errors. So, please try to install Python again, and re-attempt the other commands in that order.
As for the full OTA packages, I maintain the OnePlus 8/8 Pro OxygenOS repository. I try and keep it updated as much as I can. And then of course, you can download the same from OnePlus’ support page also. The only downside is that it’s made available much after the update is actually released. Anyways, if you have the Global variant, you will check the OnePlus 8 and OnePlus 8 Pro software update page on the official website.
As for the comments, you can use basic HTML tag to bold and
for representing line(s) of code. I believe you used this already when you posted the comment above.
Mike
I’m not really sure why I’m getting different results. I’ve tried it multiple times and even rebooted a couple times, but it’s the still the same. Is it possible the pip package is no longer included when installing Python? This is my first time using a terminal on Android, so I have no idea. I will point out that ever since I ran
termux-setup-storage
, the E: in the lineE: unable to locate package PIP
actually displays as red. All other text remains white, so I wonder if that’s supposed to represent an error. I’m going to try charging up an old phone and see what happens.Thanks so much for the link to your OnePlus OTA repository. I know I saw it before, but totally forgot about it and was only thinking of your boot image repository. The link for OnePlus is also very helpful. I just wasn’t sure if we were supposed to be downloading them or somehow pulling the updates from our phones, so this is very helpful.
And thanks for clarifying how to format. Yeah, I kind of figured it out by testing it in my last comment. Very cool.
Dhananjay Bhardwaj
“Is it possible the pip package is no longer included when installing Python” – I thought the same yesterday and tried it on my OnePlus 8 instantly, but it worked. Anyways, PIP is very crucial to Python, I am sure they will never un-bundle it from Python, doesn’t add up.
Sure, you’re welcome.
Mike
I just found my problem! 😆
I was using
pkg
instead ofpip
forpip install –upgrade pip
. 🤦♂️I only figured it out because I tried it on an old phone with the same results. After I ran
pip install protobuf
, it suggested updating pip and I noticed the command it suggested.Dhananjay Bhardwaj
Haha, I am really laughing hard right now. I went through your previous comment and just spotted that 😀
One little syntax error and we go wondering where it actually went wrong. I went through something very similar lately. I was recently practicing my skills and missed a mere parenthesis, and the whole code blew up.
Anyways, glad you got it sorted.
Mike
Haha, I’m glad you found that funny too! 😄 I was thinking “why didn’t Dhananjay catch the mistake in my comment?!?” 🤬😜
Funny how these tiny little mistakes can have disastrous outcomes. It reminds me of how Michael Bolton messed up the code with a rounding error in Office Space (a classic, must-see movie).
Dhananjay Bhardwaj
Yes, me too. Got to start paying more attention to the details. 😀
I will watch it for sure. Thanks for the recommendation and see you around, Mike.
B SHYAM SUNDER
Thanks for a very good blog Dhananjay! I am newbie to Linux but got it working on first go!
Credited your article here
https://android.stackexchange.com/questions/232257/how-do-you-root-a-device-with-magisk-when-it-doesnt-have-a-custom-recovery
Dhananjay Bhardwaj
I am glad it was helpful, Shyam. And thank you for the credit, appreciate it.
And must say, a really comprehensive answer there on Stack Exchange. Should help a lot of other users there.
Hope to see you around here. If there’s anything you want me to write a tutorial on, I’d be more than happy to do that.
Savio Dantes
On Step 6: “python paylod_dumper.py payload.bin”
“paylod_dumper.py”
should be:
“payload_dumper.py “
Dhananjay Bhardwaj
Thank you Savio for pointing it out. I have corrected the typo.
kyaw zin
Works on my window 10, type as below. Thank you so much.
.\python -m pip install -r requirements.txt
.\python paylod_dumper.py payload.bin
Oldporkchops
Thanks for putting this together. In the end, I had to use the Android methods as the Windows methods didn’t work due to the aforementioned reasons.
Dhananjay Bhardwaj
Good to hear. Could you try again on Windows, but this time with this dumper script? – https://codeload.github.com/vm03/payload_dumper/zip/master
Oldporkchops
Thanks very much for your help. It’s extremely helpful.
python paylod_dumper.py payload.bin didn’t work
py payload_dumper.py payload.bin worked.
Note the spelling error in the original command. The first payload in “python paylod_dumper.py payload.bin” is missing an “a”.
Dhananjay Bhardwaj
Thanks for pointing that out. I will make the required changes.
Yes, the command could be a bit different depending on how Python is configured on the machine. I will add the command (that worked for you) as an alternative to try if the primary fails.
Brian Partridge
misspelled payload in step 5 Copy pasting here
Dhananjay Bhardwaj
Brian, I have corrected it under step #6. Thanks for informing me.
Bryan McNamara
I’m running Payload Dumper on a Windows 10 system. I have the payload.img file in the same folder as the python scripts. When I run the command in Powershell I get the following:
python payload_dumper.py payload.bin
Traceback (most recent call last):
File “payload_dumper.py”, line 86, in
assert op.type in (op.REPLACE, op.REPLACE_BZ, op.REPLACE_XZ), \
AssertionError: unsupported op
Help!? 🙂
Thank you sir.
Dhananjay
Hi Brayan. Are you sure that the payload.bin is from a full OTA package and not an incremental OTA?
KawaiiBit
Does not work on windows 10.
KawaiiBit
OK, somehow got it to work by downloading the 64 bit web installer instead the default selection of 32-bit Python offline installer and using the command python without number 3.
Dhananjay
Hi. I am glad you figured it out by yourself.
On my 64-bit PC, I had to use the ‘python3’ syntax specifically because there was a prior installation of another Python version which was configured to use just ‘python’ without the ‘3’.
Thanks for bringing it up, other readers will benefit from this info.
Azhar Ravat
Hi sorry to bother you nowhere in this article does it say where to put the .img file in that im extracting the payloaf.bin file from obviously it has to be for certain .img file im suffering with windows 7 trying to get the payload.bin for x96 mini android t.v box for android 9 please help or if you could perhaps help me i would upload my .img file for you and maybe u can assist me to get all the .img files after extracting the patload.bin
Dhananjay
Hello Azhar. The firmware image files are basically contained with the ‘payload.bin’. Could you please elaborate your question more so that I can understand it better?
Md
For Windows 10, do NOT use
python3 payload_dumper.py payload.bin
Instead, use this
python payload_dumper.py payload.bin
Dhananjay
Hi Md. Yes, you’re correct. I updated this article recently and only had my MacBook at hand to confirm that the process still works as intended. I will make the required changes. Thanks!
Bryon Mickelson
Your awesome, worked for Wins 10!!
Arek
Hi Dhananjay,
Thank you for your answer. I have it like that:
1. python -m pip install -r requirements.txt
Nothing happens.
2. py -m pip install -r requirements.txt
Required already satisfied: protobuf == 3.6.0 in c: \ users \ satya \ appdata \ local \ programs \ python \ python36 \ lib \ site-package
s (from -r requirements.txt (line 1)) (3.6.0)
Required already satisfied: six == 1.11.0 in c: \ users \ satya \ appdata \ local \ programs \ python \ python36 \ lib \ site-packages (f
rom -r requirements.txt (line 2)) (1.11.0)
Required already satisfied: setuptools in c: \ users \ satya \ appdata \ local \ programs \ python \ python36 \ lib \ site-packages (fr
om protobuf == 3.6.0 -> – r requirements.txt (line 1)) (28.8.0)
3. python payload_dumper.py payload.bin
Nothing happens.
Creating subtitles such as “On Windows”, “On Linux” and “On MacOS” is a very good idea, especially for linux.
Thank you for your work and send greetings to you!
Dhananjay
Hi again. Thanks for confirming.
1) Is the payload.bin file placed in the folder where the payload_dumper.py file is present?
2) Also, please check if the name of the dumper file is exactly ‘payload_dumper.py’ or something else?
Arek
Hi!
Thank you for reply.
ad. 1, 2: yes, exactly
But luckily I can do it without problems on my Linux.
I wonder if other readers have encountered this problem?
Dhananjay
Hi Arek. Have you tried redownloading the tool?
Just to confirm, I have tried it again on my cousin’s laptop and it worked in the first go. I believe we will have to wait for some other Windows user to provide us some sort of confirmation.
Dhananjay
Hi Arek. I have an update for you. At first, I thought of creating individual sections for Windows, macOS, or Linux too. However, the commands that I put up earlier were wrong.
In order to install the requirements, use the following:
pip3 install -r requirements.txt
And, finally for extracting the payload.bin file:
python3 payload_dumper.py payload.bin
I have updated the instructions above. I can confirm that the same commands work for Windows and macOS. Could you confirm the same for Linux as well?
aiman ziad
hi, i am a beginner in python. as i input the first line of code, it is stated it does not recognize pip3 as a cmdlet. how can i resolve this?
Dhananjay
Hi. It seems like pip3 is either not installed or not configured under Windows PATH. Please try the following:
pip install -r requirements.txt
Puneet
Thanks a lot bro
I successfully extracted the payload.bin via termux in android
Dhananjay
Hi Puneet. I am glad it worked out for you!
Oldporkchops
py -m pip install protobuf worked for me on Windows 10 with the latest Python x64 bit version.
Arek
Hi Dhananjay,
Not work on Windows 10 for me I don’t know, why.
OK On Debian:
$ sudo apt install python3-pip
$ python3 -m pip install -r requirements.txt
$ python3 payload_dumper.py payload.bin
On Arch:
$ sudo pacman -S python-pip
$ sudo python -m pip install -r requirements.txt
$ python payload_dumper.py payload.bin
Greetings 🙂
Dhananjay
Hi Arek. I can confirm that it works on Windows 10. The screenshots you see above are from my Win 10 machine. Could you give me some more insight on the situation? Did the requirements install just fine? Or did an error show up when extracting the payload.bin?
BTW, thanks for the confirmation. I forgot to make the steps compliant with Linux and macOS. I will do that now.
I think it would be good to create sub-headings like “On Windows”, “On Linux”, and “On macOS” and then put the OS-specific instructions. What do you think?