How to Manually Install OTA Updates on Android (2 Methods)
Sideloading OTA updates can help you update your Android phone to the latest software instantly. In this post, we will show you how to manually install OTA

Sideloading OTA updates can help you update your Android phone to the latest software instantly. In this post, we will show you how to manually install OTA updates on Android devices using 2 different options in the stock recovery.
Latest and regular software updates are an integral part of every Android device, irrespective of its manufacturer. On Android, updating to the latest software version could be easily done Over-the-Air, which is more commonly referred to as “OTA Updates”. The whole process is completely automated and requires the least amount of effort on the user’s end to get through it. Especially when it comes to phones that support seamless updates. With the new A/B partition, users don’t even need to reboot their phone, as the update is installed to the alternate partition in the background.
However, an OTA update isn’t always available for all the devices at once. There are several factors like the device region, mobile carrier, etc that impact the rollout and thus, a delay can be expected. Also, it is often that a manufacturer may perform a staged rollout, which means the update will reach a small percentage of devices initially and then slowly be available for the rest.
But we, as users, can be impatient when it comes to trying out the new software that would fix the existing bugs or bring in some exciting new features. It’s likely that users who have already received the update, tend to capture the OTA update zip and share it with others on forums and social groups. In such a case, if you have the OTA package (update.zip), then you can instantly upgrade your phone to the latest software. The instructions below will help you manually install Android OTA Updates using stock recovery.

Sideloading OTA updates do not require an unlocked bootloader. And unlike Factory Image/Firmware, sideloading or manually installing OTA updates via stock recovery doesn’t wipe the data stored on your device. Your data stays intact.
Despite that, we strongly recommend that you take a full backup of all your data stored on your phone including the internal storage to safeguard from any data loss situation.
Take a note that you will first need the OTA update zip package for your device before you follow the steps. You can find these zips either on forums like XDA or request a fellow mate to capture the OTA update package. Also, these methods require your phone’s software to be completely unmodified/stock. It will fail if your phone is rooted via Magisk/SuperSU, has TWRP recovery installed, or any other modifications of this kind.
Once you have the OTA package, you can proceed to the instructions below and use one of the listed methods to manually install the OTA update on your Android device.
Method 1: Install OTA Update from SD Card (Apply update from SD card)
The first method works by storing the OTA zip package on your phone’s internal/external storage. And then using the ‘Apply update from SD card’ option in stock recovery to install the OTA update. This method is best for users who do not have access to a PC.
-
Download the OTA zip package for your Android phone.
-
Connect your phone to the PC using the USB cable.
-
Next, transfer the OTA zip package to the root directory of your phone’s internal/external storage.
-
Once copied, disconnect the phone.
-
Boot your phone into the recovery mode using the physical buttons combination or by entering the following ADB command:
adb reboot recovery
-
In the stock recovery menu, use the Volume buttons of your phone to select the ‘Apply update from SD card’ option.
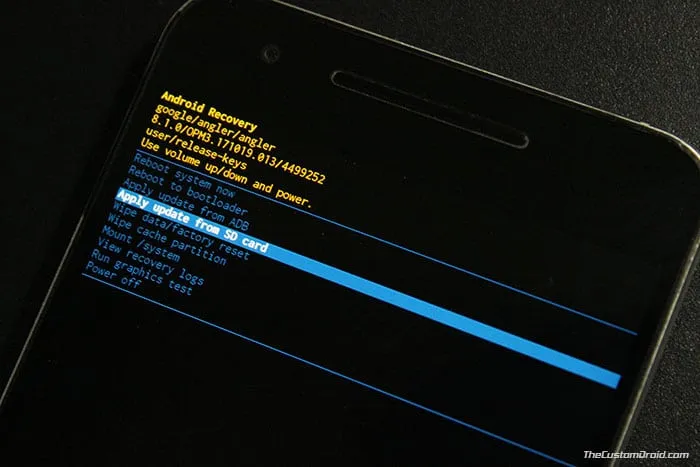
- Press the Power button to confirm the selection.
- Now, use the Volume keys to highlight the OTA update package.
- Finally, press the Power button to confirm and install the OTA update package on your Android device.
- After the update is installed, select ‘Reboot system now’.
Method 2: Install OTA Update using ADB Sideload (Apply update from ADB)
Sometimes, the phone might not detect the storage or the OTA package itself. In such cases, you can use the ‘Apply update from ADB’ option in the stock recovery and the ADB Sideload command to manually install OTA update on your Android device. Before you proceed with the instructions below, you must first setup ADB and Fastboot tools on your PC.
- Download OTA zip package for your Android device.
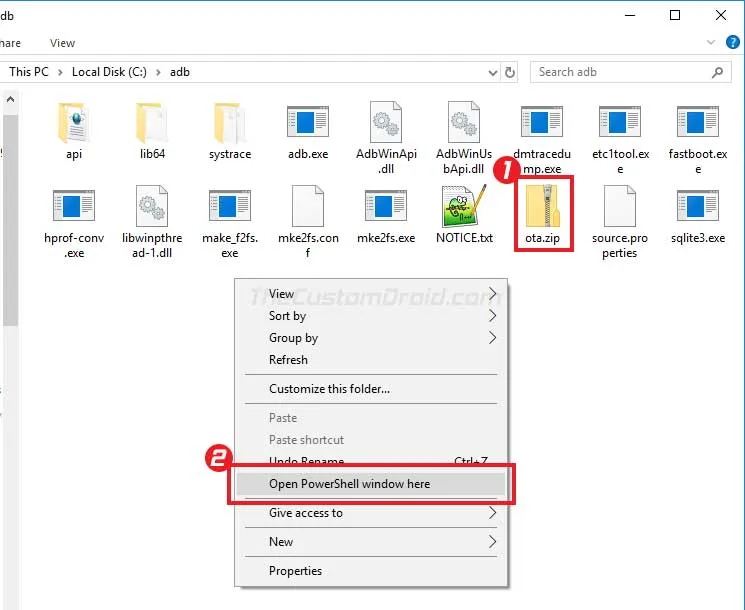
- Copy the downloaded package to the folder where the ADB and Fastboot binaries are present.
- Hold the SHIFT key on the keyboard and right-click on an empty space inside the same folder.
-
Select the ‘Open PowerShell window here’ option.
-
Connect your phone to the PC using the USB cable.
-
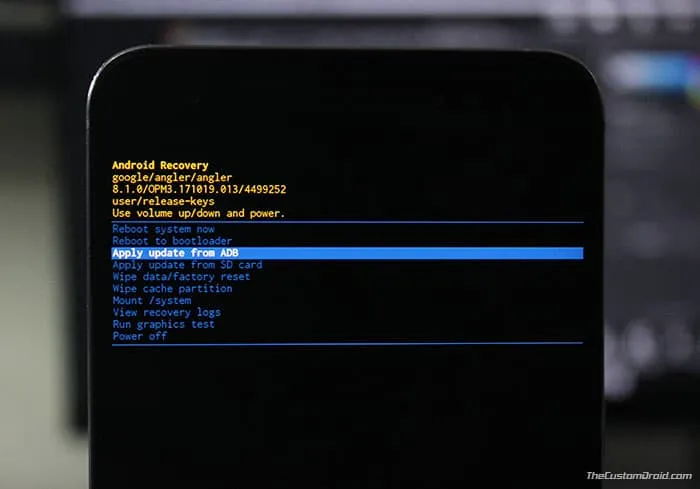
Now enter the following command to boot your Android device into stock recovery:
adb reboot recovery
-
In the stock recovery, use the Volume buttons to select the ‘Apply update from ADB’ option.
-
Press the Power button to confirm the selection.
-
Now, enter the following command to install the OTA update package on your Android device:
adb sideload ota.zip
-
Make sure to replace “ota.zip” with the actual filename of the OTA update package.
-
Once the installation is complete, select the ‘Reboot system now’ option.
Your device will now boot into the updated firmware. You can use this method on almost every Android device. Required that you have the correct OTA update zip for your phone and stock recovery installed on it.
So this was our guide on how to manually install OTA updates on Android using Stock Recovery. If you face any errors while updating your phone using these methods, let us know by commenting below.
Comments
Comments are moderated, and published only if they are relevant to the topic and add value in a constructive way. If you disagree with something, please be polite and respectful. We suggest you read our comment policy before commenting.