Sideloading OTA updates can help you update your Android phone to the latest software instantly. In this post, we will show you how to manually install OTA updates on Android devices using 2 different options in the stock recovery.
Advertisement
Latest and regular software updates are an integral part of every Android device, irrespective of its manufacturer. On Android, updating to the latest software version could be easily done Over-the-Air, which is more commonly referred to as “OTA Updates“. The whole process is completely automated and requires the least amount of effort on the user’s end to get through it. Especially when it comes to phones that support seamless updates. With the new A/B partition, users don’t even need to reboot their phone, as the update is installed to the alternate partition in the background.
However, an OTA update isn’t always available for all the devices at once. There are several factors like the device region, mobile carrier, etc that impact the rollout and thus, a delay can be expected. Also, it is often that a manufacturer may perform a staged rollout, which means the update will reach a small percentage of devices initially and then slowly be available for the rest.
But we, as users, can be impatient when it comes to trying out the new software that would fix the existing bugs or bring in some exciting new features. It’s likely that users who have already received the update, tend to capture the OTA update zip and share it with others on forums and social groups. In such a case, if you have the OTA package (update.zip), then you can instantly upgrade your phone to the latest software. The instructions below will help you manually install Android OTA Updates using stock recovery.
Advertisement
Advertisement
Sideloading OTA updates do not require an unlocked bootloader. And unlike Factory Image/Firmware, sideloading or manually installing OTA updates via stock recovery doesn’t wipe the data stored on your device. Your data stays intact.
Despite that, we strongly recommend that you take a full backup of all your data stored on your phone including the internal storage to safeguard from any data loss situation.
Take a note that you will first need the OTA update zip package for your device before you follow the steps. You can find these zips either on forums like XDA or request a fellow mate to capture the OTA update package. Also, these methods require your phone’s software to be completely unmodified/stock. It will fail if your phone is rooted via Magisk/SuperSU, has TWRP recovery installed, or any other modifications of this kind.
Once you have the OTA package, you can proceed to the instructions below and use one of the listed methods to manually install the OTA update on your Android device.
Advertisement
Method 1: Install OTA Update from SD Card (Apply update from SD card)
The first method works by storing the OTA zip package on your phone’s internal/external storage. And then using the ‘Apply update from SD card’ option in stock recovery to install the OTA update. This method is best for users who do not have access to a PC.
- Download the OTA zip package for your Android phone.
- Connect your phone to the PC using the USB cable.
- Next, transfer the OTA zip package to the root directory of your phone’s internal/external storage.
- Once copied, disconnect the phone.
- Boot your phone into the recovery mode using the physical buttons combination or by entering the following ADB command:
adb reboot recovery
- In the stock recovery menu, use the Volume buttons of your phone to select the ‘Apply update from SD card‘ option.
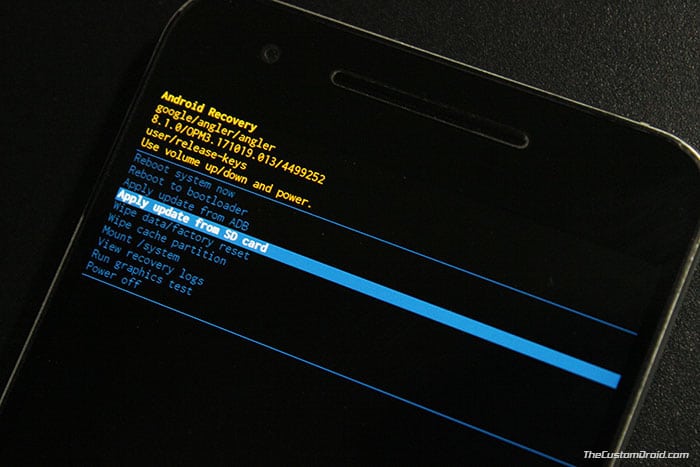
- Press the Power button to confirm the selection.
- Now, use the Volume keys to highlight the OTA update package.
- Finally, press the Power button to confirm and install the OTA update package on your Android device.
- After the update is installed, select ‘Reboot system now’.
Method 2: Install OTA Update using ADB Sideload (Apply update from ADB)
Sometimes, the phone might not detect the storage or the OTA package itself. In such cases, you can use the ‘Apply update from ADB’ option in the stock recovery and the ADB Sideload command to manually install OTA update on your Android device. Before you proceed with the instructions below, you must first setup ADB and Fastboot tools on your PC.
Advertisement
- Download OTA zip package for your Android device.
- Copy the downloaded package to the folder where the ADB and Fastboot binaries are present.
- Hold the SHIFT key on the keyboard and right-click on an empty space inside the same folder.
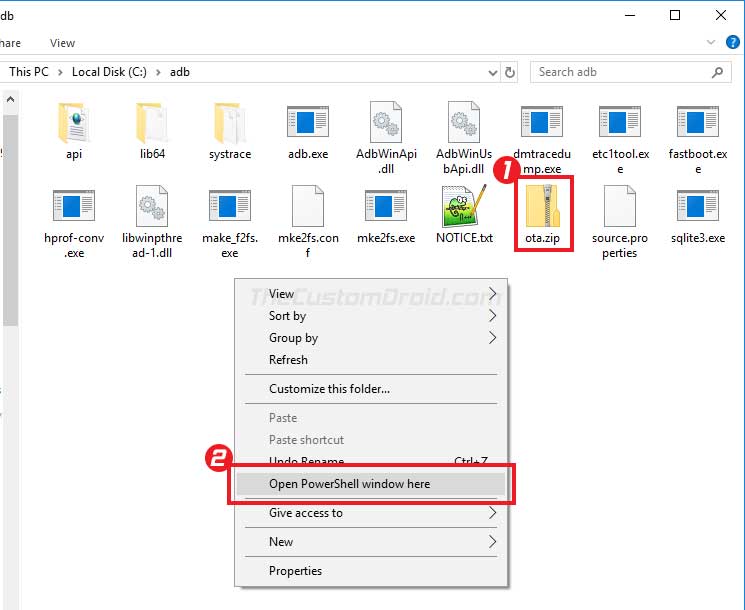
- Select the ‘Open PowerShell window here’ option.
- Connect your phone to the PC using the USB cable.
- Now enter the following command to boot your Android device into stock recovery:
adb reboot recovery
- In the stock recovery, use the Volume buttons to select the ‘Apply update from ADB‘ option.
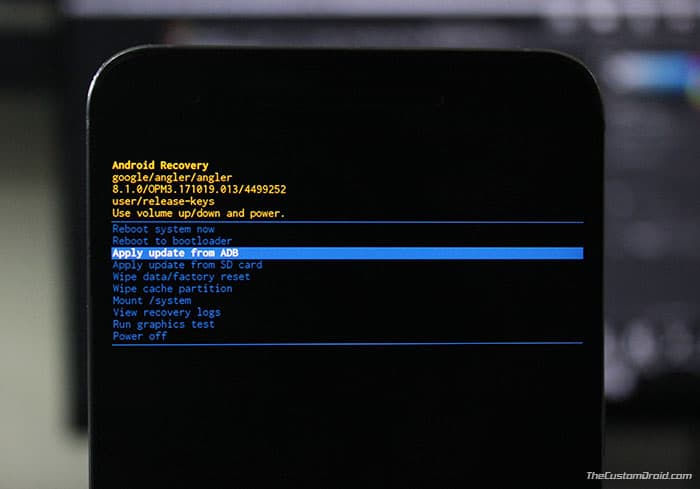
- Press the Power button to confirm the selection.
- Now, enter the following command to install the OTA update package on your Android device:
adb sideload ota.zip
- Make sure to replace “ota.zip” with the actual filename of the OTA update package.
- Once the installation is complete, select the ‘Reboot system now‘ option.
Your device will now boot into the updated firmware. You can use this method on almost every Android device. Required that you have the correct OTA update zip for your phone and stock recovery installed on it.
So this was our guide on how to manually install OTA updates on Android using Stock Recovery. If you face any errors while updating your phone using these methods, let us know by commenting below.
Comments 12 Comments
Comments are moderated, and published only if they are relevant to the topic and add value in a constructive way. If you disagree with something, please be polite and respectful. We suggest you read our comment policy before commenting.
Can we use sideload the full OTA image to download the Android System from Android 12 to Android 9 in Google Pixel 3a XL?
Alice, afraid it’s not possible to downgrade using the full OTA image. You will need to download and flash the factory image to do that.
Although note that this will require an unlocked bootloader. If you need help, we have an article that discusses the same: Google Pixel Bootloader unlocking guide
I am trying to sideload a ota onto a google pixel 2 whose os was corrupted but i cannot seem to be able to get either my windows 10 or my windows 7 installations to recognize the connected phone (USB connection) and a pixel does not have a SD card. I know I am doing something wrong as it is not working. I do not knwo if it is a driver issue, a connection issue a command issue or a user issue.
Please assist
Hi Frank. Please do the following:
1) Boot your Pixel 2 into Bootloader Mode by holding the Volume Down + Power keys together while the phone is turned off. Then, keep tap the Volume keys a few times until you see “Recovery Mode” as a selection and finally press the Power button to confirm. This will boot your phone into the stock recovery mode, wherein, you will first see a screen with “No command” text and an Android bot. On this screen, hold the Power button and tap the Volume Up button once. This should boot your Pixel 2 into the stock recovery mode (You will see a couple of options in blue color, along with some device info in yellow color on the top-left).
2) Connect your phone to the PC via a USB cable.
3) Use the Volume keys to move the selector (in stock recovery mode) to “Apply update from ADB”. And then press the Power button to confirm the selection. This will put your phone into ADB sideload mode. You can confirm this by looking at the text on the bottom of the screen. It should say something like: Now send the package you want to apply to the device with “adb sideload “Device Manager”. In the device manager window, you should see a yellow triangular warning icon right beside your phone (In case there’s a driver issue). If it doesn’t show any sorts of warnings, then you can continue to enter the ADB sideload command on your PC’s PowerShell/CMD window.
Please let me know if you have any questions.
Does “USB Debugging” need to be Enabled under “Developer Options” for any of these methods or is that dependent on the phone manufacturer/model?
I’m investigating options to recover a Pixel 1 suffering from a bootloop issue. Despite many of these guides I find being nearly identical in instruction, it seems half of these say it’s necessary to Enable USB Debugging for this process to be successful (especially Method 2).
Hi Willy. I can understand the confusion, considering how several online resources just blindly copy and paste redundant requirements.
The only thing that you need to know here is: USB debugging only needs to be enabled to make an ADB connection between the PC and the device, while the phone is BOOTED INTO THE OS.
For anywhere else, like while in recovery, in this case, it doesn’t have any use and will work without any efforts.
Did you try flashing the factory image on your Pixel to recover it from the bootloop?
Hi Dhananjay, sorry about the delay. The bootloop began after an OTA update, but I believe the bootloop was being caused due to hardware failure. Specifically, bad/cracked solder joints on one of the BGA ICs. I arrived to this postulation after fully disassembling the phone, removing the RF shield covers on both sides of the PCB, and then applying firm pressure on both sides, mostly to the DRAM and Storage ICs (the two largest chips). These can be identified with red boxes in steps 10 & 11 in the ifixit teardown of the Pixel XL:
https://www.ifixit.com/Teardown/Google+Pixel+XL+Teardown/71237
I googled the FCC ID, searching for: “fcc NM8G-2PW4100” and looked for the links beginning with:
“https://apps.fcc.gov”. The PCB layout is nearly identical to the smaller Pixel as evidenced in the “Internal photos” found on the FCC website here:
https://apps.fcc.gov/oetcf/eas/reports/ViewExhibitReport.cfm?mode=Exhibits&RequestTimeout=500&calledFromFrame=N&application_id=n4oFa%2BX8mfrKBoGB%2BruZjQ%3D%3D&fcc_id=NM8G-2PW4100
At this point, I only had the display, battery, and buttons (Power/Vol Up/Vol down) connected to the mainboard and observed the Google boot animation behave as though it was trying to finish installing the update, then the lock screen flashed VERY briefly before the phone repeated the process again. As I mentioned, the phone would only behave this way with pressure on the ICs. Without pressure, the phone would only bootloop the Google startup animation logo, but NO animation. It would just be frozen on “Google” and then reboot. This behavior would occur:
-when the phone was started normally
-when the phone was plugged in for charging
-instantly after “Recovery mode” was selected from the Bootloader screen
I determined this is not worth trying to repair at this point considering the ICs are epoxied into place (ironically, to prevent BGA ICs from developing cracks) and I don’t have the tools, time, nor inclination to affect the repair.
I had another Pixel mainboard though and decided to experiment on that and you are correct! USB debugging had not been enabled on this phone and the bootloader was still locked. After placing the phone in Recovery Mode and selecting the option “Apply update from ADB”, I was able to view device info with the “adb devices” command.
Initially, the “adb sideload ota.zip” command was returning with the error, “* cannot read ‘ota.zip’ *”. So I verified the usual (*.zip file checksum, USB cable, USB port, command prompt in admin mode, etc.) and tried again with no luck. I think my problem was possibly related to ADB and FASTBOOT being integrated into the system so the adb/fastboot commands can be run from any path. So I tried moving the ota.zip from my C:\Windows\system32 folder (where the command prompt application automatically goes when opened) to the root of the drive ( C:\> ), and it worked. I used “cd\” to go to the root and then ran the “adb sideload ota.zip” command again:
C:\Windows\system32>adb devices
List of devices attached
FA6********* sideload
C:\Windows\system32>adb sideload ota.zip
loading: ‘ota.zip’
* cannot read ‘ota.zip’ *
[I moved *.zip file to root of C: drive.]
C:\Windows\system32>cd\
C:\>adb sideload ota.zip
serving: ‘ota.zip’ (~20%)
[When finished, progress was replaced with:]
Total xfer: 2.00x
The update process took a little over 9 min using ADB and I remember the phone display reported an error after it finished, I think it mentioned something about decryption/encryption. At any rate, I verified the OTA update worked after rebooting the phone into recovery and checking the build version at the top of the display. I suspect I received the error due to the phone being updated via ADB and/or still having my Google account on it (Factory Reset Protection in effect). I repeated this process a few times (sending the same OTA update image with ADB) and the error was absent on subsequent updates.
I tried sending a full Factory image instead of the OTA update image out of curiosity but it failed with the phone displaying:
….
Verifying update package…
E:footer is wrong
Update package verification took 0.1 s (result 1).
E:Signature verification failed
E:error: 21
Installation aborted.
Maybe the bootloader needs to be unlocked as Google says in their official guide:
https://developers.google.com/android/images
In the future, it may be a good idea to explicitly differentiate between using an “OTA update image” vs “Factory image”.
Thanks for your response and time Dhananjay!
Hi again. Thanks for providing all the details. You’re correct, the bootloader needs to be unlocked in order to flash a ‘factory image’. That’s the primary reason Google released the concept of full OTA images, which can be used even on Nexus/Pixel phones with a locked bootloader.
So finally, replacing the mainboard work?
Absolutely, ultimately replacing the mainboard was the only solution in my case. Unfortunately it was the 128 GB version that failed and I only had a 32 GB to replace it with.
Naturally, other users/devices may experience an identical situation to mine where the device is bootlooping with no access to the recovery screen and it could be attributed to a completely different failure of a part/component.
I’m no engineer or programmer, just a tinkerer, but hardware failures can manifest into VERY weird experiences. For example, I have an old Motorola (Droid) RAZR HD (XT926). Years ago I had to replace the display assembly after the LCD broke. I bought a used phone off Ebay for parts and moved the display assembly to my phone. Oddly though, when I attempted to use the Chrome browser, I was always getting warnings/security notifications. If I recall it was regarding the certificates, specifically the date. Anyways, Chrome said the my phone date didn’t appear to be correct and suggested I change it. So I went into settings and tried to change it every possible way I could think of, yet no matter what or how I selected the Date in the System Settings, it always reverted back to several decades ago… something like Dec 1, 1970!
I foolishly did a Factory Data Reset in an attempt to restore functionality to the phone, but the date issue remained. 🙁
Eventually, I isolated the mainboard/PCB/motherboard into a completely different phone housing with all different modular components (headphone jack, loudspeaker, battery, camera, etc.) and the date problem finally went away. I replaced the modular components with the originals one-at-a-time and narrowed the culprit down to the earpiece speaker assembly. The earpiece speaker assembly included the notification LED and proximity sensor with the front facing camera attached to it via FPC (flexible printed circuit/flex-cable/ribbon cable).
https://www.ifixit.com/Guide/Motorola+RAZR+Maxx+HD+Earpiece+Speaker+Replacement/37893
Apparently, there was something going on in JUST the earpiece speaker assembly and that failure led to the system date being stuck! I realized why the phone was on Ebay at this point (LOL) and used ONLY display assembly, moving MY original earpiece speaker assembly to the donor/Ebay display assembly. So far the phone is STILL working great!
This is the lesson I want to share with others. My point being if someone else is having the same Pixel bootloop problem I had or even an unrelated “weird” glitch or oddly behaving device, it would be worth trying to check the mainboard in another known working unit first. It’s also worth mentioning that sometimes devices will boot with the bare minimum connected to the mainboard: battery, display, and buttons ONLY. However, there are times it’s necessary to fully connect everything to get a proper boot, though it’s not necessary to fully close/seal up the device.
Yes, that’s most odd of the experiences. I remember how users with the Nexus 6P and Nexus 5X struggled with the bootloop issue, which was again a hardware failure.
I am glad you were able to revive your device. And thanks again for putting it all up into the fine details. Other users who might have or may face such an issue would be helped by this.
> sideloading or manually installing OTA updates via stock recovery doesn’t wipe the data stored on your device. Your data stays intact.”
Well this is not true. Last time when I used this method it did wipeout my hard drive and I lost all the images.
Hi Gyandeep. Just think of it this way: The OTA you receive and install on the phone automatically via the Settings, it is the same as a manual OTA update. The package is the same. So, if it doesn’t wipe your phone when updating automatically, then it shouldn’t wipe when doing it manually.
Of course, in some situations, like with certain beta releases, the OEM makes a mandatory wipe when moving from Stable to the Beta release. The same happens when Google pushes out Dev Preview. The first Dev Preview build installed via OTA will wipe the phone (At least in case of Google Pixel devices).
I can understand if it happens and the data is lost. So, I have updated the article with a precaution.