Pixel and Nexus devices from Google have always known to be developer-friendly and well admired by enthusiasts. And that’s majorly because users can easily unlock the bootloader on these devices if they want to. An unlocked bootloader is a requirement if you wish to root, flash custom ROMs, or mod the software of your Pixel device.
Advertisement
In this tutorial, we will discuss how to properly unlock the bootloader on Google Pixel and Nexus devices using just a bunch of fastboot commands. The method itself has been provided by Google and does not require the use of any third-party tool or software as in the case of other OEM Android devices.
Before everything, let me start by helping you understand what a bootloader is, why it is locked in the first place, and why/when you may want to unlock it. It is a good practice to understand these things and how they work before you actually decide to follow the instructions to unlock the bootloader of your Google Pixel/Nexus device.
Who is this guide for? – It does not matter if you’re someone who’s completely new to the scene, or someone who has had years of experience in rooting, flashing ROMs, etc. This guide is suitable for every user, regardless of their level of knowledge in the field of Android software flashing/modding.
Page Contents
What is Bootloader?
The Bootloader is a piece of program that is responsible for booting your Pixel/Nexus device. Generally, the bootloader brings up the kernel which then loads the Android operating system when you turn on the device. But it can also determine if the device should be booted into the Android Recovery Mode, which is loaded from a different partition than the main Android OS.
Advertisement
The bootloader also guards the device state, and verifies the boot and recovery partitions to ensure that the device is running the manufacturer-authorized software. You may consider it as a gatekeeper to your phone’s software.
Android’s official documentation is a great resource if you wish to learn more about the Android bootloader and boot-process.
Why is the Bootloader Locked?
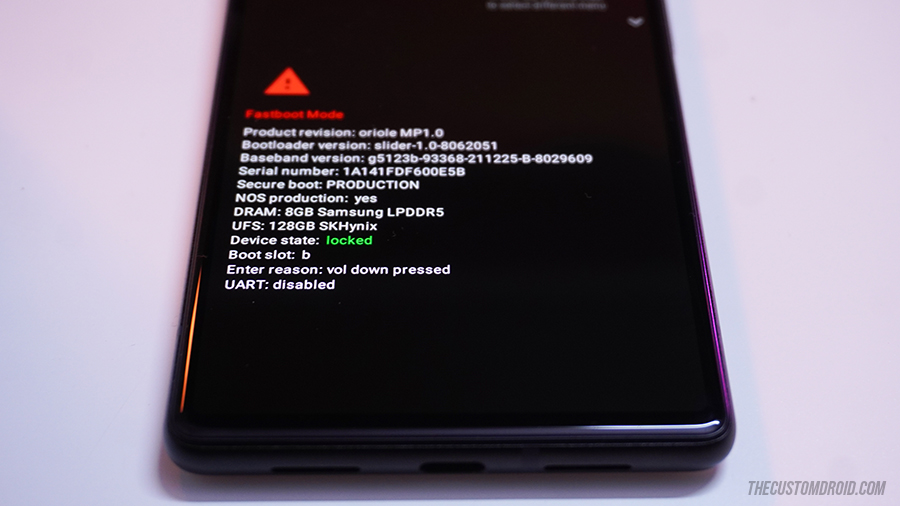
The bootloader of Google Pixel/Nexus (or any other Android device for that matter) is locked to ensure that device is running the firmware provided and installed by the manufacturer. This is done by:
- Matching the firmware’s digital signature against the one intended by the manufacturer. And if it does not match, then the device fails to boot.
- Preventing users from flashing the bootloader or other device partitions.
Why Unlock Bootloader on Google Pixel?
So, why would a user want or need to unlock the bootloader of their Google Pixel device?
With a locked bootloader, your Google Pixel/Nexus device is limited to the preinstalled firmware provided by the manufacturer and the features it offers.
If you’re interested in extensively modifying the stock firmware by rooting it or flashing a totally different firmware altogether, then you will need to unlock the bootloader of your Pixel/Nexus device.
Things like gaining root access, installing a custom recovery, installing custom ROMs, etc involve flashing device partitions like system, boot, recovery, vendor, etc. And a locked bootloader does not allow flashing the device partitions at all. So, that is when you would need to unlock the bootloader of your Pixel device.
Which Devices are Supported?
You can use the instructions provided provided on this page to unlock the bootloader on every Google Pixel and Nexus device released to date. But just for the sake of clarity, the list below includes all Pixel devices supported by this guide, along with their codenames.
| Google Pixel devices: | Google Nexus devices: |
|---|---|
| Pixel 6a (bluejay) | Nexus 6P (angler) |
| Pixel 6 Pro (raven) | Nexus 5X (bullhead) |
| Pixel 6 (oriole) | Nexus 6 (shamu) |
| Pixel 5a (barbet) | Nexus 9 LTE (volantisg) |
| Pixel 5 (redfin) | Nexus 9 Wi-Fi (volantis) |
| Pixel 4a (sunfish) | Nexus 5 (hammerhead) |
| Pixel 4 XL (coral) | Nexus 7 Wi-Fi [2013] (razor) |
| Pixel 4 (flame) | Nexus 7 Mobile [2013] (razorg) |
| Pixel 3a XL (bonito) | Nexus 10 (mantaray) |
| Pixel 3a (sargo) | Nexus 4 (occum) |
| Pixel 3 XL (crosshatch) | Nexus 7 Wi-Fi (nakasi) |
| Pixel 3 (blueline) | Nexus 7 Mobile (nakasig) |
| Pixel 2 XL (taimen) | Galaxy Nexus |
| Pixel 2 (walleye) | Nexus S |
| Pixel XL (marlin) | |
| Pixel (sailfish) | |
| Pixel C (ryu) |
A Few Important Things
While I have been a part of the Android software modding community for a decade, I was once a novice too. And being new to something means you will have a lot of questions about everything and so is the case with bootloader unlocking.
So, I have gathered the following list highlighting some very important things that you should note before you decide to unlock the bootloader of your Pixel/Nexus device.
- Affects on device warranty: The first and foremost question that everybody has is how bootloader unlocking affects the manufacturer-provided provided warranty and RMA process.
In case of many other OEM Android devices, unlocking the bootloader completely invalidates the warranty offered by the manufacturer. This is specially discouraging as the manufacturers would not even cover a hardware fault if the bootloader is unlocked.
But it’s the completely opposite case with Google devices. Unlocking the bootloader of your Google Pixel/Nexus device DOES NOT void the manufacturer-provided warranty and/or the RMA process. I have verified this with a Google customer support representative when my Pixel 2 XL experienced hardware issues within the offered warranty period. - Unlocking the bootloader wipes all data: The next very important thing is that unlocking the bootloader completely erases all the data stored on your phone. So you should always take a complete backup of all your data before you begin with the unlocking process.
While this might feel annoying as you would need to go through the complete setup process again and restore your data afterwards. But it is important considering from a security standpoint. - Bootloader unlocking and Android apps: There are certain Android apps that may completely stop working if they detect an unlocked bootloader. While the percentage of apps that enforce such behavior is small, it is something worth keeping in mind. This is caused due to failed SafetyNet checks.
If you plan on rooting your Pixel/Nexus device after unlocking the bootloader, you could use Universal SafetyNet Fix, Denylist or similar MagiskHide alternatives to completely hide root access and the bootloader lock status. This would allow you to use such apps without any issues. - Android version does not affect bootloader unlocking process: The method through which you unlock the bootloader is exactly the same and works regardless of the Android version your Pixel/Nexus device is running.
- There are some risks: Unlocking the bootloader isn’t always safe and comes with certain risks. This awesome article by Chris Hoffman at How-to Geek does a great job at explaining the risks involved with bootloader unlocking. I would suggest going through it, especially if you’re completely new to the thing.
Verizon does not allow bootloader unlocking at all. Even if you manage to unlock the phone’s bootloader through an exploit, you will completely void the warranty offered by Verizon.
Before you begin
Here are some things that you are strongly advised to do before starting off with the instructions.
Advertisement
- Take a backup: As mentioned earlier on this page, unlocking the bootloader of your Pixel/Nexus phone erase all the stored data. This includes the call logs, text messages, installed apps and their data, as well as any other files that you might have stored on the phone’s storage.
So, make sure that you take a complete backup of all the data on your phone. You can restore this data after your phone’s bootloader is fully unlocked. - Install required USB drivers: Computers with the latest Windows operating system generally install the required USB drivers for your phone automatically. But that’s not always the case though, especially if you’re using an older version of Windows. So, if you’re operating on a Windows machine, you might want to download and install the official Google USB drivers.
If you’re using a macOS/Linux PC, you shouldn’t need any additional drivers at all. - Charge your phone: If you’re new to the concept of bootloader unlocking, I suggest you take all your time to fully read and understand the instructions. This should prevent you from making any errors.
Having a sufficient battery charge in your phone will ensure that it doesn’t power off while you’re following the instructions and performing them. I suggest charging your phone to a minimum of 40-50% battery level.
How to Unlock Bootloader on Google Pixel and Nexus Devices
Now that you have a good understanding, let me finally show you how you can easily unlock the bootloader of your Pixel/Nexus device using Fastboot. The complete process is fairly simple and does not require the use of any external utilities or software, such as in case of several other manufacturers.
The only things you will need to perform these instructions is your Google Pixel/Nexus device, a compatible USB cable, and a computer with Windows, macOS, or Linux OS installed.
I have broken down the instructions down into six major steps to help you understand the whole process. Let’s start!
Step 1: Set up Android SDK Platform-Tools on Your PC
Unlocking the bootloader on Google Pixel and Nexus devices require the use of the fastboot command-line tool. This tool is a part of the Android SDK Plaform-Tools component which also includes some other important tools such as adb and systrace. So, the first step of the unlocking process is to download and set up the Android Platform-Tools on your computer.
Note:
While you could use one-click ADB/Fastboot installers like Minimal ADB and Fastboot, I recommend doing it manually as shown below. This is because one-click installers often include outdated platform-tools binaries, which may cause unusual errors during usage.
So, start by downloading the latest Android SDK Platform-Tools package according to your computer’s OS from the links below:
After the ZIP package has been downloaded, you will need to extract its contents on your computer to get the “platform-tools” folder. You can do this by using an archive utility such as 7-Zip on a Windows computer, or the default archive utility built into macOS/Linux. The extracted folder contains the binary files of all the command-line tools including fastboot.
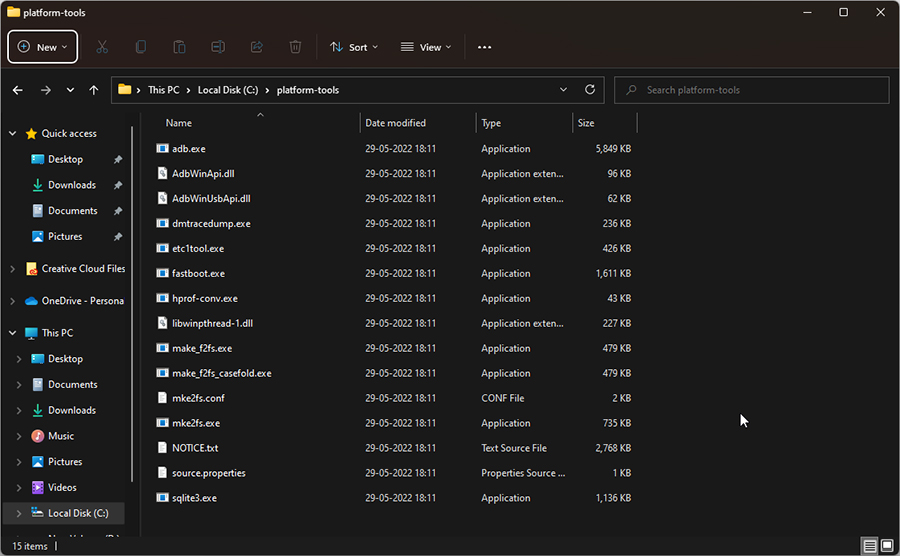
For convenience, I personally suggest moving the “platform-tools” folder to the root directory of the C:\ drive of your Windows computer, or to the Documents directory of your macOS or Linux computer.
Step 2: Open Command Window in Platform-Tools Folder
With the required tools now set up and ready to use, the next step is to launch the command-line window on your computer inside the working directory. That is, inside the “platform-tools” folder.
An alternative to this step is to add the platform-tools to your computer’s PATH. This way, you would be able to open the command-line window and use the Fastboot (and ADB) commands from any directory of your computer.
I have already covered a tutorial on opening the Fastboot/ADB command window inside platform-tools folder. So head over to the linked page, follow the instructions and come back here to follow the next step.
Advertisement
Basic command-line usage:
When entering the commands, make sure to prepend them with a dot and backslash .\ in Windows PowerShell, and a dot and forward slash ./ in Mac/Linux Terminal.
Step 3: Enable OEM Unlocking
With Android 5.0 Lollipop, Google introduced the OEM unlocking (also referred to as “OEM unlock”) option that needs to be enabled in order to unlock the bootloader on Google Pixel and Nexus devices.
Under the hood, OEM unlocking basically sets the value of the get_unlock_ability property. The bootloader reads this property to decide whether or not to accept the bootloader unlock command.
As a security measure to prevent unauthorized unlocking of the bootloader, the OEM unlocking option is disabled out-of-the-box on all Google Pixel/Nexus devices that support it. Which means that the get_unlock_ability is set to 0 and the bootloader will not accept the unlock command.
So, you will need to enable OEM unlocking on your Pixel/Nexus device first. Doing so will set the value of the get_unlock_ability property to 1 and thus allow you to unlock the bootloader.
Note: Nexus 5 and older devices do not support the OEM unlock option. If you’re following this tutorial for the same, skip this step and follow the rest.
The OEM unlocking option resides inside the hidden Developer Options to prevent accidental access. So, you will first have to enable the Developer Options menu to access it.
To enable OEM unlocking on your Google Pixel/Nexus device, follow the instructions below.
- Open the Settings menu and go to “About phone“.
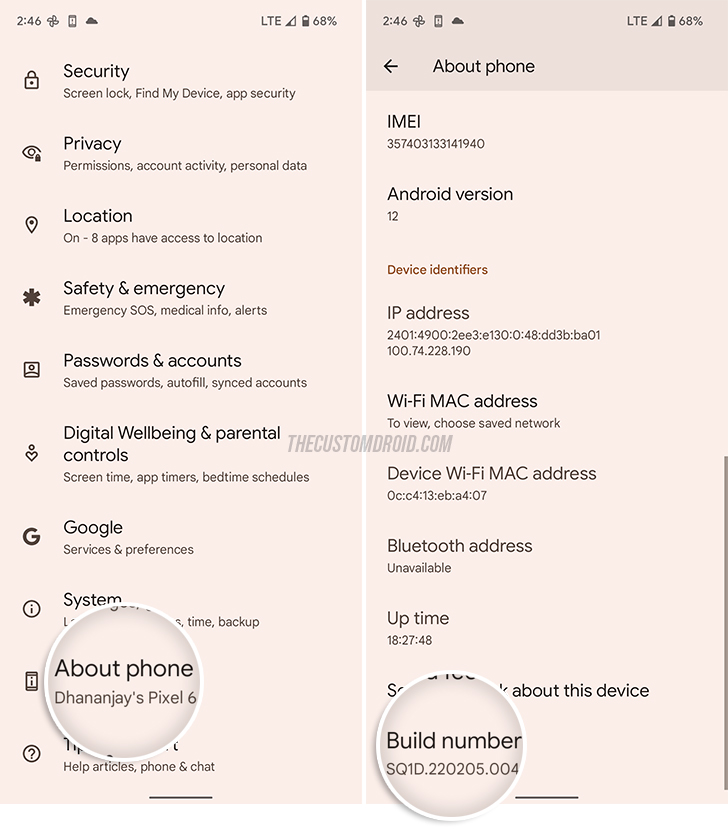
Go to Settings > About phone and locate the Build number section - Scroll down to the very end and locate the “Build number” section.
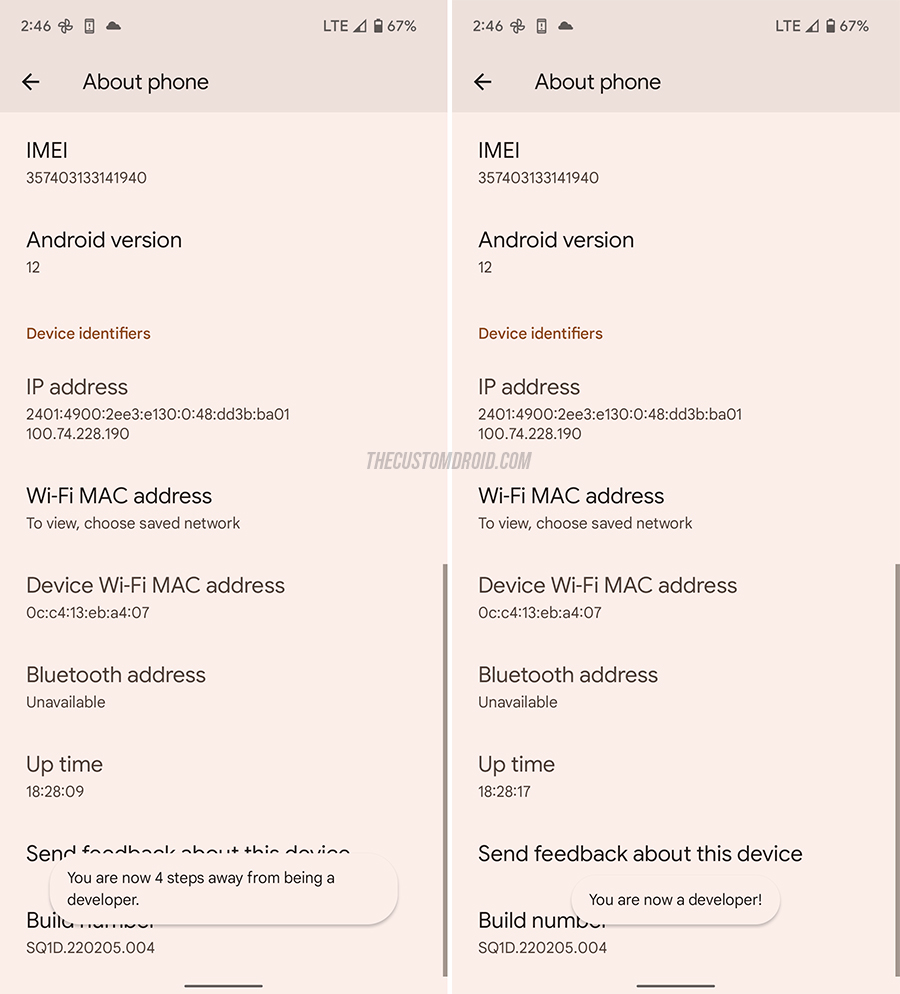
Repeatedly tap “Build number” to enable Developer Options - Repeatedly tap the build number 7 times until you see the “You’re now a developer!” message on the screen.
- Go back to Settings, tap “System” and then tap on “Developer options“.
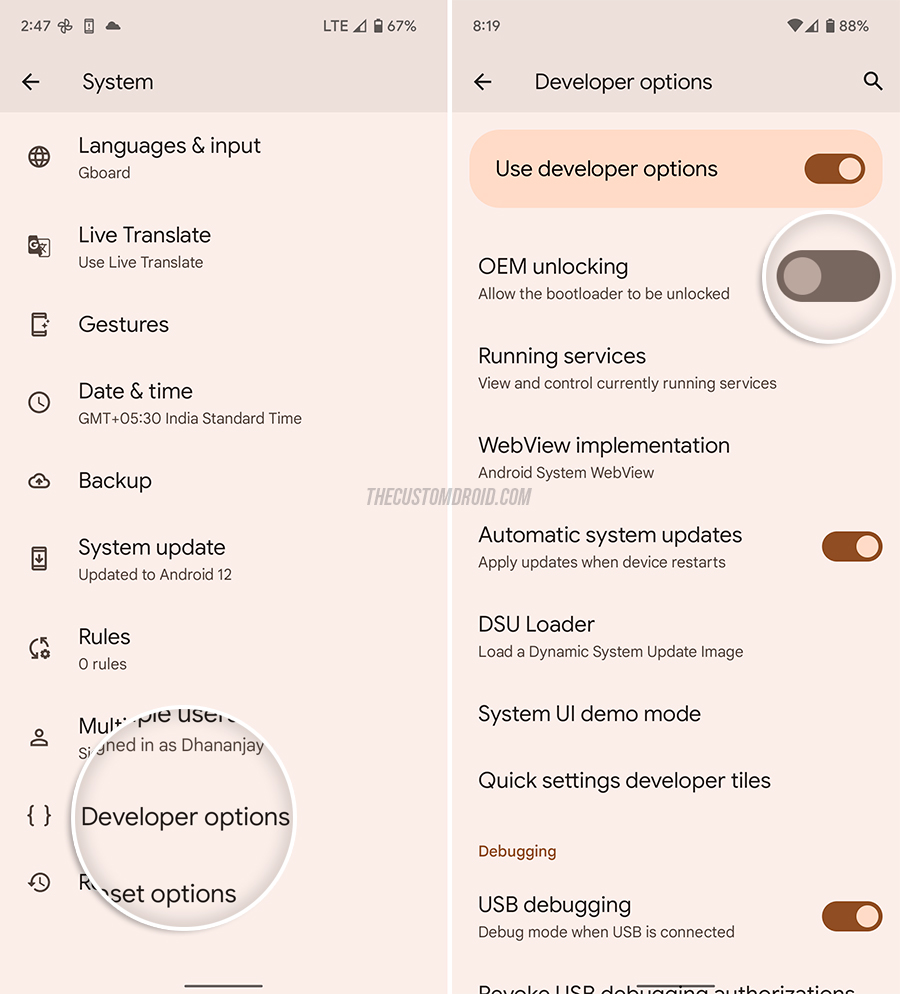
Turn ON the OEM Unlocking switch - Find “OEM unlocking” and tap the slider next to it. You might be prompted to enter your phone’s PIN/Password/PIN.
- Finally, select “Enable” when prompted to allow OEM unlocking.
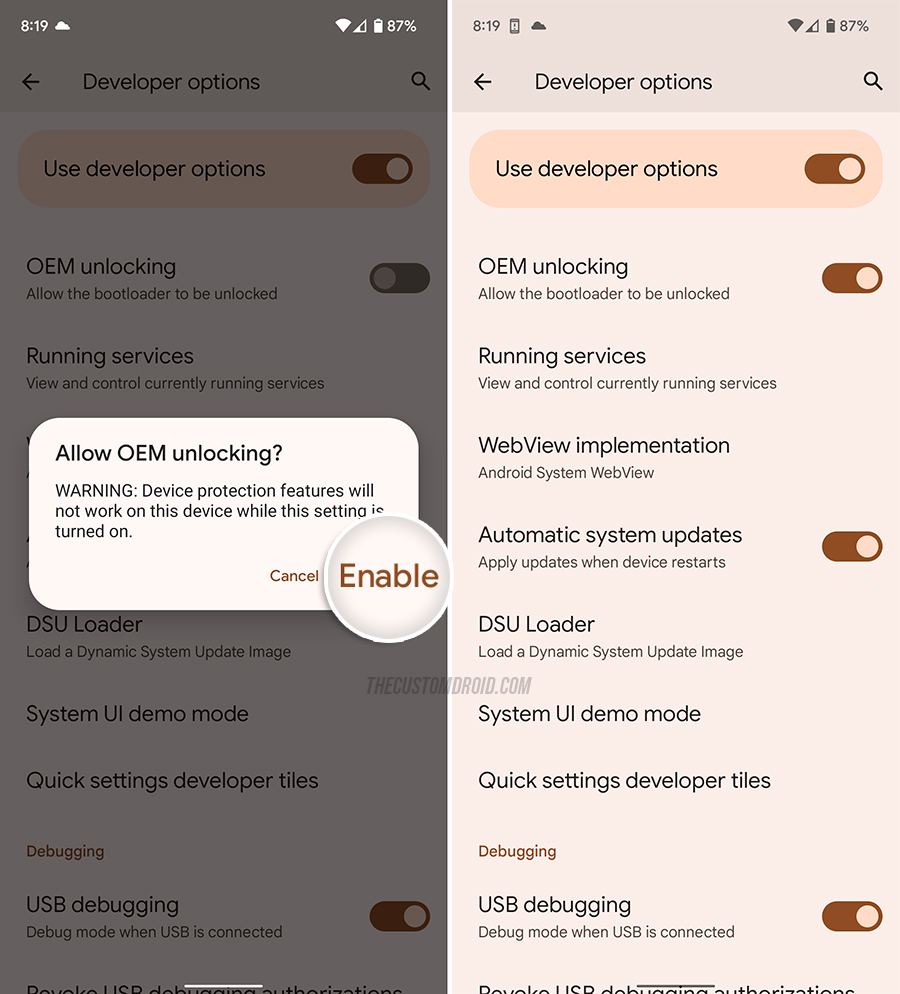
Press “Enable” to confirm
Tip: If OEM unlock option is missing or greyed out, make sure that you have logged into your Google account and connected your phone to the internet via WiFi or mobile data.
That’s it, you now have OEM unlocking enabled and your Pixel/Nexus device will now accept the bootloader unlock command and honor it.
Step 4: Boot into Fastboot Mode
The fastboot tool that you will be using to unlock the bootloader can only communicate with your phone over a special interface known as Fastboot mode.
So, the fourth step of the process is to boot your Google Pixel/Nexus device into Fastboot mode. Start by powering off your Pixel/Nexus device. Once the phone is completely turned off, use the keys combination for your device as mentioned in the table below.
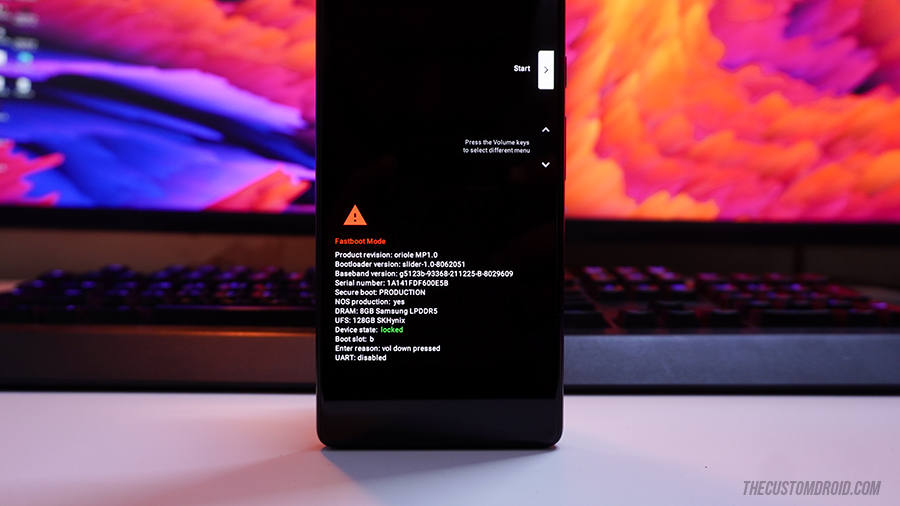
If you’re experienced with command-line, you can alternatively enable USB debugging on your phone and then use the adb reboot bootloader command to boot your Pixel into Fastboot mode.
| Device | Keys combination |
|---|---|
| Pixel 6, Pixel 6 Pro, Pixel 6a | Press and hold Volume Down button, then press and hold Power button. |
| Pixel 5, Pixel 5a (5G) | Press and hold Volume Down button, then press and hold Power button. |
| Pixel 4a, Pixel 4a (5G) | Press and hold Volume Down button, then press and hold Power button. |
| Pixel 4, Pixel 4 XL | Press and hold Volume Down button, then press and hold Power button. |
| Pixel 3a, Pixel 3a XL | Press and hold Volume Down button, then press and hold Power button. |
| Pixel 3, Pixel 3 XL | Press and hold Volume Down button, then press and hold Power button. |
| Pixel 2, Pixel 2 XL | Press and hold Volume Down button, then press and hold Power button. |
| Pixel, Pixel XL | Press and hold Volume Down button, then press and hold Power button. |
| Nexus 6P | Press and hold Volume Down button, then press and hold Power button. |
| Nexus 5X | Press and hold Volume Down button, then press and hold Power button. |
| Nexus 6 | Press and hold Volume Down button, then press and hold Power button. |
| Nexus 9 | Press and hold Volume Down button, then press and hold Power button. |
| Nexus 5 | Press and hold both Volume Up and Volume Down buttons then press and hold Power button. |
| Nexus 7, Nexus 7 3G | Press and hold Volume Down button, then press and hold Power button. |
| Nexus 10 | Press and hold both Volume Up and Volume Down buttons then press and hold Power button. |
| Nexus 4 | Press and hold Volume Down button, then press and hold Power button. |
| Nexus 7 (2012), Nexus 7 3G (2012) | Press and hold Volume Down button, then press and hold Power button. |
| Galaxy Nexus | Press and hold both Volume Up and Volume Down buttons then press and hold Power button. |
| Nexus S, Nexus SG | Press and hold Volume Down button, then press and hold Power button. |
Step 5: Connect Device to PC and Verify Connection
With your Pixel/Nexus device in Fastboot mode, connect it to the computer via the USB cable.
Advertisement
![]()
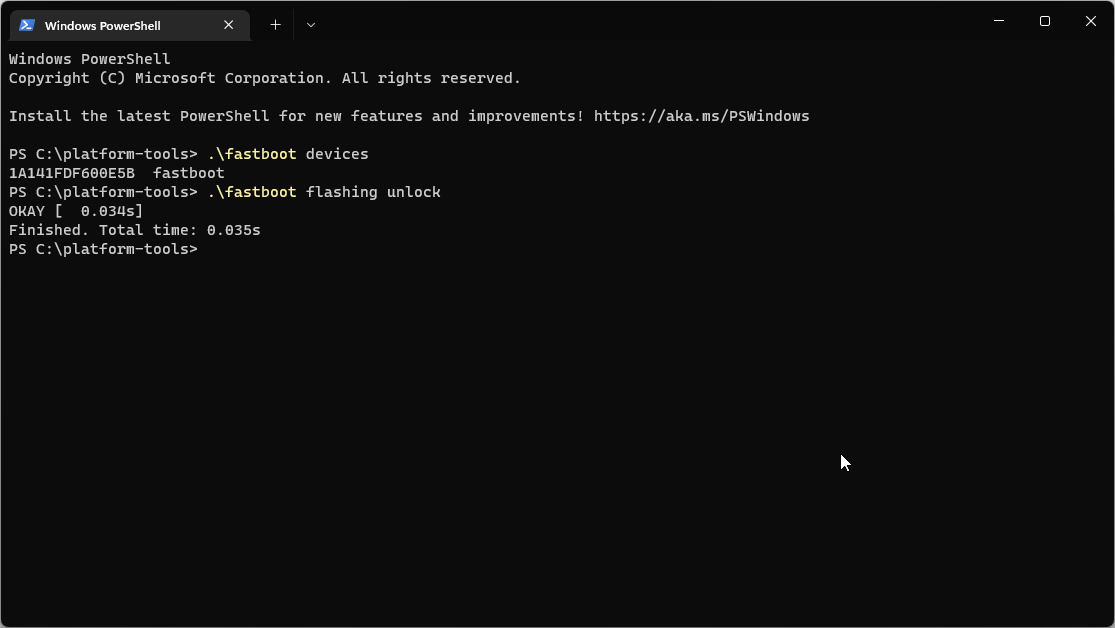
Once that is done, you will need to ensure that your computer can communicate with your device over the fastboot protocol. To do this, go the command window that you opened earlier, input the following command, and hit Enter:
fastboot devicesAgain, the command should be preceded with a dot immediately followed by a forward slash (./) on a Linux/macOS computer, or a dot followed by a backward slash (.\) on a Windows computer.
The fastboot devices command should return an output with your device’s unique ID, just as shown in the figure below.
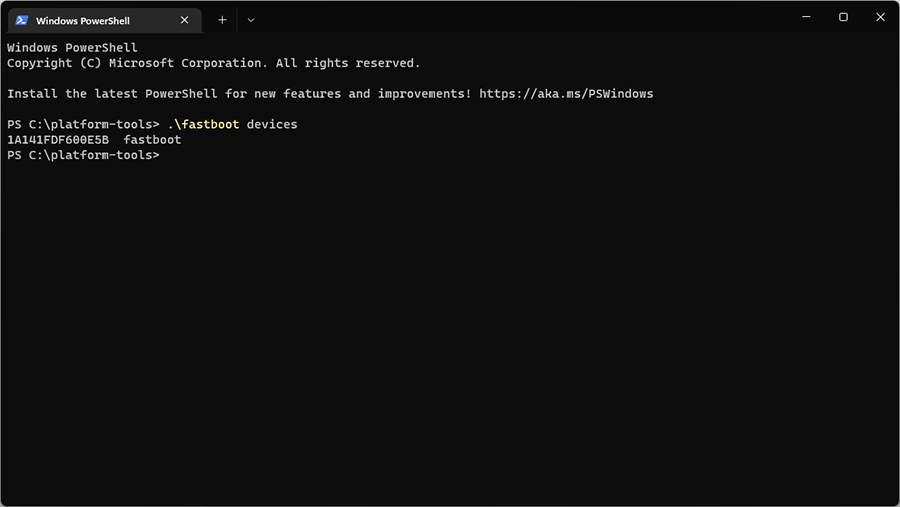
In case you get an empty output, it means that your computer could not recognized your phone over fastboot. If so, it would require some simple troubleshooting at your end. Below are a few things that I would suggest checking:
- Try switching to a different USB cable for connecting your phone to the computer.
- USB 3.0/3.1/3.2 could sometimes cause issues with fastboot connections. Try using a USB 2.0 port in that case.
- If you’re using a Windows computer, try installing the official Google USB drivers and reboot your PC.
Once you have checked for the above, enter the fastboot devices command again and make sure that the output includes a device ID.
Step 6: Use Fastboot to Unlock Bootloader of Your Pixel/Nexus Device
With everything ready, the final step is to use fastboot to unlock the bootloader on your Google Pixel/Nexus device. So, open up the command window, type in the following command, and just hit Enter:
fastboot flashing unlockImportant note:
Nexus devices manufactured before 2015 such as the Nexus 6, Nexus 4, etc do not support the fastboot flashing unlock command. For these devices, you will need to use the fastboot oem unlock command to unlock the bootloader.
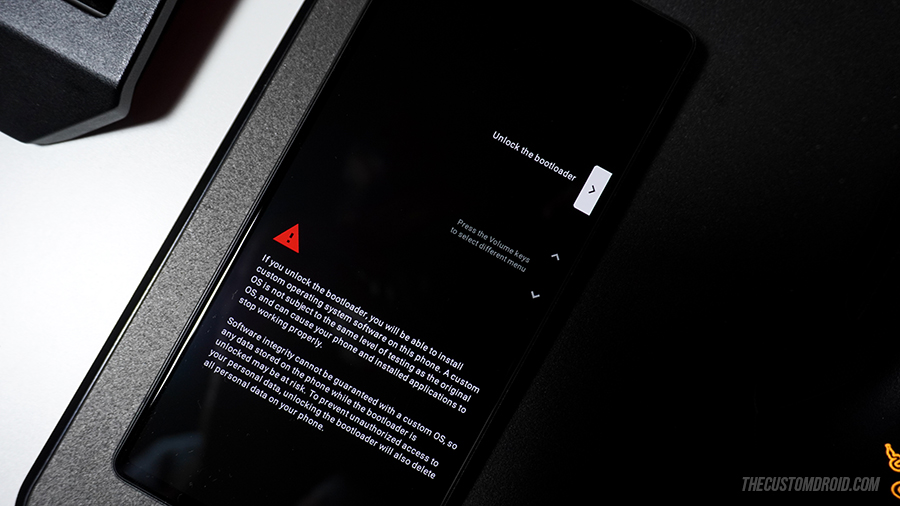
As soon as the command is sent, you should see a confirmation prompt on your device’s screen. Use the Volume keys of your device and move the selector to “UNLOCK THE BOOTLOADER“. Finally, press the Power key to confirm and unlock the bootloader of your Pixel/Nexus device.
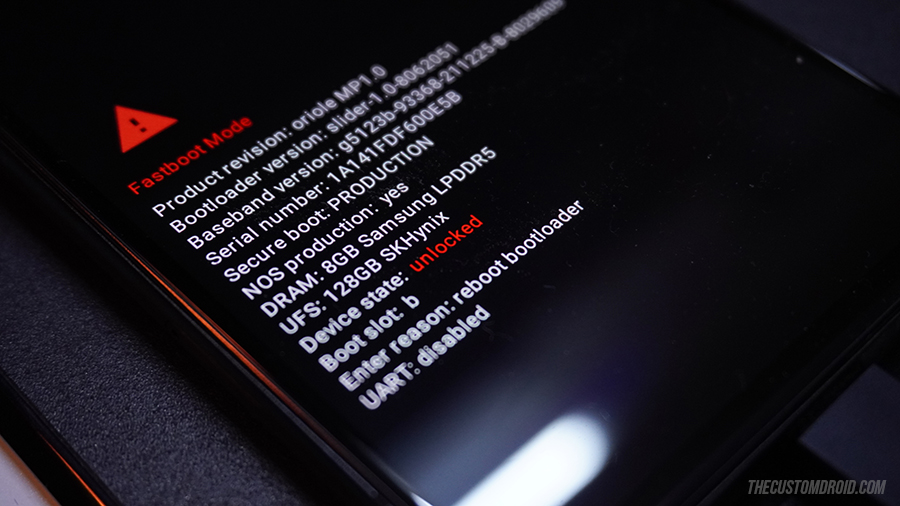
Your phone’s bootloader will instantly be unlocked and it should reboot back into Fastboot Mode. The value of Device state in Fastboot Mode should be switched from locked to unlocked.
Now, reboot your Pixel/Nexus device back into the OS by entering the following command:
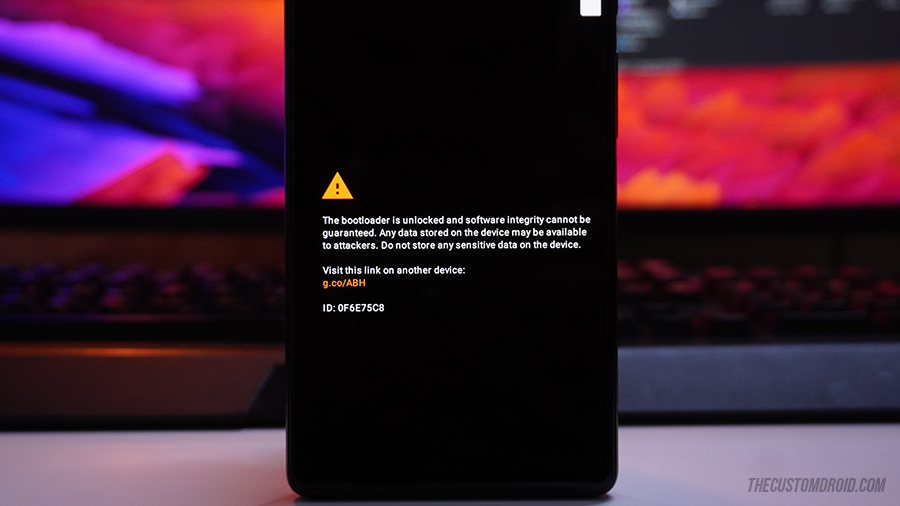
fastboot rebootYou will notice the unlocked bootloader warning message during the initial boot process. The message is completely normal and you can continue to use your device as normal. If you need more information about this message, it has been published by Google.
Wrapping Up
So by now, the bootloader of your Pixel/Nexus device should be fully unlocked. You can now make your way to rooting, custom ROMs and kernels, other software mods, and customize your phone’s UI, performance, and features the way you like.
If you’re new to the whole scene of flashing and modding, it will be very overwhelming at first. I would personally suggest starting off with something as simple as rooting your device (yes, it’s actually quite simple) with the stock firmware installed. Then slowly learn and move towards more advanced things like custom recoveries, ROMs/kernels, and mods such as Xposed Framework.
On a personal note, please excuse the length of this guide. I know it’s quite long given how fairly simple the process is. But as I said, I wanted this guide to be comprehensive, and understandable enough at the same time for everybody regardless of the level of their experience in the field.
I hope it was helpful to you. If you feel there’s anything that could be improved, added, or removed with regards to this guide, please share your feedback. And do not hesitate to comment if you have any questions, or if you face any problems while following the instructions.
Comments 8 Comments
Comments are moderated, and published only if they are relevant to the topic and add value in a constructive way. If you disagree with something, please be polite and respectful. We suggest you read our comment policy before commenting.
Hi Dhananjay, have an older but pristine Pixel 2 XL running Android 11 from Verizon. Have tried various means to unlock the bootloader, all fail. Read that Verizon blocks this, but thought I’d try one last query before I give up =)
Output:
creature@Johns-MacBook-Air platform-tools % ./fastboot devices710KPBF0447917 fastboot
creature@Johns-MacBook-Air platform-tools % ./fastboot oem unlock
FAILED (remote: 'unknown command')
fastboot: error: Command failed
creature@Johns-MacBook-Air platform-tools % fastboot oem unlock
zsh: command not found: fastboot
creature@Johns-MacBook-Air platform-tools % ./fastboot oem unlock
FAILED (remote: 'unknown command')
fastboot: error: Command failed
creature@Johns-MacBook-Air platform-tools % ./fastboot flashing unlock
FAILED (remote: 'Flashing Unlock is not allowed
')
fastboot: error: Command failed
creature@Johns-MacBook-Air platform-tools %
creature@Johns-MacBook-Air platform-tools % fastboot oem unlock
zsh: command not found: fastboot
creature@Johns-MacBook-Air platform-tools % fastboot oem
zsh: command not found: fastboot
creature@Johns-MacBook-Air platform-tools %
Any guidance?
thanks John
Hi John, generally with mobile carriers, they would allow bootloader unlocking once you pay off the device and get the SIM unlocked. Unfortunately, in case of Verizon, they choose to completely restrict the users from doing anything, like even enabling the OEM unlocking option, which is a perquisite for unlocking the bootloader.
Back in the day, a developer found an exploit in an old firmware version that allowed Verizon Pixel 2 users to unlock the bootloader. However, that exploit did not cover the Pixel 2 XL and was later patched in a following software update.
So all in all, there’s no way to unlock the bootloader on your Verizon Pixel 2 XL. The custom development community generally recommends staying away from Verizon, or any particular carrier for that matter, and get your phone directly from the Google Store if you wish to modify the software by unlocking the bootloader, rooting, or install a custom ROM.
Hello,
Great article but I am stuck on the most basic step which is getting the boot loader unlocked on a Pixel 5 with ATT bought from Google. I have tried the following:
– Signed into Google account
– Applied all updates
Still the option for “OEM Unlock” is grayed out. This is now the 2nd “Unlocked” phone I have tried to unlock with no luck, what am I missing ?
Any help is greatly appreciated
Hi Brett, do you have a SIM card inserted in your Pixel 5 and the mobile data turned on?
Let me know so that I can help you further.
I have purchased a refurbished Google Pixel 5 mobile and when switching the phone a message appears saying the bootloader is unlocked and software integrity cant be guaranteed, shortly after the message disappears and boots up normally. The message comes on everytime the phone is switched on. The seller saying I have rooted the device which I have no idea what he is talking about and refusing to take back the phone. Please advise me is it something that is easily done or would you need specialised software, equipment etc. I have been informed that it may well have had third party software installed prior to sale.
Bernie, the warning message you’re seeing appears if the phone’s bootloader is unlocked. Unfortunately, the seller is not being transparent about what he might have done with the device.
Nevertheless, there’s nothing to worry about. It’s very easy to restore the stock firmware on Pixel phones and relock the bootloader. This will ensure that there’s no third-party software is installed on the phone, and relocking the bootloader will also remove the warning message you’re seeing upon every boot.
To start off, please go to Settings > About phone and let me know the what it shows under “Model”. This is to verify the device model so that I can direct you to the exact files (provided by Google itself) for your phone.
Hi, I have a Verizon Pixel 4 OEM unlock is not visible. Is there such a thing as unsamlock?
Fernando, I am afraid there isn’t a bootloader unlock service similar to UNSAMLOCK of Google Pixel devices.