A Comprehensive Guide to Unlock the Bootloader on OnePlus Phones and Relock it
A step-by-step guide that will take you through the complete process of unlocking the bootloader on any OnePlus phone. Also learn how to relock the bootloader.

On this page
Unlocking your phone’s bootloader is the very first step if you wish to root your OnePlus phone, flash a custom ROM on it, or make any direct modifications to the firmware.
In this tutorial, I will guide you on how to unlock the bootloader on any OnePlus phone easily using a bunch of simple fastboot commands. Further, we will also be going through the process of relocking the bootloader in case you ever want to revert your OnePlus phone to its factory state.
Introduction
In the past, I would generally cover a separate bootloader unlocking guide for every OnePlus device that was released. The fact is, the process of unlocking the bootloader on any OnePlus phone is exactly the same.
Covering the same thing over and over again, with the same information and instructions, without adding any additional value, feels redundant, and honestly makes no sense to me now.
So, I decided to put this one up. A single comprehensive guide, that will walk you through the complete process of unlocking the bootloader on any OnePlus phone.
Who is this guide for? - It does not matter if you’re someone who’s completely new to the scene, or someone who has had years of experience in rooting, flashing ROMs, etc. This guide is suitable for every OnePlus user, regardless of their expertise in the field of Android software modding.
Before kicking off with the instructions, let me first help you understand what a bootloader on your OnePlus phone is, why it is locked in the first place, and why/when you may want to unlock it.
It is a good practice to understand these things and how they work before you actually decide to perform them on your phone.
What is a bootloader?
The bootloader on your OnePlus phone is a part of the core Android system that brings up the kernel and is responsible for booting up your phone. In more layman terms, a bootloader basically tells your phone which program(s) to run when it is powered on.
Apart from that, the bootloader also guards the device state, and verifies the boot and recovery partitions to ensure that the device is running the software authorized by the manufacturer. You might just consider it as a gatekeeper to your phone’s software.
The basic concept aside, if you’re someone who wants to dive deeper into the bootlooader, the flow of the boot process, etc, then Android’s official documentation on the subject will be helpful.
Why is the bootloader locked by OnePlus?
Most Android manufacturers, including OnePlus, lock the bootloader on their phones to prevent users from flashing the bootloader and other device partitions.
So, you can not flash a custom ROM/firmware on it, root it, and/or perform any sorts of modifications to the OS. The lock ensures that your phone can only run the operating system that came per-loaded on it.
The locked state of the bootloader is further aided by the “OEM unlocking” toggle under “Developer options”, so that no one could unlock the bootloader without having full access to the device, especially in case of thefts.
Why unlock bootloader?
This brings us down to the next major question - Why you may want to unlock the bootloader of your OnePlus phone?
Things like gaining root access, installing a custom recovery, installing custom ROMs, etc involve flashing certain device partitions like system, boot, recovery, vendor, etc. And like we mentioned, a locked bootloader does not allow flashing the device partitions at all.
So, if you’re an enthusiast who wishes to do any of the said modifications, you’d need to unlock the bootloader of your OnePlus phone first. Moreover, an unlocked bootloader is also a requirement if you ever need to unbrick your phone by flashing the factory image through Fastboot commands.
That being said, unlocking your phone’s bootloader isn’t a necessity at all. Don’t do it because your friend did it, especially not if you have no idea of what you’re going to do with it next. Be it rooting, or flashing a custom ROM, or anything else in between. Read, read more, and understand what you’re trying to achieve first.
Things you should know before unlocking
Now let’s take a look at some of the things you should know before you decide to unlock your OnePlus phone’s bootloader.
- Unlocking the bootloader wipes all data: The first very important bit to note is that unlocking the bootloader instantly wipes off (deletes) all the data stored on your phone. So you should always take a complete backup of all your data before you begin with the unlocking process.
While this might feel annoying as you would need to go through the complete setup process again and restore your data afterwards. But it is important considering from a security standpoint.
- The safety of your data with an unlocked bootloader: Talking of data, does unlocking the bootloader give attackers access to your data? No, not directly. An unlocked bootloader does not mean that your phone and its data is left open for attackers/hackers to access remotely. That’s not true at all.
However, with an unlocked bootloader, there’s a possibility that someone with physical access to your phone might be able to bypass the PIN/password lock and access your data. But the good thing is that Android offers real-time data encryption to ensure that even if someone could access your data, they would not be able to read it.
It’s also worth noting that data encryption on Android is unaffected by the bootloader lock state. So your data will still be encrypted even if you unlock the bootloader. That is, unless you decide to deliberately disable encryption.
Chris Hoffman at How-to-Geek covered a very good piece on the risks of bootloader unlocking. You might want to go through it.
Which OnePlus phones are supported by this guide?
Be it the latest OnePlus 10 Pro, OnePlus 9 series, or the original OnePlus One that was released more than 7 years ago, this guide applies to all OnePlus phones.
An important note for carrier-branded OnePlus phones:
OnePlus carrier-branded phones from T-Mobile, MetroPCS, and Verizon are SIM locked. For such devices, you will first need to get the SIM unlocked by your phone carrier and only then you could unlock the bootloader.
Further, the bootloader unlocking method for these phones is slightly different as well. In addition to the SIM unlock, you’d also need to obtain an unlock token from OnePlus for the same. The instructions for T-Mobile models have already been provided by OnePlus.
I will also try to cover a seperate guide for unlocking the bootloader on carrier-branded OnePlus phones at a later time.
For the sake of clarity, below is a complete list of OnePlus phones to which this guide, its information, and instructions apply to.
- OnePlus 10 Pro
- OnePlus 9 Pro, OnePlus 9, OnePlus 9R, and OnePlus 9RT 5G
- OnePlus Nord 2 5G
- OnePlus Nord CE 5G
- OnePlus Nord N10 5G
- OnePlus 8T
- OnePlus 8 and OnePlus 8 Pro
- OnePlus 7T and OnePlus 7T Pro
- OnePlus 7 and OnePlus 7 Pro
- OnePlus 6 and OnePlus 6T
- OnePlus 5 and OnePlus 5T
- OnePlus 3 and OnePlus 3T
- OnePlus 2
- OnePlus X
- OnePlus One
With that out of the way, let us now show you how to unlock the bootloader on your OnePlus phone. The only things you will require is your phone, a Windows/Mac/Linux computer, and a compatible USB-C cable.
Before you begin
Let us first take a look at some things that you should do before beginning with the unlock instructions.
- Take a backup: As mentioned earlier on this page, unlocking the bootloader of your OnePlus phone performs a factory data reset and erase all the stored data. This includes the call logs, text messages, installed apps and their data, as well as any other files that you might have stored on the phone’s storage.
So, make sure that you take a complete backup of all the data on your phone. You can restore this data after the bootloader is fully unlocked.
- Install required USB drivers: Computers with the latest Windows operating system generally install the required USB drivers for your OnePlus phone automatically. But that’s not always the case though if you’re using an older version of Windows. So, if you’re operating on a Windows machine, you might want to download and install the official OnePlus USB drivers.
If you’re using a macOS/Linux PC, you shouldn’t need any additional drivers at all.
- Charge your phone: If you’re new to the concept of bootloader unlocking, I suggest you take all your time to fully read and understand the instructions. This should prevent you from making any errors.
Having a sufficient battery charge in your OnePlus phone will ensure that it doesn’t power off while you’re following the instructions and performing them. I suggest charging your phone to a minimum of 40-50% battery level.
How to Unlock the Bootloader on OnePlus Phones
The process of unlocking the bootloader on OnePlus phones is extremely easy and could be done by just issuing a bunch of Fastboot commands from your computer. It’s almost the very same method that we would use when unlocking the bootloader on a Google Pixel device.
I have broken down the instructions down into six major steps so that it’s easier for you to understand the whole process. Now follow the steps below to unlock the bootloader on your OnePlus phone.
Step 1: Set up Android Platfrom-tools
We are going to use the official Android Fastboot tool to send the bootloader unlock commands. Fastboot itself is a part of the Android Platform-tools. So the first step is to download and set up the Platform-Tools on your PC.
While you could use one-click ADB/Fastboot installers like Minimal ADB and Fastboot, we recommended doing it the manual way as shown below. This is because one-click installers often include outdated platform-tools binaries, which may cause unusual errors during usage.
So, start by downloading the latest tools package according to your PC’s operating system:
Once you have downloaded the tools, extract the contents of the ZIP package to get the “platform-tools” folder. This folder contains the binary files of the required tools, such as ADB and Fastboot.
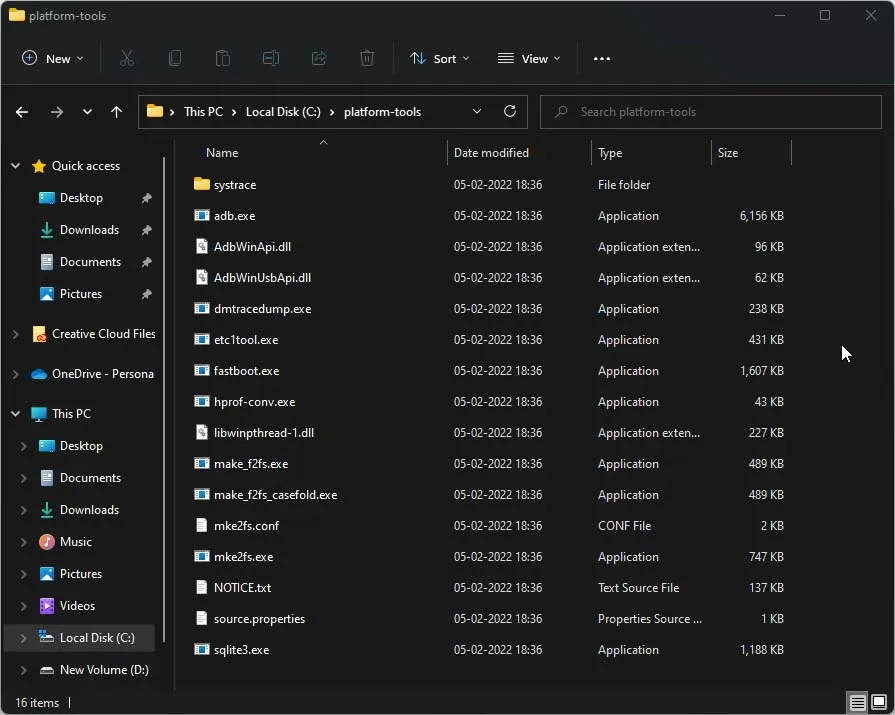
For quick access, I suggest moving the “platform-tools” folder to the root of the C:\ drive if you’re using a Windows computer, or inside the “Documents” directory if you’re operating on macOS/Linux.
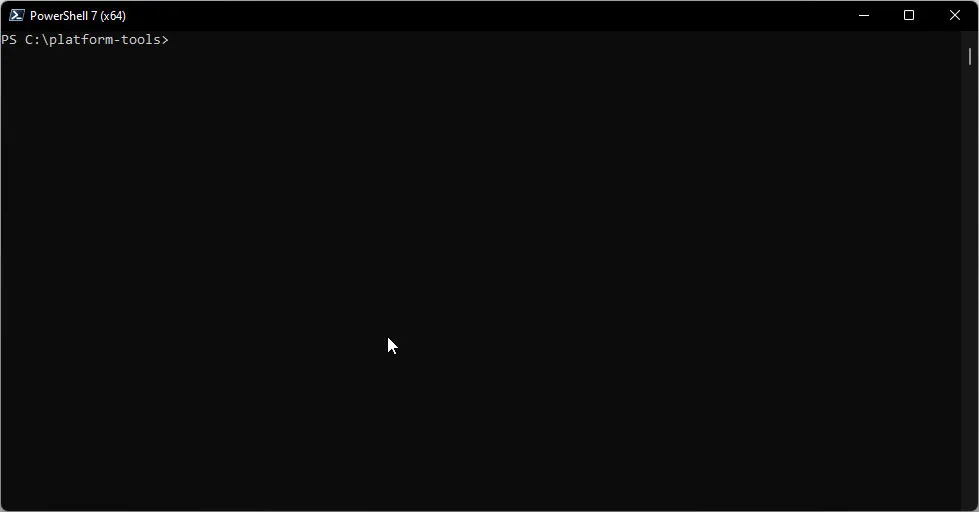
Step 2: Open the command-line window
With the required tools set up, you now need to launch the command-line window inside the working directory (the ‘platform-tools’ folder).
An alternative to this step is to add the platform-tools to your computer’s PATH. This way, you would be able to open the command-line window and use the Fastboot (and ADB) commands from any directory of your computer.
I have covered a short guide on how to open Fastboot command-window inside the Platform-tools folder. So, head over to the tutorial, follow the steps and come back here when done.
Basic command-line usage:
When entering the commands, make sure to prepend them with a dot and backslash .\ in Windows PowerShell, and a dot and forward slash ./ in Mac/Linux Terminal.
Step 3: Enable OEM unlocking
The next step of the process is to enable the OEM unlocking toggle on your OnePlus phone.
As I mentioned earlier, the bootloader is guarded by the OEM unlocking switch that controls whether or not your OnePlus phone will accept the bootloader unlock command. Under the hood, OEM unlocking sets the get_unlock_ability from 0 (don’t allow) to 1 (allow unlock command).
The OEM unlocking toggle can be located inside the Developer Options menu of the Settings, which in itself is hidden to avoid accidental access.
So go to “Settings” > “About phone” and repeatedly tap the “Build number” five times. Enter your phone’s lock screen password/PIN/pattern if prompt. You should see the “You are now a developer!” toast notification on the screen.
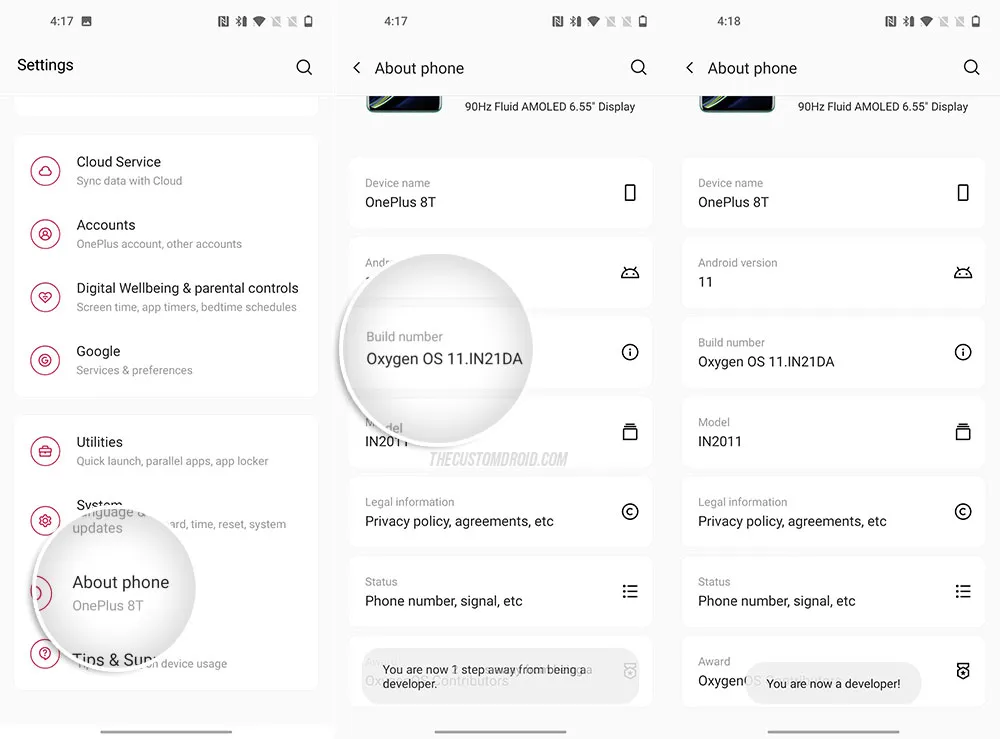
Now access the Developer options screen by going to “Settings” > “System” > “Developer options”. Then scroll down through the options to locate the OEM unlocking toggle and turn it ON. You should see a confirmation prompt on the screen to Allow OEM Unlocking. Finally, select “Enable” to activate OEM unlocking on your OnePlus phone.

Tip: If OEM unlock is missing or greyed out, make sure that you have logged into your Google account and connected your phone to the internet via WiFi or mobile data.
With the toggle enabled, your phone will now accept the bootloader unlock command.
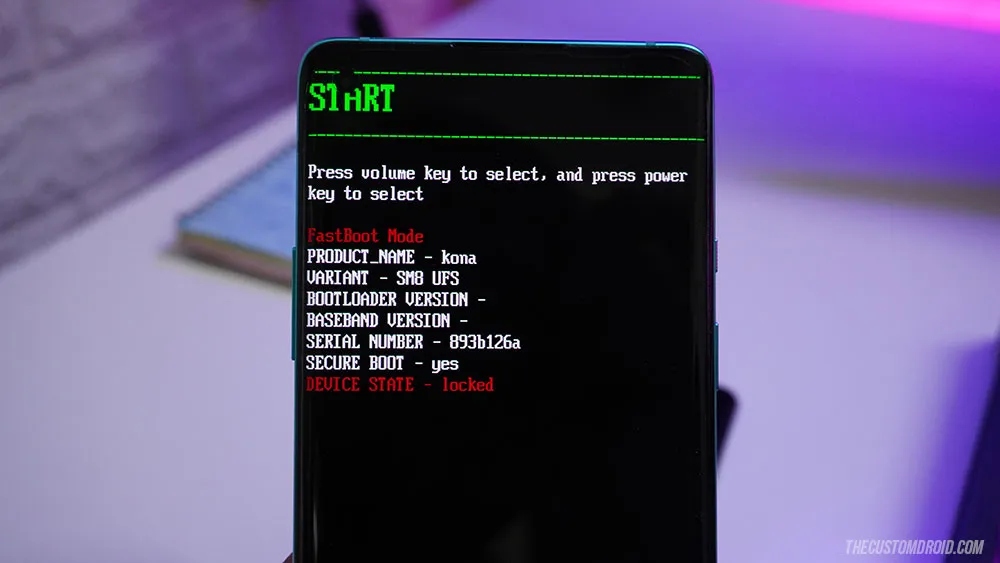
Step 4: Boot your OnePlus phone into Fastboot mode
The Fastboot tool can only establish a connection with your OnePlus phone and accept commands while it is in “Fastboot Mode” (also sometimes referred to as the “Bootloader Mode”).
There are a couple of different ways to enter Fastboot Mode on OnePlus phones. While you will only need one, I have covered all of them below for informational purpose.
By using the physical key combination
The first way to enter Fastboot Mode is by pressing and holding a combination of physical keys on your phone.
While it may seem a little intimidating at first, this method is what I would recommend. Why? This is the only method that will work while your phone is switched off and is extremely resourceful if your phone cannot boot into the OS, or is in a bootloop. It isn’t a requirement for this specific tutorial, but might come in handy otherwise.
Begin by powering off your phone completely. Then hold the physical key combination to boot your OnePlus phone into Fastboot Mode. Refer to the table below for the exact key combination for your particular device.
<div class=“table-wrapper”>
| OnePlus 10 Pro | - |
| OnePlus 9, OnePlus 9 Pro, OnePlus 9R, OnePlus 9RT | Volume Up + Power |
| OnePlus 8, OnePlus 8 Pro, OnePlus 8T | Volume Up + Volume Down + Power |
| OnePlus 7, OnePlus 7 Pro, OnePlus 7T, OnePlus 7T Pro | Volume Up + Volume Down + Power |
| OnePlus 6, OnePlus 6T | Volume Down + Power |
| OnePlus 5, OnePlus 5T | Volume Up + Power |
| OnePlus 3, OnePlus 3T | Volume Up + Power |
| OnePlus 2 | Volume Up + Power |
| OnePlus X | Volume Up + Power |
| OnePlus One | Volume Up + Power |
| OnePlus Nord, OnePlus Nord N10, OnePlus Nord CE, OnePlus Nord 2 | Volume Up + Volume Down + Power |
</div>
By using ADB command
The second way to enter Fastboot Mode is by sending an ADB command from your computer. To do this:
-
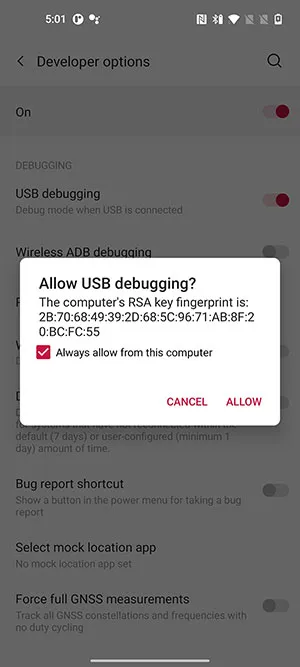
First, enable USB debugging inside Developer Options
-
Connect your phone to the computer via the USB cable
-
Open the command-line window and enter the following command verify the ADB connection:
adb devices -
Press “Allow” when prompted to allow allow USB debugging
-
Enter the following ADB command to boot your OnePlus phone into Fastboot Mode:
adb reboot bootloader
Your phone should instantly reboot and enter Fastboot Mode.
By using the advanced reboot menu
OxygenOS includes a nifty little feature known as the Advanced Reboot menu. It allows you to boot your OnePlus phone into Fastboot (and Recovery) mode with just a few taps. This menu is disabled out-of-the-box and needs to be enabled manually.
To enter Fastboot Mode using the Advanced Reboot menu:
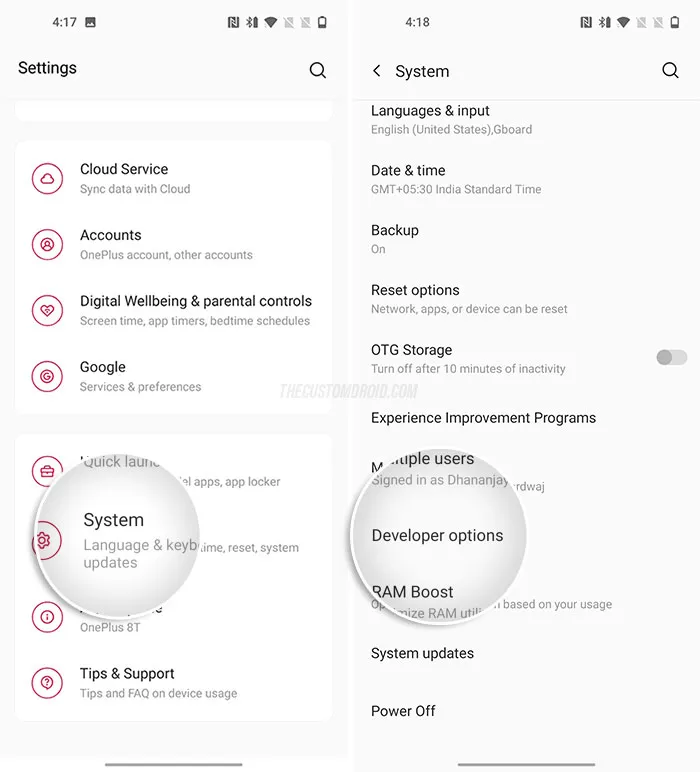
- Go to Settings > System > Developer options on your OnePlus phone
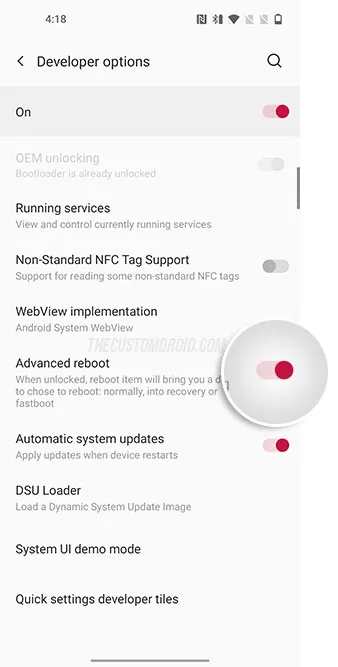
- Locate the “Advanced reboot” toggle and turn it on
- Once enabled, hold the Power key to bring up the power menu
- Then press “Bootloader” to reboot and enter Fastboot mode.
Note: The power menu was redesigned in Android 11 and above. If your phone has Android 11 or later installed, you will need to press the 3-dots on the top-right of the power menu to reveal the advanced reboot options (after pointer #3).
Step 5: Connect the phone to the PC and verify connection
With your phone in Fastboot mode, connect it to the computer using a compatible USB cable.
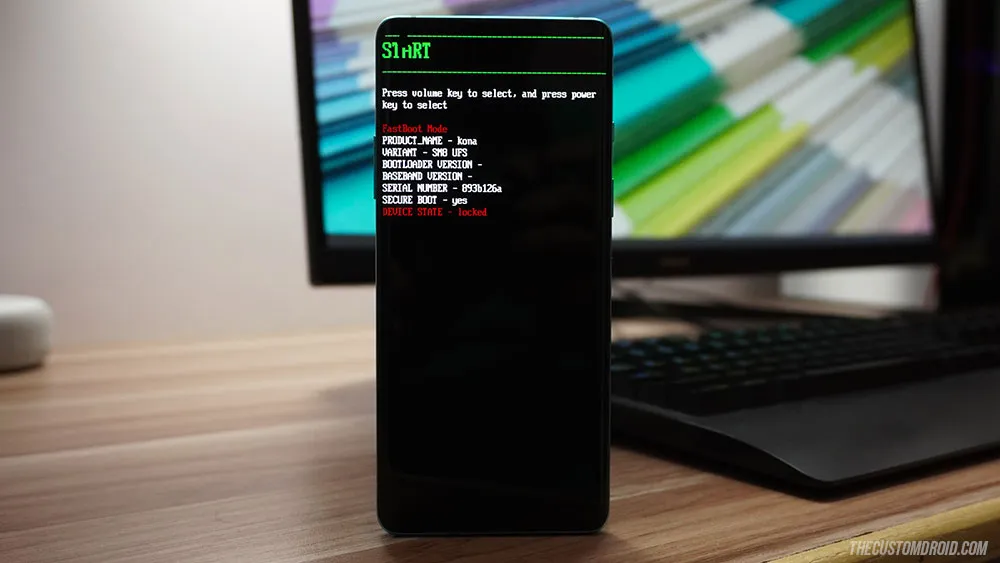
Now let us verify the connection and ensure that your PC can communicate with your OnePlus device over the Fastboot/bootloader interface. To do this, go to the command-line window that you opened in step #2, input the following command and hit enter:
fastboot devicesThe command should return a unique identifier of your phone along with the corresponding “fastboot” message just like shown in the image below.
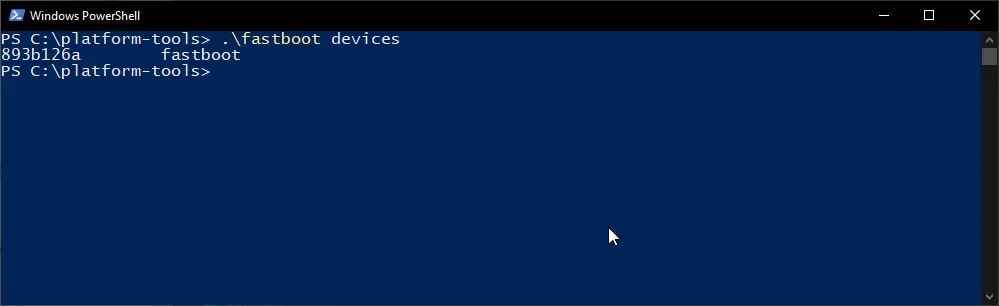
If you’re presented with a blank output, it means that your computer could not recognized your phone over fastboot. This should require some simple troubleshooting at your end.
Below are a few things that I would suggest checking:
- If you’re using a Windows computer, install the OnePlus USB drivers manually and reboot your PC.
- Try switching to a different USB cable for connecting your phone to the computer.
- USB 3.0/3.1/3.2 could sometimes cause issues with fastboot connections. Try using a USB 2.0 port in that case.
Once you have checked for the above, enter the fastboot devices command while your phone is connected and make sure that the output includes a device ID.
Step 6: Unlock the bootloader using Fastboot
This brings us down to the last step, that is, to finally unlock the bootloader on your OnePlus phone using Fastboot. So, go to the command-line window and initiate the bootloader unlock by entering the following Fastboot command:
fastboot flashing unlock
Important note: The fastboot flashing unlock command will not work on older phones such as the OnePlus 3 series, OnePlus 2, OnePlus X, and OnePlus One.
For these devices, you will need to use the fastboot oem unlock command to unlock the bootloader. Further, you will also not get any confirmation message while using this command.
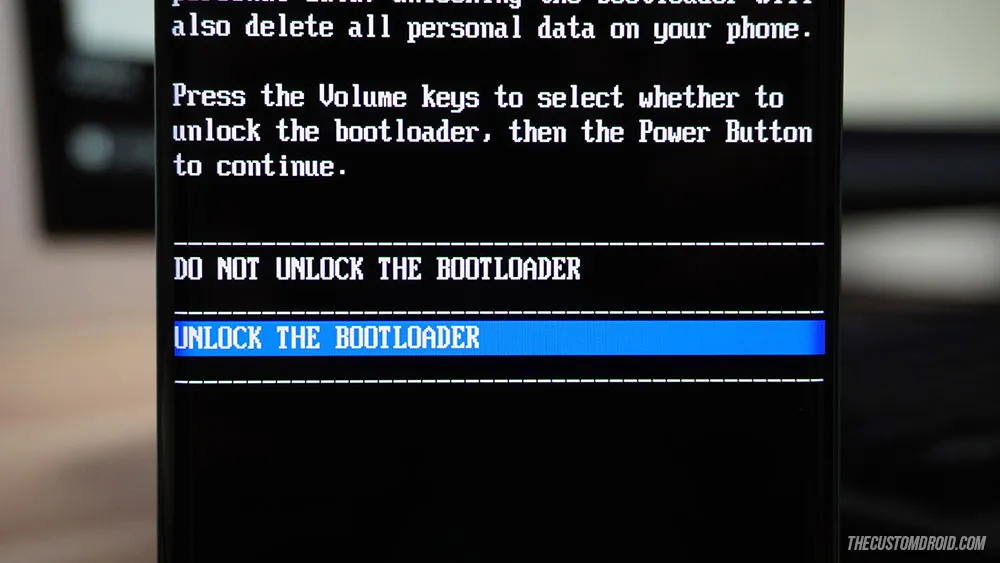
As soon as the command is executed, your phone should display a confirmation prompt on the screen. Simply press the Volume keys to move the selector to “UNLOCK THE BOOTLOADER” and press the power key to confirm.
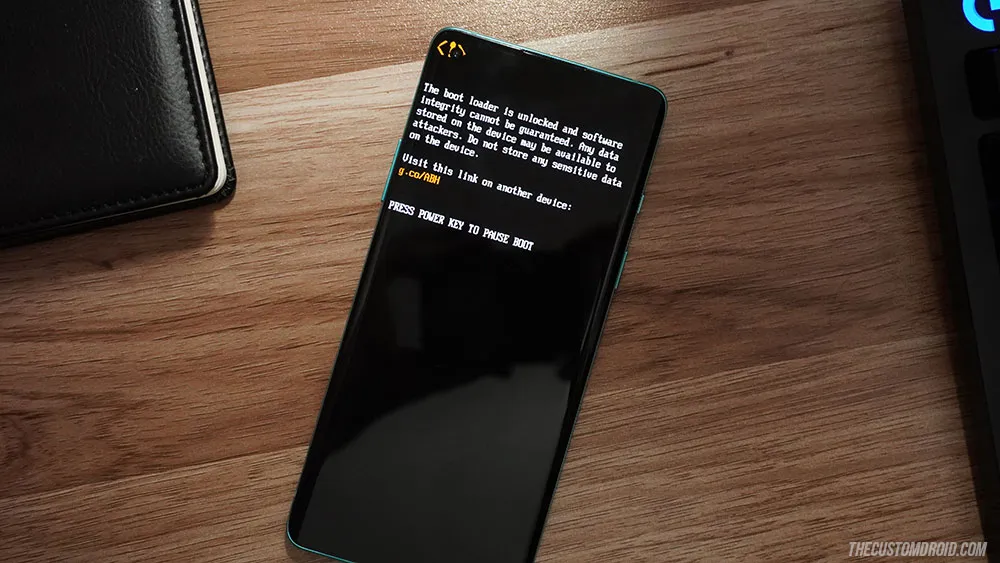
That’s it! The bootloader of your OnePlus phone is now unlocked and it should automatically reboot into the OS.
You will also see the unlocked bootloader warning message during the initial boot process. This is a mandatory warning and completely normal. The only way to get rid of this warning message is by relocking the bootloader, which is not something you would want to do if you plan on installing TWRP, custom ROMs, rooting the phone, etc.
Relock the bootloader on OnePlus phones
Things like custom ROMs and rooting are all too great and exciting. But there are times you may feel like reverting your OnePlus phone to its factory state by unrooting and/or installing the stock OxygenOS software. After doing so, you would want to go ahead and also relock your phone’s bootloader.
Locking the bootloader again will ensure the software’s integrity and prevent unauthorized flashing of the software in case it is ever lost or stolen.
Important Note: Do not attempt to relock the bootloader unless you have made sure that the phone is running the stock OxygenOS software without any sorts of modifications like TWRP, root, custom ROMs, etc whatsoever.
To relock the bootloader of your OnePlus phone:
-
Power off your phone and boot it into Fastboot Mode.
-
Connect it to your computer using the USB cable.
-
Launch the command-line inside the platform-tools folder.
-
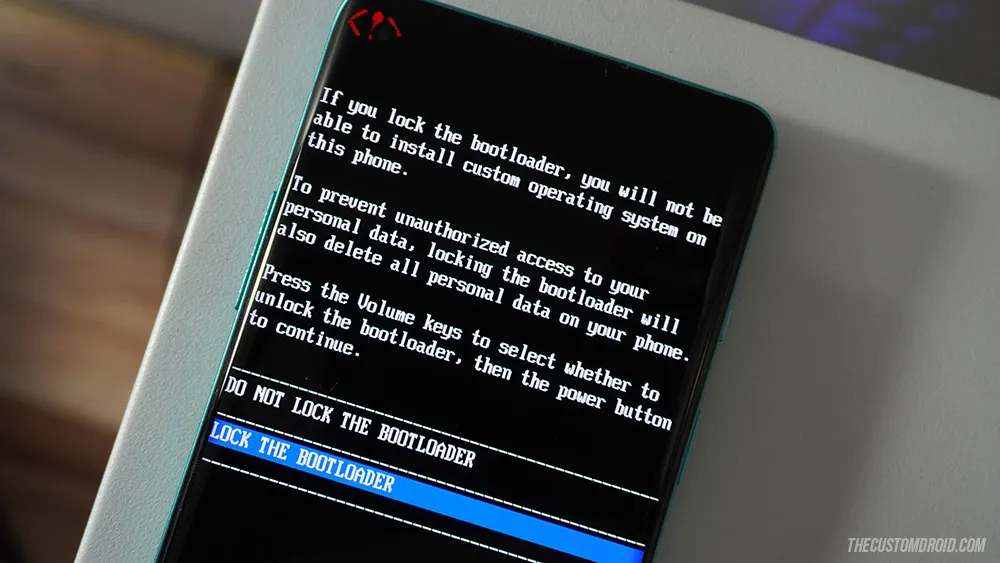
Enter the following Fastboot command to initiate the bootloader locking process:
fastboot flashing lock -
As soon as the command is executed, you should see a confirmation prompt on your phone’s screen. Use the Volume keys to select “LOCK THE BOOTLOADER” and press the power button to confirm and finally lock the bootloader on your OnePlus phone.
Important note: You will need to use the fastboot oem lock command to relock the bootloader on older phones such as the OnePlus 3 series, OnePlus 2, OnePlus X, and OnePlus One.
Your phone should reboot into the operating system. Just like unlocking, relocking the bootloader factory resets your phone as well. So you will need to set it up again by going through the initial setup.
Conclusion
So this guide took you through the complete process of unlocking the bootloader on OnePlus phones. With an unlocked bootloader, you can now make your way to rooting, custom ROMs and kernels, other software mods, and customize your phone’s UI, performance, and features the way you like.
If you’re new to the whole scene, it will be a lot to grasp at once. I would suggest starting off with something as simple as rooting with the stock OxygenOS software installed. Then slowly learn and move towards more advanced things like custom recoveries, ROMs, and kernels.
We also shared how you could easily relock your phone’s bootloader should you want to do it. But like I mentioned earlier, do not relock before ensuring that your phone’s running stock OxygenOS with no modifications done to the software.
On a personal note, please excuse the length of this guide. I know it’s quite long given how fairly simple the process is. But as I said, I wanted this guide to be comprehensive, and understandable enough at the same time for everybody regardless of the level of their experience in the field.
I hope it was helpful to you. If you feel there’s anything that could be improved, added, or removed with regards to this guide, please share your feedback. And do not hesitate to comment if you have any questions, or if you face any problems while following the instructions.
Comments
Comments are moderated, and published only if they are relevant to the topic and add value in a constructive way. If you disagree with something, please be polite and respectful. We suggest you read our comment policy before commenting.