Enable Always-on Display on Any OnePlus Phone using OPAodMod Xposed Module
A complete guide on how to enable customizable Always-On Display feature on any rooted OnePlus phone using OPAodMod Xposed Module.

On this page
OnePlus users can now enable the Always-On Display feature on their rooted phones using the OPAodMod Xposed module. In this detailed guide, you will learn more about the said module, its features, and how to use it to enable Always-On Display on any rooted OnePlus phone running OxygenOS or HydrogenOS.
What is it with OnePlus and Always-On Display?
OnePlus’ OxygenOS software has always been known best for providing a proper balance between stability and customization. Well, the latter depends heavily on the former, as any feature that the company already has or wants to implement in the OxygenOS software has to be absolutely stable and shouldn’t affect the phone’s performance or user experience in any manner.
That’s one strong reason why the OnePlus never actually added the highly-demanded Always-On Display (Known as ‘AOD’ for short) feature on any of their phones. Don’t know what the feature is or what it does? Always-On Display is a software feature that allows supported Android devices to show brief information like time, notifications, events, weather, etc on while the device is asleep (Wikipedia). So, you will not miss any important information even if the phone’s display is turned off.
Though all OnePlus phones are equipped with a decent AMOLED display, they still haven’t got the AOD feature as it could occasionally have an adverse effect on battery life. OnePlus 6 is an evident proof of the same. The company added this feature on the phone initially but removed it later via a software update due to battery concerns.
On the official front, that’s about to change as the company has finally confirmed that AOD will finally be arriving on supported OnePlus phones through OxygenOS this year. The exact time of arrival is still unknown, but it’s coming, that’s for sure.
Update: OnePlus has finally introduced Always-On Display as a mainstream feature with OxygenOS 11 (Android 11) on the OnePlus 8 series. Other devices like the OnePlus Nord, OnePlus 7/7T series, and OnePlus 6/6T will also get AOD with their respective OxygenOS 11 updates.
OPAodMod lets you enable Always-On Display on Rooted OnePlus Phones
Well, given the extreme popularity of the feature and its demand, the modding community has finally decided to come up with a solution of their own. So, if you’re eager on trying it, you can enable the Always-On Display feature on your OnePlus phone right now.
In the past, we have already seen a mod that would allow you to enable AOD and customize it as well. But the said mod(s) didn’t work universally on every OnePlus phone and were far from perfect.
XDA Recognized Developer/Contributor Quinny899 has been well-known among the modding community for his mods, including DarQ. The developer has now come up with OPAodMod (Certainly that’s short for OnePlus-Always-On-Display-Mod), which is an Xposed module that allows users to enable Always-On-Display on root OnePlus phones.
Features
The module further provides you with tons of options to customize and fine-tune the feature as per your liking. According to the information provided by the developer, the following are all the features offered by OPAodMod.
- Unlike OnePlus’ Ambient Display, the Always-On display runs all the time
- Ability to customize the layout with options including three digital clock styles, two-word clocks, and a DVD screensaver
- Notification display shows the notification text upon receiving and rolls back to an icon after a few seconds
- Option to display only when the phone is picked up/raised
- Option to hide the screen when flipped/in your pocket, disable it overnight, or after a time period (10 minutes or 15 seconds)
- Show the next alarm, current weather, and currently playing music
- Display the customizable lock screen message
- Full settings GUI for the module with a live preview of your clock
Going by the features mentioned above, the AOD feature enabled using this module is far better than what Google Pixel devices have or OnePlus could implement. Like we mentioned earlier, you can practically customize each and every part of the Always-On Display.
Supported Devices
This guide and the provided mod will work on the following OnePlus devices. The only requirement being that your device must be rooted.
- OnePlus 8 and OnePlus 8 Pro
- OnePlus 7/7T and OnePlus 7/7T Pro
- OnePlus 6 and OnePlus 6T
- OnePlus 5 and OnePlus 5T
Instructions to Enable Always-On Display on Any OnePlus Phone using OPAodMod
The instructions below will guide in a step-by-step manner on how to install OPAodMod Xposed Module and use it to enable the Always-On Display feature on your OnePlus phone.
STEP 1: The first step of the process is to root your OnePlus phone. This is required in order to install both the Xposed Framework as well as the OPAodMod module. If your phone is already rooted, you can head straight to step 2.
To root your phone, simply click on your device name listed below. This will take you to your device-specific rooting guide.
If any of the OnePlus phones haven’t been mentioned above, you could head over to your device’s section at XDA-Developers forum to learn how to root.
STEP 2: Now you need to install the Xposed (EdXposed) Framework on your OnePlus phone. To do this, open the Magisk Manager app, press the menu icon on the top left of the screen, and select ‘Downloads’.
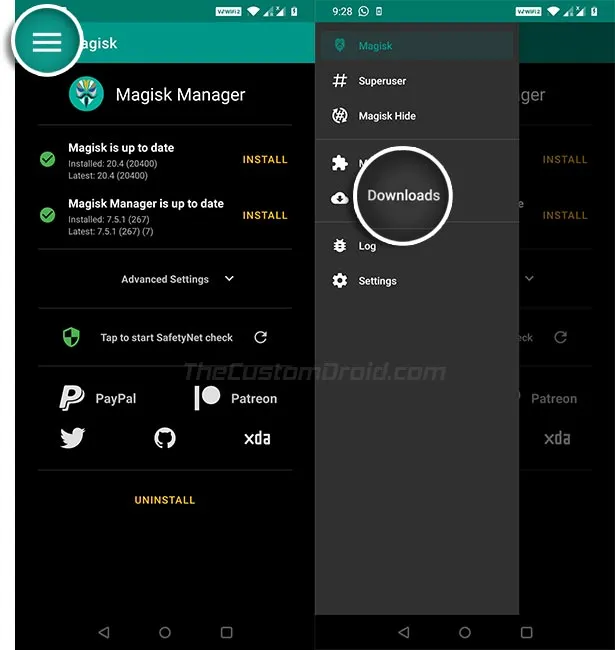
Press the search icon on the top and search the repository for ‘Riru’ module. Then press the download icon on the right and press ‘Install’ to install the module on your phone.
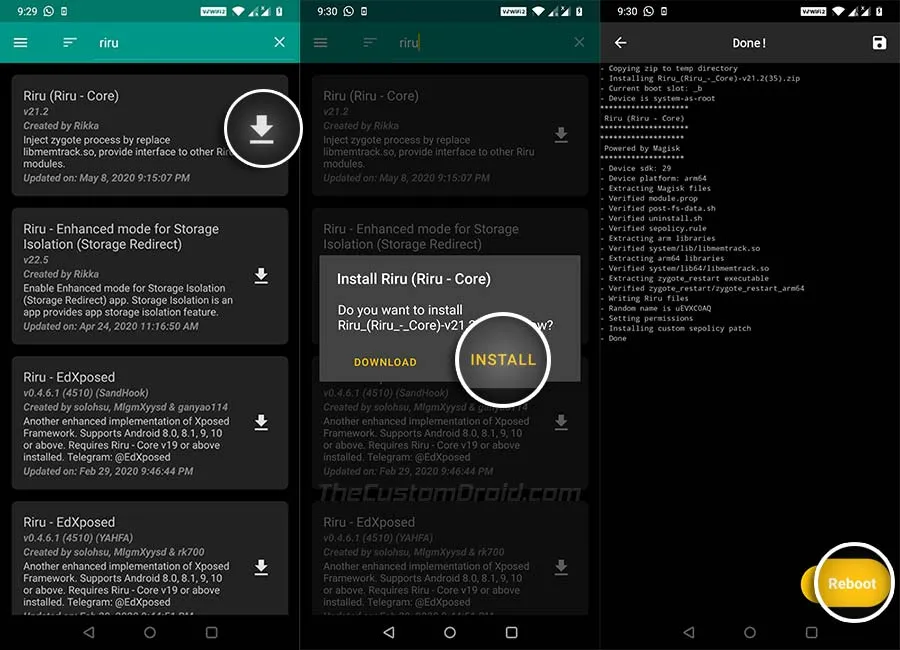
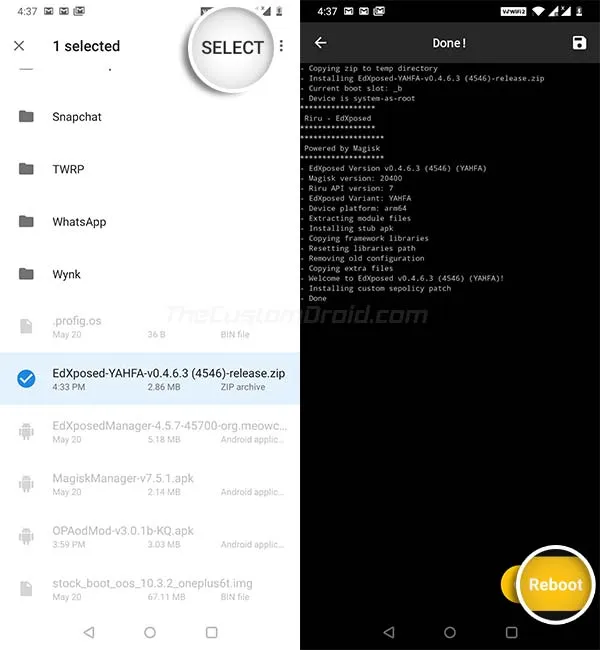
STEP 3: Next, download the latest Canary version of the “Riru - EdXposed” module (in ZIP file format) from GitHub to your OnePlus phone. Once downloaded, open the Magisk app, press the menu icon, and select “Modules”.
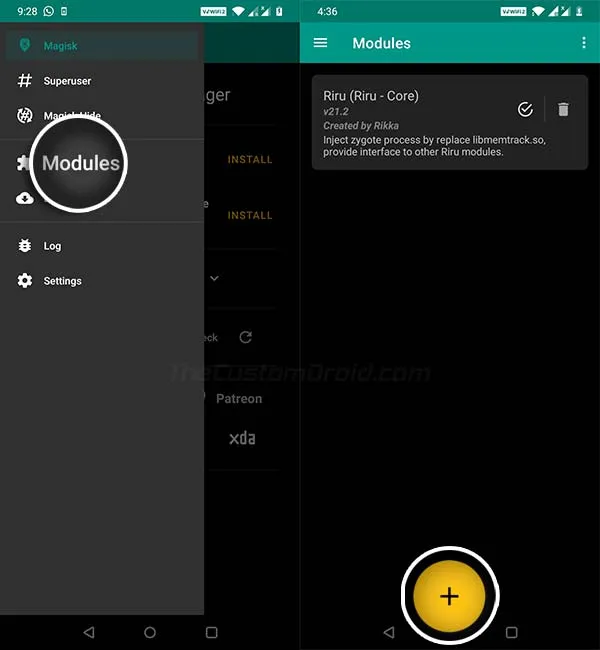
Then press the circular plus icon on the bottom, navigate to the folder where the module was downloaded, and select the EdXposed-YAHFA-v0.4.6.3 (4546)-release.zip file to install it.
STEP 4: At this point, you have the Xposed (EdXposed) Framework installed on your OnePlus phone. In order to manage the framework and its modules (like OPAodMod in this case), you will need the EdXposed Manager application. Download the APK file of the app from GitHub Releases page and install the APK on your phone.
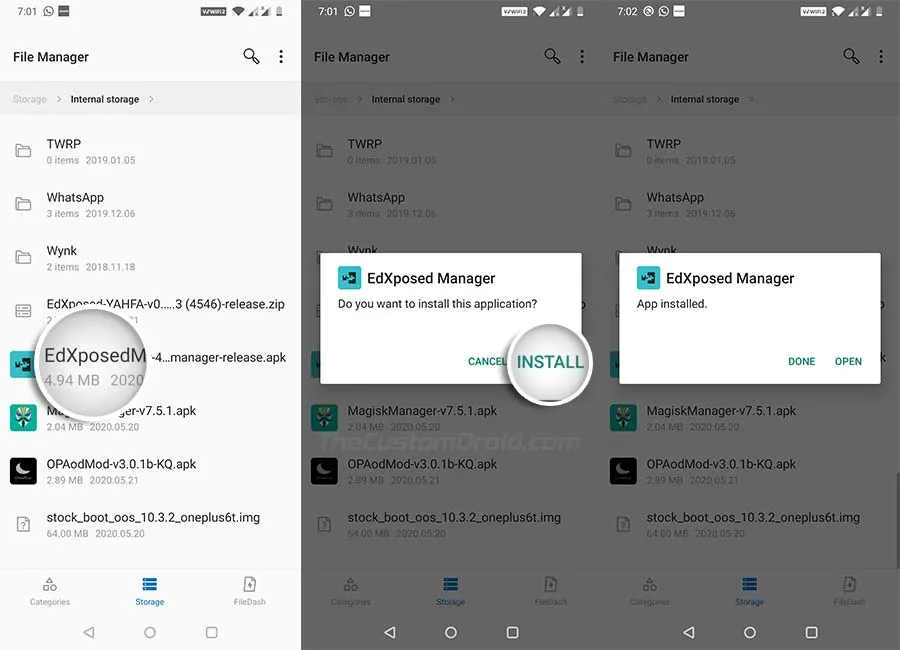
STEP 5: Your phone is now fully set up to install OPAodMod and use it to enable the Always-On Display feature. So, download the latest version of the OPAodMod module (OPAodMod-3.3-KQ.apk) from the official XDA thread. Install the module’s APK file on your phone using the File Manager.
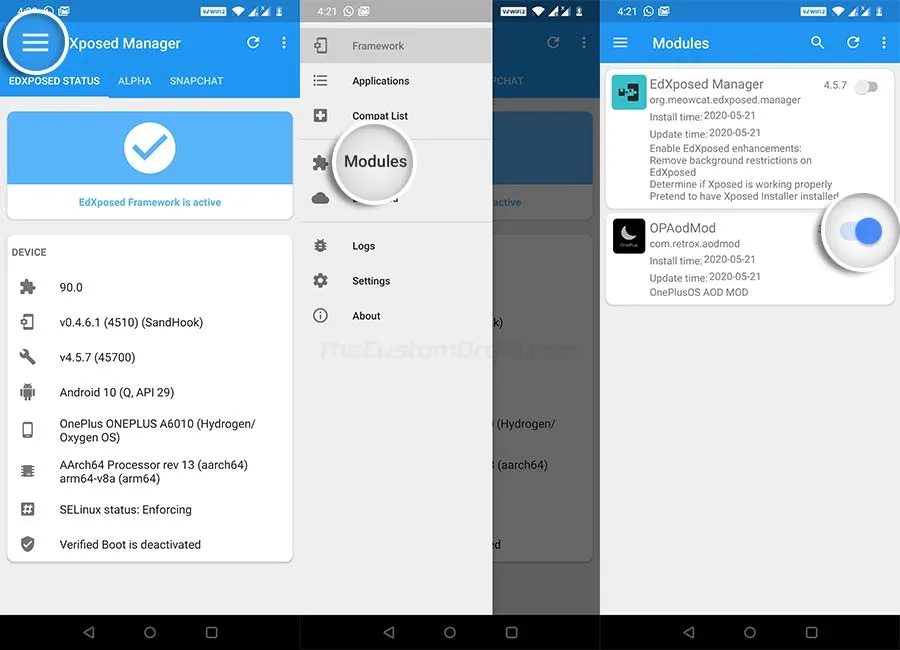
STEP 6: Go to the app drawer on your phone and launch the EdXposed Manager application. Then press the menu icon on the top left and select “Modules”. Finally enable the “OPAodMod” module by turning on the toggle next to it and reboot your phone. Once your phone reboots, the module should be active. You can confirm it by going to the “Modules” section of the EdXposed app.
That’s it! You have just enabled Always-On Display on your OnePlus phone. If you see any error messages in the EdXposed Manager or within the module settings, please refer to the Troubleshooting section towards the bottom of this post.
Using OPAodMod & Customizing Always-On Display
Like we mentioned earlier, OPAodMod not only allows you to enable Always-On Display but also gives you options to customize its complete UI of the AOD screen.
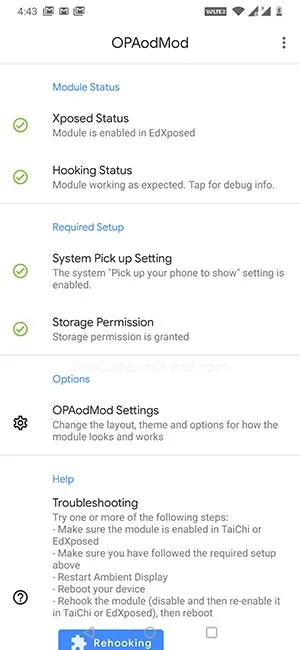
So, go to your phone’s app drawer and launch the OPAodMod module. On the module’s main screen, you will find info like its status and required permissions. If there’s any problem with the setup of the module, it will be shown on this screen.
If you scroll down a bit, you will find “OPAodMod Settings” which is the actual hub for all the customization options that are available. Once you tap on it, you will see four different tabs and each of these tabs allow you to customize different parts/elements of the Always-On Display screen, as listed below.
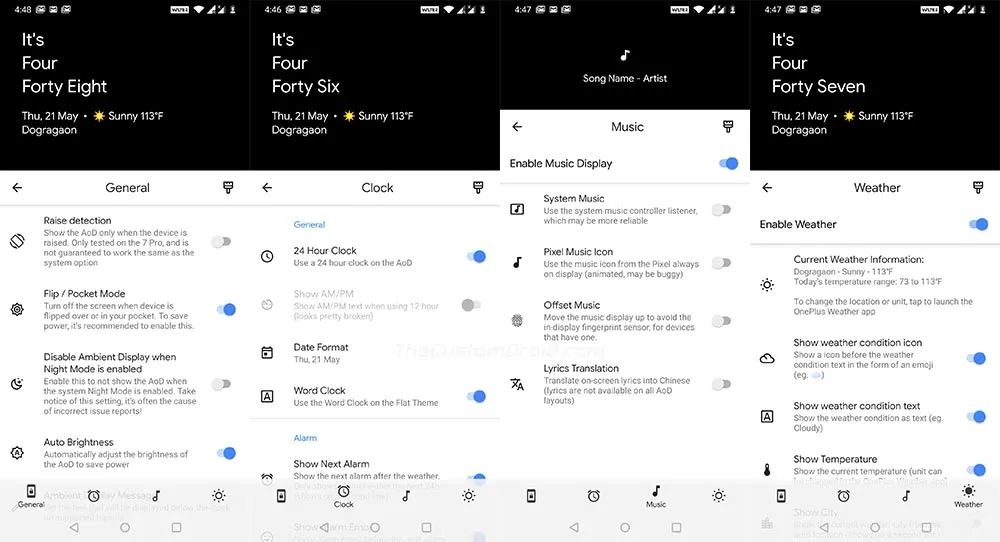
- General: Allows you to change AOD’s behavior like Raise Detection, Pocket Mode, brightness, disable Ambient Display when Night Mode is enabled, and more.
- Clock: Allows you to change the clock type, style, format, date, option to show the next alarm, and more.
- Music: Customize the music display to use the system music controller listener, to show the Pixel-like music icon, and offset the music display to prevent contradictions with phones that have an in-display fingerprint sensor.
- Weather: Allows you to show/hide weather icon, condition, temperature, city, and more.
The top of the screen will also show a live preview of the AOD screen and reflect any changes you make in the settings, which is quite convenient.
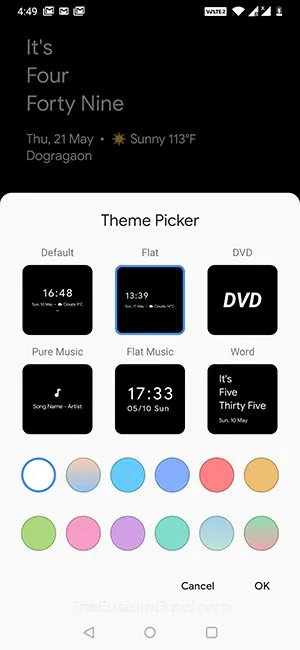
That’s not it! If you press the brush icon on the right of the tab’s text, you will get access to the “Theme Picker”. Through these options, you will be able to pick a preset theme for the Always-on Display screen. You can also choose the color scheme of your choice.
There are certainly a lot of options for customization. As we said, it’s way more than what Google offers currently on the Pixel devices or what OnePlus will offer in the future.
Troubleshooting
Below, you will find the list of the most common issues/errors that you might encounter while installing and setting up the OPAodMod module, along with their plausible fixes/solutions.
Issue 1
-
Problem: EdXposed Manager shows that “Xposed Framework is installed but not active”
-
Solution: Simply clear the app’s data, uninstall EdXposed Manager, and then reinstall it.
Issue 2
-
Problem: “Hooking status” in the module shows “The always-on display has not been hooked yet”.
-
Solution: This could be primarily caused if you have not installed the Canary version of the ‘Riru - EdXposed’ module, which is highly recommended. If you did install the canary version and the module still shows the error, you might want to disable and re-enable the OPAodMod module in the EdXposed Manager and reboot your phone. Some times, an additional reboot further could fix this issue, as in our case.
Issue 3
-
Problem: “Storage Permission” in the module shows “The storage permission must be granted to store global settings on your device”
-
Solution: While this may not prevent AOD from working, but you would not be able to change any settings. So just tap on the section and allow storage permissions to the module through the instructions displayed on the screen.
Issue 4
-
Problem: Always-On Display doesn’t work even after properly configuring OPAodMod without any of the above errors
-
Solution: After you have properly set up the module, make sure to reboot your phone. If it still doesn’t work, try disabling ‘Raise Detection’ in the OPAodMod Settings menu and reboot the phone again.
So there you go! You have learned how to enable the Always-On Display feature on any rooted OnePlus phone using the OPAodMod Xposed Module. We would like to extend our thanks to developer Quinny899 for developing such a simple yet powerful AOD solution for existing OnePlus phones. If you really like his work, please head over to the official XDA thread to thank him.
If you face any problems while following the instructions in this guide, please feel free to let us know via the comments. Please make sure that you provide your device name and installed OxygenOS/HydrogenOS version. This will make it easier for us to help you.
More for OnePlus users:
Source: XDA-Developers
Comments
Comments are moderated, and published only if they are relevant to the topic and add value in a constructive way. If you disagree with something, please be polite and respectful. We suggest you read our comment policy before commenting.