
On this page
In this guide, I will show you how to root OnePlus 8 and OnePlus 8 Pro using Magisk, without having to install TWRP recovery at all. Further, we will also show you how to install OxygenOS OTA updates on your rooted phone. These instructions will work on any OnePlus 8/8 Pro running Android 13 (OxygenOS 13), Android 12 (OxygenOS 12), Android 11 (OxygenOS 11), or Android 10 (OxygenOS 10).
Rooting your phone with Magisk not only allows you to use root applications but also enables you to apply modifications to your phone’s software systemless-ly. That is without actually mounting or altering the system partition. We have already covered a detailed tutorial on how to install TWRP on OnePlus 8 series and root the phone using it.
However, if you do not plan on flashing custom ROMs and just want to root your phone, then installing TWRP isn’t even necessary. If you wish to flash custom ROMs, you could simply boot TWRP temporarily (using the fastboot boot command) and use it to install ROMs or anything else for that matter.
For those who do not know – it is possible to install Magisk and root your phone without installing TWRP at all. This could be done using what we call the “Magisk Patched Boot method”. This method of rooting involves patching the stock boot image file with the Magisk app and then flashing the resultant patched boot image to the phone via Fastboot.
This simply makes the whole rooting process much more straightforward, less time-consuming, and also enables you to take OTA updates on your OnePlus 8 after rooting, with ease.
So now, without any further ado, let us begin with the instructions.
Also read: Google Camera Port for OnePlus 8 Series – Comparison, Download, and Instructions
Requirements
- A Windows, Linux, or Mac PC
- A compatible USB cable, preferably the one that came in the box.
- Take a backup of all the important data stored on your phone. Although performing the instructions in this guide will not erase any data, it’s a good practice to safeguard it in case anything unusual happens. If you need, take a look at our detailed tutorial on how to take a backup.
- In order to root, your OnePlus 8/8 Pro must have an unlocked bootloader. If it’s not, then follow the instructions in this guide on how to unlock the bootloader and come back here once done.
- If you’re using a Windows computer, install the latest OnePlus USB drivers on it.
Instructions to Root OnePlus 8 and OnePlus Pro using Magisk
As we mentioned earlier, rooting your OnePlus 8 device without TWRP recovery could easily be done through the ‘Magisk Patched Boot’ method. We have split the complete process into four major steps so that it’s easier for you to understand and perform the instructions.
Step 1: Install Android SDK Platform-Tools on PC
The rooting process involves using the fastboot tool to flash the patched boot image. So, the first step is to download the Android SDK platform-tools (which includes fastboot) and install them on your PC.
To do this, download the latest version of the tools according to your PC’s operating system:
Once the platform-tools package has been downloaded, extract its contents on your PC. The extracted ‘platform-tools’ folder should contain the ADB, Fastboot, and other binary files.
Next, move the ‘platform-tools’ folder to an easily accessible location on your PC for installation. For example, move it to the C:\ drive if you’re using a Windows PC or inside the ‘Desktop’ directory on a Linux/Mac machine.
With the required tools now installed, launch the PowerShell/Terminal window on your PC inside the ‘platform-tools’ folder.
At this point, you have everything ready and set up on your PC for carrying out the flashing later during the steps. Keep the PowerShell/Terminal window open as you’ll need it later during the instructions.
Step 2: Download the Stock Boot Image
Now, the second step is to download the stock boot image for the OxygenOS version currently installed on your OnePlus 8/OnePlus 8 Pro. You can download boot images for all models and OxygenOS versions from this page.
Each boot image is packed inside a compressed ZIP package. So, make sure that you extract the ZIP to get the boot image (.img) file. Once extracted, copy the boot.img file inside the “Download” folder of your your phone’s internal storage. Although you can place the file anywhere on the internal storage, we prefer the Download folder so that it’s easier to locate.
Important notes:
- It is very important that you use the boot image that matches the OxygenOS version installed on your phone. Using and flashing a mismatching boot will result in a boot loop or things like WiFi/mobile network not working.
- It’s best to avoid using pre-patched boot images provided by others. When you self-patch the boot image in Magisk app, it takes and stores a backup of the stock boot, which is necessary for both uninstalling Magisk (unrooting), as well as for installing OTA updates after rooting. If you use a pre-patched boot, the Magisk app won’t be able to store a backup.
- Do not patch your OnePlus 8/8 Pro’s boot image on a different device. This is because Magisk defines configs based on the device it’s running on (Here’s the full explanation by John Wu).
Step 3: Patch Stock Boot Image with Magisk App
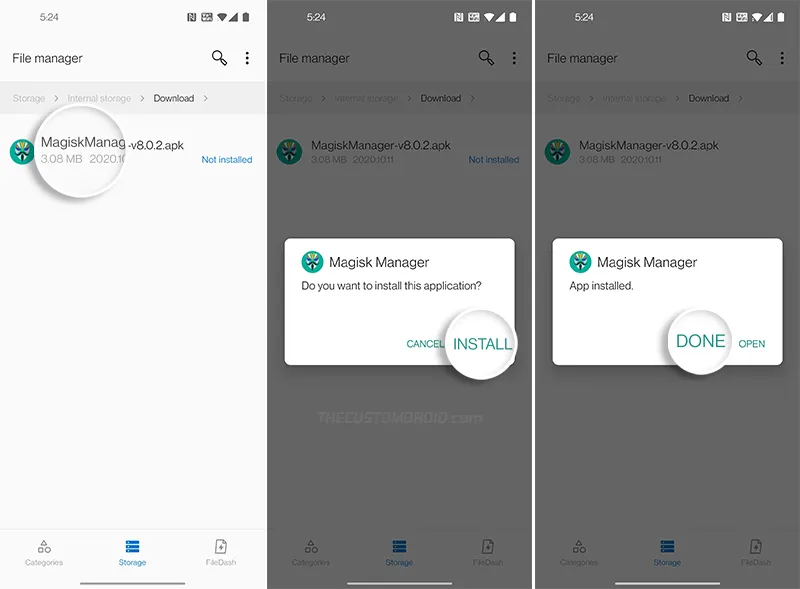
Now that you have your phone’s stock boot image, you will need to patch it using the official Magisk app. To do this, first download the latest version of Magisk app from Github directly to your phone.
Then, launch the file manager app and navigate to the folder where the APK file was downloaded. Tap on the APK file (e.g. Magisk-v25.2.apk) and press the ‘Install’ button to install the Magisk app on your OnePlus 8.
Once installed, launch the Magisk app, press the “Install” button and tap on “Select and Patch a File”. Then navigate to the “Download” folder and select the stock boot image file you transferred during step #2. Once the file has been selected, press “Let’s Go”.
- Note: If you have Android 11 installed on your OnePlus 8, you will need to change Magisk Manager’s Update Channel to “Beta” by going to the app’s settings. This is because Magisk v21.0 (that supports Android 11) is only available on the Public Beta channel (for now). Not needed anymore as Magisk v21.x has been published to the stable channel as well.
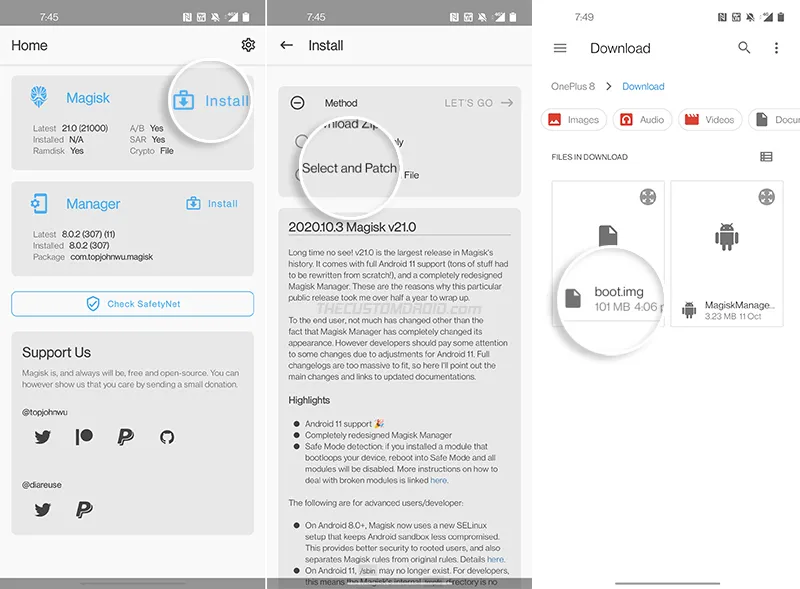
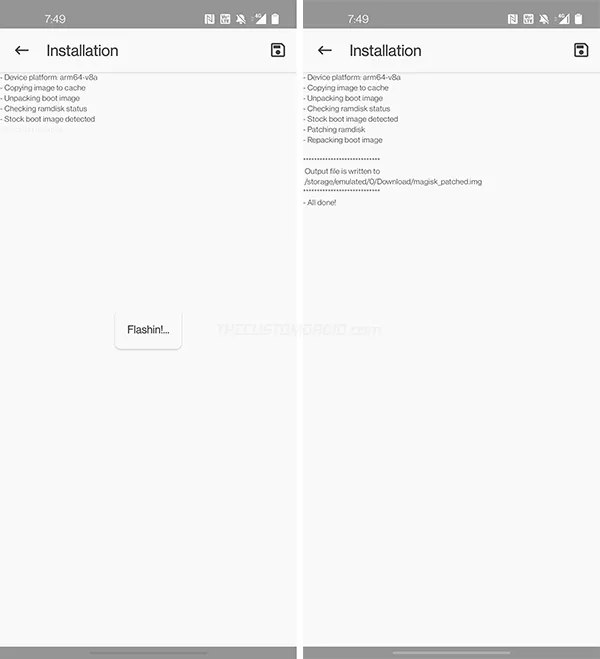
The app will patch the stock boot image with the latest version of Magisk. Once done, the patched boot image (magisk_patched.img) will be stored inside the “Download” folder of your phone’s internal storage.
Step 4: Flash the Patched Boot Image to root OnePlus 8/8 Pro
Now that you have the patched boot image, the fourth and last step is to flash the patched boot image to your OnePlus 8/OnePlus 8 Pro in order to root it.
Note: When entering the mentioned Fastboot commands, make sure to prepend them with a dot and backslash [.\] in Windows PowerShell or a dot and forward slash [./] on Mac/Linux Terminal. For reference, take a look at the figures below.
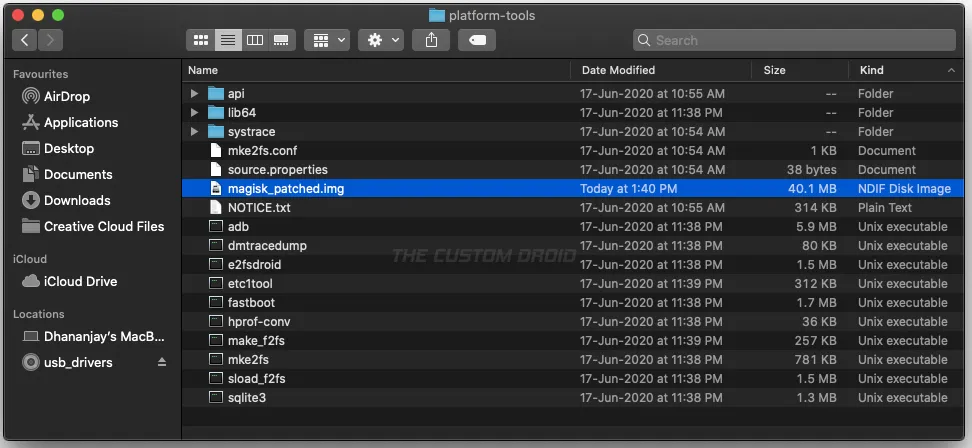
So first, transfer the ‘magisk_patched.img’ file from the ‘Download’ folder in the internal storage to the ‘platform-tools’ folder on your PC.
Next, boot your OnePlus 8/8 Pro into Fastboot Mode and connect it to your PC over USB.
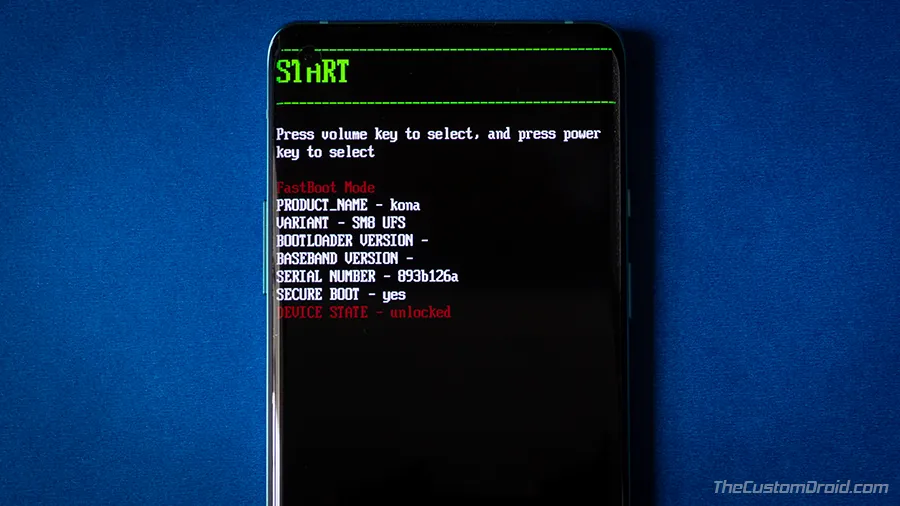
Now, enter the following command in the PowerShell/Terminal window to ensure that your PC can communicate with the phone over the fastboot interface.
fastboot devices
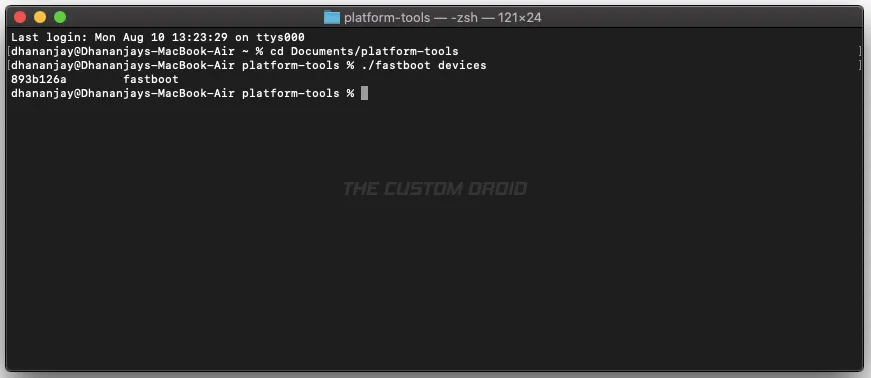
The command should return your phone’s unique ID. In case it doesn’t, then make sure that you have the required USB drivers installed and restart your PC.
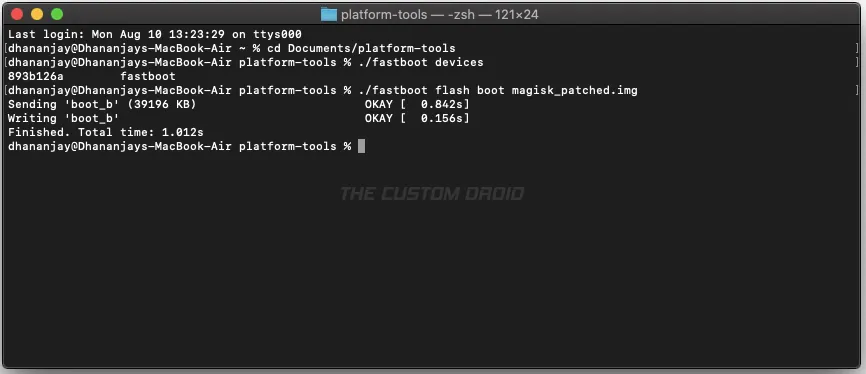
Finally, enter the mentioned fastboot command to flash the Magisk patched boot image and root your OnePlus 8/OnePlus 8 Pro.
fastboot flash boot magisk_patched.img
Once the file has been flashed, reboot the phone back into the system (OS) using the following command.
fastboot reboot
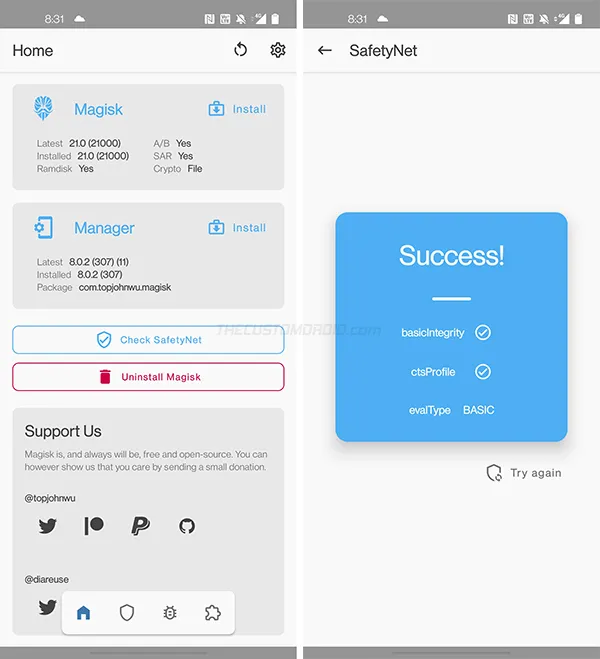
That’s it! Your phone should now be rooted with Magisk. You can verify this by launching the Magisk app and check the version of Magisk installed.
Now that your phone is rooted, you can install and use root applications such as Titanium Backup. You could also install modules to apply modifications to the software, systemless-ly.
Installing OxygenOS OTA Updates on Rooted OnePlus 8/8 Pro
Now that we are done with the rooting part, let’s talk about something that’s a major concern for every user after rooting their phone, i.e. OTA updates. On a traditional A-only device, installing OTA updates would require completely unrooting first.
However, with the new A/B partition system, it is possible to easily install OxygenOS OTA updates after rooting your OnePlus 8 series using Magisk. This also allows your phone to stay rooted even after installing the update so that users wouldn’t need to go through the trouble of rooting their phones again. You will find a more detailed explanation on this page.
To install OTA updates on your rooted OnePlus 8/8 Pro:
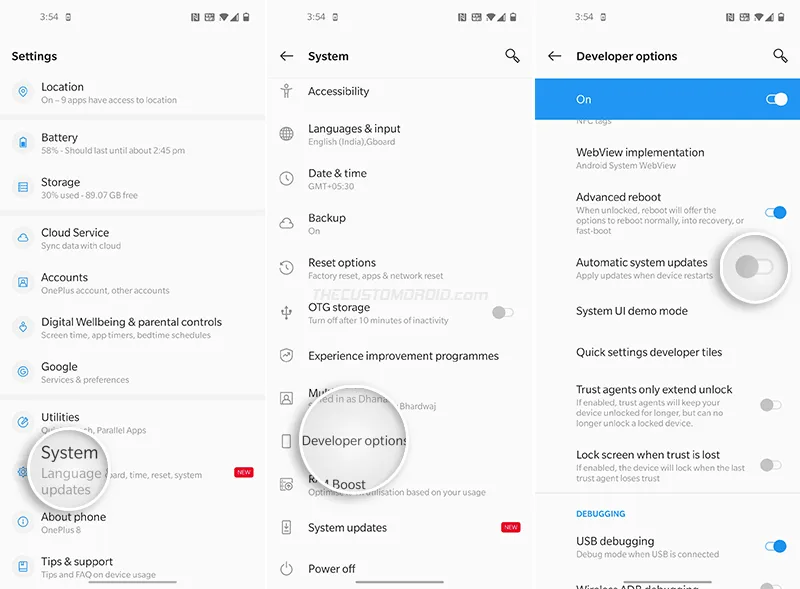
- First, enable the Developer Options screen on your phone.
- Go to “Settings” > “Developer options” and disable the “Automatic system updates” option. This will prevent your OnePlus 8 from automatically installing OTA updates in the background.
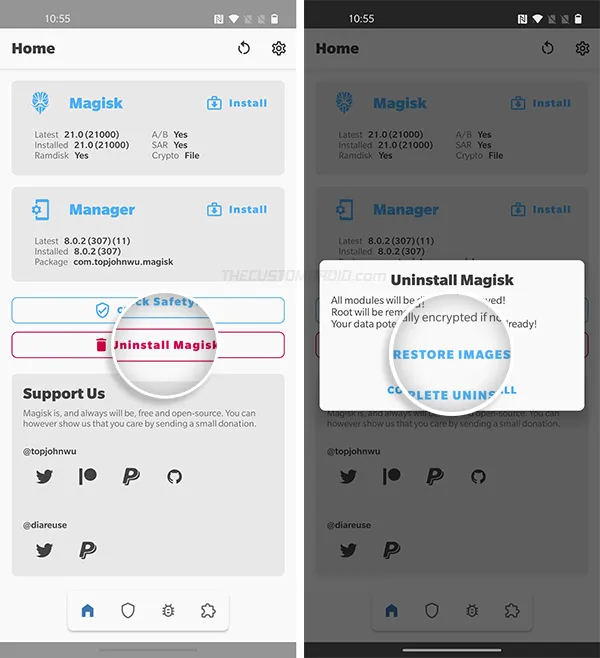
- Next, open the Magisk Manager application, select “Uninstall”, and choose the “Restore Images” option. Magisk will restore your phone’s stock boot image that was backed up during the rooting process.
- Now go to “Settings” > “System” > “System updates” and select “Download and Install Now” to install the OxygenOS OTA update on your rooted OnePlus 8/8 Pro.
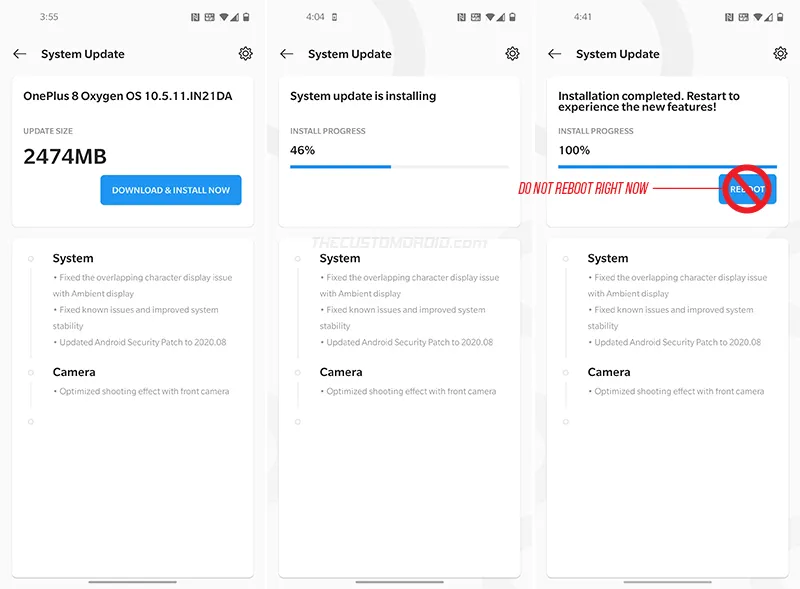
- After the update finishes, DO NOT REBOOT the phone. Since you restored the stock boot image, the root access will be lost if your reboot right now.
- Now open Magisk Manager again, press “Install” and select “Install to Inactive Slot (After OTA)” from the list of available methods.
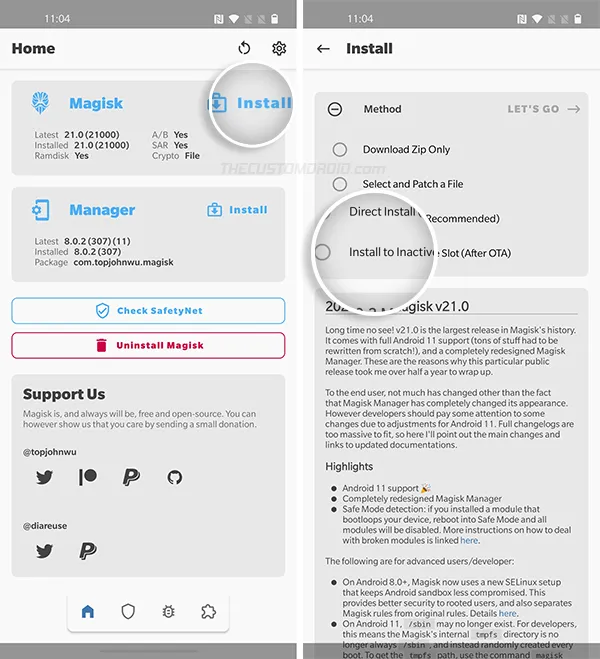
- Finally, select “Let’s Go” to confirm and install Magisk to the inactive slot (where the OxygenOS OTA has been installed).
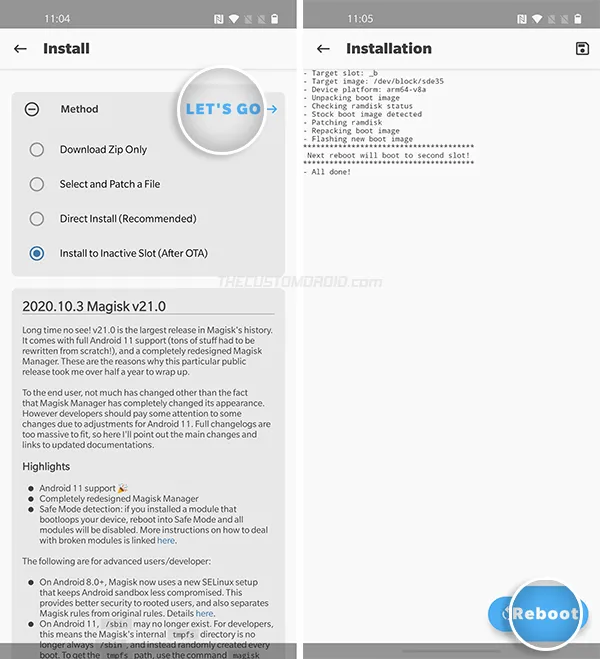
- After Magisk is installed, reboot your phone by pressing the ‘Reboot’ button.
Tip: In case the OTA installation fails at step #4 above and shows an error, you could alternatively download the latest OxygenOS OTA package and install it using Local Upgrade. Once done, follow step #5 onward.
That’s it! Your OnePlus 8/8 Pro will now boot into the updated OxygenOS software with Magisk root still intact. You can repeat this same process every time a new OxygenOS OTA update is available for your phone.
So by now, you have learned how to root the OnePlus 8 and OnePlus 8 Pro using Magisk, and also how to install OTA updates after rooting. If you have any questions or feel stuck while performing the instructions, let us know. Please make sure that you mention your device name, model number, as well as the OxygenOS version currently installed on the phone.
Comments
Comments are moderated, and published only if they are relevant to the topic and add value in a constructive way. If you disagree with something, please be polite and respectful. We suggest you read our comment policy before commenting.