In this guide, I will show you how to root OnePlus 8 and OnePlus 8 Pro using Magisk, without having to install TWRP recovery at all. Further, we will also show you how to install OxygenOS OTA updates on your rooted phone. These instructions will work on any OnePlus 8/8 Pro running Android 13 (OxygenOS 13), Android 12 (OxygenOS 12), Android 11 (OxygenOS 11), or Android 10 (OxygenOS 10).
Advertisement
Rooting your phone with Magisk not only allows you to use root applications but also enables you to apply modifications to your phone’s software systemless-ly. That is without actually mounting or altering the system partition. We have already covered a detailed tutorial on how to install TWRP on OnePlus 8 series and root the phone using it.
However, if you do not plan on flashing custom ROMs and just want to root your phone, then installing TWRP isn’t even necessary. If you wish to flash custom ROMs, you could simply boot TWRP temporarily (using the fastboot boot command) and use it to install ROMs or anything else for that matter.
For those who do not know – it is possible to install Magisk and root your phone without installing TWRP at all. This could be done using what we call the “Magisk Patched Boot method“. This method of rooting involves patching the stock boot image file with the Magisk app and then flashing the resultant patched boot image to the phone via Fastboot.
Advertisement
This simply makes the whole rooting process much more straightforward, less time-consuming, and also enables you to take OTA updates on your OnePlus 8 after rooting, with ease.
So now, without any further ado, let us begin with the instructions.
Also read: Google Camera Port for OnePlus 8 Series – Comparison, Download, and Instructions
Page Contents
Requirements
- A Windows, Linux, or Mac PC
- A compatible USB cable, preferably the one that came in the box.
- Take a backup of all the important data stored on your phone. Although performing the instructions in this guide will not erase any data, it’s a good practice to safeguard it in case anything unusual happens. If you need, take a look at our detailed tutorial on how to take a backup.
- In order to root, your OnePlus 8/8 Pro must have an unlocked bootloader. If it’s not, then follow the instructions in this guide on how to unlock the bootloader and come back here once done.
- If you’re using a Windows computer, install the latest OnePlus USB drivers on it.
Instructions to Root OnePlus 8 and OnePlus Pro using Magisk
As we mentioned earlier, rooting your OnePlus 8 device without TWRP recovery could easily be done through the ‘Magisk Patched Boot’ method. We have split the complete process into four major steps so that it’s easier for you to understand and perform the instructions.
Step 1: Install Android SDK Platform-Tools on PC
The rooting process involves using the fastboot tool to flash the patched boot image. So, the first step is to download the Android SDK platform-tools (which includes fastboot) and install them on your PC.
To do this, download the latest version of the tools according to your PC’s operating system:
Once the platform-tools package has been downloaded, extract its contents on your PC. The extracted ‘platform-tools’ folder should contain the ADB, Fastboot, and other binary files.
Next, move the ‘platform-tools’ folder to an easily accessible location on your PC for installation. For example, move it to the C:\ drive if you’re using a Windows PC or inside the ‘Desktop’ directory on a Linux/Mac machine.
With the required tools now installed, launch the PowerShell/Terminal window on your PC inside the ‘platform-tools’ folder.
At this point, you have everything ready and set up on your PC for carrying out the flashing later during the steps. Keep the PowerShell/Terminal window open as you’ll need it later during the instructions.
Step 2: Download the Stock Boot Image
Now, the second step is to download the stock boot image for the OxygenOS version currently installed on your OnePlus 8/OnePlus 8 Pro. You can download boot images for all models and OxygenOS versions from this page.
Each boot image is packed inside a compressed ZIP package. So, make sure that you extract the ZIP to get the boot image (.img) file. Once extracted, copy the boot.img file inside the “Download” folder of your your phone’s internal storage. Although you can place the file anywhere on the internal storage, we prefer the Download folder so that it’s easier to locate.
Important notes:
- It is very important that you use the boot image that matches the OxygenOS version installed on your phone. Using and flashing a mismatching boot will result in a boot loop or things like WiFi/mobile network not working.
- It’s best to avoid using pre-patched boot images provided by others. When you self-patch the boot image in Magisk app, it takes and stores a backup of the stock boot, which is necessary for both uninstalling Magisk (unrooting), as well as for installing OTA updates after rooting. If you use a pre-patched boot, the Magisk app won’t be able to store a backup.
- Do not patch your OnePlus 8/8 Pro’s boot image on a different device. This is because Magisk defines configs based on the device it’s running on (Here’s the full explanation by John Wu).
Step 3: Patch Stock Boot Image with Magisk App
Now that you have your phone’s stock boot image, you will need to patch it using the official Magisk app. To do this, first download the latest version of Magisk app from Github directly to your phone.
Advertisement
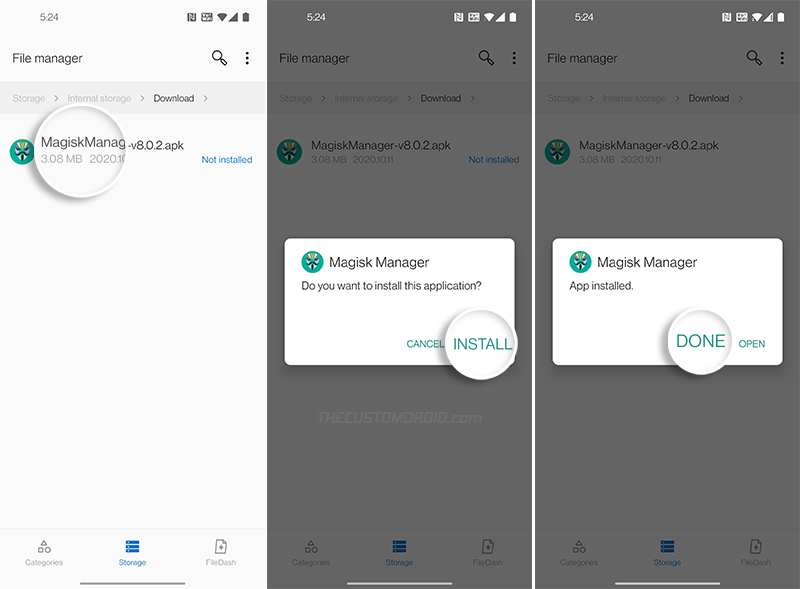
Then, launch the file manager app and navigate to the folder where the APK file was downloaded. Tap on the APK file (e.g. Magisk-v25.2.apk) and press the ‘Install’ button to install the Magisk app on your OnePlus 8.
Once installed, launch the Magisk app, press the “Install” button and tap on “Select and Patch a File”. Then navigate to the “Download” folder and select the stock boot image file you transferred during step #2. Once the file has been selected, press “Let’s Go”.
- Note:
If you have Android 11 installed on your OnePlus 8, you will need to change Magisk Manager’s Update Channel to “Beta” by going to the app’s settings. This is because Magisk v21.0 (that supports Android 11) is only available on the Public Beta channel (for now).Not needed anymore as Magisk v21.x has been published to the stable channel as well.
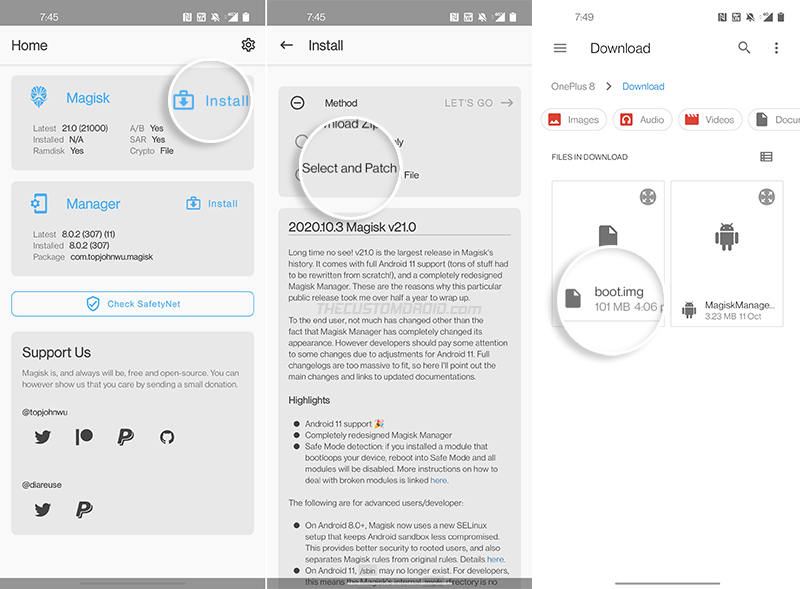
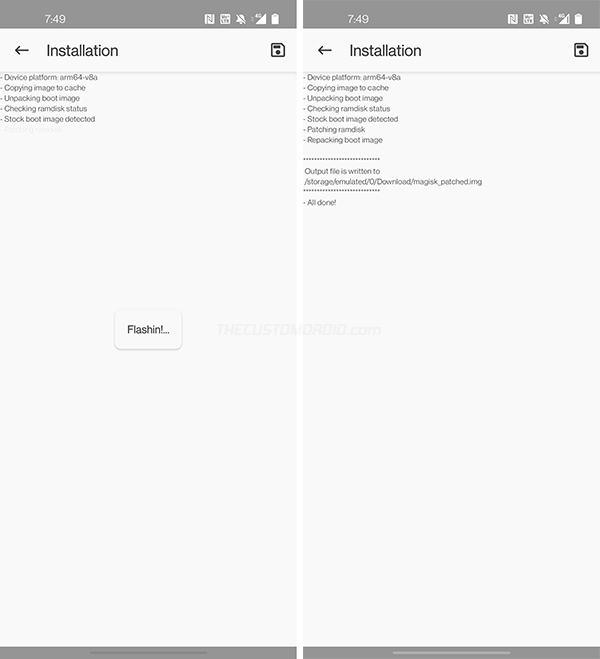
The app will patch the stock boot image with the latest version of Magisk. Once done, the patched boot image (magisk_patched.img) will be stored inside the “Download” folder of your phone’s internal storage.
Step 4: Flash the Patched Boot Image to root OnePlus 8/8 Pro
Now that you have the patched boot image, the fourth and last step is to flash the patched boot image to your OnePlus 8/OnePlus 8 Pro in order to root it.
Note: When entering the mentioned Fastboot commands, make sure to prepend them with a dot and backslash [.\] in Windows PowerShell or a dot and forward slash [./] on Mac/Linux Terminal. For reference, take a look at the figures below.
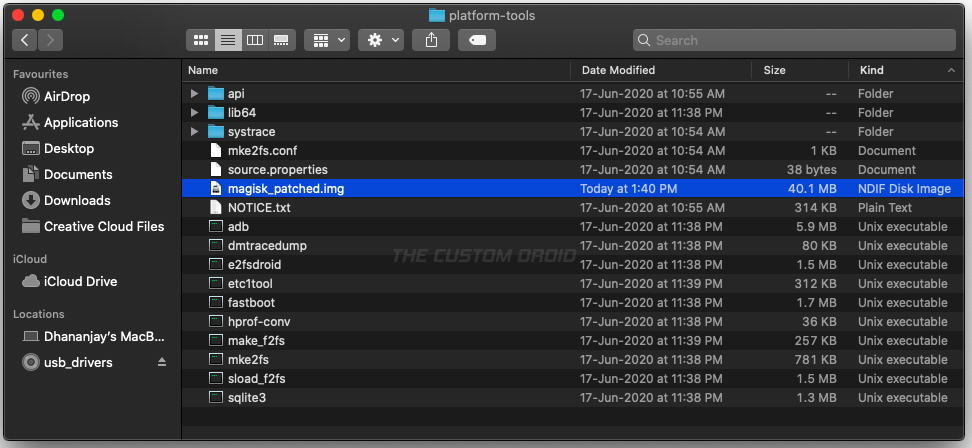
So first, transfer the ‘magisk_patched.img’ file from the ‘Download’ folder in the internal storage to the ‘platform-tools’ folder on your PC.
Advertisement
Next, boot your OnePlus 8/8 Pro into Fastboot Mode and connect it to your PC over USB.
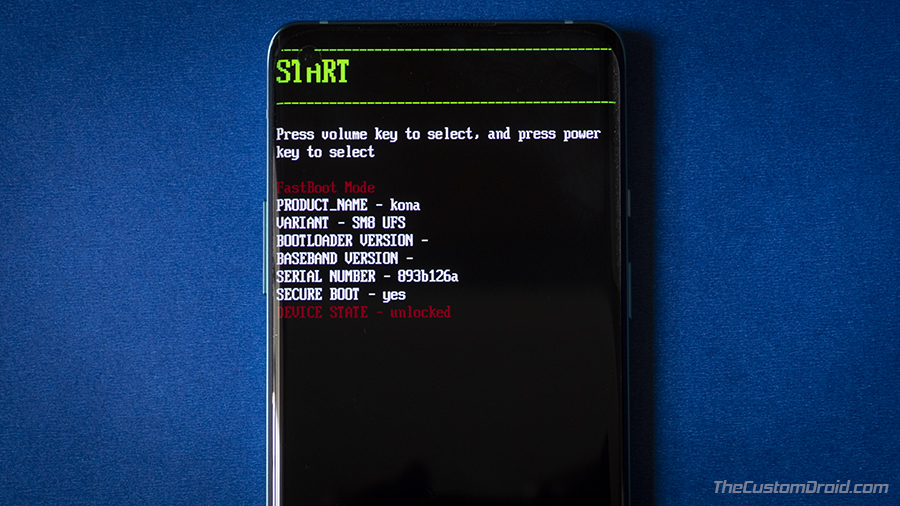
Now, enter the following command in the PowerShell/Terminal window to ensure that your PC can communicate with the phone over the fastboot interface.
fastboot devices
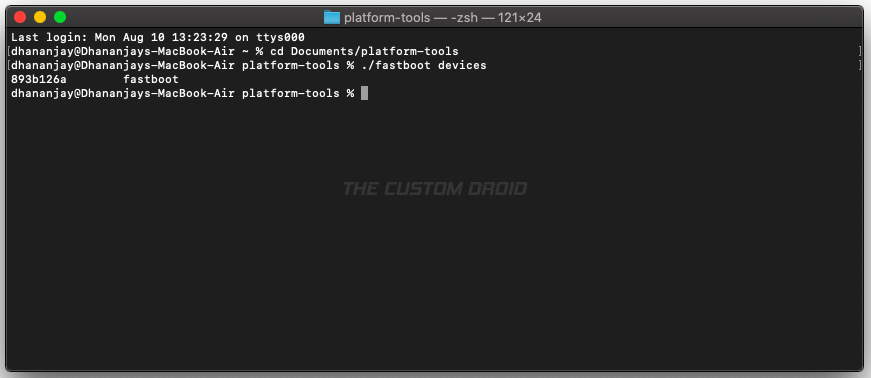
The command should return your phone’s unique ID. In case it doesn’t, then make sure that you have the required USB drivers installed and restart your PC.
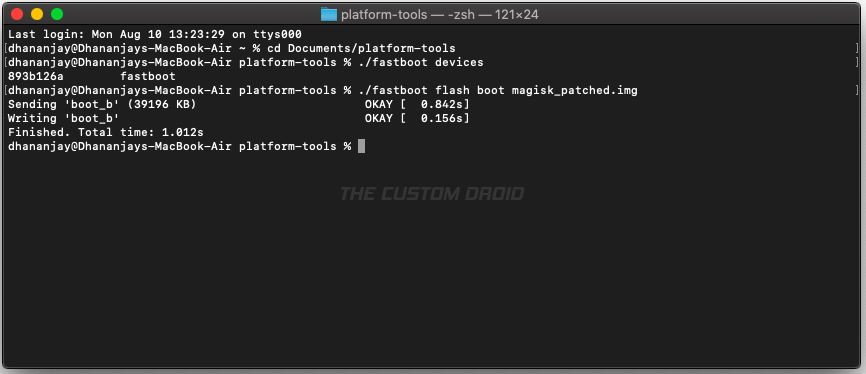
Finally, enter the mentioned fastboot command to flash the Magisk patched boot image and root your OnePlus 8/OnePlus 8 Pro.
fastboot flash boot magisk_patched.img
Once the file has been flashed, reboot the phone back into the system (OS) using the following command.
Advertisement
fastboot reboot
That’s it! Your phone should now be rooted with Magisk. You can verify this by launching the Magisk app and check the version of Magisk installed.
Now that your phone is rooted, you can install and use root applications such as Titanium Backup. You could also install modules to apply modifications to the software, systemless-ly.
Installing OxygenOS OTA Updates on Rooted OnePlus 8/8 Pro
Now that we are done with the rooting part, let’s talk about something that’s a major concern for every user after rooting their phone, i.e. OTA updates. On a traditional A-only device, installing OTA updates would require completely unrooting first.
However, with the new A/B partition system, it is possible to easily install OxygenOS OTA updates after rooting your OnePlus 8 series using Magisk. This also allows your phone to stay rooted even after installing the update so that users wouldn’t need to go through the trouble of rooting their phones again. You will find a more detailed explanation on this page.
To install OTA updates on your rooted OnePlus 8/8 Pro:
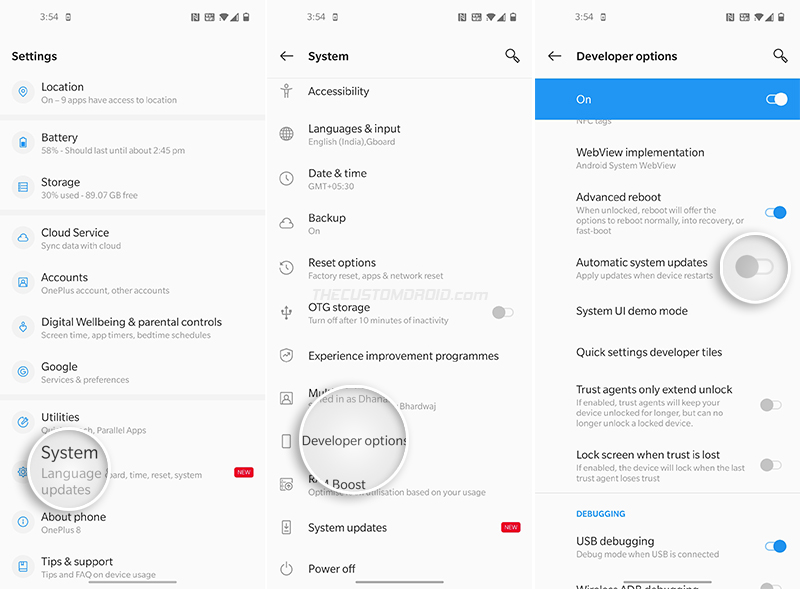
- First, enable the Developer Options screen on your phone.
- Go to “Settings” > “Developer options” and disable the “Automatic system updates” option. This will prevent your OnePlus 8 from automatically installing OTA updates in the background.
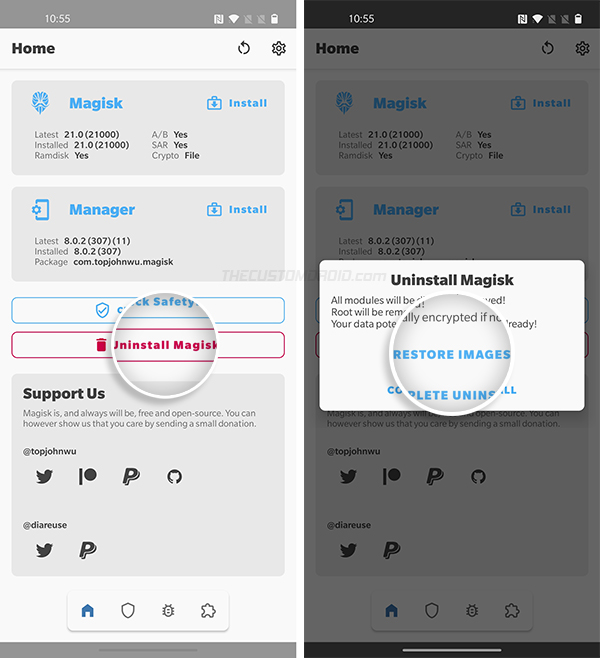
- Next, open the Magisk Manager application, select “Uninstall”, and choose the “Restore Images” option. Magisk will restore your phone’s stock boot image that was backed up during the rooting process.
- Now go to “Settings” > “System” > “System updates” and select “Download and Install Now” to install the OxygenOS OTA update on your rooted OnePlus 8/8 Pro.
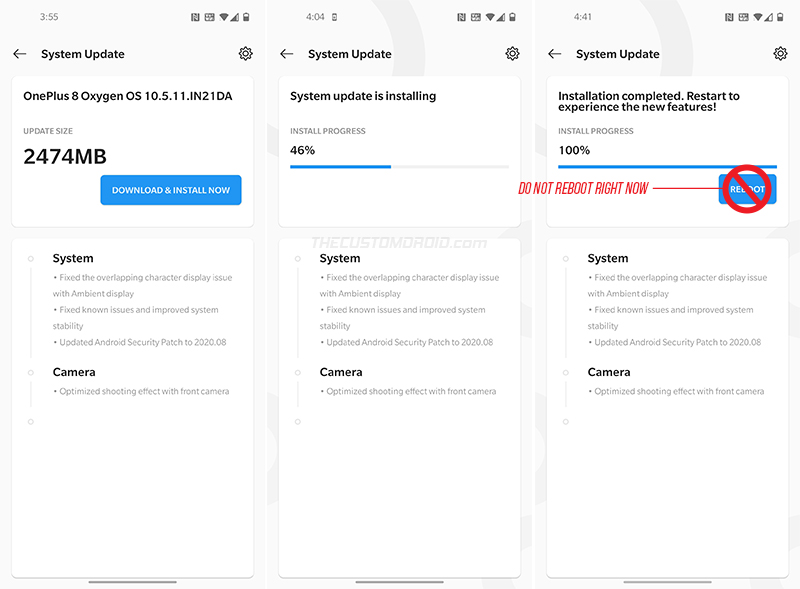
- After the update finishes, DO NOT REBOOT the phone. Since you restored the stock boot image, the root access will be lost if your reboot right now.
- Now open Magisk Manager again, press “Install” and select “Install to Inactive Slot (After OTA)” from the list of available methods.
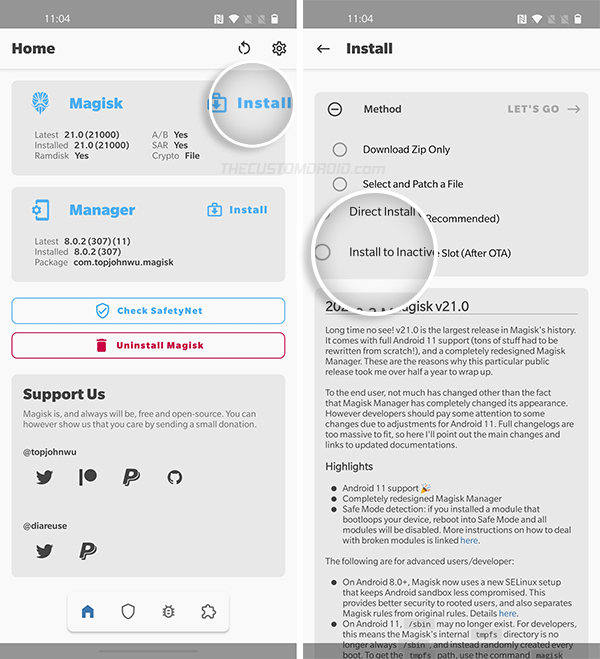
- Finally, select “Let’s Go” to confirm and install Magisk to the inactive slot (where the OxygenOS OTA has been installed).
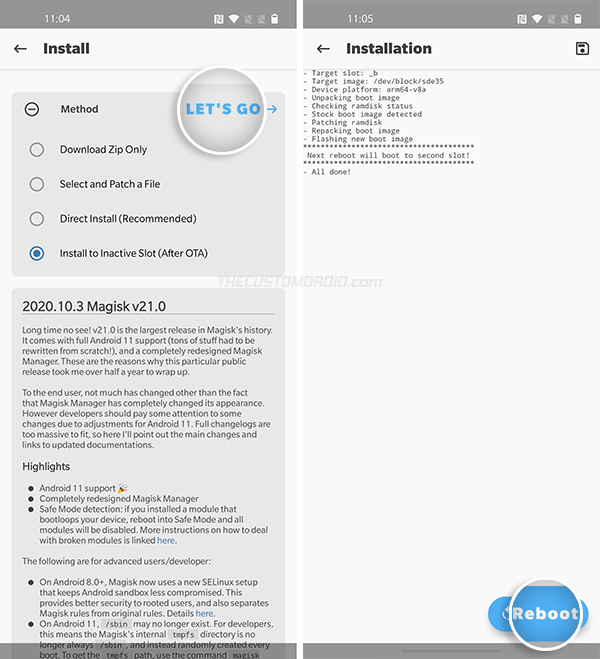
- After Magisk is installed, reboot your phone by pressing the ‘Reboot’ button.
Tip: In case the OTA installation fails at step #4 above and shows an error, you could alternatively download the latest OxygenOS OTA package and install it using Local Upgrade. Once done, follow step #5 onward.
That’s it! Your OnePlus 8/8 Pro will now boot into the updated OxygenOS software with Magisk root still intact. You can repeat this same process every time a new OxygenOS OTA update is available for your phone.
So by now, you have learned how to root the OnePlus 8 and OnePlus 8 Pro using Magisk, and also how to install OTA updates after rooting. If you have any questions or feel stuck while performing the instructions, let us know. Please make sure that you mention your device name, model number, as well as the OxygenOS version currently installed on the phone.
Comments 48 Comments
Comments are moderated, and published only if they are relevant to the topic and add value in a constructive way. If you disagree with something, please be polite and respectful. We suggest you read our comment policy before commenting.
Hi Dhananjay, is there any way to still root my phone with the newer updates? I was able to update without a problem in the past, but the newest version of Android forced my phone back to stock after it got stuck in a bootloop. I’ve been searching for the boot image of IN2025_11.C.11 for months now… and now my phone just got updated to IN2025_11.C.33, so I feel like I’m even more stuck without root.
Mike, the full OTA image of the IN2025_11_C.33 firmware isn’t available yet. Someone over at XDA did post the link for the Incremental OTA (from 11_C.21 > 11_C.33), but you couldn’t use it to extract the boot image that you’ll need for rooting.
In your current situation, would suggest waiting for the 11_C.33 full OTA link, which should probably be available in coming weeks. Download the OTA when it’s available, dump the payload.bin to extract the boot.img, and then use it to root the phone as shown in the guide.
I will keep an eye out on your behalf and update the OnePlus 8/Pro OTA repo with the link when it’s available. Also, in the meantime, make sure that you disable “Automatic system updates” under “Settings” > “System” > “Developer options” to ensure that your OnePlus 8 Pro doesn’t update itself automatically in the background.
Thanks so much, Dhananjay! I will continue waiting and checking for the IN2025_11_C.33 full OTA link so I can extract the boot img from the payload.bin.
I’m just curious… were other people able to upgrade and keep root or is this normal when going up to a new version of Android? I’m just trying to figure out if I did something wrong because my previous updates didn’t give me issues.
Generally, major version upgrades are performed in the same way as security updates. Normally, any new update is installed to other/inactive slot, and that’s how you’re able to keep root.
I my opinion, it could be the transition from the old OxygenOS to the new ColorOS software. May be, OnePlus forced this update to be installed on both the slots.
That, or it was an error on your part, which only you can confirm. Did you install Magisk to the inactive slot after installing the update and then reboot? Or did you reboot right after installing the update?
No, I patched it right away before rebooting as instructed in the guide. The only thing I wish I would have tried (or had a chance to try) is to turn off the Magisk modules when I was in the bootloop. I think it was probably the combination of that and, as you said, the transition from the old OxygenOS to the new ColorOS software.
I’m just curious what other users may have experienced, but it seems there probably aren’t too many people nowadays playing with this device.
I have 2 oneplus 8 pro. I accidentally looked at the wrong one when I downloaded the boot image. I used OxygenOS 11.0.7.7.IN11AA.. my current oxygenOS on the phone I used on the fastboot was 11.0.10.10.IN11AA .. now my phone is just recycling the boot screen. It goes to the red circle. then will load to the red box with the white o and then restart and go through that cycle again. Please help if there is a fix.
Do you mean that you used the OOS 11.0.7.7.IN11AA boot image, while your OnePlus 8 Pro had OOS 11.0.10.10.IN11AA installed on it? Confirm so that I can point you to the solution.
yes that is correct. that is exactly what happened.
Ok, then the bootloop was caused due to the use of a mismatching boot image.
The solution is rather simple, BUT not possible at the moment because the full OTA package of OOS 11.0.10.10 isn’t publicly available yet. I have personally tried searching XDA, as well as the OnePlus forums for it, as I recently updated the OnePlus 8/Pro OTA repository on this very website.
It should be available soon enough on the official OnePlus software upgrade page.
But it doesn’t make any sense to wait for it and keep your device in a bootloop over the time.
My suggestion would be to flash the OxygenOS firmware by using the MSMDownload Tool. This will allow you to restore your phone back to it’s factory state (but on a previous OxygenOS version). Here’s my guide to restore the OnePlus 8 Pro to stock using the MSM tool.
The last version of decrypted OOS firmware with MSM tool was OOS 11.0.4.4, which could be found on AndroiFileHost. Once you have used the tool to unbrick, you can go ahead and update back to 11.0.10.10. And then, wait for the full OTA package to be available, so you can pull the boot image and go ahead with the rooting part.
Oh, and just FYI, the OTA update files for the Global variant (IN11AA) of the OnePlus 8 Pro (as well as Global variants of other OnePlus phones) take more time to be made available because OnePlus uses Google’s servers to push the OTA updates rather than their own, which is the case with the European and Indian models.
what an absolute pain. THank you so much. I got it work and am back in business. you are wonderful.
Thanks a lot for the detailed article. This really helped me through the rooting process!
Hi Dhananjay, I just wanted to let you know I got the latest system update and this time Magisk restored the images perfectly. I was able to update smoothly and retain root.
Thank you!
Very good to know, Mike!
Dhananjay thanks for replying.
I uninstalled all files on computer and on phone and tried again. Seems to be working though have only rebooted phone once.
Magisk modules tried downloading on 1st root where Call recorder and full immersive mode(which I do want). I also tried some themes from substratum, and it did say android 11, but did not theme the whole phone so deleted it, maybe that was it.
So everything seems fine apart from Banking, which am trying to sort.
Good to know, Andy.
As for the banking app, it depends on how the app verifies the integrity, does it look for root access, if the Magisk app is installed, or does it look for an unlocked bootloader. There are a lot of things that could factor in depending upon the app.
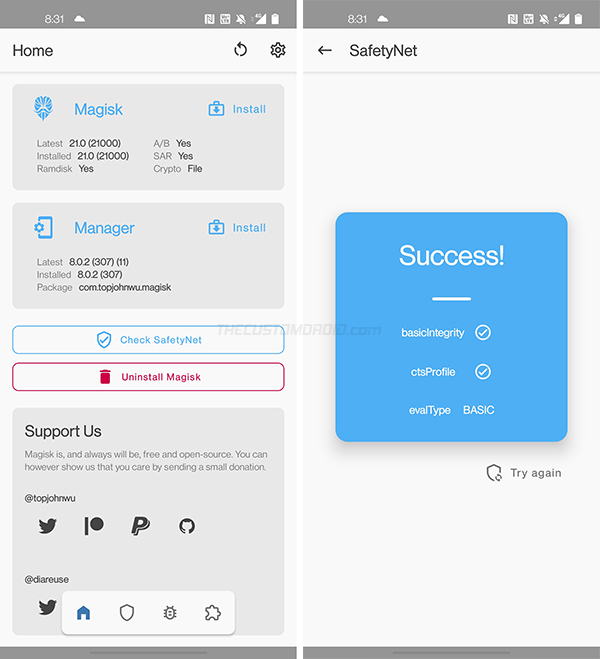
Please run the SafetyNet check via the Magisk app and let me know the results it shows.
Dhananjay
Yes everything looks good, banking app does work. Rebooted a few times now, with no problems. Just Theming to go, which was the main reason rooted in the 1st place.
Substratums no good, swift installer did my quick settings but not my Settings. I will get there.
Again TY
Substratum isn’t that easy to understand upfront. You will have to read more about it and try out different themes before you can actually find something that works for this particular phone and Android version. I personally purchased the Liv Dark theme and it works great on OP8.
Safety Net Check
Success
Basic Integrity Ticked
CTS Profile Ticked
EvalType Basic
Everything seems alright (at least for now). Before we try anything else, open the Magisk App, access the MagiskHide UI, and make sure that you have enabled MagiskHide for the banking app (or any other app) that doesn’t work. You have to check the box next to the app name.
After doing this, clear the banking app’s data via Settings and uninstall the app. Then reboot the phone, reinstall the app and see if it works now.
Dhananjay
Tried Liv Dark, no good for me, it themes my settings but has no BLK theme for quick settings, is always coloured. Unless I’m doing something wrong. Tried several other themes, none any good, Flux disabled my settings.
I will have to wait till there are more themes available for Android 11 or OS 11. Still I’m close to getting what I want.
Hey again, Andy. That’s odd, the last time I tried, it worked pretty well on my OP8. Could be an Android 11 compatibility thing. Substratum could be confusing, so make sure that you explore all the theme layer modifications, just in case.
Most good themes that are updated time-to-time for newer Android versions will be paid. At least that’s what I have experienced.
Anyways, it’s still progress, and happy to know that you’re getting near to what you were looking for.
Hi followed tutorial and rooted OnePlus 8pro and it was rooted correctly with magical and root checker. 16hrs later stuck on boot. Now it won’t even go into recovery mode. Every time I press recovery or start it just goes to start. So I have to reflash the sock boot image from computer and it just constantly tries to boot.
Anyone willing to help please, would be appreciated.
Andy, looks like a software failure to me, or if you used the wrong boot image. That is a boot image that doesn’t match the OxygenOS version currently installed on your OnePlus 8 Pro and/or the variant.
Is your OnePlus 8 Pro the global, EU, or Indian variant? Which OxygenOS version did it had when you attempted rooting?
IN11BA 11.0.44, and I used that Boot image, manged to get back in phone, went to magisk and uninstalled root and then phone got stuck on bootloader unlock page. Took an hour to get back into phone now I dont dare turn it off. Plus I also uninstalled the rooted apps I had downloaded from magisk, but still have magisk installed but not proper root.
Alright. I need you to download the 11.0.4.4 boot image for your IN11BA model and then flash the boot image using the
fastboot flash boot boot.imgcommand. Then reboot the phone usingfastboot reboot.Once that is done, you should have a fully working system without root. Then try rebooting the phone a couple of times and see if it gets stuck on the boot logo for a long time or not.
Magisk and Magisk Manager are two different parts. The latter is just a companion app, which is used to manage Magisk and its functionality, as well as for boot image patching as shown in this tutorial. Once you have restored the stock boot image, you can uninstall the Magisk Manager app safely.
Just curious, what all Magisk modules did you install when your phone was rooted? Magisk modules could cause bootloops due to incompatibility.
I’m glad you mentioned the modules, Dhananjay, because that’s exactly what happened to me when I first followed this guide. I played around and installed a few modules that caused a scary bootloop and TBH, I’m still not sure how I ever got out of it. I just kept rebooting and trying to clear cache in the stock recovery… eventually it just came to life and I noticed all the modules in Magisk were disabled. I’ve since come across this guide that should help me if I have a module problem again.
Mike, bootloops caused by Magisk modules are extremely common. Could be due to rogue modules, or because of a conflict between two installed modules.
I had to remove the link. While the particular resource is good, I have the same covered a while back here: Fix Bootloops caused by Magisk Modules (Using TWRP Recovery or ADB)
Moreover, that’s really not the ideal method anymore. Magisk v21 includes a new feature called Safe Mode Detection (Magisk on Canary channel had it even before that). The feature basically disables all modules when a device enters Safe Mode. So if you ever encounter a bootloop due to modules, just boot your phone into Safe Mode. The modules will be disabled, and then you can boot back into the OS.
To enter Safe Mode on the OnePlus 8/8 Pro: Power off the phone and hold the Power key. When you feel the phone vibrate and see the OnePlus logo, press and hold the Volume Down key while still holding the Power key. This should get your phone into Safe Mode. To exit, just power off and reboot normally.
In the meantime, I will update my own tutorial on fixing Magisk bootloops to include this new and more convenient option.
I’ve run into a problem now that it’s time to update. When I try to Uninstall Magisk as per the instruction above, I get an error message that says “Stock backup image does not exist!” I still have the stock boot.img on my phone, so do I need to move it somewhere? My understanding is that Magisk saves a copy of this when flashing, so why wouldn’t it exist?
I tried researching this and haven’t really found any info for how to fix. Do I need to worry about losing my data in order to update?
Yes, it does create a backup when flashing. You did patch the stock boot image on your phone, am I right?
Anyways, here’s what I think you should do:
1) Skip the stock boot image restoration via Magisk
2) Install the update
3) Install Magisk to the inactive slot as instructed
4) Reboot
Since it’s the full OTA, it shouldn’t check partition integrity like incremental OTA updates. So, it should install just fine.
Thank you, Dhananjay! Yes, I patched the stock boot image exactly as instructed in your guide. While I don’t think I made any system changes, I saw something about how doing that will break the stock image or something (I didn’t really understand that so I’m probably explaining it wrong). It’s possible I changed something inadvertently.
I appreciate your suggestion and I will try updating without the step of restoring the stock boot image. I have 2 questions about that, though.
1) What steps should I take the next time I have a full or incremental system update? Will I be able to restore the stock boot image once again?
2) If the update can be done without that step of restoring stock, what is the purpose for it in the guide?
Yes, that could be the cause. Because in my experience of rooting a lot of different OEM devices with Magisk in the past few years, I never faced any issue with the stock backups not existing.
1) Well, I believe Magisk will take a backup this time. But, then again, in the case of OnePlus, if the device has an unlocked bootloader or root, the updater will always download full OTA instead of incremental ones. So, if you face a similar issue in the future, this trick you’ll be doing now should work (if it works, you tell me).
2) I am asking myself the same question right now. And like I said, I never faced it, so I didn’t consider the possibility. You can confirm this for me. And if it works, I will be altering the steps.
Well, this is odd. I tried doing the system update and all it does is fail, so now I’m stuck. First it tells me “Installation will resume when device isn’t being used. To install now, tap Resume.” Then when I resume, it says “Installation problem.” I tried rebooting and I have the same problem with Magisk. I wonder if switching Update Channels from Beta to Stable in Majisk had something to do with it. 🤔
So I’m not sure what – if any – options I have now.
Yes, that’s odd. And no, switching the Magisk channels had nothing to do with it.
You’re trying to update to OxygenOS 11.0.4.4? Is it the Global, European, or Indian model?
I’m finally all back to normal! 🥳 I had a little luck and had a couple scary moments, but I did get it to work. Since I couldn’t get Magisk to restore the stock image, I decided to try the other uninstall option “Complete Uninstall.” Magisk ran through the process and then disappeared, which made sense. Then a couple seconds later, the phone shut off!
When I tried booting it back up… Bootloop! 😫
So I wondered what happen if I flashed the stock boot image, but I first made sure to search and verify that it wouldn’t wipe my phone’s data. A couple answers I found made it sound like I was safe, so that’s what I did and it got my phone booted back up! 😃
With it working and back to stock, this morning I went ahead and successfully took the system update for 11.0.4.4.IN11AA. Then once I was back to normal, unrooted, and up to date, I went back to the beginning of this guide and started over. Everything went well except I didn’t see a link for the newest boot image, but I found it in this thread, which appears to be up to date:
https://forum.xda-developers.com/t/boot-img-stock-patched-recovery-with-adb-11-0-4-4-in11aa-global.4196153/
I used the newest stock boot image found in the Google Drive link for the patching and everything went well.
It’s good to know that, Mike. I will make sure to add the new boot images to the repository right away.
And just so you know, you can self-extract the stock boot image from the Payload.bin file in the OxygenOS full OTA package. That’s actually what I do exactly when a new update arrives.
Good luck ahead!
So sorry for the double post, Dhananjay. I’ve been refreshing and thought my comment got lost. It wasn’t until I just submitted it again that it finally looked like it went through and then I saw your reply. Please feel free to delete it and this comment too.
Not a problem. I am glad you figured it out. I have also added the OOS 11.0.4.4 boot images for all both the OP8 and OP8Pro in the repo.
Thank you for this guide! I followed it a couple months ago and it worked perfectly. Since then, I was even able to do a system update smoothly.
There was one thing your guide didn’t mention, however… updating Magisk and the Magisk Manager. Updating the Manager was really straightforward since that’s basically just an app.
Updating Magisk itself was something I wasn’t 100% clear on, though. Looking above at the updating instructions for the system made me think I might have to uninstall Magisk, find and flash a boot image, etc., etc. Luckily, it’s way easier than that! You simply Install Magisk and choose the option for Direct Install.
Hope this helps anyone else looking to update!
My pleasure, Mike. I am glad that the guide worked out for you.
Yes, I believe it could be confusing. And you just found the solution all by yourself. Kudos.
I think it would be a good idea to mention this in the tutorial as well. Thanks for the suggestion.
BTW, the next major release of Magisk (possibly v22) will unify both the Magisk Manager app and Magisk itself into one single package. So, the method to update should be more streamlined with that. You can view the announcement on Twitter posted by John Wu (Magisk’s creator).
Hi bro please any one give me one plus 8 pro oxygen os 11.0.3.3 Boot image
Aashutosh, the boot image for OOS 11.0.3.3 for the Indian and European models have been added to our OnePlus 8 boot image repository.
Hi. my Oneplus 8 pro (IN2020) has been updated the latest Oxygen OS 10.0.2.2 but I accidently flashed OxygenOS 11.0.0 (Europe (IN11BA)) into it because I overlooked the note about OS version, and now it is in a boot loop. Is there any way to recover from this?
Thank you in advance.
Best regards
Yes, it’s totally possible to do this by flashing the factory image (or what we also call a ‘fastboot ROM’). Please refer to this post for the instructions.
Nice One Dhananjay, this sorted my OP8 after and update to 11.0.1. Saved messing around with TWRP etc, as I didnt need it.
Really good guide
Many Thanks……. 🙂
Thank you Myrthy for such kind words. I also updated my OP8 to OOS 11.0.2.2 recently without any issues.
Hello
Related questions to Magisk:
1 °) is a full “ADB” backup (backup.ab file) similar if the device is “rooted” or not?
2 °) is a full “ADB” backup identical to a “nandroid” backup with TWRP?
Thank you for your information…
I root my OnePlus 8 with no problem, but I was in version 11.
My brother is on the new one 11.0.1 and I tryed to root and it’s not working. It’s because the Boot.img is version 11 and he is 11.0.1?
Where can I find the european boot img version 11.0.1?
Yes, it is very important to download and use the boot image for the OxygenOS version installed on the phone. I am maintaining a repository here for the boot images for all the variants/models of the OnePlus 8 and OnePlus 8 Pro.