How to Install TWRP Recovery on HTC U11 Plus
TWRP recovery is now available for the latest HTC flagship. Follow this guide on how to install TWRP recovery on HTC U11 Plus (U11+).

On this page
TWRP recovery is now available for the latest HTC flagship. Follow this guide on how to install TWRP recovery on HTC U11 Plus (U11+).
The development scene for the recently released HTC U11 Plus is taking a hike. The device was announced during this month and is yet to reach the general public. However, it seems like some lucky users have already had the chance to get their hands on it. And thanks to the powerful XDA community, you can now install TWRP recovery on HTC U11 Plus, unofficially. We will further be updating this article when the official recovery is released to the public.

- Download HTC U11 Plus Wallpapers For Your Android
- Install TWRP Recovery on Google Pixel 2 & Pixel 2 XL
- How to install TWRP and root HTC U Ultra
Install TWRP Recovery on HTC U11 Plus
The U11 Plus is HTC’s first take on the bezel-less design with the 6.01-inches display. It offers an 18:9 screen ratio, just like the Galaxy Note 8, LG G6, and OnePlus 5T. On the inside, the device comes with a Snapdragon 835 chipset, Adreno 540 GPU, a dual-LED 12 MP primary camera with OIS, rear-mounted fingerprint sensor, and much more.
XDA senior member - sabpprock has come up with an unofficial working build of TWRP for the HTC U11 Plus. Sabpprock took the Oreo-based HTC U11 recovery and patched the kernel (boot) with that of the U11 Plus.
Though the developer doesn’t own the device, he has tested this recovery through one of his acquaintance. Since we will be only booting the recovery, there are no risks involved of bricking your device. The unofficial build is shared on XDA and you can use it to install TWRP recovery on HTC 11 Plus.
The recovery is in its early alpha stage and already has a drawback. That is, it doesn’t support decryption yet. Which totals a few things like:
- You cannot backup or restore Nandroid.
- You also cannot enable MTP and transfer files.
However, you can still sideload flash-able zips over ADB.
Prerequisites
- Your HTC U11 Plus must have an unlocked bootloader. You can do it directly from HTCDev.com.
- While there’s no risk of data loss or bricking, we still highly recommend that you take a full backup of your phone. You can follow our guide on how to backup Android devices.
- Enable USB debugging on your device.
- You must install ADB and Fastboot on your PC to install TWRP Recovery on HTC U11 Plus.
Instructions
- Download TWRP Recovery for HTC U11 Plus:
- Security Patch 2017-12-01: twrp-3.2.1-3-ocm_171201.img
- Security Patch 2018-06-01: twrp-3.2.1-3-ocm_180601.img
- Once the file is downloaded, move it to the C:\adb (Prerequsities, #3) folder where the ADB and fastboot files are present.
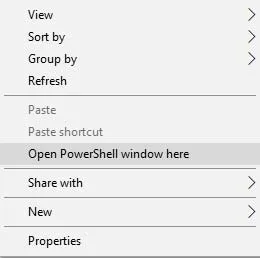
- Go to the C:\adb folder. Press the SHIFT key on your PC and right-click inside the folder.
- Select ‘Open PowerShell window here’ or ‘Open command window here’ from the menu that appears on-screen.
-
While making sure that USB debugging is enabled on your U11 Plus, connect it to the PC.
-
Enter the ADB command to reboot your device into Fastboot mode:
adb reboot bootloader
-
Once your phone enters Fastboot mode, use the following command to install TWRP recovery on HTC U11 Plus:
fastboot boot recovery-image.img
-
Replace “recovery-image.img” with the actual filename of the TWRP recovery. For example:
fastboot boot twrp-3.2.1-3-ocm_180601.img
-
Your device should instantly boot into TWRP recovery mode.
Once booted, you can use the recovery to sideload zips like SuperSU/Magisk. However, we have no confirmation if either root method works on the device. So, wait for our the ‘Good-to-go’ flag on the same. We hope the customization scene on this device will start soon.
There you go! You have succeeded to install TWRP on your phone. If you have any problems installing TWRP recovery on HTC U11 Plus, leave a comment below.
Source: XDA-Developers
Comments
Comments are moderated, and published only if they are relevant to the topic and add value in a constructive way. If you disagree with something, please be polite and respectful. We suggest you read our comment policy before commenting.