Install TWRP Recovery on Google Pixel 2 & Pixel 2 XL
World's most renowned customization utility tool is finally available for Google's 2017 Pixel lineup.

On this page
World’s most renowned customization utility tool is finally available for Google’s 2017 Pixel lineup. Here in this guide, we will help you easily install TWRP Recovery on Google Pixel 2 and Pixel 2 XL.
It has almost been a month since the Pixel 2’s official announcement and during this time, many of us had hoped to see the progress on its rooting scene. So when we have the device’s delivered to us, we could instantly start tweaking it. At least, that’s what I do. Well, if you’re in the same league, you are now welcome to start customizing your Google Pixel 2. So start by following this guide on how to install TWRP Recovery on Google Pixel 2 and Pixel 2 XL.
Read more:
TWRP RecoveryGoogle Pixel 2 and Pixel 2 XL
TWRP is one of the most powerful custom recoveries for Android devices. You may often consider it as a base to every tinkering you do on your device. TWRP recovery for Google Pixel 2 and Pixel 2 XL has been available since November. While the initial builds had certain issues like unsupported encryption, the more recent versions work flawlessly on the said devices. Both the devices are maintained by Dees_Troy himself, the lead team developer.
Since the latest Pixel series follow a new partition layout, there is no dedicated recovery partition present. The recovery itself resides in the boot partition (kernel). So, in order to install TWRP Recovery on Google Pixel 2 and 2 XL, you will first need to temporary boot the recovery and then flash the installer zip. The latter simply patches your phone’s boot image to permanently inject TWRP recovery.
Before we hop onto the instructions, let’s talk a bit about what a recovery is. If you’re not new to this, you might just skip to the instructions below. But for those who have just entered the whole Android rooting and customization scene, you might want to read this through.
What is a recovery? - It is a dedicated partition on your Android device that has the recovery console in it. Normally, a recovery includes the option to wipe partitions (individually or all-together) and install signed firmware update packages. These available options are pretty limited when it comes to the stock recovery, that comes pre-installed from the manufacturer’s end.
Fast forward to a custom recovery, and as the prefix suggests, it is a recovery console designed by third-parties. These recoveries offer way more functionality than the stock recovery. Now before we head over to install TWRP Recovery on Google Pixel 2 (and 2 XL), let us go through a few features of the TWRP recovery.
- Supports for touchscreen interface
- Backup and restore device partitions (Individually or collectively)
- Mount device partitions
- Initiate terminal console in recovery mode
- Install flashable *.zips like custom ROMs, mods, and root solutions like SuperSU and Magisk.
- Format/wipe device partitions
These features allow you to have full control over your device’s software and provides almost every function to deal with common problems like bootloops or soft-bricks.
The developer - Dees_Troy mentions that you should not try to permanently flash this build. The only way right now to use TWRP recovery on Google Pixel 2 (and 2 XL) is by booting it through the fastboot command.
Prerequisites
Before you start with the procedure, go through the list of requirements below and make sure all of them are fulfilled.
- Backup your device’s data including internal storage and everything else that is important. Here’s our extensive guide to backup Android devices.
- We highly recommend that you should first unlock bootloader on Google Pixel 2. So, just in case anything goes wrong, then you will easily be able to flash the factory image.
- It is important that you enable USB debugging and install ADB and Fastboot on your PC since we will be using it in this procedure.
Once you have fulfilled the above requirements, you can proceed ahead and install TWRP Recovery on Google Pixel 2 and Pixel 2 XL.
How to Install TWRP Recovery on Google Pixel 2 and Pixel 2 XL
- Download TWRP Recovery for Google Pixel 2 and Pixel 2 XL. Also, download the corresponding installer ZIP file.
- Pixel 2 (walleye): Download link
- Pixel 2 XL (taimen): Download link
- Connect your device to the PC and transfer the installer zip file to the storage.
- Next, copy the downloaded *.img file to C:\adb folder where the fastboot binaries are present.
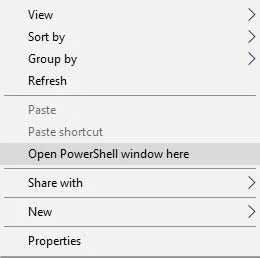
- Press the SHIFT key on your keyboard and right-click on an empty space inside the folder.
- Select ‘Open PowerShell window here’ from the pop-up menu.
- Boot your device into bootloader mode:
- Power off the device completely.
- Press and hold the Volume Down and Power button altogether until you see the bootloader screen.
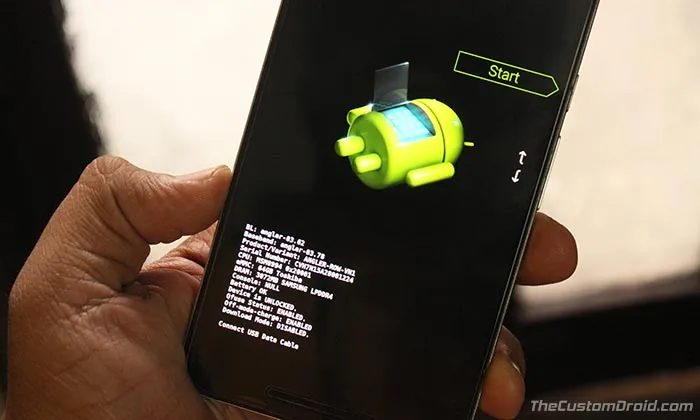
-
Now, connect your Pixel 2 (XL) to the PC using the USB cable.
-
Enter the following command to detect proper fastboot connection:
fastboot devices
-
The command shall return a device ID along with ‘fastboot’ message.
-
Now, temporarily boot TWRP Recovery on Google Pixel 2 using the following command:
fastboot boot twrp-3.2.1-0-walleye.img
-
For the Pixel 2 XL:
fastboot boot twrp-3.2.1-0-taimen.img
-
Your phone should now boot into the TWRP recovery mode.
-
Once in TWRP, go to the “Install” menu.
-
Navigate to the internal storage and select the installer zip file (e.g. twrp-pixel2-installer-taimen-3.2.1-0.zip).
-
Finally, swipe the button to install TWRP Recovery on Google Pixel 2 (XL).
-
When the flashing process is complete, hit “Reboot System”.
Now, go ahead and install some mods like ViPER4Android or Xposed Framework on the device. We can only hope to see more progress soon until then stick with us cause we will be updating this article as new updates arrive. If you have any questions, feel free to comment below.
There you go, you have just been able to install TWRP Recovery on Google Pixel 2 and Pixel 2 XL. You can now use it to root your device.
Comments
Comments are moderated, and published only if they are relevant to the topic and add value in a constructive way. If you disagree with something, please be polite and respectful. We suggest you read our comment policy before commenting.