Install Google Product Sans Font on Any Android
The Pixel 2 on Android 8.1 Dev Preview incorporates a fresh new typeface in Settings, Clock, Lockscreen, etc.

On this page
The Pixel 2 on Android 8.1 Dev Preview incorporates a fresh new typeface in Settings, Clock, Lockscreen, etc. Using this guide, you will be able to install Google Product Sans font on any Android device running AOSP, MIUI, LineageOS, or Stock.
Android 8.1 Developer Preview was announced recently and it brought some hefty new features and aesthetic changes that make the overall visual experience pretty neat and better than ever. We have seen new changes like the revamped settings menu, translucent Quick Settings, dimming navigation bar and much more.
But there’s another renovation that has only made in case of the Pixel 2. The device’s system now uses a different font family (Than Roboto or Nato). The new typeface is known as ‘Google Product Sans’. But it is only limited to the 2017 Pixel devices only. That’s unfortunate, but then Android customization community makes its way through such things. So, it is now possible for you to install Google Product Sans font on Android devices.

- Google Camera NX Brings Pixel 2 Camera Features on Nexus 6P/5X
- Download Google Pixel 2 Launcher and Wallpaper APK
- How to Delete WhatsApp Sent Messages on Android
- Enable 280 Character Tweets and Tweetstorm Feature on Rooted Devices
Google Product Sans Font in Android
The Roboto font family has been a part of Android phones since 2011 and were introduced in Ice Cream Sandwich. Since then, Google hasn’t made any major changes till date. Now, in 2017, with a new set of Pixel devices, it was about time that the company did some reformations.
Other OEMs including Samsung and OnePlus have their own native settings for changing fonts device-wide. However, that’s not the case with devices running AOSP based firmware including Nexus and Pixels. Such device owners either have to struggle with rooting to use custom fonts. But that’s another story, today we are here to help you install Google Product Sans font on any Android device, irrespective of the type of firmware it is running.

If you have noticed close enough, you will realize that it is the same font that is used in the ‘Google’ logo. While the Google Product Sans font was itself introduced in 2015, with the remake of the official Google logo, it was never introduced to be a part of the Android system, until only recently.
For now Google Product Sans is officially only available on the Pixel 2. We are not sure if it will make its way to other Nexus and Pixel devices in further Developer Preview releases or not. But no worries, you can still install Google Product Sans font on your phone, thanks to XDA Senior member SharkcpN.
While the major instructions rely on root, the font could still be installed on non-rooted devices, required that the phone is running an Oreo ROM (Officially or Unofficially). That is because we will be using a Substratum theme for such devices.
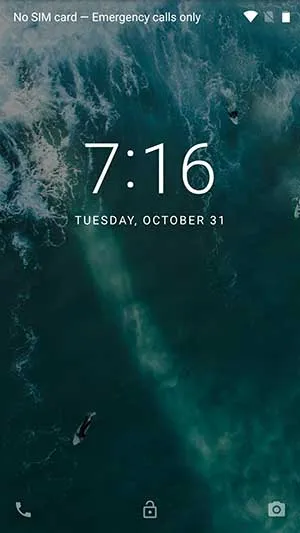
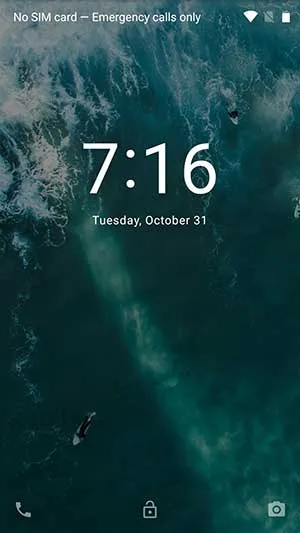
Screenshots
Before you go ahead and install Google Product Sans font, have a look the screenshots below. The image on the left shows the stock Robot font and on the right shows the Product Sans font.

How to Install Google Product Sans Font on Android
Brief up:
- If your device is running MIUI 8 or 9, you will have the choice to either install using TWRP or without it.
- TWRP is compulsory in case of LineageOS, AOSP, or stock ROMs.
- Only the lockscreen font will be changed using Magisk Module/Substratum theme.
Now that you have a clear idea on how you will proceed, let us hop onto the instructions to install Google Product Sans font on Android.
Option 1: AOSP, LineageOS, Stock ROM, MIUI 8 and MIUI 9 using TWRP
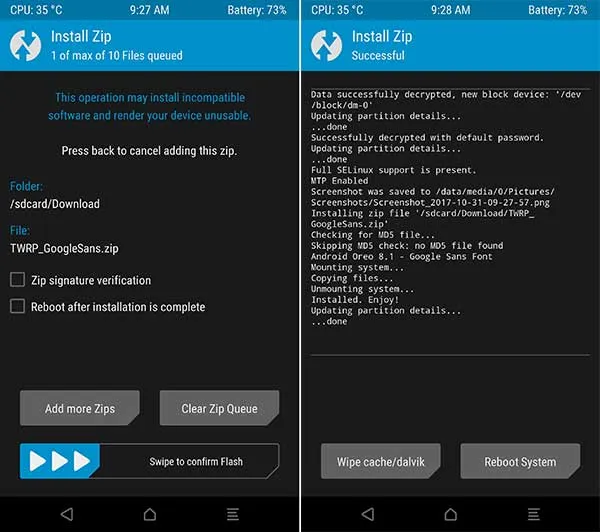
- Download the TWRP flashable *.zip file according to your ROM/device.
- AOSP/LineageOS/Stock: TWRP_GoogleSans.zip
- MIUI 8/MIUI 9: MIUI_TWRP_GoogleSans.zip
- Resurrection Remix: RR_TWRP_GoogleSans.zip
- Pixel devices: Pixel_TWRP_GoogleSans.zip
- Now, once you have downloaded the file from above, connect your phone to the PC in MTP/File transfer mode.
- Copy the specific *.zip file to the internal storage and then disconnect the device.
- Boot your device into TWRP mode using the special button combination. We can’t mention it here for every device, but if you don’t know it, you can ask us through the comments.
- Tap on the ‘Install’ button. Navigate through the storage and select the zip package.
- Swipe the ‘Swipe to confirm Flash’ button.
- Once done, tap on ‘Reboot System’.
Option 2: MIUI 8/9 without TWRP
To install Google Product Sans font on MIUI devices, we can also make use of ‘MIUI Theme Editor’ app and manually add the font *.mtz file.
- Download the Google Product Sans font file: MIUI_GoogleSans.mtz
- If you have downloaded the file to your PC, then make sure to transfer it to your device’s storage.
- Open the Mi Themes app on your device.
- Under the ‘Theme’ tab, select ‘Offline’.
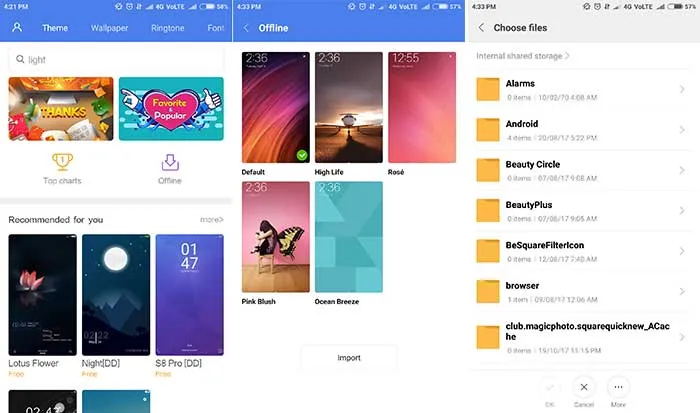
- Scroll down to the bottom and press on the ‘Import’ button.
- Browse through the storage and select the ‘MIUI_GoogleSans.mtz’ file to install Google Product Sans font on your MIUI Themes.
- The font installation will begin and complete in a few seconds.
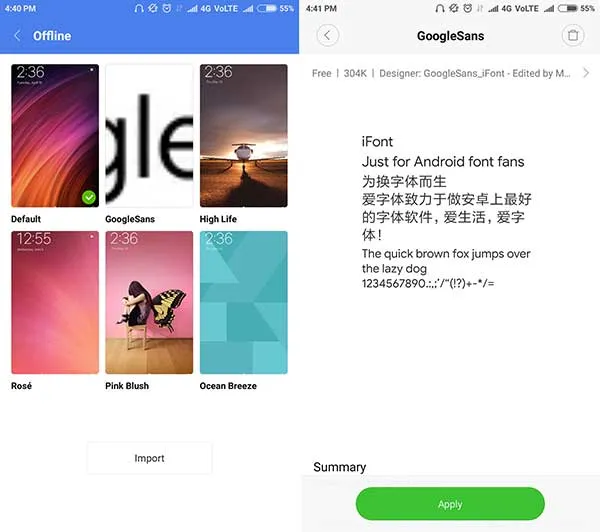
- After the font has been installed, go to the ‘Offline’ menu again and choose ‘GoogleSans’.
- Select ‘Apply’.
Option 3: Only Lockscreen Font using Magisk Module
If you only wish to change the lockscreen font and install Google Product Sans font, then you can simply make use of the Magisk module.
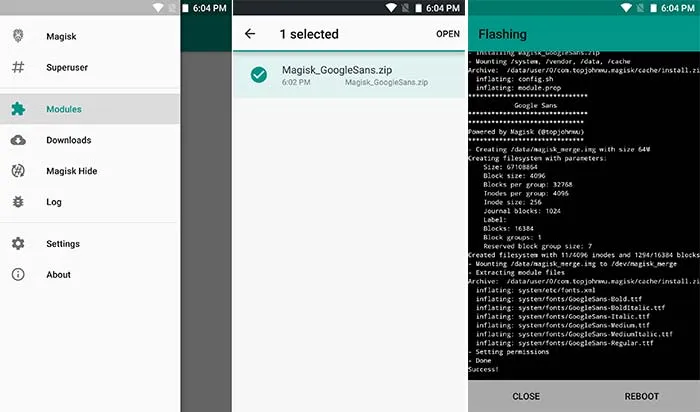
- For this, you must first have Magisk installed on your device.
- Download the Magisk module (Credits: elmkzgirxp): Magisk_GoogleSans.zip
- Open the ‘Magisk Manager’ app on your device.
- Swipe out from the left-edge of the app screen to open the menu.
- Select ‘Modules’.
- Tap on the rounded plus ”+” icon on the bottom.
- Navigate through the phone’s storage and select ‘Magisk_GoogleSans.zip’.
- Press ‘OPEN’ to install Google Product Sans Font.
- Finally, reboot the device by pressing on ‘REBOOT’.
The module will automatically be activated when your device boots back.
Option 4: Only Lockscreen Font using Substratum Theme
Another option is to install Google Product Sans font is by using a Substratum Theme. Note that this theme will only work for ROMs that support OMS or Android Oreo 8.0 (without root).
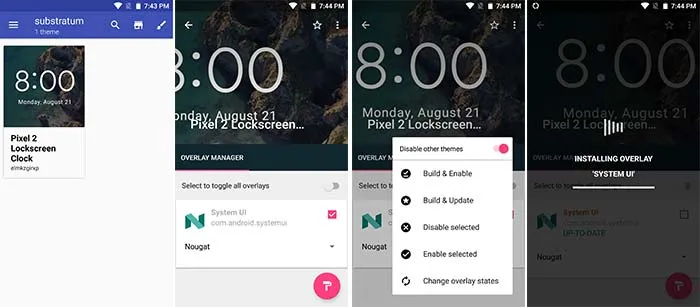
- Download the Substratum theme: Pixel+2+Lockscreen+Clock_1.1.apk
- Install the APK file using a file manager of your choice.
- Open ‘Substratum’ from the app drawer.
- Select the ‘Pixel 2 Lockscreen Clock’ theme.
- Now select the current Android version of your device in the ‘Select Android version’ drop-down menu.
- Select the checkbox next to the ‘System UI’ overlay.
- Finally, tap on the round paint roller icon and select ‘Build & Enable’.
- The overlay installation will complete in a few seconds.
- Finally, reboot your device for the changes to take effect.
That was all you need to do to install Google Product Sans font on your device. If you have any problems installing or have questions prior to the process, then please feel free to comment below.
Our appreciations go to XDA senior member SharkcpN, and a few others who played an important role including elmkzgirxp, who created the Magisk Module and Substratum theme for this. And Recognized Contributor gianton for fixing the boxed layout issue.
Source: XDA-Developers
Comments
Comments are moderated, and published only if they are relevant to the topic and add value in a constructive way. If you disagree with something, please be polite and respectful. We suggest you read our comment policy before commenting.