How to Install Custom Themes on Android Oreo without Root
The Android scene is getting exciting at every corner! We have recently seen the latest Android version - Android Oreo, which is by far the best Android

On this page
The Android scene is getting exciting at every corner! We have recently seen the latest Android version - Android Oreo, which is by far the best Android version ever released. Now the other thing you will be thrilled about is using a full-fledged theme engine on stock Android, without root. Yes! You heard it just right. Follow up on this extensive guide to install custom themes on Android Oreo without root.
Visual overhauls and substantial theme integrations have been a part of Android (CM Theme Engine, remember?) in the past, but only through custom ROMs and Root. For the first time ever in Android, you can easily install custom themes on your Android Oreo running device, without deviating from the stock aspects. Using custom themes on Android Oreo does not need any sort of system modification and everything will be performed systemlessly.

How to Install Custom Themes on Android Oreo using Substratum & Andromeda
The next era of theming on Android began with RRO (Runtime Resource Overlay), which later evolved into OMS with better support and easier customization. Android Oreo includes Sony’s Overlay Manager Service (OMS) and Substratum just makes the right use of this privilege to provide system-wide theme support.
XDA-Developers indicated that Substratum theme engine will soon be supporting Android Oreo and that too without root. And the day has come when the updated Substratum has been released. The support for themes on Android Oreo has been brought to us by an extension to the main Substratum theme engine. This extension/add-on is now called “Andromeda”.

Brief: Andromeda is an add-on to the famous Substratum Theme Engine that allows users to install custom themes on Android Oreo phones, without the need of Root. It is both an app and a desktop-client that work simultaneously to bring system-wide theme support to Oreo. The Andromeda desktop-client works with the app on your phone, over ADB. While the Substratum theme engine is FREE, the Andromeda add-on is a PAID app and only costs $2.49. Which, I believe is a relatively small amount for the amazing innovation.
The best part about Substratum is that it is not just confined to theming the Android framework, but also has the capability to add its touches to apps through OMS. After this tutorial, we will be covering several more tutorials that will help you make full use of Substratum on Android Oreo.
Usually, when you think of theming or customizations that involve ADB, you believe that it will eventually be more complex to perform and rather confusing. But that is not the case today. The instructions below will help you easily setup Andromeda first and then demonstrate how you can use it to install custom themes on Android Oreo. No Root is required!
Also read: Find If Project Treble Supports Your Android Oreo Device
Before you begin
Wait! There are a few things that should be done before you proceed to the actual instructions to install custom themes on Android Oreo.
- A device running Android Oreo 8.0 (Officially or unofficially): Rootless theming will only work on Oreo because no other previous version had native support for OMS (Overlay Manager Service), which is the backbone of the whole rootless theming scene.
- The front-end interface of Andromeda supports three major desktop platforms - macOS, Windows, and Linux. It is important that you have access to a PC with one of these operating systems installed.
- You will first need to install the Substratum Theme Engine on your Android Oreo device. So get it on Play Store.
- The next and more important thing is to install the Andromeda add-on for Substratum. The Add-on is to be paid for and you can easily get it for just $2.49 (Get it on Google Play).
- Once you have downloaded the add-on, you will also need to download the Andromeda desktop-client on your PC according to the operating system you have. So, visit the XDA thread and download it.
Now that you have all the essentials, let us begin!
Setup Andromeda - App & Desktop Client
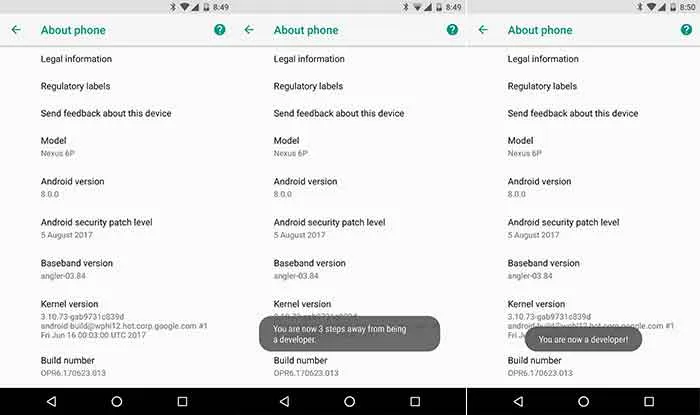
- On your phone, go to Settings > System > About phone.
- Tap on the “Build number” consecutively for 7 times until you see the “You are now a developer!” toast notification.
- Now go back to “System” and tap on “Developer options”.
- Scroll down and enable the “USB debugging” toggle. When prompted, confirm by pressing “OK”.
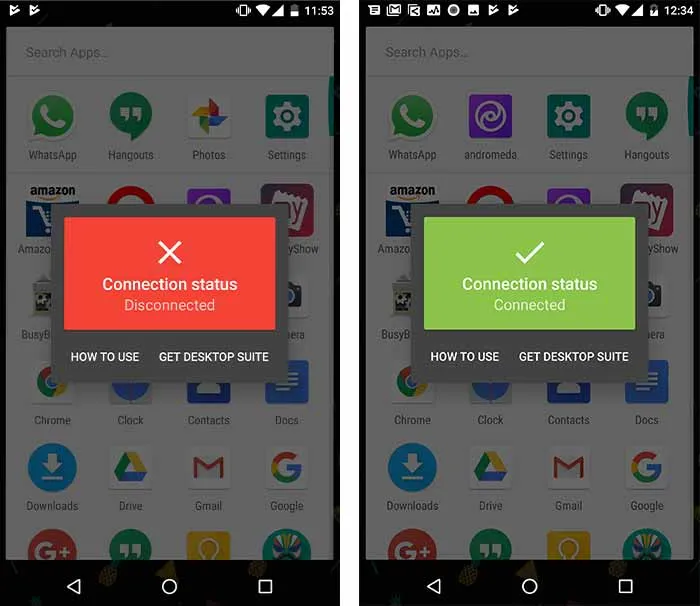
- Now that you have USB debugging enabled, go to the app drawer and launch “andromeda”. You should see the “Connection status” as “Disconnected”.
- Now connect your phone to the PC via USB cable and make sure that you have complete ADB access.
- Setup Andromeda Desktop Client
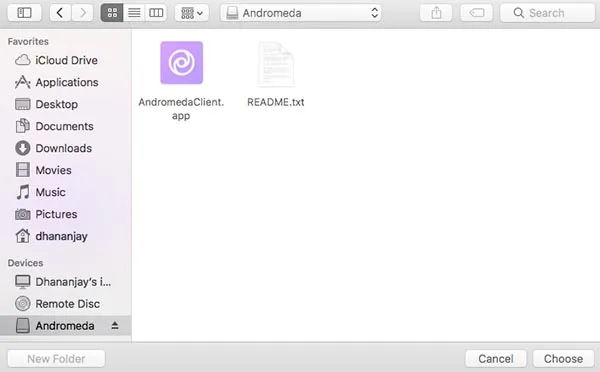
- On macOS: Go to the folder where the Andromeda desktop-client was downloaded and double-click on “AndromedaClient-Mac-3.2.dmg”. The mac installer window will open.
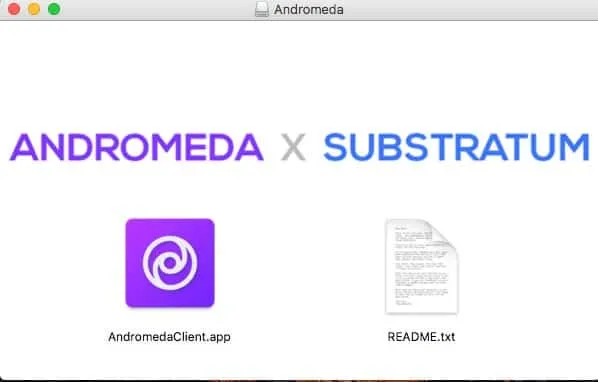
Now, double-click on “AndromedaClient.app”. The app will prompt you for selecting the disk image of Andromeda mounted desktop client. Click on “Continue” and select “Andromeda” from the “Devices” list. You shall then receive the confirmation message, click on “Done!”.
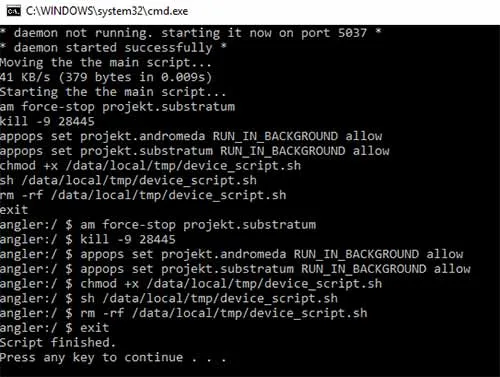
- On Windows: Run the downloaded “start_andromeda.bat” file. A command prompt window will launch on the PC. All you need to do is press a key inside the CMD window and it will do the rest.
- On Linux: Run the “start_andromeda.sh” script file that you have downloaded on your machine. It should launch a Terminal window with a bunch of commands running.
- As soon as you are done with the desktop client setup, the Andromeda app will initiate the Substratum theme engine. Now, go to the app drawer and launch “andromeda”. It shall now show the “Connection status” as “Connected”.
- Now you have been successful in setting up Andromeda on your PC and device. Time to move over to install custom themes on Android Oreo using it, without any Root.
Install Custom Themes on Android Oreo
Now what you need is a custom theme on Android Oreo. You can grab these themes either from the Play Store, by searching for “Substratum themes”. Only themes that use “OMS” will work on your device. Do not try installing any themes that use “Legacy” or “RRO” methods. Or, you can find many themes on XDA.
I will be using the “[Substratum] Sai’s Android Oreo Black Theme” theme as an example for installing it on my Nexus 6P that is running on Oreo. So just like me, you can you use any theme of your choice, there are many available. So I will be downloading the theme of my choice.
Get [Substratum] Sai’s Android Oreo Black Theme on Google Play
- Once the theme has been installed on the phone, go to the app drawer and launch “substratum”.
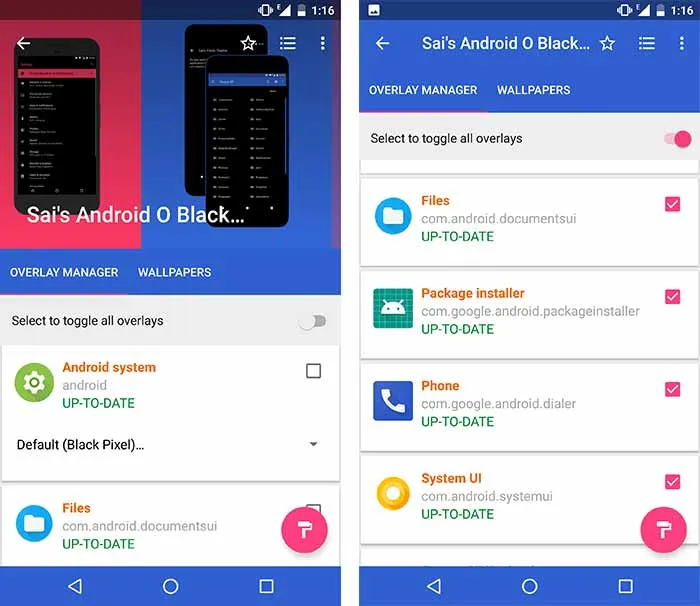
- Browse the list of themes installed and select your theme (Example: Sai’s Android Oreo Black Theme).
- The theme window will open. You will see two tabs - OVERLAY MANAGER and WALLPAPERS.
- Now, in “OVERLAY MANAGER” you shall see different apps and services that the specific theme can modify. You now have two ways to go - you can either enable all the options by toggling ON the default theme style. Or, you can select the themeable apps and services individually.
Note: Not all themes work perfectly with Oreo. So the theme you choose might break a few elements. What you can do then is disable those specific overlays using the Substratum theme manager. Please only choose overlays that been confirmed working on Oreo.
- Finally, tap on the paint-roller icon on the bottom-right of the theme window. A number of options will pop-up. What you need to do now is select the “Build & Enable” option.
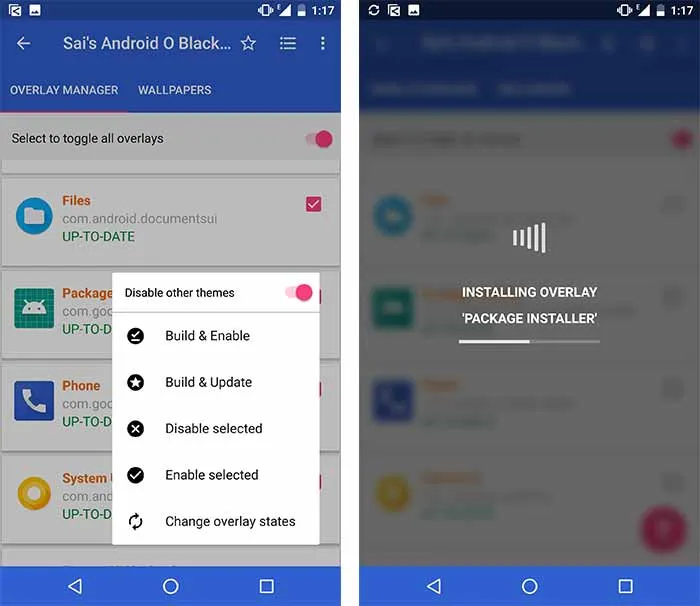
- As soon as you do it, you will see an overlay screen mentioning that the theme is being installed. Depending upon the number of overlay options you selected, the installation time may vary.
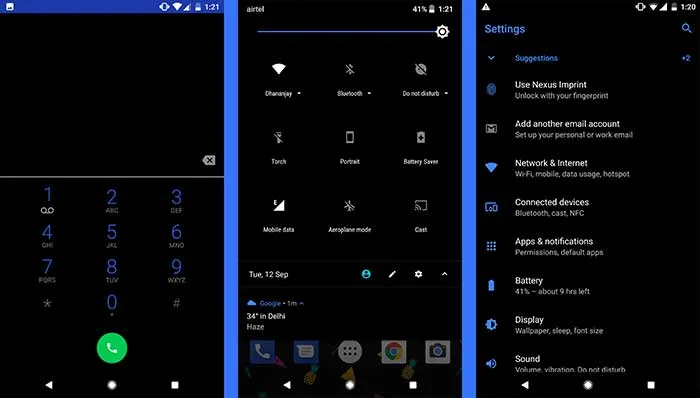
Once the installation is done, exit Substratum. You may need to reboot your device for some specific overlays! Cool now, enjoy custom themes on Android Oreo!
Now that you have Substratum installed on your Android, you can follow the following tutorials and make full use of it:
- Android Oreo Substratum Themes Support List
- How to Install Blob Emojis in WhatsApp and Telegram
- How to Customize Android Oreo NavBar without Root
Uninstall or Change Custom Themes on Android Oreo
So, using this tutorial, you have installed custom themes on Android Oreo via Substratum theme engine. And all this without root. Which is great, right?
Now, if you would like to change your theme to a different one, it is wise to first disable the current theme using Substratum. But before that, you will first need to relaunch Andromeda desktop client and let it do its work. So, follow steps #6 and 7 again of the “Setup Andromeda” section.
Once that is done, you can go to Substratum, select the theme overlays that you have applied previously, and press the paint-roller icon. Then select “Disable selected”. Reboot your device.
Check out more on Android Oreo:
- Android Oreo Custom ROMs List for Popular Devices – Find Yours Now!
- Get ‘Turn on Wi-Fi Automatically’ Option for Nexus 6P/5X on Android Oreo
- How to Fix Android Oreo Bluetooth Issue
That’s it! You have just downloaded and installed custom themes on Android Oreo using Substratum Theme Engine and Andromeda add-on! Wait until we get back with more tutorials for customizing Android Oreo.
If you have any problems setting up or installing themes using this tutorial, comment down and we will help you to the best of our knowledge.
Comments
Comments are moderated, and published only if they are relevant to the topic and add value in a constructive way. If you disagree with something, please be polite and respectful. We suggest you read our comment policy before commenting.