Advertisement

In this tutorial, you will learn how to install TWRP recovery and simultaneously root Xiaomi Mi A2/Mi A2 Lite using Magisk. The instructions will allow you to root any Mi A2 or Mi A2 Lite running Android 10, Android 9 Pie, and Android 8.1 Oreo firmware.

The Xiaomi Mi A2/A2 Lite was released back in 2018, following the huge success of its predecessor, the Mi A1. It is also part of Google’s Android One program, which means it runs stock Android OS without any manufacturer modifications or skins, offering the user a clean, stock Android experience. Both the phones come with decent hardware, ran Android Oreo 8.1 out-of-the-box and are now upgradable to Android 10.

Thanks to XDA Senior Member Manish4586 and the official TWRP team, we now have working builds of  TWRP recovery for Xiaomi Mi A2 (codename: jasmine_sprout) and Mi A2 Lite (codename: daisy), respectively. This means you can gain root access by flashing Magisk and also flash a variety of custom ROMs that are available for the device.

Want to root without TWRP? Follow this guide instead.

How to Install TWRP Recovery and Root Xiaomi Mi A2/A2 Lite

Table of Contents

Prerequisites

  • First and foremost, ensure that you have taken a full backup of all your important data on your phone. This includes messages, contacts, and everything else that you feel necessary. We also have a tutorial that will help you backup your data with ease.
  • Charge the device battery to at least 60%. This shall prevent the phone from suddenly shutting down during the process.
  • In order to unlock the bootloader, you must first enable the ‘OEM Unlock’ toggle on your Mi A2/A2 Lite.
  • Also, download the Android SDK platform-tools from here and install them on your PC.
  • When asked to launch the command-line window on your PC at any point during the instructions below, do the following.
    • On Windows: Go to the folder where the ADB and Fastboot tools are installed (e.g. C:\platform-tools). Hold the Shift key and right-click on any empty space inside the folder. Then select ‘Open PowerShell window here’.
    • On macOS/Linux: Launch the Terminal and change its directory (using the ‘cd’ command) to the folder where the ADB and Fastboot tools are installed. For example, if the tools are installed to ‘/Documents/platform-tools’, then the command should be:
      cd Documents/platform-tools

Downloads

For the Mi A2 Lite, we have also provided the unofficial TWRP (by offain) that supports data encryption on Android 10 and Android Pie. If the official TWRP doesn’t work for you, then you may use the unofficial version. The builds were sourced from here. Also, note that you’ll still need to format the /data partition to be able to use internal storage in TWRP.

Instructions

Rooting the Xiaomi Mi A2/A2 Lite is a 4-step process. In brief, the process involves unlocking the phone’s bootloader first. Once the bootloader is open to modifications, the second step is to install TWRP recovery using a couple of fastboot commands. Then, the third step is to format the phone’s data partition via TWRP so that the internal storage can be recognized by the recovery. This is followed by the fourth and final step, which is to flash the Magisk installer zip and root Xiaomi Mi A2/A2 Lite.

Now without any further wait, let’s get straight to the instructions!

Step 1: Unlock Your Phone’s Bootloader

In order to make any modifications, you must first unlock the bootloader on your Mi A2/A2 Lite. Since the said devices run the stock Android software, the process is relatively easy when compared to other Xiaomi devices running MIUI.

With everything set up properly, follow the instructions in this guide to unlock the bootloader.

Step 2: Install TWRP Recovery on Xiaomi Mi A2/A2 Lite

Since the Mi A2/A2 Lite comes with A/B partition system, you will first have to temporarily boot the TWRP recovery image on your phone. Once booted, you can simply flash the TWRP installer zip to permanently install TWRP recovery on Mi A2/A2 Lite.

Note: While entering the commands, make sure that you replace the recovery name with the actual filename of the TWRP recovery image you are using.

  1. Download TWRP recovery image and installer ZIP files for your Mi A2/A2 Lite.
  2. Copy the downloaded files to the folder where ADB and Fastboot tools are installed on your PC.
  3. Launch the command-line window on your PC (See the ‘Prerequisites’ section for reference).
  4. Power off your Xiaomi Mi A2/A2 Lite completely.
  5. Hold the Volume Down and Power buttons together to boot your phone into Fastboot Mode.
    Install TWRP Recovery on Xiaomi Mi A2/A2 Lite - Boot into Fastboot Mode
  6. Connect the phone to the PC using a USB cable.
  7. Enter the following command to temporarily boot the TWRP recovery image:
    • on Xiaomi Mi A2:
      fastboot boot twrp-3.3.1-0-jasmine_sprout.img
    • On Xiaomi Mi A2 Lite:
      fastboot boot twrp-3.3.1-dees_troy-daisy.img
  8. After entering the command, your phone should boot into the recovery mode.
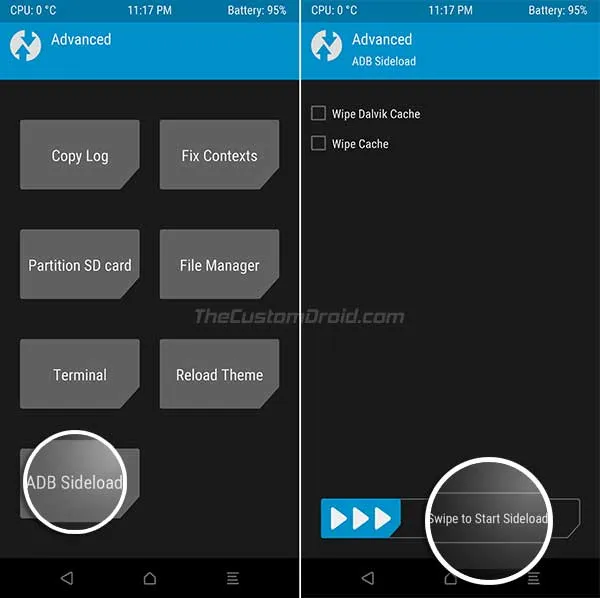
  9. In TWRP, go to ‘Advanced’ > ‘ADB Sideload’ and swipe the button on the bottom.
    Install TWRP Recovery on Xiaomi Mi A2 and Mi A2 Lite - ADB Sideload TWRP Installer zip
  10. Finally, enter the following command to sideload and permanently install TWRP recovery on Xiaomi Mi A2:
    adb sideload twrp-installer-3.3.1-0-jasmine_sprout.zip

    On Mi A2 Lite:

    adb sideload twrp-installer-3.3.1-dees_troy-daisy.zip

Note that TWRP cannot decrypt the storage (/data partition) on Android 10 and Android Pie, by default. If you’re on Android Oreo, you can skip directly to the rooting instructions.

Step 3: Format Data Partition and Disable Encryption (on Android 10 & Pie)

Since TWRP doesn’t support encryption on Android 10/Pie. It is important to first format the data partition in TWRP and flash the forced-encryption disabler first. Even if you do not want to root, it is essential to do this, to be able to access the storage in TWRP.

  1. In TWRP, go to ‘Wipe’ > ‘Format Data’.
    Root Xiaomi Mi A2 and Mi A2 Lite - Format Data Partition in TWRP
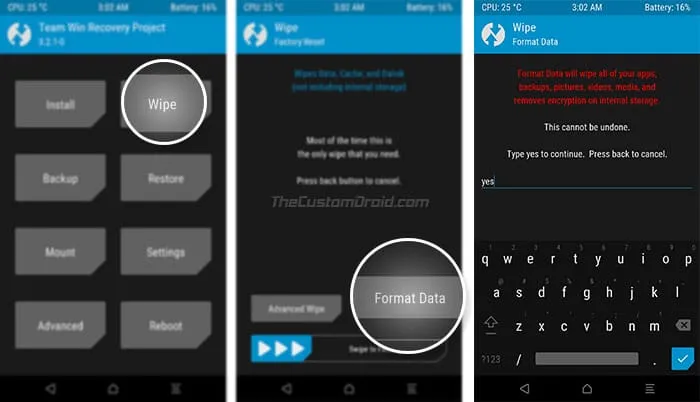
  2. Enter ‘yes’ in the provided field and swipe the button to format the data partition of your Mi A2/A2 Lite.
  3. Once formatted, go to the ‘Reboot’ menu from TWRP’s main screen.
  4. Press the’ Recovery’ button to reboot your Mi A2 device into TWRP recovery mode. This will ensure that TWRP can successfully decrypt the phone’s internal storage after formatting the data partition.
  5. Once your phone reboots into the recovery, go to the ‘Mount’ menu and tap on ‘Enable MTP’.
  6. Download the Forced-Encryption Disabler zip file and transfer it to the phone’s internal storage.
  7. Disconnect the phone and go to the main TWRP menu.
  8. Tap on ‘Install’ and select the Encryption-Disabler zip file (e.g. Disable_Dm-Verity_ForceEncrypt_02.02.2020.zip).
    Root Xiaomi Mi A2 and Mi A2 Lite - Install Forced-Encryption Disabler
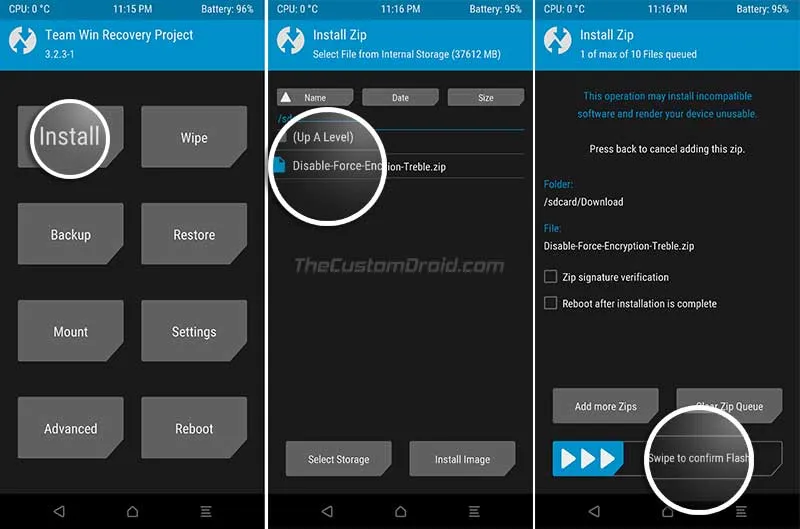
  9. Finally, swipe the button to flash the file and install Forced-Encryption Disabler on your Mi A2/A2 Lite.

Once the flashing process finishes, you can easily root your Xiaomi Mi A2 device by flashing the latest Magisk installer zip. Just follow the instructions in the step below.

Step 4: Flash Magisk to Root Xiaomi Mi A2/A2 Lite

  1. Download the latest Magisk install ZIP file on your PC.
  2. Connect your Mi A2/A2 Lite to the PC using the USB cable.
  3. Copy the downloaded Magisk ZIP file to the phone’s internal storage.
  4. Disconnect the phone and power it off completely.
  5. Hold the Volume Up and Power buttons together to boot your Xiaomi Mi A2/A2 Lite into TWRP recovery mode.
  6. In TWRP, tap on the ‘Install’ button and select the Magisk zip file (e.g. Magisk-v20.3.zip).
    Root Xiaomi Mi A2 and Mi A2 Lite - Install Magisk zip using TWRP
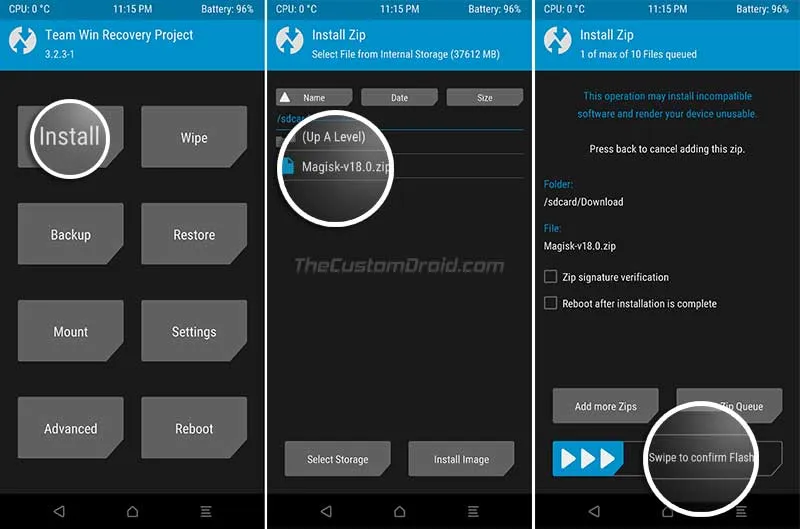
  7. Finally, swipe the button to flash the Magisk ZIP file and root Xiaomi Mi A2/A2 Lite.
  8. Once the flashing process finishes, tap on the ‘Reboot System’ button.

When your phone boots up, you should have Magisk Manager in your app drawer and have full root access with a working TWRP. To verify whether the rooting process succeeded, simply launch the Magisk Manager application.

Now that your phone is rooted, you can start using root-enabled apps or install Magisk modules to add extra features to the software. On the other hand, you can also use TWRP recovery to flash custom ROMs, kernels and mods.

F.A.Qs

  1. Can the official TWRP recovery decrypt /data and mount internal storage on Mi A2 or Mi A2 Lite running Android 10/Android Pie?
    • No. Natively, TWRP doesn’t support decryption on Pie. To get past this, you will first need to format the /data partition and flash the Encryption Disabler zip file (See Step #3 above).
  2. I am seeing the ‘System has been destroyed’ message after installing TWRP on Mi A2 Lite (daisy)?
    • Then download the ‘aboot.img’ from V9.6.4.0 (Download Link), boot your Mi A2 to Fastboot Mode and flash it using the following command:
      fastboot flash aboot_a aboot_9.6.4.img
      
      fastboot flash aboot_b aboot_9.6.4.img
    • According to the explanation given by XDA Senior Member mac12m99, the newer bootloader (aboot.img) version checks for stock recovery, even when the bootloader is unlocked. To overcome this, you can flash an older bootloader version (Especifically from V9.6.4.0) to fix this issue.
  3. My Mi A2/A2 Lite reboots into TWRP and does not enter the OS at all?
    • Boot your phone into TWRP recovery and re-flash the latest Magisk installer zip file again.

So, this was our guide on how to install TWRP recovery and root Xiaomi Mi A2/A2 Lite using Magisk. If you have any questions or if you get stuck at any step, feel free to ask us via the comments, and we will try our best to help you out.

Comments

  1. Hi guys!
    First of all thanks for this guide is pretty clear and help me a lot. But I have the same problem other users had.
    I followed all the steps carefully on my Xiaomi Mi A2 Lite with Android 10. I installed twrp-installer-daisy-3.3.1-0-offain as recovery, then flashed the Disable_Dm-Verity_ForceEncrypt, everything went smoothly but my phone is stuck on a loopboot I guess. The phone only goes to the recovery mode.
    Any idea how can I fix this problem?
    Thanks and sorry for my english

    1. Miguel, thanks for the kind words, as well as for reporting the problem.

      After flashing the forced-encryption disabler, did you flash the Magisk ZIP file?

    2. Thanks for your quick response.
      Yes. First time I flashed Disable_Dm-Verity_ForceEncrypt, which went well. And then I flashed Magisk-v21.1. Seeing that my phone went on the recovery loopboot I started again with the Format Data, flashed Disable_Dm-Verity_ForceEncrypt and reboot but the result was the same.

      Thanks a lot for your help and patience

    3. Okay, so we can probably take them out of the equation. Which version of TWRP did you use? Please share the filename of the recovery image.

    4. I used: twrp-installer-daisy-3.3.1-0-offain (unofficial).
      By the way, as I am not an expert I must say that in order to install Twrp I followed these steps.
      1. Through CMD, I flashed the image twrp-installer-daisy-3.3.1-0-offain.img
      2. As my phone can’t mount twrp zip via ADB sideload, I load twrp-installer-daisy-3.3.1-0-offain.zip on the sd card of my phone and I used the comand install
      3. twrp is installed on the phone so with volume + and power I have accesed to Twrp and I can flash Disable_Dm-Verity_ForceEncrypt

    5. At point number 1 when you say that you “flashed”, did you mean you used the “fastboot flash twrp-installer-daisy-3.3.1-0-offain.img” command?

      Or did you use “fastboot boot twrp-installer-daisy-3.3.1-0-offain.img” as instructed in the steps below?

    6. I did it as in the instuctions: fastboot boot twrp-3.3.1-dees_troy-daisy.img
      Then I used the TWRP command install, in order to install the zip

    7. If you’re using the Offain TWRP image, use the Offain TWRP installer ZIP.

      Likewise, if you use the dees_troy installer ZIP, use the corresponding TWRP image.

      After you boot the TWRP image using fastboot command (just like you mentioned), flash the corresponding installer ZIP and then reboot the phone into TWRP (TWRP main menu > Reboot > Recovery) before you attempt to format the /data partition and further install the encryption disabler and Magisk ZIP files.

    8. Is compulsory to install TWRP in the phone? or I can simply use the TWRP image to install the Disable_Dm-Verity_ForceEncrypt and Magisk?
      Thanks for your great effort

    9. Not at all. You can root without TWRP at all. Here’s the link to the tutorial.

      The only thing important while following that tutorial is to make sure that you use the boot image for the firmware build number currently installed on your phone,

    10. Done. I didn’t install TWRP and it worked perfectly.
      Thank you so much for your help and patience

  2. hi…
    I followed all of your instructions and successfully rooted through twrp,but when I open magisk manager …there are two options
    1. Preserve force encryption
    2. Preserve Avb 2.0/dm verity

    Both of them are in ticked
    Why?
    But before I rooted without twrp both of this option was enabled,but having this situation after flashing magisk via twrp.
    What to do?
    Is it anything wrong or it’s all okey.please let me know bro.i am confused.

    1. Hi Shahriar, as long as your phone boots, you wouldn’t need to worry about those two.

      Magisk is handling both forced-encryption and DM-verity for you. These are parts of the kernel/boot. Again, everything is fine on your end, so don’t worry.

      If you have any more questions, please do let me know.

    2. thanks for your response to me.
      now i am fine with root,but one more questions, if any ota updates comes then how i will able to update? i am worried because i rooted my phone with twrp….tell me the whole processes.

    3. Hi again, Shahriar. Sure, when an update arrives, you can follow the steps in this guide.

      I also have two additional advice for you to make things easier when it comes to installing OTA updates on rooted devices.
      1) Disable automatic system updates as soon as possible. The instructions for this could be found under step #1 of the guide I linked.
      2) Do not mount and modify the /system partition of your phone. This means, do not modify the build.prop directly or delete/add any APK files from/to the system partition. Use Magisk Modules for any modifications that you want to perform.

    4. thank you again.i used to visit your website regular. and you man really very responsive.and thank for helping me out again.if you dont mind i am curious to know about boot.img file…i wanted to know…how can i get backup or pull out boot.img file that you updated in this topic regularly.i mean i want to get my own boot img file.
      thanks.

    5. Thank you for your kind words Shahriar! I really appreciate them.

      I personally keep a lookout for the full OTA package or fastboot image of the new update, whichever I get my hands on first. I try and find these on XDA forums, Reddit, or the MIUI forums.

      Extracting the boot.img file from the fastboot image is plain and simple. You just have to extract the archive and you’ll get it.

      However, things are a bit difficult with full OTAs. The boot.img file resides inside the ‘payload.bin’ file. To extract this file, I use an open-source script that works on Python.

      Once the payload is extracted, I get the boot.img from it. If you want to learn more about Payload.bin in Android OTA files and how to extract them, see this guide I wrote. I recently also found a way to extract payload.bin directly on the device, without using a PC. Will be updating that method in the linked guide soon.

  3. Hey! Im using a mi a2 lite. I always get stuck in the part where we have to disable the encryption. When i transfer it to the internet storage, it doesnt appear in install section of the custom recovery. Pls help

    1. Hi Namii. Try this, after formatting the /data partition in TWRP, go to the ‘Reboot’ menu and tap on ‘Recovery’ to reboot your phone back in TWRP recovery.

      After that, try transferring the file and see if it shows up in the ‘Install’ menu of TWRP.

    2. Thanks for the quick response!
      I should do this after the 4th part of the format data encryption step right? (Cuz I’m kind of new to these things :p)

    3. Hi again, Namii. Glad you were able to figure it out and also that it worked. I will quickly update this post as I missed that step. So thanks for bringing it to my notice.

    4. Hey could u just help me with one more thing? How do we remove the twrp recovery and get the stock recovery back? (Mi a2 lite)

    5. Hi Namii. For that, you must flash the stock boot image corresponding to the software build number installed on your phone.

      Since both TWRP and Magisk reside in the /boot partition, both will be overwritten.

  4. I just booted my device with twrp 3.3.1-0 img,and when booted it asked for pattern to decrypt data and decrypted successfully. Does this mean I don’t have format data partition and flash disable encryption zip.
    Jasmine sprout

    1. Hi Anand. Go to the ‘Install’ menu in TWRP. If you see the files/folders on your internal storage, then no, you don’t need to format the /data partition.

  5. Hello, many thanks for all your work and valuable instructions! I have magisk root and as you can tell, unlocked bootloader since long time.
    From how i understood intructions, it is absolutely necessary for me to Format data and disable encryption?
    I vaguely recall installing magisk first time via twrp but too old to memorize exact procedure back then :S
    Format data – does that mean os erase and need to install new rom?

    1. Hi. Thank you for the kind words, they keep me going.

      Encryption only needs to be disabled if TWRP cannot decrypt the /data partition (internal storage).

      Formatting the /data partition is like factory resetting the phone and erasing all the data on it, including the internal storage. The OS won’t be erased at all.

  6. Do you have unroot method? Or I can just easily remove TWRP by replacing it with stock boot image and uninstall magisk?

    1. Hi Raynaldi. The best approach to do it is by first uninstalling Magisk completely via Magisk Manager. This will unroot and restore the stock boot image. Thus, uninstalling TWRP too, because it is present in the /boot partition too.

      To further ensure the integrity, you can also flash the stock boot image using the “fastboot flash boot stock_boot_*******.img” command.

      Hope that helps.

    2. I have little problem with uninstalling magisk on my Mi A2 Lite September Update. When I uninstall magisk via magisk manager app, my A2 lite keep stuck in TWRP until I flashed magisk again. That means my device still rooted to not stuck in TWRP. Do you have solution for this?

    3. Hi Reynaldi. That’s because both Magisk and TWRP reside inside the boot partition of your device. When you uninstall using Magisk, only Magisk is removed, while TWRP is still there.

      First off all, perform a “COMPLETE UNINSTALL” using Magisk Manager.

      Then simply download the stock boot image for your Mi A2 Lite September v10.0.14.0 Update (Download link)

      Once downloaded, boot your phone into Fastboot Mode and execute the following command:
      .\fastboot flash boot stock_boot_10.0.14.0_mi_a2_lite.img

      Next, execute the following command to reboot your phone into the OS:
      .\fastboot reboot

      Your phone should now be completely unrooted with no TWRP installed. BTW, I am curious to know as for what specific reason would you want to unroot the phone?

    4. Thank you, I am gonna try it later because my phone still in daily use.

      There are some rumors that Mi A2 Lite will get Android 10. I can’t get OTA update if I’m still in root mode right? Or do you know another method to get update even in root mode?

    5. Hi again Reynaldi. Yes, there are possibilities because Android One devices are proposed to get 3 major Android version upgrades. The phone came with Android Oreo, and might also receive Android 10 in the future.

      As for OTA updates, yes, you can install them even when the phone is rooted. How? We already have a detailed guide here on how to do it (Both in case if you have TWRP + Root setup or simply Root without TWRP setup).

  7. Dear Sir,

    I have followed each and every step, formatting data, flash disable description, etc.
    still when i reboot into recovery after successfully flashing twrp the screen stops at teamwin screen and does not go forward.
    Im a not able to flash any custom ROM du to this.
    Please help !!!

    1. Hi Sandeep. I would need a bit more insight into the situation. Did you succeed in rooting your phone previously? Was it booting normally into the OS and TWRP after that?

    2. Yes sir, first boot successful, checked for root, it’s working well. Wanted to flash custom rom. Hence rebooted to recovery. But recovery stops at teamwin screen and does not go forward from there.
      Tried manually reboot to recovery and through adb command as well….

    3. Hi again. Let me know one more thing. Do you have the Mi A2 or the Mi A2 Lite?

    4. Hi. Okay, so here’s what i want you to try:

      1) Download the TWRP recovery image and installer zip files.
      2) Temporarily boot your phone into TWRP by using the ‘fastboot boot’ command.
      3) Once your phone boots into TWRP by doing that, flash the custom ROM and then flash the TWRP installer zip and Magisk zip files. Make sure to follow the order of flashing I stated (Custom ROM > TWRP Installer > Magisk).
      4) Reboot your phone. It should then boot into the custom ROM. After that, try booting into the custom recovery using the buttons combination.

      Let me know how that goes.

    5. Sir.,
      Did not succeed, with these steps.

      Actually i flahsed this – ‘Disable_Dm-Verity_ForceEncrypt_05.21.2019’

      Now everything works properly i can reboot into TWRP without any problem.

      Please update this file instead of this ‘Disable-Force-Encryption-Treble.zip’

      Also used Magisk-v19.1 instead of Magisk-v19.3

      After many failures….Atlast ….

    6. Hi Sandeep. Thanks for informing me about this. The file you used is the Universal DM-Verity, Forced-Encryption, and Disk Quota Disabler by Zackptg5. I have updated the file in the download section and also make amendments to the instructions where needed.

      Thanks again!

    7. Sir,
      Now I am able to reboot into TWRP properly on my Mi A2. However after doing wipe in cache, dalvik, data, etc, I am flashing custom ROM ~ Pixel Experience ROM, ROM flashes properly, however after successful flashing it shows a warning, No OS installed.
      When rebooted it loops continuously…..?

    8. Did you flash the TWRP zip and Magisk zip (In that order) after flashing the ROM?

    9. Yes sir.
      Flashed image, then boot into TWRP and flashed TWRP zip file, next flashed DM-Verity, Forced-Encryption and then Magisk. Is the sequence correct?

    10. Yes, correct sequence. Now try without the DM-Verity/Forced-Encryption disabler. ROM > TWRP zip > Magisk.

    11. After several attempts tried the following steps, it worked FINALLY 🙂

      if you’re coming from stock, you need to do this first

      type the following command (data and files will be wiped)

      Code:
      fastboot -w
      fastboot set_active b

      Used this twrp : https://androidfilehost.com/?w=files&flid=294154
      The the steps like this :

      1- flashed the ROM zip
      2- flashed TWRP zip.
      3- Tap on Advanced > Tap on Slot A, as i selected slot B in the beginning. (Slot B if you were on A)
      4- reboot recovery
      5- flash Gapps if required.
      6- Flash DM-VERITY & FORCEENCRYPT DISABLER.zip
      (https://zackptg5.com/downloads/Disable_Dm-Verity_ForceEncrypt_05.21.2019.zip)
      8- flash Magisk 19.3 (preferably latest one)
      9- reboot to system
      Voila ! you are in Custom ROM 🙂

    12. Hi again Sandeep. Thanks for clearing it out for me. It shall definitely prove useful to other readers.

  8. Hi! Thanks for the input.

    For other users, here is the translation: WORKS!! Disable forced encryption. Key to start the system is to flash the Magisk.

    If you’re on Pie, you will need to first disable forced-encryption. It is important.

    1. I am also on v10.0.8.0. Tried the whole process but it did not work, ended up with the “System Damaged” sequence then after a long wait (and boots) it re-encrypted itself.
      To be fair I did not try the aboot_a/b flash procedure because I am afraid to mess with my bootloader which in my v10.0.8.0 was free to unlock without applying for authorization at Xiaomi. Also I have already rooted and patched boot.ini without my bootloader complaining so not sure if flashing aboot_a/b will help. Any ideas please?
      Thanks to all for your efforts anyway, I appreciate your work.
      Christos.

  9. Hi Lex. Please check the newly added ‘F.A.Q’ section at the bottom of the post. The fix has been provided now.

  10. Hi Greg. After seeing Lex’s and finally your comment, I went ahead and dug XDA for related info. I did find something that might be useful. But for that, please let me know the exact firmware version installed on your phone, is it 10.0.3.0 or 10.0.4.0?

    1. Hi Vijay. Yes, it will work. Just download the correct patched boot image corresponding to your version 10.0.2.0 and follow the method.

  11. Hi Lex. The System has been destroyed message would not create any problems while booting the TWRP image. Once you enter the ‘fastboot boot’ command, let the phone boot into TWRP. In TWRP, flash Magisk 18.1 zip and then boot your phone back into the OS.

    BTW, which version of Magisk did you install?

    1. I installed the twrp file that was in the thread,and even if i change slots i can boot into both system and twrp

    2. same with me. i got stuck on twrp logo too after hold power + volume up button. already follow all the instruction. My phone Mi A2 Oreo

    3. The same problem on my side :/ I stuck on TWRP team logo and can’t get into actaul menu… I using “Mi A2” with Android 9 (Pie) and executed “adb sideload twrp-installer-jasmine-3.2.3.zip” sucesfully. Any clue what should I do to get a Recovery menu?

    4. Hi Ed. So when you execute “fastboot boot TWRP-3.2.3-jasmine-20181201.img”, your phone doesn’t reach the TWRP main menu?

    5. Hi, I executed “fastboot boot TWRP-3.2.3-jasmine-20181201.img” -> TWRP menu opened -> ‘Advanced’ > ‘ADB Sideload’ -> executed “adb sideload twrp-installer-jasmine-3.2.3.zip” sucesfully -> rebooted phone to system and disconnected usb -> turned phone off -> Volume Up + power buttons -> TWRP team logo appears but NO menu 🙁

    6. Hi again! When I executed “fastboot boot TWRP-3.2.3-jasmine-20181201.img” -> TWRP menu OPENED and I was able to perform other actions -> ‘Advanced’ -> ‘ADB Sideload’ -> executed “adb sideload twrp-installer-jasmine-3.2.3.zip” sucesfully -> rebooted phone to system and disconnected usb -> turned phone off -> Volume Up + power buttons -> TWRP team logo appears but NO menu 🙁 Maybe I should perform “Format Data Partition and Disable Encryption” directlly after executing “adb sideload twrp-installer-jasmine-3.2.3.zip” ?

    7. No Ed. I don’t think that’s gonna help here. There’s something with January Pie update for Mi A1/A2/A2 Lite that literally breaks TWRP and renders different errors.

      For now, please re-flash the stock boot.img from the Fastboot ROM. I will keep you posted when I have found a fix over at the XDA forums.

    8. Hi, Thanks for reply! As I’m a novice in this topic could you please give a quick guide how to “re-flash the stock boot.img from the Fastboot ROM”? That would be really helpful 🙂 Thanks!

    9. Ok, As I understand correctly – I have to download full official ROM for Mi A2; extract “boot.img” file from it and execute those commands in BOTTLOADER -> “fastboot flash boot_a C:\adb\images\boot.img” and “fastboot flash boot_b C:\adb\images\boot.img” ? Please correct me if I’m wrong.

  12. The screen will only appear if your phone is completely unmodified. Did you modify the boot image in any manner? Like using a patched boot?

    1. ohh yaa it worked for me, even though after following all the steps, my phone is not get rooted.
      few difference which i noticed is, in step 9 when you have checked for the active slot it was ‘a’ for you and in my case it is ‘b’ and as per step 15 when i did reboot it did not get reboot it was just showing the ‘andriodone’ symbol, to reboot the device again i had to go to fastboot and set active slot to ‘b’ and do ‘fastboot reboot’.

      Thanks,

    2. No. We don’t have an IRC channel. But you can get in touch with us on Facebook.

    3. Hi again. So, is your device finally rooted or not?

      Which was your active slot before starting the process?

    4. No it’s not 🙁

      The active slot before the process is ‘b’, that’s weird right ?

      Thanks

Post a Comment

Comment Policy: We welcome relevant and respectable comments. Only input your real first name and valid email address if you want your comment to appear. Read our comment policy fully before posting a comment.