How to Unlock Bootloader on Xiaomi Mi A2/A2 Lite
An unlocked bootloader is vital if you wish to install custom ROMs, kernels, mods, or a custom recovery like TWRP.

An unlocked bootloader is vital if you wish to install custom ROMs, kernels, mods, or a custom recovery like TWRP. Follow this comprehensive guide on how to unlock the bootloader on Xiaomi Mi A2/A2 Lite using Fastboot.
The Xiaomi Mi A2 and the A2 Lite are successors to last year’s Mi A1. Following its footsteps, the all-new Mi A2 also comes as a part of the Android One program. Despite being offered the clean stock Android experience, users might often crave for additional features. Like flashing Magisk Modules, installing mods like ViPER4Android and Dolby Atmos for enhanced audio, using root-enabled applications, etc. Most of these things rely on a custom recovery such as TWRP and/or root. But before you can even install TWRP or root, you must first unlock the bootloader on Xiaomi Mi A2/Mi A2 Lite.
Unlike other Xiaomi phones, unlocking the Mi A2/A2 Lite bootloader does not require the Mi Unlock tool. This means you do not need to have a registered Mi account and neither do you have to wait for days to finally unlock the bootloader. Rather, the process is much simpler and only requires you to execute the dedicated fastboot unlock command. We have prepared this tutorial to take you through the process in a step-by-step manner.
Requirements
- Unlocking the bootloader on the Mi A2 and Mi A2 Lite will wipe all the data stored on the device. We will still strongly suggest you take a full backup of all your data. This shall help you avoid any data loss in-midst or post the process.
- Charge the phone to a sufficient battery level (60% or above) to avoid any sudden shutdowns during the unlock process.
- You must install and set up Android platform-tools on the PC. You can follow our tutorial for doing this manually or use the Minimal ADB and Fastboot tool to automate the process.
- Download and install Xiaomi USB drivers on the PC.
How to to Unlock Bootloader on Xiaomi Mi A2/A2 Lite
- Power off your Mi A2/Mi A2 Lite completely.
- Boot your Mi A2 into Fastboot Mode.

- Connect the phone to your PC while it is in Fastboot Mode.
- Go to C:\platform-tools on the PC where the ADB and Fastboot binaries are present.
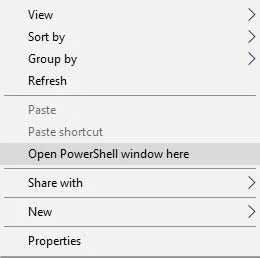
- Hold the SHIFT key on the keyboard and right-click on an empty space inside the folder.
- Select ‘Open PowerShell window here’.
-
Verify the connection between the device and the PC using:
.\fastboot devices
Linux/macOS:
./fastboot devices
-
The command should output the device ID along with the ‘fastboot’ message. If not, then make sure that you have properly installed the USB drivers.
-
Now, unlock the bootloader on your Xiaomi Mi A2/A2 Lite using the following command:
.\fastboot flashing unlock
Linux/macOS:
./fastboot flashing unlock
-
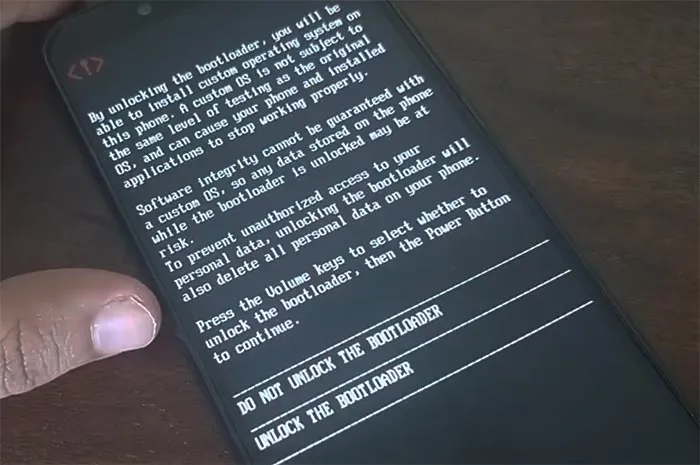
As soon as the command is executed, the confirmation prompt will appear on the phone’s screen.
-
Use the Volume keys to highlight ‘UNLOCK THE BOOTLOADER’ and press the Power button to confirm the unlock process.
-
The phone should automatically boot into the OS.
-
Now, reboot your Mi A2/A2 Lite back into the Fastboot Mode and enter the following command to further unlock the critical partitions for the phone:
-
On Windows:
.\fastboot flashing unlock_critical
-
On macOS/Linux:
./fastboot flashing unlock_critical
-
-
As soon as the fastboot command is issued, you’d be prompted to confirm the bootloader unlock on your phone’s screen. Simply use the Volume keys to move the selector to “UNLOCK THE BOOTLOADER” and press the Power key to confirm.
That’s it! The bootloader on your Mi A2/A2 Lite should now be fully unlocked. Once your phone boots into the Android OS, go ahead and follow the on-screen instructions and finish the setup wizard.
With that done, you can go ahead and install TWRP recovery and root Xiaomi Mi A2/A2 Lite. Or, you can also simply root the phone without TWRP, which is best if you want to install OTA updates on rooted phone with Magisk.
We hope that you found this tutorial to be useful and easy. Though, if you have any questions regarding the procedure, then feel free to write to us via the comments section below.
Comments
Comments are moderated, and published only if they are relevant to the topic and add value in a constructive way. If you disagree with something, please be polite and respectful. We suggest you read our comment policy before commenting.