How to Boot Galaxy Note 9 Download Mode and Recovery Mode
Today here, we will show you how to boot Galaxy Note 9 Download Mode and Recovery Mode easily. Like any other Android device, Samsung phones also offer

On this page
Today here, we will show you how to boot Galaxy Note 9 Download Mode and Recovery Mode easily.
Like any other Android device, Samsung phones also offer different pre-boot modes for carrying out certain actions or procedures. If you own the Galaxy Note 9 and are thinking of dipping your toes into the custom stuff, then you must be well acquired with two specific modes - Download Mode and Recovery Mode.
You will often be asked to boot Galaxy Note 9 into either of these modes while performing the instructions in various tutorials here on our blog. If you’re new to Samsung devices, then do not worry, the steps below will help you boot Galaxy Note 9 Download Mode and Recovery Mode. This tutorial will work for any Galaxy Note 9 model on any carrier including but not limited to Verizon, T-Mobile, Sprint, and AT&T.
How to Boot Galaxy Note 9 Download Mode?
Download Mode on Samsung devices is a pre-boot state that lets you flash certain packages via utilities like the Odin Flash Tool. For instance, if you’d like to flash a custom recovery like TWRP or flash the stock firmware to restore your phone, then you will need to enter Download Mode on your Galaxy Note 9.
The process of booting Samsung devices into Download Mode using the buttons combination has been similar across various Samsung phones for years. However, with the inclusion of the ‘Bixby’ button and removal of the ‘Home’ button on the Galaxy S8/S8+ and Note 8, it changed a bit. And for the 2018-released Galaxy Note 9, the method has changed yet again. Well, if you’re still not aware of the new button combination, then go through the steps below to boot Galaxy Note 9 Download Mode.
- Press and hold the Power button of your Galaxy Note 9.
- Tap on ‘Power off’ when the Power menu appears on the screen.
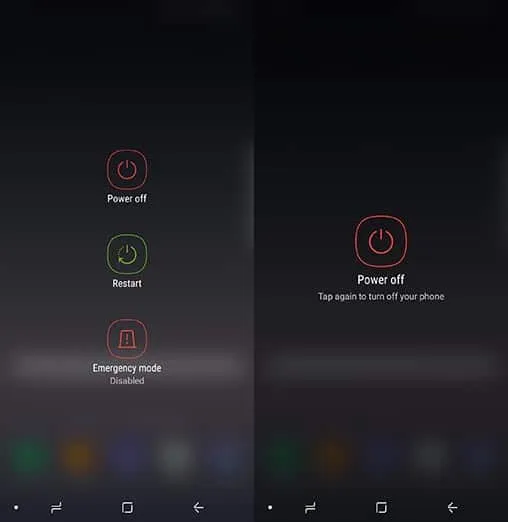
- Tap on ‘Power off’ again to confirm the shutdown.
- Hold the Volume Down and Bixby button on your Note 9.
- While holding the said buttons, connect your phone to the PC using the USB cable.
- The Download Mode warning message should appear on the screen.
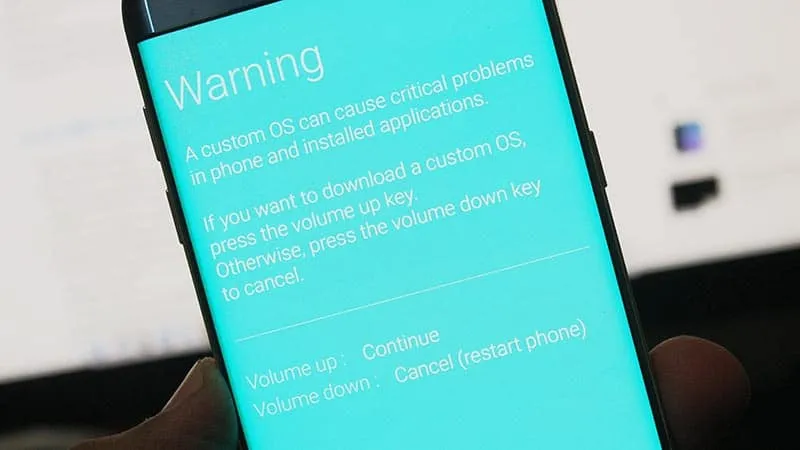
- Finally, press the Volume Up button to continue and boot Galaxy Note 9 Download Mode.

Now that you have booted into Download Mode on Galaxy Note 9, you can go ahead and connect it to the PC for flashing stock firmware/custom binaries via Odin.
How to Boot Galaxy Note 9 Recovery Mode?
The next most common pre-boot mode on any Android device, including the Galaxy Note 9 is the Recovery Mode. And as the name suggests, it allows you to recover your phone by factory resetting it, wipe the data/cache partitions, sideload incremental OTA update packages and more.
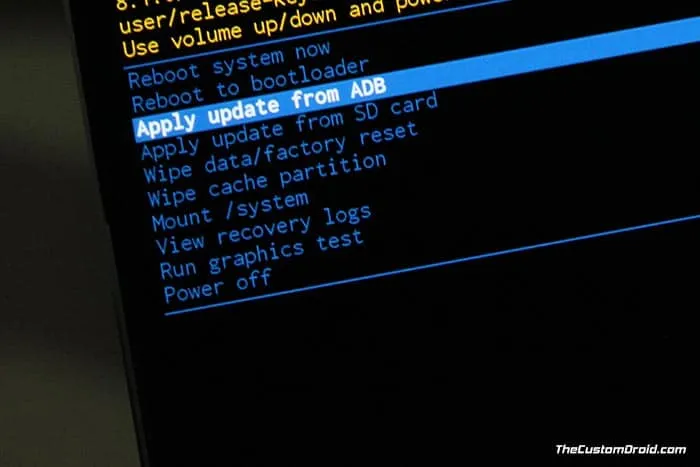
When we talk about booting into Recovery Mode, we generally refer to the ‘Stock Recovery’ that comes pre-installed on the Galaxy Note 9. However, the booting process stays the same even if a custom recovery is installed, such as TWRP recovery.
Now, there are two different ways to boot Galaxy Note 9 Recovery Mode. You can either use a special button combination when the phone is switched off. Or, you can execute an ADB command via a command-line tool. Both the methods have been listed below. To add, Method 2 will require you to enable USB debugging and also install Android Platform-tools on the PC.
Method 1: Using Buttons Combination
- Press and hold the Power button on the Galaxy Note 9.
- Tap on ‘Power Off’ on the power menu screen.
- Tap on ‘Power Off’ again to confirm the shutdown.
- Ensure that the phone is switched off completely.
- Finally, press and hold the Volume Up, Bixby, and Power button simultaneously to boot Galaxy Note 9 Recovery Mode.
- Your phone should now be in stock recovery mode, or in TWRP recovery mode if you have that installed.
Method 2: Using ADB Command
- Make sure that USB debugging is enabled on your Galaxy Note 9.
- Connect your Galaxy Note 9 to the PC using the USB cable.
- Open the folder where the ADB and Fastboot binaries are present (e.g. C:\adb).
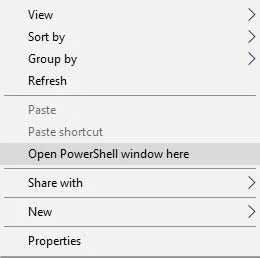
- Hold the SHIFT key and right-click on an empty space inside the folder.
- Select ‘Open PowerShell window here’.
- Enter the following command to confirm that the phone is being detected properly:
adb devices - Agree to any prompts that show up on the phone’s screen.
- Finally, boot Galaxy Note 9 Recovery Mode using:
adb reboot recovery - The phone will instantly reboot and enter into the stock/TWRP recovery mode.
So, now that you have succeeded to boot Galaxy Note 9 Download Mode and Recovery Mode. In several of our Note 9-specific tutorials, you will be asked to boot your phone your phone in either of the modes. And that is where this guide will come in handy.
If you have any questions about the process, then leave a comment below and ask us.
Comments
Comments are moderated, and published only if they are relevant to the topic and add value in a constructive way. If you disagree with something, please be polite and respectful. We suggest you read our comment policy before commenting.