Advertisement

In this tutorial, you will learn how to enable Camera2 API on Xiaomi Mi A2 and Mi A2 Lite without root. Once enabled, you can download ports of various versions of the Google Camera app from below and install it on your phone.

In the past few years, Google Camera (GCam) Port from Pixel devices has gained immense popularity. But it is not just known for the amazing and latest features, it also enhances the camera quality and allows you to take great pictures using AI software. It is, in several ways, better than the stock camera app that comes pre-installed on the phone.

But in order to install Google Camera Port, you must first enable Camera2 API on your Xiaomi Mi A2/A2 Lite. Even though Xiaomi phones run the stock Android software, they still do not support Camera2 API officially. It’s easy to enable it when your phone is rooted, by editing the build.prop file manually or using a Magisk module.

But if your phone is not rooted, you will need to follow a different approach. And this guide will take you through the same. So, just follow the instructions below to first enable Camera2 API without root and then install Google Camera Port on Xiaomi Mi A2/A2 Lite.

Related Article: How to Root Xiaomi Mi A2/A2 Lite without TWRP (Magisk)

Table of Contents

Download Patched Boot Image

Here, we have provided Magisk Patched Boot Images for Mi A2 and Mi A2 Lite to temporarily root it. We have also provided stock boot images for the corresponding firmware, to help you unroot if you mistakenly flash the image.

Starting with the January 2021 update, patched boot images will not be provided on this page. I do not own this device anymore. You can easily patch the stock boot image on your phone itself by following step #2 of this tutorial.

For Xiaomi Mi A2 (jasmine_sprout)

V11.0.28.0.QDIMIXM Stock Boot Image
V11.0.27.0.QDIMIXM Stock Boot Image
V11.0.22.0.QDIMIXM Stock Boot Image
V11.0.21.0.QDIMIXM Stock Boot Image
V11.0.20.0.QDIMIXM Stock Boot Image
V11.0.19.0.QDIMIXM Stock Boot Image Patched Boot Image
V11.0.17.0.QDIMIXM Stock Boot Image Patched Boot Image
V11.0.15.0.QDIMIXM Stock Boot Image Patched Boot Image
V11.0.14.0.QDIMIXM Stock Boot Image
V11.0.13.0.QDIMIXM Stock Boot Image
V11.0.12.0.QDIMIXM Stock Boot Image
V11.0.11.0.QDIMIXM Stock Boot Image Patched Boot Image
V11.0.10.0.QDIMIXM Stock Boot Image Patched Boot Image
V11.0.8.0.QDIMIXM Stock Boot Image Patched Boot Image
V11.0.5.0.QDIMIXM Stock Boot Image Patched Boot Image
V11.0.4.0.QDIMIXM Stock Boot Image Patched Boot Image

For Xiaomi Mi A2 Lite (daisy)

V11.0.21.0.QDLMIXM Stock Boot Image
V11.0.20.0.QDLMIXM Stock Boot Image
V11.0.18.0.QDLMIXM Stock Boot Image
V11.0.17.0.QDLMIXM Stock Boot Image
V11.0.16.0.QDLMIXM Stock Boot Image Patched Boot Image
V11.0.14.0.QDLMIXM Stock Boot Image Patched Boot Image
V11.0.12.0.QDLMIXM Stock Boot Image Patched Boot Image
V11.0.11.0.QDLMIXM Stock Boot Image Patched Boot Image
V11.0.10.0.QDLMIXM Stock Boot Image Patched Boot Image
V11.0.7.0.QDLMIXM Stock Boot Image Patched Boot Image
V11.0.5.0.QDLMIXM Stock Boot Image Patched Boot Image
V11.0.4.0.QDLMIXM Stock Boot Image Patched Boot Image

How to Enable Camera2 API on Xiaomi Mi A2/A2 Lite without Root?

The process is quite easy. In order to enable the API, you must first boot the patched boot image to temporarily root your phone. Once that is done, you can use a Terminal Emulator to execute the commands that will enable Camera2 API. Once the API has been successfully enabled, you can reboot your phone to fully unroot and then install the Google Camera Port. By using this method, you will still be able to take OTA updates without any issues.

In order to temporarily boot the patched boot image, you will need to install Android SDK Platform-Tools on your PC and unlock the phone’s bootloader first. Once done, follow the steps below to enable Camera2 API on your Xiaomi Mi A2/A2 Lite.

  1. Download the patched boot image for the software build number installed on your phone.
  2. Extract the contents of the downloaded ZIP file to get the ‘magisk_patched.img’.
  3. Copy the extracted patched boot image file to the folder where the ADB/Fastboot tools are installed on your PC (e.g. C:\platform-tools).
  4. Now, launch the command-line inside the Platform-Tools folder.
  5. Power off your phone completely. Then hold the Volume Down and Power buttons simultaneously to boot it into Fastboot Mode.
    Enable Camera2 API on Xiaomi Mi A2/A2 Lite - Boot into Fastboot Mode
  6. Connect your phone to your PC using a USB cable.
  7. Enter the following command to temporarily boot the Magisk patched boot image on your Mi A2/Mi A2 Lite:
    fastboot boot boot-image-filename.img
  8. Replace “boot-image-filename.img” with the actual filename of the patched boot image you’re using. For example, if you downloaded the V11.0.6.0 patched boot image, then the command should be the following:
    fastboot boot magisk_patched.img

    Enable Camera2 API on Xiaomi Mi A2/A2 Lite - Boot Magisk Patched Boot Image

  9. Just as the command is entered, your Mi A2/Mi A2 Lite should boot into the OS with temporary root.
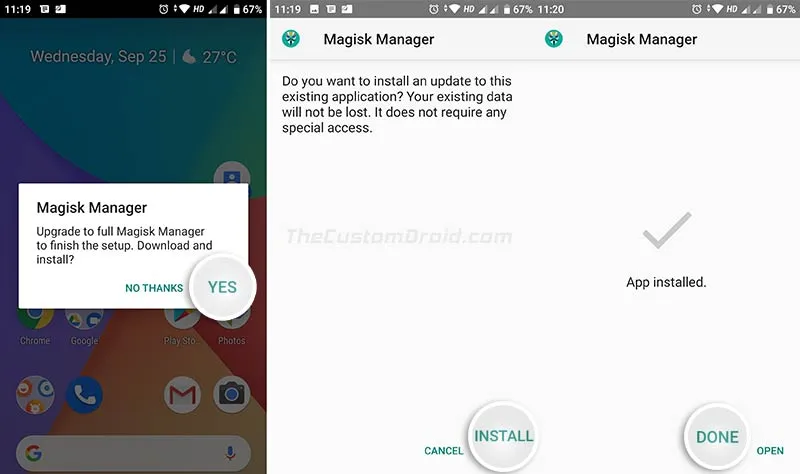
  10. Right now, only the Magisk Manager stub is installed on your phone. In order for Magisk to work properly and to grant superuser permissions, you must first install the full Magisk Manager.
  11. Simply go to the phone’s app drawer and launch the Magisk Manager app (In case the app doesn’t show up, download the latest APK from here and install it on your phone).
    • Note: Make sure that you install the app to the internal storage only, and not to the SD card via Adoptable Storage.
  12. Select “Yes” when prompted to upgrade to full Magisk Magisk Manager and follow the on-screen instructions.
    Upgrade to Full Magisk Manager on your Xiaomi Mi A2/A2 Lite when prompted
    (For reference only)
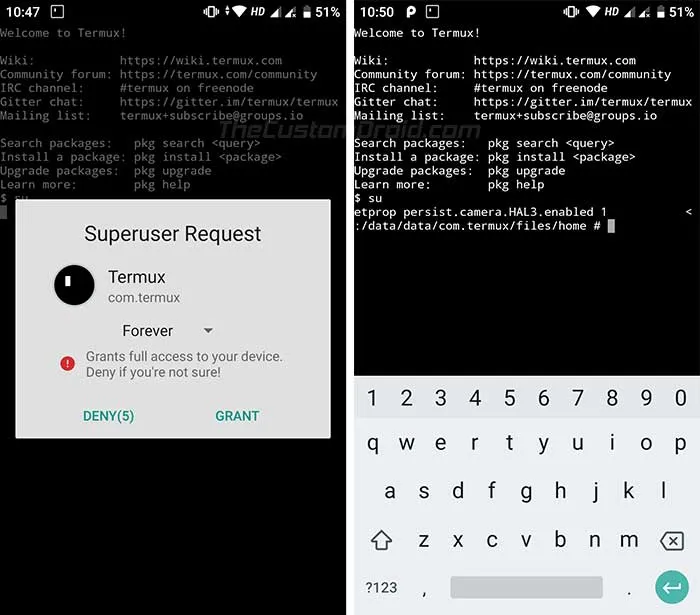
  13. Once Magisk Manager is fully installed, download and install Termux (Terminal Emulator) on your phone
  14. Once installed, launch Termux and enter the following command:
    su
  15. Grant superuser permissions to Termux when prompted
    Enable Camera2 API on Xiaomi Mi A2/A2 Lite without Root - Terminal Emulator
  16. Finally, enable Camera2 API on Xiaomi Mi A2/A2 Lite by entering the following command:
    setprop persist.camera.HAL3.enabled 1
    setprop persist.vendor.camera.HAL3.enabled 1
    setprop persist.camera.stats.test 5
    setprop persist.vendor.camera.stats.test 5
  17. Once the commands have executed successfully, reboot your phone to uninstall Magisk and unroot completely.

For further confirmation, you can also check Camera2 API support using an app. And finally, follow the next section to install Google Camera Port on Xiaomi Mi A2/A2 Lite.

Download Google Camera Port for Xiaomi Mi A2/Mi A2 Lite

There’s no dedicated Google Camera Port, you can try different versions from here. However, after digging enough on XDA forums, I was able to find a few versions of the Google Camera ports for the Mi A2 and Mi A2 Lite.

As of 13 November 2019, Google Camera 7.2 and 7.0 Ports for Xiaomi Mi A2 and Mi A2 Lite are available for download. v7.2 ports are only compatible with Android 10, while v7.0 ports can be installed on both Android 9 Pie and Android 10. Thanks to Kwanthay for tipping us!

General advice: Not all GCam Ports are perfect, some features like NightSight and HDR+ might be buggy on some ports, while not on some others. I have tried and gathered the most stable ones as recommended by the users themselves on XDA forums. Start by trying the first port listed and move down to test other versions until you find the one that works best for you.

How to Install

  1. Download Google Camera Port for Xiaomi Mi A2/A2 Lite
  2. Open a file manager app on the phone
  3. Navigate to the location where the APK file was downloaded
  4. Tap on the APK file to install Google Camera Port on Xiaomi Mi A2 and Mi A2 Lite
    Install Google Camera Port on Xiaomi Mi A2 and Mi A2 Lite
  5. Follow the on-screen instructions to finish the installation
  6. Once Google Camera has been installed, go to the app drawer and launch it

So, this was how you can enable Camera2 API on Xiaomi Mi A2/A2 Lite and install Google Camera Port on it. If you have any questions, please leave them down in the comments.

Huge thanks to f.y, Roy Goldberg, Nico van Draanen, and 4KhadaJhin4 for their contribution.

Comments

  1. It worked! but my default camera app is now crashing on opening.. how do I reset the changes that I have caused. Is there a tutorial for that? Please help me in this regard

    1. Nithin, that’s a known bug since the Android 10 update. You can either enable camera2 API and use GCam, or keep the API disabled and use the stock camera app.

      The both cannot be used simultaneously.

    1. Hi Daniel. If you need the stock boot for a specific firmware version, I can do that for you.

      Could you point to the firmware version for which you want the stock boot image?

      You can do so either by extracting the fastboot ROM (the easiest) or by extracting the Payload.bin file from a full OTA package. Here are the instructions to extract the Payload.bin file.

      You can get both of these FW packages from the Mi A2/A2 Lite Update repository I maintain.

    2. Thanks for the information. Could you tell me more details about fastboot ROM extraction please. Do you need a root for this in advance?

    3. Extracting the fastboot ROM is nothing but extracting a tarball (.tgz) package using a utility like WinRAR or 7-Zip.

      Just install one of those utilities on your computer, download the fastboot ROM, right-click the file and extract it.

  2. Hi Dhananjay,

    Actually after installing magisk app.. I opened it and that app asked to “restart the mobile” and i restarted my mobile (all this done before installing the TERMUX app). & Then after installed termux app it shows:- No su program found on this device. Termux does not supply tools for rooting.

    So i uninstalled magsik app normally and started again installing magsik app using Patched boot image ‘this time I didn’t restarted my device after installing Magsik app, so as usually I followed the instructions it worked 😃

    So i noticed that :- after installing Magsik app if the device is restarted then the problem occurs at TREMUX app

    Thank you.

    1. Yes, Karthik. That’s how it works when you temporarily boot the patched boot image. I am glad you figured it out on your own.

  3. What changes I’m supposed to do in that 4 lines of termux code to disable camera2 api and use stock camera??

    1. Hi Fenil. The value for those lines should be turned back to “0” if you want to disable the API and use the stock camera.

  4. I have downloaded the patched image and the bootloader of my Mi A2 is unlocked. But when I am booting the patched image through power shell, it reboots into the stock rom. Patched image is not booting up.

    I am using: patched_boot_11.0.10.0_mi_a2.img

    1. Hi Tanvir. Yes, after you issue the command on your PC, your phone will reboot and enter the OS. That’s how it should be.

      After it boots, go to the app drawer and open the ‘Magisk Manager’ app to verify that your phone is rooted or not. It should show Magisk as installed.

  5. Hi, I have just enabled camera 2 api in my mi a2 lite, running on Android 10 latest patch. Didn’t face any issue while following the steps. Your content is very informative. I just have one question. Can I lock the bootloader after enableing camera 2 api? Will it boot loop the device?

    1. Hi Fahim. Glad that you’re able to enable it and thanks for the appreciation.

      I wouldn’t recommend locking the bootloader. You will need to perform this same process every time you install a new update on your phone. Without an unlocked bootloader, this won’t be possible and relocking, then unlocking bootloader again and again would be messy. So, I’d suggest sticking to the unlocked bootloader.

  6. I flashed the stock img and locked the bootloader again after enabling camera2 API procedure. Gcam didn’t work. now repeating the procedure again and flashing patched img. I want to ask if this is necessary to stay bootloader unlock and patched img?

    1. Hi Shakeel. First off, don’t lock the bootloader as it will undo the commands you have used to enable Camera2 API and that’s the reason why you cannot use GCam.

      Next, don’t flash the patched boot image, instead, you have to temporarily boot it using the command mentioned in the instructions above.

      To make it more clear, the “fastboot boot” command is for temporarily booting (and rooting) and the “fastboot flash” command is for permanently flashing. You have to use the former.

  7. Hey, I’m followed all the steps and it worked perfectly. The only issue I had it was that after rebooting (phone reboot), Magisk Manager still installed, and I only could uninstall it from my android device manually (hold on the app > Unistall). I’m a little worried since you said that with the reboot, Magisk would disappear but it did not.
    Will this be a problem in the future?
    P.S. Thanks for the tutorial 😀

    1. Hi Erik. Thanks a lot for your feedback, as well as for those nice words.

      The Magisk Manager application is just an app, like any other. It doesn’t root your phone and is only used to manage root permissions if your phone is rooted. Normally, if you flash Magisk patched boot image (instead of temporarily boot it, as we did here), then the Magisk Manager app gets installed automatically and will be uninstalled automatically when you unroot.

      Now since we’re only temporarily booting the patched/rooted boot image, the application’s behavior isn’t the same as above and thus it needs to be removed manually.

      So, no, this won’t create any problems for you. I hope this clears your question.

    1. Sorry but I can’t.
      I unlocked, everything ok.
      I flashed the “patched_boot_10.0.17.0_mi_a2_lite.img” file but there was no Magisk on reboot.
      So I installed apk for Magisk 7.1 but starting the app it tells me that Magisk is not installed.
      I tried from inside the Magisk app to flash “patched_boot_10.0.17.0_mi_a2_lite.img” again but it always tells me that Magisk is not installed and I can’t do it from Termux.
      What should I do?
      Thanks!

    2. I believe (I hope) to have solved.
      After locking the Mi A2 Lite in bootloop (at times I use it as an ashtray …;)), I flashed v.13 of the software with MiFlash and then I made the following steps:

      1 – Flashing from Magisk Manager “patched_boot_10.0.18.0_mi_a2_lite.img”
      2 – Copy from Internal \ Download “magisk_patched.img” under C: \ adb
      3 – Restart in recovery
      4 – Flash:
        – fastboot devices
        – fastboot flash boot magisk_patched.img
        – fastboot reboot
      5 – Check from Magisk Manager if Magisk is installed
      6 – Install Termux and do:
        – on (agree Superuser)
        – setprop persist.camera.HAL3.enabled 1
        – setprop persist.vendor.camera.HAL3.enabled 1
        – setprop persist.camera.stats.test 5
        – setprop persist.vendor.camera.stats.test 5
      7 – Install apk GCam

      The above steps must be redone with each update (since I updated with the latest OTA and I redid everything for testing).
      Thanks again friend …;)
      Just one question: I can’t find the Recommended Settings you described in the latest version of GCam 7.2.018, under settings / advanced … did the developer remove them?

    3. Hello,

      I believe I misunderstood your question in the first place.

      Yes, the procedure needs to be performed every time you install an OTA update. And it’s extremely important to use the patched boot image corresponding to the software version installed on your phone. For example, if you recently updated the phone to V10.0.18.0, then you must use the 10.0.18.0 patched boot image only.

      Regarding the instructions, make sure that you do not flash the patched boot image. Instead, temporarily boot it using the “fastboot boot” command.

      One more thing, earlier when you were unsuccessful, were you using the 10.0.17.0 patched boot image after updating your phone to 10.0.18.0?

      As for the recommended settings, they were meant for the initial versions of GCam for the phone.

  8. Hey Dhananjay !

    Thanks for such a detailed and up to date guide ! I was extremely surprised to see patches even for the latest month ! Kudos to you for being so active in the comments section and extensively helping everyone in the process.

    I haven’t yet unlocked the bootloader and tried this, but I will, in the future !

    Thanks for this post and all your hardwork 🙂

    1. Hi Suraj. Thank you for all the kind words! I am so happy that you took the time just to appreciate my work. That means a lot.

      And yes, do let me know when you try it. If you need any help, I am always here.

  9. Hi Dhananjay! I followed your instructions and now I am able to enjoy Gcam on my Mi A2. Thanks for this step by step procedure. You have really written it in a lucid and at the same time in a detailed manner with the required links for all the drivers and software making it a one stop solution for anybody who wants to enjoy Gcam without root. Appreciate your work here.
    The only place I had an issue was when after booting into the the patch image I was not able to install the full Magisk Manager app on my phone. It always encountered an error (Error while downloading Magisk) when downloading/updating the full app after clicking Yes. I tried manually uninstalling and installing from the above mentioned link but I was getting the same error. I even tried different older versions but was not able to install.
    Then I thought it’s better to start from Step 1 and repeat the same procedure again. I did it and voila! after the boot it was already showing the full app installed (don’t know how.) Finally! And yes everything is working as before all the banking apps etc. I am using the DMGC_6.2.030_ver.1.6-PE.apk as I tried the latest ver. 7 but didn’t find it stable. This version is working fine for me without any issues. Everything works. Photos obviously look more natural and detailed as compared to stock camera. The only downside is that I can’t take 20MP photos now won’t be able to utilize the full potential of the sensor because every Gcam supports upto 12MP pictures only.
    Anyways! Thanks again

    1. Hi Hussain. Thank you for such kind words! This means the world to me, to be competent enough to be able to write articles that could help others.

      The issue could have been a faulty boot, it could happen, like in your case. I am glad you figured it out by yourself.

      As for GCam v7, give a try to the latest one from here, and use the device-specific config file from here. It might give you a more stable camera experience.

    2. Thanks again! As I check there were config files for Mi A2 lite and not the regular Mi A2. Could you please check?

    3. Hi again, Hussain. Yes, I know, but it is worth trying. Start without the config and see if you get optimal results. If not, then try the config. If it doesn’t work, then you can always clear the app’s data from the Settings to remove the config.

    4. Hi there! Just wanted to run by a couple of things before I attempt this!

      When attempting this, it won’t restore my phone to factory defaults and remove all my data right?

      Also, do I need to have developer mode/tools activated?

      Thank you! Looking forward to your reply!

    5. Hi Mirage. Sure, I have answered both your questions below.

      1) No, it won’t do either. However, as always, I would still suggest keeping your important data always backed up.

      2) No, there’s no need to enable any special modes/tools in the OS.

      Now before you proceed, I have a question for you as well. Do you have your phone’s bootloader unlocked? Because if that’s the case, then the answers to both your questions will change.

      If it’s already unlocked, then you can safely go ahead.

  10. Hello sir,

    How do I perform a full backup of my device first before I perform this guide? Thanks in advance! 🙂

    1. Hi Archie. We already have a guide here that explains it all. Although it needs updating, but the existing instructions will ensure that all your data is backed up.

      And, you’re most welcome!

    2. Hello sir, after step#18 I’ll just close the cmd/powershell, disconnect the USB from my phone then reboot my phone like usual? It will boot to the stock image with the data wiped clean? No need to manually uninstall Magisk and termux?
      Thank you again 😉

    3. Hi again Archie. Yes, just reboot and Magisk will be automatically uninstalled and your phone will be unrooted.

      The data will not be wiped at all. The data is only wiped when you have to unlock the bootloader. If it’s already unlocked, then nothing will be wiped.

      However, I still recommend taking a backup. Just to safeguard it.

      When your phone boots back you can open Magisk Manager (if it’s still installed) and it will show that Magisk is not installed on your phone. This will confirm that Magisk has been removed completely. You can then safely uninstall Magisk Manager, as well as Termux.

  11. Sir, editing the build.prop can modify the system isn’t it? So even we unroot we can’t receive updates or even if we update it the device can end up in bootloop isn’t it?

    1. Yes, that’s correct. However, when we use “setprop”, it doesn’t actually modify the build.prop in the /system partition, rather store the properties in the /data partition (Reference).

      The method used here is fully compliant with OTA updates. If we would have actually modified the build.prop, the installation would fail. I have followed this same method on my sibling’s Mi A1 and there have never been a problem with OTA updates. I began by flashing the stock firmware to both the slots first, and then used the method to enable Camera2 API and subsequently install GCam.

      In case of most users the cause of the OTA installation problem is that they have some modifications present in the inactive slot, where the OTA would be installed.
      For instance, if someone installed Magisk on their phone, but then decide to unroot. In such cases, one should first disable and uninstall all the Magisk Modules completely, followed by a reboot. Then perform a complete uninstall via Magisk Manager. One should also take note of any other sort of modifications that have been applied.

      For example, they downloaded the Kernel Adiutor or FK Kernel Manager app (both of which require root) and tweaked their kernel a bit. If the user misses to restore those modifications, then even if they had Magisk root completely removed, the OTA will fail.

      My point is: Users often overlook the information provided within tutorials and sometimes even fail to understand the procedure in the first place, and head straight to the instructions. This is why, several of our readers have succeeded with these instructions and are still able to take OTA updates without any problems, while others have not.

      I wouldn’t blame them. the A/B partition concept is not easy to understand when it comes to custom development.

      I have been in the same boat like others, back when Froyo was the latest version available. Didn’t read the provided information and often overlooked how the procedure works. It has taught me a great amount of lessons. That’s why, I always try to provide information about the procedure, before writing the instructions in my posts.

    2. Shall I backup my build.prop via a root explorer and restore it later again with the root explorer?I want to enable AR mode on some games like Gcam stickers,CSR2,Porche mission E.The game needs camera2api,arcore and must change the device to a Pixel XL or else it won’t work.So will I do it?Sir,

    3. Let us make it even easier. Your phone is rooted with Magisk, right?

      If so, then follow the instructions above from step #15 to 18. This will enable Camera2 API.

      Next, go to Magisk Manager > Downloads and install the ‘ARCore/Playground Patcher’ module by macrant01 and finally reboot your phone. This module will enable ARCore support, so that you can download the official ARCore app from the Play Store (Or you can manually get the APK from here as well). Next, it will also subsequently add support for AR Stickers (now known as “Playground”). Get the patched Playground APK from here.

      Why I am suggesting this procedure? It will make OTA installation much more easier and quick. So, you wouldn’t have to restore build.prop or do any thing. When an OTA arrives, simply disable and uninstall the module, then follow the instructions here.

  12. Hi everyone who have had problems with termux su command.
    I got it also, after couple hours of digging internet and trying eventually. I solved it.
    If you tried it couple time so its meaning you have magisc and termux installed on your phone.
    So then follow instructions of Dhanajay. Just boot patched image one more time through fastboot, then go to!! termux and you will got grand permission prompt. Then put su in termux you will see result. I used last August 5 patched core and mi a2. If there’s no grand permission, then try it again to fastboot it. Good luck everyone. And a lot of thanks to author

    1. Hi Andre. Thanks for digging into it and providing a possible solution.

  13. Hi. Nice tutorial. Sorry for the question but for those who dont have temporary but definitive root and bootloader already unlocked, and after changing the prop lines, how to continue receiving ota updates? I need to unroot my device too?

    1. Hi. Thanks for the appreciation.

      If you choose that method, then you will first need to undo the build.prop changes, and disable ‘n’ completely uninstall any Magisk Modules.

      The next step depends on how you have rooted your phone – (1) By flashing the zip via TWRP or (2) By flashing the patched boot image to the currently active slot?

      In the case of the first, you will need to make a complete uninstall via Magisk and then restore the stock boot image, just to be sure. Once that is done, installing the OTA wouldn’t be a problem.

      For the second case, you can simply follow the instructions here, provided directly by topjohnwu himself.

    2. Thanks Dhananjay! I opted to completely uninstall Magisk and then use ur method to enable camera2 and leave my device unroot. It worked well. But now about new ota updates… before installing them i’ll have to change the values ​​by termux again to keep the system unchanged?

    3. Hi again. The benefit of using this method is that your phone is not rooted and thus installing the OTA wouldn’t require any extra effort.

      Although, once you have updated, you will need to re-do the procedure with the patched boot image of the new firmware version. Doesn’t take more than a few minutes once you get hold of the process.

  14. hey Dhananjay thanks for the work,

    somehow I just get to step 14. I type in the 4 commands into Termux and than nothing happens but also no error is showing so I Exit and reboot and when I check with the camera 2 api app just Level 3 is green the rest is still red, and when I install the Gcam app it obviously chrases, so it seems the 4 commands did not work. Do you know what could be the mistake I made?

    Thanks

    >Greetings

    1. Hi Alex. Was Termux able to gain superuser permissions properly?

      Actually, that’s what is supposed to happen. The commands won’t give out anything as resultant, just the next line. If that was so then the commands were successful. And Level 3 of the API is what you need. If it is marked with the green tick, it means that the API was enabled successfully.

      Once you have enabled the API, reboot your phone. Then try a different version of the port:
      1) Arnova’s Advanced v1.7 or v2.2: Download Link
      2) Dise’s v1.6: Download Link

  15. Easiest way to enable camera2api could be installing build prop editor and then search for HAL3 and set the value from 0 to 1 for both the search results
    This is an easy way compared to Termux

    1. Hi Sandeep. Indeed, however, that will only work when the phone is rooted. The instructions here are for those who’d like to keep their phone unrooted.

      BTW, thanks for sharing your input. It’d be helpful for the rooted users who visit this page.

    2. Hello Sir,
      In fact i followed your tutorial and succeeded in enabling camera2api and installed Gcam and clicking away pics like a Pro.
      Thanx a million Bro for sharing this tutorials.
      But the hardest part of your tutorial is the Termux part.That why i used build prop editor method..
      Termux gives a hell a lot of errors ….its not impossible but definitely weird to follow.
      Otherwise your tutorial is on spot.
      Once again Thanks for sharing this piece of instructions for all android lovers..!

  16. Hi !
    In case I dont like the pixel gcamera and I want the undo all the changes I made, how can I flash the stock ROM and lock the bootloader.
    Maybe if you are kind enought, you can make a tutorial or a post here in comments, how can we revert all the changes we had made, like flashing the stock ROM and locking back the bootloader.

    I would kindly appreciate.
    Thanks !

    1. Hi. When you use this method, you only temporarily root the device. Which means, after executing the command when you reboot your phone, root is automatically gone and your device is still running the stock boot image.

      So, even after performing this procedure, your device is completely stock, but just with an unlocked bootloader. To lock it back, reboot your phone into the Fastboot Mode, connect it to the PC, and run the “fastboot oem lock” command in the PowerShell/CMD window on the PC.

      That’s it. Your phone’s bootloader will then be locked again.

    2. After restarting my phone I still have Magisk app on it.Does that means that my phone is still rooted or? And can I delete Magisk and Termux now and just leave it be or do I have to flash stock image on it.
      Btw thanks for everything !!! 🙂
      This is the only version that doesn’t crash for me MGC_6.1.021_MI8_V2e.apk
      but I have some kind of scripts/commands on screen (just above the “take photo” button)

    3. Yes, you can safely delete both of them. If you only booted the patched boot image and didn’t flash it, then your phone will be unrooted automatically upon reboot.

      You’re welcome! And as for the GCam version, you can give a try to some different ones from here and see which works the best for you.

    4. I asked it, because after I did what you said in your tutorial I lost my Google Play Certificate, and I wondered if I flash the stock imagine and lock the bootloader back maybe I can get my certification back.

    5. Okay. In that case, simply flash the stock boot image via Fastboot and re-lock the bootloader, and verify if the device gets certified again.

  17. Hi Dhananjay, I will be trying this method. I have knowledge about bootloaders in pc, but not in a phone. This is the first time I am going to try such a process. I am going to do the following after temporary root:

    Install termux and do the usual, install link2sd and es file explorer and grant them su before rebooting (unrooting).

    My questions are:
    1. Is it safe to relock the bootloader after the procedure? Is “fastboot oem lock” the correct command for that?
    (I read a post where a guy bricked his phone by relocking the bootloader and disabling “oem unlocking” options in developer options. The same settings are there in MI A2 jasmine sprout)

    2. And, since I am not flashing anything permanently (except installing 3 system apps), nor changing the stock bootloader or leaving my bootloader unlocked, will my warranty be still present?

    1. Hi Abir.

      Don’t do that! The apps you mentioned require root permission every time they launch and mount the /system partition. So, when the person (That you are telling me about) did this and rebooted his phone, the security feature (dm-verity) detected the modified partition and thus the phone was bricked. It’s easy to get away with this and restore the stock system.img to revive the device back.

      However, with a locked bootloader, there’s no way to recover it. Make sure that you keep the ‘OEM Unlocking’ toggle enabled at all times if you’re even going to try this for your satisfaction.

      The warranty stays intact only if the system has not been modified at all (Not even a single app) and the bootloader is locked.

      Hope this answers your queries. If you have any questions, feel free to ask them to me by commenting here.

  18. hello sir, can i seek for help. why does my power shell says fastboot not recognized? big thanks

    1. Hi goody. You must first download and install Android platform-tools on the PC. The platform-tools include fastboot, adb, etc. You can follow our tutorial here.

    1. Hi Anubhav. Yes, you will need to unlock the bootloader first. You can do that without losing data, but you’ll need to follow a specific set of instructions for that.

      If data isn’t a concern, then you can unlock the bootloader and simply follow the process.

    2. Can I lock the bootloader after that and keep camera2api enabled or it will be disabled?

    3. It should still be enabled, however, I wouldn’t recommend re-locking until everything is completely stock.

    4. I tried the above steps after unlocking my bootloader , but wheneven i try to send this command “fastboot boot patched_boot_10.0.7.0_mi_a2.img” the console just says: sending “boot.img” it doesn’t do anything

    5. Hi Anubhav. As soon as you enter the command, does the phone boots into the OS with the patched boot image?

      In case it doesn’t and the command prompt doesn’t move ahead, then I believe it’s a connection issue between the device and the PC. It could be the USB drivers, the cable, or the USB port on your PC itself.

  19. Hi
    Am I going to lose my data if I try to root my Mi A2 and install Gcam according to your instructions ?

    1. Hi. You won’t lose your data if you use this method to root the phone and enable Camera2 API. However, you might lose it when unlocking the bootloader (Which is a requirement for this process).

      You can unlock the bootloader without losing data if you want to know how then let me know.

    2. Hello again,
      What you mean that I can lose data during bootload ?
      Could you give me instructions ?
      I just want to enable Camera2 API and to install Gcam later, without loosing any data or OTA updates fro my device.
      Thanks in advance!

    3. Also another question,
      Am I going to receive OTA updates after your procedure ?
      Thanks

    4. Hi. You will still be able to take OTA updates, so don’t worry about that. As for unlocking the bootloader without wiping data, please refer to the steps in this XDA thread.

      Make sure that you read the thread first and follow it exactly as it tells you to or you will end up losing the data while unlocking the bootloader.

  20. Hi, I tried the method yesterday, but in camera2 probe apk shows green mark in legacy not in level 3 or any other. and one thing, you provided 4 different commands here, are they all for mi a2 lite? if not, then which are?
    and how can I be sure that the commands are executed properly. I am not getting it. I will wair for your ans. And thanks for this post.

    1. Hi. The commands are the same for both Mi A2/A2 Lite. Please make sure that you use the patched boot corresponding to the software version installed on your phone. Once you have booted the patched boot image, open Termux and follow the steps. Also, make sure that you execute the ‘su’ command first to grant root permissions to Termux.

      Once you have granted the root permissions, you can execute the four commands to enable Camera2 API on your A2 Lite.

    1. Hi again Rae! Thanks for sharing his. I have updated the post with the link you provided, along with the previous one.

      GCam ports are not all same. Some might have bugs in certain features. So, you need to keep testing which one works the best for your setup.

    2. ok. i’ll update again if some other ported gcam works. ill send it right away here. 😊

    3. Please share a thread on how to lock bootloader again,cz I’m unable to do software update

    4. Hi Ankit. You don’t need a locked bootloader to update. You can simply uninstall Magisk from within Magisk Manager and then flash the stock boot image corresponding to your software version. Once you have done this, you will be able to install the OTA update normally.

  21. 1.For my mi A2 Lite (android Pie),which one install V10.0.3.0.PDLMIXM or V10.0.2.0.PDLMIFJ?
    2.Do you need to unlock the oem bootloader in developer mode?

    Thanks in advance

    1. Hi Alehandro.

      1) You need to use the patched boot image for the firmware version installed on your Mi A2 Lite. So, if you have V10.0.3.0, you will need to use the patched V10.0.3.0 boot image.
      2) Yes, you need to enable OEM unlock in Developer Options and also unlock the bootloader after that. You can find the guide for unlocking the bootloader on Mi A2 Lite here.

Post a Comment

Comment Policy: We welcome relevant and respectable comments. Only input your real first name and valid email address if you want your comment to appear. Read our comment policy fully before posting a comment.