How to Set Up Google Public DNS over TLS on Android Pie Devices
On January 9, 2019, Google announced that their Public DNS service (8.8.8.8 and 8.8.4.4) now supports DNS-over-TLS and it can be configured on Android devices

On this page
On January 9, 2019, Google announced that their Public DNS service (8.8.8.8 and 8.8.4.4) now supports DNS-over-TLS and it can be configured on Android devices as a system-wide DNS. Here we will show you how to set up Google Public DNS over TLS on Android Pie devices. But before we get to the instructions, let us learn what a DNS actually is and the advantages of using Google Public DNS over TLS on Android devices.
What is a DNS?
A DNS or ‘Domain Name System’ is a component of the network connection that resolves human-readable addresses or domain names (like www.thecustomdroid.com) to machine-readable IP addresses (like 10.0.502.100). So, whenever you enter a query (Domain name) on your device, it starts a DNS lookup to load the internet resources of the entered query. It is normally carried over the default DNS provided by your ISP (Internet Service Provider) or Carrier.
Advantages of using Google Public DNS over TLS on Android
Traditionally, DNS queries are resolved over UDP or TCP without encryption, which makes your web browsing vulnerable to surveillance, spoofing, or modifications. With Google’s Public DNS, the DNS queries and their responses are carried over TLS encrypted connections, thus improving privacy and security between devices and their resolvers.
The advantage is not just limited to the privacy of user’ data when browsing the web. When you search the web, you send a query which is then resolved by the corresponding server. Now, this might take some time depending upon factors like your internet connection speed, the server’s location, etc. Google Public DNS supports TLS 1.3, which significantly reduces the response time during a DNS lookup and aids in faster web browsing. If you want to dive into the details of how Google Public DNS helps in faster web browsing, please visit the official page.
To know more about how Google Public DNS over TLS works, you can also refer to the official documentation here.
How to Set Up Google Public DNS over TLS on Android Pie Devices?
Devices running Android 9 Pie support the ‘Private DNS’ option to help you change the system-wide DNS easily.
- Go to the ‘Settings’ menu on your Android Pie device
- Tap on ‘Network & internet’ and then on ‘Advanced’
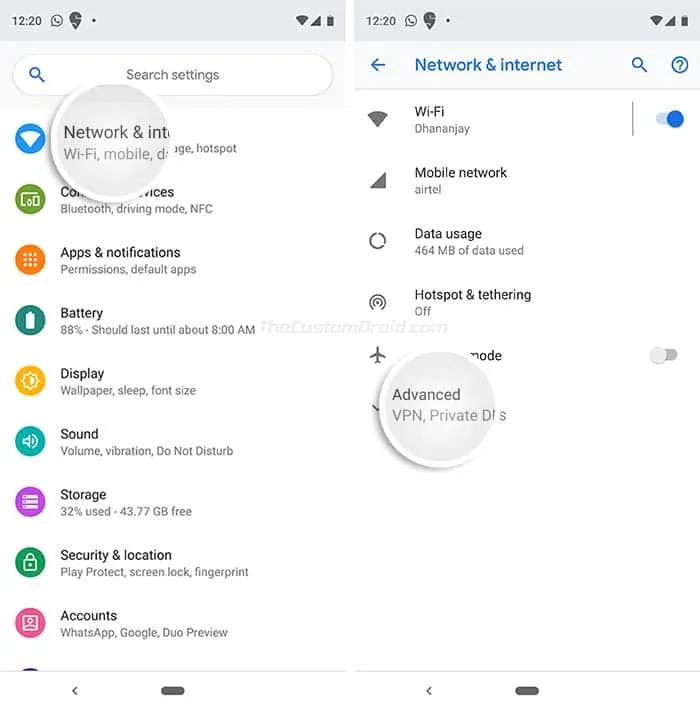
- Press on the ‘Private DNS’ option
- Select ‘Private DNS Provider hostname’
- Enter ‘dns.google’ into the given field
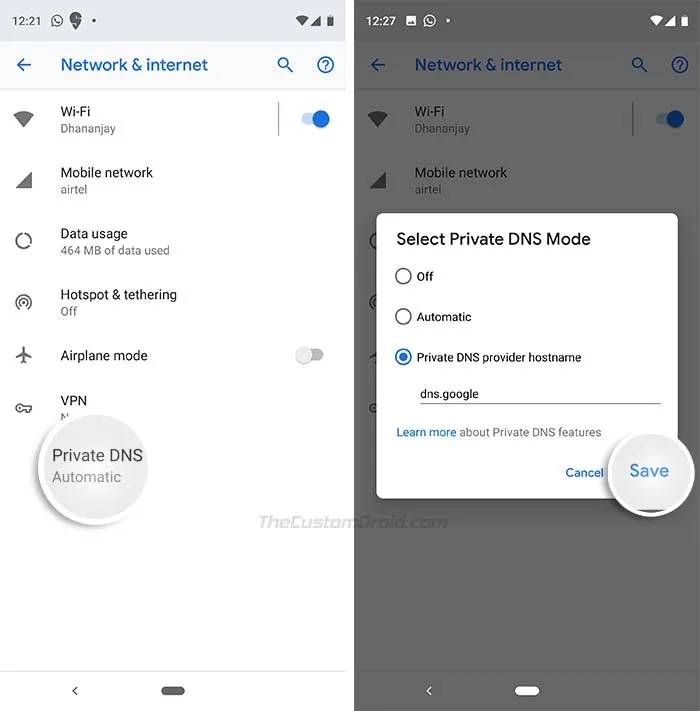
- Finally, tap on ‘Save’ to set up Google Public DNS over TLS on your Android Pie device
Note that the location of ‘Private DNS’ option in the Settings menu could vary from device-to-device. For example: On Samsung devices running Android Pie, it could be found under ‘Settings > Connections > More connection settings’. If you’re not able to find it on your device, then just search the Settings menu for Private DNS.
Once it is set up correctly, you will be able to browse the web faster and significantly reduce the chances of your information being exposed.
It’s worth noting that this setting will only set up Google Public DNS for the queries sent from your Android device. In the next section, we will show you how to set up Google Public DNS in your WiFi Router, so that it can be used on all your devices connected to the WiFi network.
How to Set Up Google Public DNS (8.8.8.8) in WiFi Router?
-
Connect your device to the WiFi Router
-
Open a web browser and enter your WiFi Router’s IP address (It could be 192.168.0.1, 192.168.1.1, etc)
-
Log in to the Router’s menu by entering the username and password
-
Go to the DNS Server settings in the configuration page (This might be under ‘Network’ > ‘Advanced’)
- The location of the DNS Server settings could vary from router-to-router. So please refer to the official documentation of the router you are using.
-
Note down the existing DNS IP address in case you’ll need to restore them in future
-
Finally, replace the existing DNS IP addresses with the following to set up Google Public DNS in your WiFi Router:
‘8.8.8.8’ and ‘8.8.4.4’ for IPv4
‘2001:4860:4860::8888’ and ‘2001:4860:4860::8844’ for IPv6
-
Save the configuration and exit.
Now, restart your browser and WiFi router to make sure that the settings have been applied successfully.
For configuring Google’s Public DNS on Windows, Linux, or macOS PCs you can visit the official configuration page by Google.
Although not significant, you’ll surely experience faster web browsing when visiting a website or while searching for something at Google itself. Not just that, when you use Google’s Public DNS, it ensures that all your queries are encrypted and could not be tracked or modified by the ISP.
So, you have just been able to set up Google Public DNS over TLS on your Android Pie device and also in your WiFi Router. Let us know if you have any questions by posting a comment below.
Comments
Comments are moderated, and published only if they are relevant to the topic and add value in a constructive way. If you disagree with something, please be polite and respectful. We suggest you read our comment policy before commenting.