Restore Google Pixel 2 and Pixel 2 XL to Stock Firmware
Using this simple and extensive guide, you will be able to easily restore Google Pixel 2 and Pixel 2 XL to stock firmware by flashing the latest factory image

On this page
Using this simple and extensive guide, you will be able to easily restore Google Pixel 2 and Pixel 2 XL to stock firmware by flashing the latest factory image using fastboot.
Tweaking a new phone like the all-new Pixel 2 and 2XL will be fun for sure. You may choose to unlock the bootloader, install TWRP recovery, and even custom ROMs. But if in any case, you would want to return back to the stock firmware, what do you do? Well, it’s easy with Google’s in-house devices. All you have to do is flash the factory image provided using fastboot. Just in case that doesn’t sound much easy, we will cover it for you. In this guide, we will be instructing how you can restore Google Pixel 2 to stock firmware using the same method.
- How to Change Active Edge Squeeze Sensitivity on Google Pixel 2 and XL
- Install Android 8.1 Oreo Developer Preview on Pixel and Nexus
- Install Google Product Sans Font on Any Android
- Google Camera NX Brings Pixel 2 Camera Features on Nexus 6P/5X
Restore Google Pixel 2 and Pixel 2 XL to Stock Firmware
Flashing and restoring Google Pixel 2 and Pixel 2 XL to stock firmware is pretty easy, thanks to Google. But it could still be confusing for those who are new to Android or these specific devices itself.
Google is kind enough to provide every major and monthly security updates in the form of factory images. This makes it easier for the device owners to restore their phone back to the stock firmware, just in case if they have unlocked the bootloader, rooted, or tried a custom ROM. Restoring and flashing factory image also allows you to fix any software issues, like boot loops, battery hogging, third-party app issues, etc. So if you’re here for any of the reasons, we will try to help to the best of our knowledge.
In this guide, we will be using the generic method of running the flash-all script to flash the factory image and restore Google Pixel 2 and 2 XL to factory firmware. Additionally, we will be adding an extra step, that will allow you to preserve the data on your internal storage.
Below, we will be detailing how you can restore stock firmware on Google Pixel 2 and Pixel 2 XL. We will begin by fulfilling a few requirements and pre-setup before we get to the actual process.
Prerequisites
- Enable USB debugging on your Pixel 2 by going to Settings -> System -> Developer options and set up ADB and Fastboot on your PC.
- Flashing factory image requires you to unlock bootloader on Google Pixel 2 (and 2 XL).
- The process to restore Google Pixel 2 and Pixel 2 XL will wipe your device completely. So, make sure to backup your complete storage, messages, contacts, and other necessary data pre-hand. You can follow our detailed tutorial to backup Android devices.
- Charge your Pixel device to at least 60-70% battery level to avoid any sudden shutdowns during the process.
Step 1: Download Pixel 2/Pixel 2 XL Factory Image
First off, download the factory image for your device from the links below. Make sure that you download the files only for your model and carrier. Cross-flashing will result in an unbootable device.
Google Pixel 2 (walleye)
- 8.0.0: Unlocked | Telstra | Fido, Rogers | Verizon
Google Pixel 2 XL (taimen)
- 8.0.0: Unlocked | Telstra | Fido, Rogers | Verizon
Once you have downloaded the factory image for your device, you can proceed ahead to restore Google Pixel 2 and Pixel 2 XL to stock firmware.
Step 2: Extract Factory Image and Connect Your Pixel 2 Device
- Extract the downloaded factory image file (e.g. walleye-opd1.170816.010-factory-63083164.zip).
- Copy the extracted files to the C:\adb folder where all the ADB and fastboot binaries are present.
- Boot your Pixel 2 in Bootloader Mode.
- Power off the device completely.
- Press and hold the Volume Down + Power button altogether until you see the bootloader screen.
- Now, connect your device to the PC using the USB cable.
Step 3: [Optional] If you want to preserve Internal Storage Data
This is an optional step. It will help you save all your data on the internal storage during the process to restore Google Pixel 2 and 2 XL, which otherwise is wiped off.
-
Download a quality text editor like Notepad++ and install it on your PC.
-
Go to the C:\adb folder where all the factory image, ADB and Fastboot files are residing.
-
Right-click on the flash-all.bat file and select ‘Edit with Notepad++’.
-
The Notepad++ editor window will open the batch script file.
-
Find the following line for the Pixel 2 (walleye):
fastboot -w update-image-walleye-xxx.xxxxxx.xxx.zip
-
For the Pixel 2 XL (taimen):
fastboot -w update-image-walleye-xxx.xxxxxx.xxx.zip
-
Here “xxx.xxxxxx.xxx” is the build version number.
- Now, edit this line and remove “-w” from it.
- This is the fastboot flag responsible for erasing the userdata and cache partitions. Since you are going to remove it from the flashing script, it will no more execute the command and erase the partitions. Thus, you will have the data on your internal storage intact.
- Once done, click on the save icon on the top.
Step 4: Restore Google Pixel 2 and Pixel 2 XL to Stock Firmware
Now, it is very easy to flash the factory image. Go to the C:\adb folder and double-click on the “flash-all.bat” script. The Command Prompt window will open up and detect your device. In a few minutes, all the flashing process must be complete.
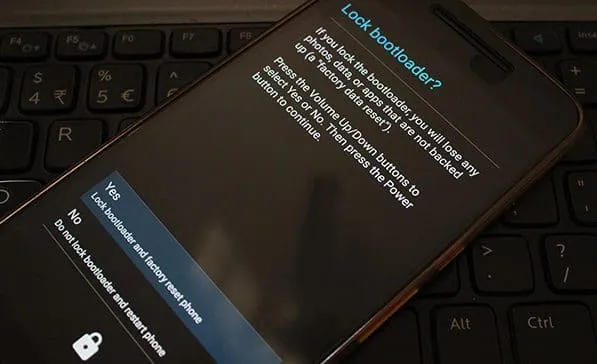
Step 5: Lock The Bootloader
Now, if you also wish to relock your device’s bootloader, then execute the following command too. Lock the bootloader using:
fastboot flashing lock
The device shall prompt you with a confirmation message. Just use the Volume buttons to highlight ‘Yes’ using the Power button and press the Power button to lock the bootloader.
You have just been able to restore Google Pixel 2 and the Pixel 2 XL to stock firmware. If you have any problems while performing the restoration process, then feel free to ask us.
Comments
Comments are moderated, and published only if they are relevant to the topic and add value in a constructive way. If you disagree with something, please be polite and respectful. We suggest you read our comment policy before commenting.