Root Google Pixel 2 and Pixel 2 XL using Magisk
You can now enjoy root-enabled apps and mods on your 2017 Pixel devices. Follow this guide to easily root Google Pixel 2 and Pixel 2 XL using Magisk.

On this page
You can now enjoy root-enabled apps and mods on your 2017 Pixel devices. Follow this guide to easily root Google Pixel 2 and Pixel 2 XL using Magisk.
The development scene is rolling fast than we have imagined. We recently saw Alpha builds of TWRP being released for the devices, and now you can easily root your newly bought Google Pixel flagship. Rooting will allow you to customize the device according to your needs, install popular mods like ViPER4Android, use root-enabled apps to modify the system, and much more. So, if you want to root Google Pixel 2 and Pixel 2 XL, then follow the steps below.
- Install TWRP Recovery on Google Pixel 2 & Pixel 2 XL
- How to Change Active Edge Squeeze Sensitivity on Google Pixel 2 and XL
- Download Google Pixel 2 Launcher and Wallpaper APK
- Install Android 8.1 Oreo Developer Preview on Pixel and Nexus
- Restore Google Pixel 2 and Pixel 2 XL to Stock Firmware
Root Google Pixel 2 and Pixel 2 XL
The device owners in the Pixel 2 XDA community have already tried rooting the device by sideloading a customized kernel. The solution worked out pretty good for those using the Pixel 2, but when tried on the Pixel 2 XL, several users reported of bootloops. And ultimately they needed to flash back the stock boot.img to fix it.
While TWRP has been released, but it is still not completely functional and it seems like not everyone has felt the urge to flash it. When the development progresses in the future, and TWRP becomes more functional, then we can expect a much efficient root method.
For now, if you would like to permanently root Google Pixel 2 and Pixel 2 XL, then you can simply use Magisk to do so. No, we don’t mean by sideloading the installer file via TWRP. We will use a rather more functional method that was introduced in Magisk 14.0 release.
The new installation method doesn’t rely on TWRP or a pre-rooted environment. It rather patches the stock boot (kernel) image and injects the root into it. The new boot image (patched_boot.img) could then be flashed easily using Fastboot. Easy right? Even if you’re new to the rooting scene, the instructions below are simple enough to help you root Google Pixel 2 and Pixel 2 XL.
Disclaimer
Rooting your device is your and only your liability. We do not hold any responsibility for the damage caused during or after performing this procedure. However, in case you find yourself stuck in any such situation, we will try the best to help you.
Prerequisites
Before you get to the process to root Google Pixel 2 and 2 XL, make sure that you meet the requirements below, beforehand.
- Before you proceed to the instructions, make sure that you backup your device completely. Rooting will not wipe your device’s data, but it is better to be cautious. You can follow our guide to backup Android phones.
- You will first need to unlock bootloader on Google Pixel 2/Pixel 2 XL.
- Enable USB debugging on your device. Go to Settings -> System -> Developer options and enable the ‘USB debugging’ toggle.
- We will be making use of Fastboot to flash the patched boot.img. So, make sure to install ADB and Fastboot on your PC first.
- Charge your device to at least 50-60% battery level to avoid any shutdowns during the rooting process.
Instructions to Root Google Pixel 2 and Pixel 2 XL using Magisk
First off, download the latest Magisk Manager application and install it on your device.
Update: With the Magisk 14.5 Beta, you shall now easily root Google Pixel 2 (XL) by flashing the zip using TWRP recovery.
Step 1: Patch Stock ‘boot.img’
- Now, download the stock boot.img file corresponding to the current build number installed. You can extract it from the factory image.
- Connect your device to the PC in File Transfer mode. Copy the boot.img to the internal storage (Anywhere on it).
- Open the ‘Magisk Manager’ app.
- Tap on the menu icon (3-horizontal lines) on the top-left and select ‘Settings’.
- Press the ‘Patched Boot Output Format’ option and select ‘“.img”.
- Now, go back to the main screen and tap on the ‘Install’ button.
- Again, tap on ‘Install’ and then select ‘Patch Boot Image File’ from the pop-up menu.
- Browse the internal storage and select the ‘boot.img’ file. As soon as you select it, the app will download the installer, patch the boot image, and will output the new ‘patched_boot.img’
Step 2: Flash the ‘patched_boot.img’
Now, we need to flash the patched boot image file in order to root Google Pixel 2 and Pixel 2 XL.
-
Connect your Pixel device to the PC via USB cable.
-
Go to the ‘Magisk Manager’ folder in the internal storage.
-
Copy the ‘patched_boot.img’ file and paste it into the folder where the Fastboot files are present (C:\adb).
-
Go to C:\adb folder, press the SHIFT key and right-click on an empty space inside this folder.
-
Select ‘Open PowerShell window here’ from the pop-up menu.
-
Now, disconnect the device and power it off.
-
Boot into Bootloader Mode by pressing the Volume Down + Power button altogether.
-
Connect the device to the PC via USB cable.
-
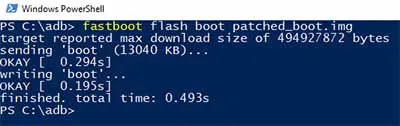
Enter the following command to flash the file and root Google Pixel 2 and Pixel 2 XL.
fastboot flash boot patched_boot.img
-
Once the image has been flashed, reboot your phone using:
fastboot reboot
Your Pixel device is now rooted and should have Magisk working. You can take the benefits of supported Magisk Modules and add more options and features to your device.
You have just been able to root Google Pixel 2 using Magisk. If you have any problems during the root process, then feel free to ask us via comments.
Comments
Comments are moderated, and published only if they are relevant to the topic and add value in a constructive way. If you disagree with something, please be polite and respectful. We suggest you read our comment policy before commenting.