
On this page
The latest Magisk Beta is now available for download. Check out the new features and follow this guide to root Android using Magisk 14.5 Beta update.
Magisk is very popular among the Android developers and customization community. It has gained its popularity due to its ability to modify your Android device systemlessly. That is, without touching the /system partition. A majority of Android power users now use the Magisk root, because it offers several more features like Magisk Hide, to hide root from apps like Android Pay and Pokemon Go. Today, we will be talking about the new update that the mod has received and instruct you on how you can root Android devices using Magisk 14.5 Beta update.
Magisk 14.5 Beta Update - New Features and Changes
Yesterday, Magisk’s creator and lead dev - topjohnwu released a new beta update for the users. According to the official changelog, the major highlights include support for Xiaomi Mi A1, Pixel 2 (and XL), and also major improvements in how Magisk Hide feature works. The update also incorporates the use of Dynamic Initramfs setup, across all the supported devices.
The official changelog for Magisk 14.5 Beta update, as stated on the source is as follows:
- [Daemon] Moved internal path to /sbin/.core, new image mount point is /sbin/.core/img
- [MagiskSU] Support switching package name, used when Magisk Manager is hidden
- [MagiskHide] Add temporary /magisk removal
- [MagiskHide] All changes above contributes to hiding from nasty apps like FGO and several banking apps
- [Magiskinit] Fix bootloop issues on several devicesv14.5 (1455)
- [Magiskinit] Use magiskinit for all devices (dynamic Initramfs) - [Magiskinit] Fix Xiaomi A1 support
- [Magiskinit] Add Pixel 2 (XL) support
- [Magiskboot] Add support to remove avb-verity in dtbo.img
- [Magiskboot] Fix typo in handling MTK boot image headers
- [script] Along with updates in Magisk Manager, add support to sign boot images (AVB 1.0)
- [script] Add dtbo.img backup and restore support
- [misc] Many small adjustments to properly support old platforms like Android 5.0
- [misc] Build binaries with NDK r10e, should get rid of the nasty linker warning when executing magisk
Though the update is labeled as Beta, it still proves to be a significant turning point for newer devices like the original Pixel, Pixel 2, and Mi A1.
Now, let’s talk about how you can root Android using the Magisk 14.5 Beta update.
Prerequisites
- Before you root your Android phone using Magisk, it is highly recommended that you take a full backup of your phone. You may follow our guide on how to backup Android devices.
- Rooting your device requires an unlocked bootloader. Check out our tutorial in the Unlock Bootloader archive.
- If you will be using method 2 for rooting, then make sure to install ADB and Fastboot tools on your PC.
Instructions to Root Android using Magisk 14.5 Beta Update
We will be covering up two different methods to install Magisk 14.5 Beta update. Method 1 is for those who already have TWRP recovery installed on their devices. For users who want to install Magisk without TWRP, can follow method 2.
Method 1: Flash Using TWRP Recovery
-
Download the Magisk 15.4 Flashable ZIP file: Magisk-v15.4.zip
-
Connect your device to the PC via the USB cable.
-
Copy the downloaded zip to the internal storage and remember the location where you copied it.
-
Disconnect your Android device.
-
Reboot your Android phone into TWRP using the special buttons combination. Alternatively, you can also use the following ADB command:
adb reboot recovery
-
Once your device enters TWRP, go to the ‘Install’ option.
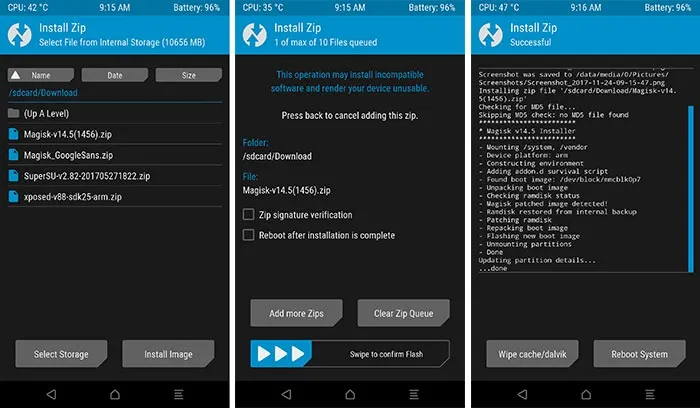
- Browse to the location where you copied the Magisk zip file and select it.
- When the file is selected, swipe the ‘Swipe to confirm Flash’ button to install Magisk 14.5 Beta update.
Once the flashing process is complete, press the ‘Wipe dalvik/cache’ button. Finally, press the ‘Reboot System’ button boot your device into the OS.
There you go, you have just been able to root your Android using Magisk 14.5 Beta update.
Method 2: Patch Stock Boot Image
Those who don’t want to install TWRP can simply patch the stock boot.img (kernel) and flash it using Fastboot.
- You will first need to grab the stock boot.img. For Nexus and Pixel phones, you can get it here. For other devices, you will need to check it with your manufacturer.
- Once downloaded, copy the boot.img to your phone’s internal storage.
- Download Magisk Manager v5.4.3 APK and install it on your device: MagiskManager-v5.4.3.apk
- Launch the app from the app drawer.
- On the app’s main screen, hit the ‘Install’ button. Tap on ‘Install’ again and select ‘Patch Boot Image File’.
-
Browse the internal storage and select the boot.img for patching.
-
Once the boot image patching is done, the new ‘patched_boot.img’ will be present in ‘MagiskManager’ folder in the internal storage.
-
Now, you will need to flash this patched boot image to your device. So connect your device to the PC and transfer the ‘patched_boot.img’ file to the C:\adb folder (Prerequisites, #3).
-
Inside this folder, press and hold the SHIFT key and right-click on an empty space.
-
Select ‘Open Command window here’ or ‘Open PowerShell window here’ from the menu.
-
Boot your Android into Fastboot mode and connect it to the PC.
-
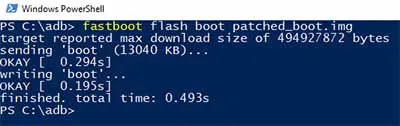
Now use the following command to root your Android using Magisk 14.5 Beta update:
fastboot flash boot patched_boot.img
-
Once the file has been flashed, use the following command to reboot:
fastboot reboot
Your phone shall reboot back into the rooted OS. You can now go ahead and try various Magisk modules, root-enabled apps, or even MagiskHide feature to hide root from banks apps.
Check out some tips for rooted Android devices:
- Enable Google Lens on Android Devices (Root)
- Enable Pixel 2 Always On Display on Nexus 6P, Pixel, and Pixel XL
- Install Google Product Sans Font on Any Android
So you have now successfully rooted Android device using Magisk 14.5 Beta update. If you have any problems during the process, leave a comment below.
Source: XDA-Developers
Comments
Comments are moderated, and published only if they are relevant to the topic and add value in a constructive way. If you disagree with something, please be polite and respectful. We suggest you read our comment policy before commenting.