Want to get another Google Pixel 2 feature on your device? Here in this guide, we will show you how to enable Always On Display feature on your Nexus 6P, Pixel, and Pixel XL devices without root.
Advertisement
Lately, we’ve been talking much about the Google Pixel 2 specific features. And why shouldn’t we? Google Lens, Active Edge, Unlimited Google Photos storage, revamped launcher design, new wallpapers, and Now Playing song recognition, all are pretty awesome features.
Today, we will talk about another cool feature that comes glued to the Pixel 2 devices only. The Always-On display feature on the Pixel 2 allows a user to get bits of information like time and notifications, without touching the device. So, following this guide, you will be easily able to get Pixel 2 Always On Display feature on your Nexus 6P, Pixel, and Pixel XL.
Advertisement
Page Contents
How to Enable Pixel 2 Always On Display on Nexus 6P, Pixel, and Pixel XL
It has been foretold that there is a list of a few features in the Pixel 2 that will never be able to make their way to the previous Google devices like the Always On Display for this instance. Well, at least not officially. That is because of some strict hardware requirements.
The new Pixel 2 uses an advanced screen technology that allows them to enter a low power Doze state. The screens on the previous devices, including the Nexus 6P and the original Pixel devices, are not truly tuned for it.
Before you head over to the instructions and enable Pixel 2 Always On Display, let us help you understand what is actually happening here.
Google has hardcoded the feature to be used on the Pixel 2 devices only. That is because the system checks for a specific function that always returns ‘False’. However, the case is different with Android 8.1 Oreo DP1. According to the source, the AmbientDisplayConfiguration now checks for a special boolean value – config_dozeAlwaysOnDisplayAvailable which is set to ‘True’ for the Pixel 2 and 2 XL, and ‘False’ for all the other devices.
The good news is, that this value is defined by an overlay, which uses OMS. And Android Oreo supports Overlay Manager Services natively. So, we can make use of Substratum to apply a customized framework overlay that will return ‘True’ for the ‘config_dozeAlwaysOnDisplayAvailable’ value.
A Few Drawbacks
After you successfully enable Pixel 2 Always On Display feature, you will have to compromise with a few caveats.
- You will need to press the Power button twice to wake up the screen from Always On Display to the Lockscreen.
- Double-tap to wake the phone will only work with four (4) consecutive taps.
- Occasionally, a grey screen might show up during the unlock process.
Steps to Enable Pixel 2 Always On Display
Our appreciation goes to XDA member InFlames03. He is the mind behind the discovery of the specific implementation. InFlames03 has also developed a framework overlay (better put up as a Substratum theme).
Prerequisites
- Your Nexus 6P/Pixel/Pixel XL must be running on Android 8.1 Oreo Developer Preview.
- You must setup Substratum + Andromeda on your Android Oreo device.
Instructions
Once you meet the requirements stated above, you will be ready to enable Pixel 2 Always On Display.
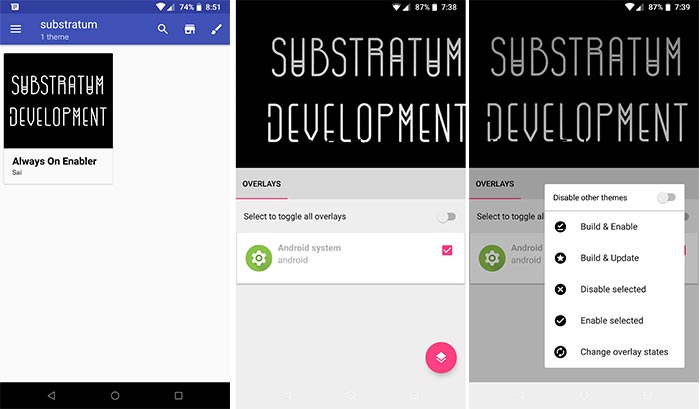
- Download and install the ‘Always On Enabler’ app on your device.
- Initiate Andromeda (Prerequisites, #2) to launch Substratum on your device.
- Once Substratum is up and running, tap on the ‘Always On Enabler’ overlay to open it.

- Select the checkbox next to the ‘Android system’ overlay card.
- Now, press the pink color icon on the bottom-left.
- Select the ‘Build & Enable’ option to install the framework overlay and enable Pixel 2 Always On Display on your device.
- Once the process is complete, reboot your device.
Once your phone reboots, go to ‘Settings’ -> ‘Display’. Scroll down to the bottom and select ‘Ambient display’. You shall see that ‘Always on’ toggle is set to ON by default.
Go ahead and enjoy the new Pixel 2-like feel on your Nexus 6P, Pixel, and Pixel XL. That was how you can enable Pixel 2 Always On Display feature on your device without root. If you have any queries regarding the process, feel free to drop a comment below.
Via: XDA
Comments 2 Comments
Comments are moderated, and published only if they are relevant to the topic and add value in a constructive way. If you disagree with something, please be polite and respectful. We suggest you read our comment policy before commenting.
Hi, thanks for the great article.
Is the first prerequisite, that you be running Android 8.1 Oreo Developer Preview, still valid for devices that are now running the full official Oreo 8.1?
My Pixel has automatically updated to this and im reluctant to “rollback” to Android 8.1 Oreo DP1
Hi Craig. First, thank you for the appreciation. Next, I have personally tested this on my Nexus 6P running Android 8.1. It works flawlessly. You are good to go! I will also update the prerequisites.