Advertisement

Can’t install ViPER4Android on your device running Android 11/Android 10? Don’t worry, it’s a known issue. In this guide, we will show you how to install ViPER4Android on Android 11 and Android 10 Q using an alternative approach. The method used here is fully working and has been personally tested by us on two different OEM devices including the Pixel 3 XL on Android 10.

ViPER4Android (Abbreviated as “V4A“) is one of the best Audio enhancing mods available for Android devices. And we already have a detailed tutorial on how to install it on any Android version, from 6.0 Marshmallow up to Android 11.

However, we have received reports that the original method sometimes fails to work on certain OEM devices. The problem? Basically the V4A drivers will fail to configure and prompt you to re-install them, again and again. This could probably be caused by the new changes implemented by device manufacturers in Android 11 and Android 10.

So, how can you install ViPER4Android on Android 11 or Android 10? Well, to be honest, the process is not the simplest one out there. It’s pretty much a hit and miss process, but it has a very high success rate as per the reports we have received. It has been tested and confirmed to be working on Pixel 3/2 XL, OnePlus 6/6T (Thanks priba77 for confirming!), OnePlus 7/7 Pro, Xiaomi Mi 9T Pro (Redmi K20 Pro), Samsung Galaxy Note 10+ 5G, along with several other devices running Android 10 (Q).

First off, we would like to thank XDA member 1dopewrx05, who shared this method on the Pixel 2 XL XDA thread.

Table of Contents

Before You Begin

Before you head over to the instructions, make sure to fulfill all the requirements as stated below.

  • Your Android 10 device must be rooted with Magisk. If it’s not rooted, then you can follow the instructions here on how to install Magisk or search our site’s database for your device-specific rooting guide.
  • Ensure that you uninstall any audio modification library and any previous version of ViPER4Android that you might have installed earlier. Once uninstalled, reboot your phone and then only proceed ahead.

Instructions to Install ViPER4Android on Android 11 and Android 10

  1. Download the latest ViPER4Android v2.7.1.0 APK from here.
  2. Install the downloaded APK on your Android 11/Android 10 device using a file manager app.
    Install ViPER4Android v2.7.1.0 APK on Android 10 Device - Do Not Install Drivers Yet
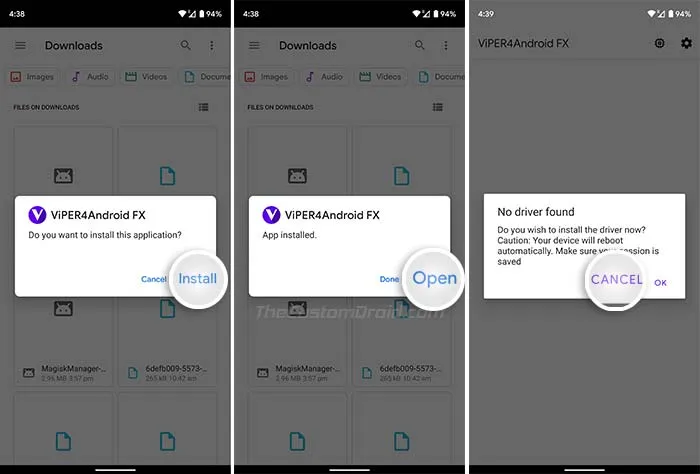
  3. Launch the ‘ViPER4Android’ app but do not install the drivers right now.
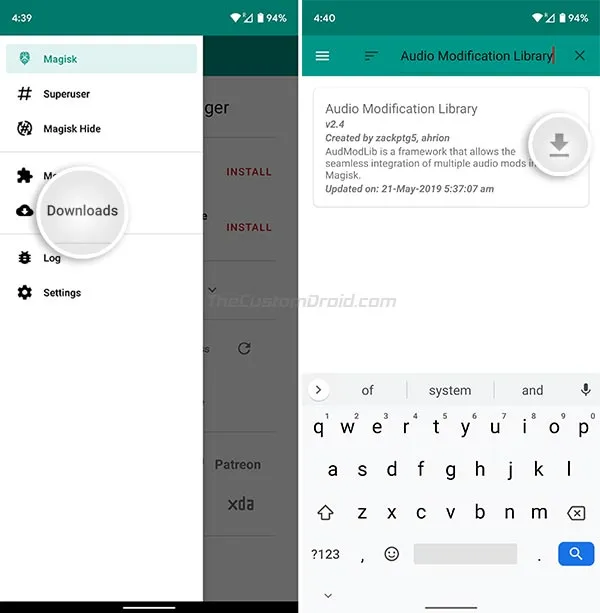
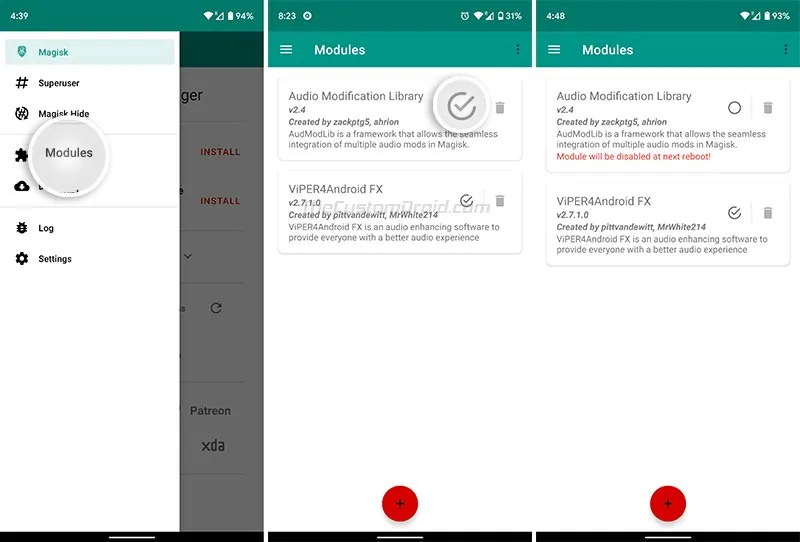
  4. Open ‘Magisk Manager’ and go to the ‘Downloads’ section of the app.
  5. Search and find the “Audio Modification Library” module and press the download icon next to it.
    Go to Magisk Manager and Install "Audio Modification Library" Module
  6. Tap on the ‘INSTALL’ button to install the module on your device.
    Install Audio Modification Library Module but Do Not Reboot Phone
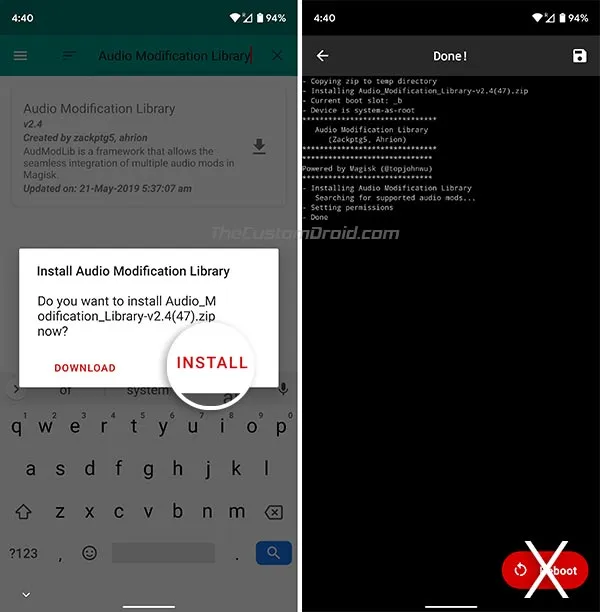
  7. Magisk module installer will prompt you to reboot but do not reboot your phone yet.
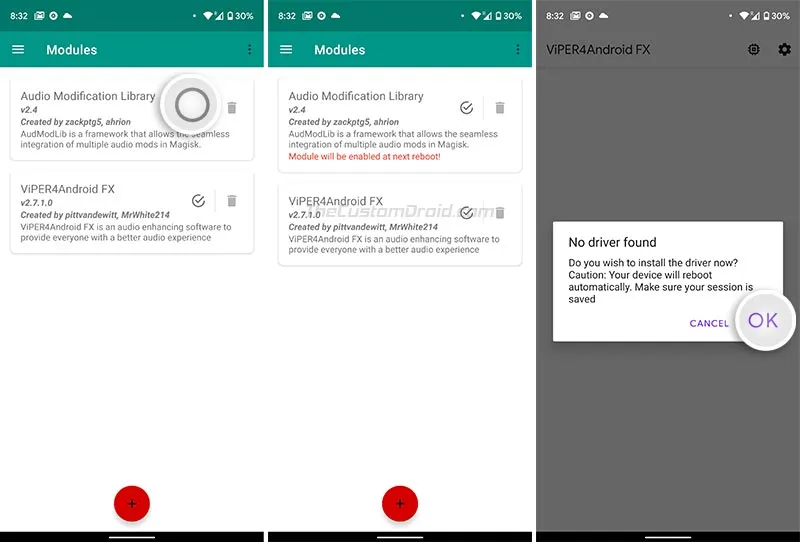
  8. Now go back to the ViPER4Android app, tap on “OK” to install the required V4A drivers.
    Install ViPER4Android Drivers and Grant Superuser Permissions when prompted
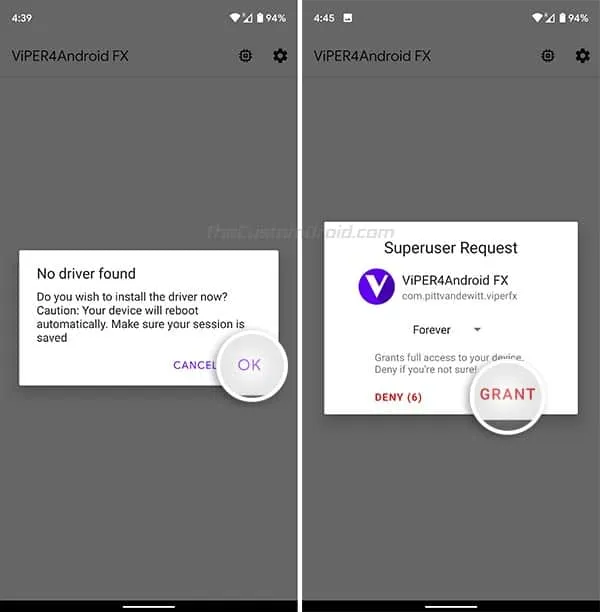
  9. Grant the Superuser permissions to the app when prompted.
  10. After the drivers are installed, the device will automatically reboot.
  11. Once the device reboots, go to ‘Magisk Manager’ → ‘Modules’ and uncheck the ‘Audio Modification Library’ to disable it.
    Go to Magisk Manager and Disable Audio Modification Library Module
  12. Now head back to ViPER4Android, repeat the driver installation process, and let the device reboot.
  13. Once the device boots, launch the ViPER4Android app. Now, if the drivers are installed properly, you’re done! If not, only then follow the steps further.
  14. Go to ‘Magisk Manager’ → ‘Modules’ and re-enable the ‘Audio Modification Library’ module.
    Re-enable Audio Modification Library Module and Install ViPER4Android on Android 10
  15. Open ViPER4Android, install the drivers when prompted, and let the device reboot.

Note: For some users, rebooting the phone after disabling the AML module in step #11 can help in the proper installation of V4A drivers (Step #12). Thanks to our fellow reader skythian for the tip!

Important Note: If your device ends up in a bootloop due to the incompatibility of drivers, you can simply follow this guide and use TWRP to remove the ViPER4Android module. This should certainly fix the bootloop issue. And so, you wouldn’t have to go through all the trouble of re-installing the ROM and re-rooting the device.

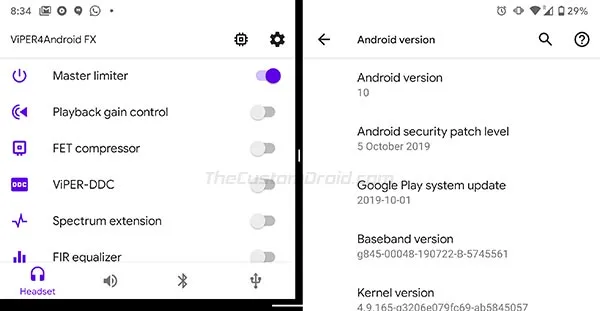
This time, the drivers should be properly installed and ViPER4Android should be running on your Android 11/Android 10 device. You can now go ahead, enhance your phone’s audio using the available controls, and unleash the audiophile in you.

ViPER4Android Installed on Android 10 Q

The method might seem a bit lengthy at first but isn’t complicated at all. It seems like the installation of ViPER4Android and Audio Modification Library should be done in a specific order in order to make it work.

Alternative Method

If your device entered a bootloop following the above method, then we do have an alternative method to install ViPER4Android on Android 11/Android 10. This substitute method has been confirmed to work on Samsung Galaxy devices running Android 10 (One UI 2.0) and may work on other OEM devices as well, especially with custom ROMs installed.

  1. Download the required files on your device:
    1. ViPER4Android v2.7.1.0 APK: XDA Labs
    2. Zackptg5’s Rootless Driver Installer: v4afx-rootless_10.21.2020.zip
  2. Go to the app drawer and launch the Magisk Manager application.
  3. Press the menu icon and select ‘Downloads’.
  4. Search the module repository for the ‘Audio Modification Library’ module and install it. Do not reboot yet!
  5. Now install the V4A APK file on your device using a file manager.
  6. Once the application is installed, reboot your device into TWRP recovery mode.
  7. Tap on the ‘Install’ button in TWRP and select the Rootless Driver Installer zip file (e.g. v4afx-rootless_03.17.2020.zip)
  8. Swipe the button on the bottom of the screen to flash the file.

When the flashing process finishes, press the ‘Reboot System’ to reboot your device into the OS (system). You should now have V4A installed on your Android 11/Android 10 device.

Once the original developers of the mod pittvandewitt and MrWhite214 (Team_DeWitt) update it to support Android 10, we are certain that the installation will again be much easier and direct.

So, you have just been able to install ViPER4Android on Android 11 and Android 10 Q. If you have any questions regarding the process, make sure to ask us by commenting below. Make sure to include your device name (with the model number, if applicable) and the ROM you’re using. We will try to the best of our knowledge to help you. Also, don’t forget to let us know which ones of the above method worked for your particular device and ROM.

A huge thanks to all the readers who confirmed that this method works, and also to those who stuck around to help others!

Comments

    1. Yes. Installing ViPER4Android through any method requires Root permissions.

  1. Is there a way to uninstall the rootless drivers? I want to retry installing it with root but the app always recognize the rootless drivers first and doesn’t request root permissions.

    1. I suppose the Rootless Driver by Zackptg5 is a unity installer. In simpler words, reflashing the ZIP will remove the drivers.

      Note that I am not 100% sure about this. But this how it used to work before Team_DeWitt came out with the new V4A version.

  2. Do I need to uncheck AML module in magisk manager once I have flashed rootless driver in the alternative method? Or let it remain enabled? It isnt explained in the alternative method

    1. Sahej, you’ll need to keep it installed. At least that’s what I had to do to keep it working on my Galaxy S10e running Android 10.

  3. Thank you, the first method just bootloop my device, the alternative method works perfectly. My device is a Xiaomi Mi Mix 2 runnig Lineage 17

  4. Hello, it worked on my mi 9t pro device with Android 10, MIUI 12. I used the first method. Thank you!

  5. I was foolish enough to install V4A directly from Magisk downloads and ended up hard bricking my Galaxy M30. After getting it working again by flashing stock firmware I followed the alternate method from here and it worked. I’m yet to test the app in itself but so far its installed with the drivers. Thank You!

    1. Good to know that the method worked out for you.

      On a side note, the kind of brick you faced is a soft-brick, which can be recovered just by flashing the stock firmware using Odin. A hard-brick is much more severe, where the device could not enter Download/Recovery modes and thus, cannot be recovered through an Odin firmware flash.

  6. If you guys are facing any abnormaln state issues..
    i just did these steps to make it work on Mi A2 with Havoc 3.5

    1. remove all.viper installations
    2. have Audio Mod Library installed in Magisk
    3. download rootless drivers installer
    4. flash it in TWRP
    5. reboot
    6. install 2.7.1.6 apk from xda app
    and here we go it works

    1. Thanks a lot, Masleyko for taking the time to share your solution for others. I am sure it will be of help.

      In my personal case on the Pixel 3 XL, I do not need to install AML or do any other tricks to get V4A working now. With the new V2.7.1.6 V4A APK, it works out of the box.

    1. Hi Paul. Thanks a lot for the confirmation. I recently discovered that on my Pixel 3 XL running Android 10, I no more have to follow this method.

      I just used the old method and it worked flawlessly. While it may not work for every device (yet), but it’s worth a try.

  7. Worked on the oneplus 6(android 10, stock OOS, magisk and twrp installed) like a charm and have been looking for driver installation issue solution for a long time, thanks a lot!!

  8. Worked great on my Pixel 2. Am so glad I found this site after being Viper-less for a long time. At first, I didn’t realize that the ‘Master Limiter’ is the on switch. Normally a limiter is half off a compressor. It should be renamed On/Off.

    1. Great! As for the ‘Master Limiter’ button, I too was confused the first time used the updated V4A app on Pie. It’s a bit confusing, especially for those who are new to the UI changes in the latest version.

  9. Thank you for this excellent guide!! Works exactly as described on oneplus 6 oxygenOS 10.0.1, with magisk 20.1 No need to go past step 13.
    NO WAY would I have found this solution by myself.

    1. Hi Pjotrski. I am glad it worked. And thanks for confirming the device name along with the rest of the information.

  10. I’m using a Mi 9T Pro running MIUI Global 11.0.1. Installed V4A with this tutorial, all the options appear in the app but none of them work. In the driver status, processing is stuck at NO.

    My Magisk modules are:
    VIPER4Android FX 2.7.1
    Audio Modification Library 2.4

    1. Hi FS. The same happens with me too sometimes on my Pixel 3 XL. To fix it, I simply force-stop V4A and re-launch it.

      Before any of this, make sure that you have the “Master Limiter” enabled in V4A’s audio channel tab (Bluetooth, Headset, etc) for which you want to tweak the audio.

  11. Don’t work for me.
    I’m tryed to install V4A in my Mi 8 Lite with MIUI.eu beta, version 9.12.6 (MIUI 11, Android 10).

    After the step 10, the device reboots in fastboot mode.

    Before, when I’ll tryed to install V4A direct from Magisk, the device is stuck on the bootlogo.

    Any suggestion?

    Thank you!

    1. Hi Alex. It could mean a lot of things. Maybe it’s the ROM or maybe another Magisk Module that could be conflicting.

      First of all, use the steps in this guide to uninstall the AML and V4A modules directly using TWRP. This shall help fix the bootloop.

  12. Works great on a OnePlus 7 Pro with Paranoid Android Quartz beta 3. I would just add that on Step 11, after uninstalling the Audio Mod library, you need to reboot before re-installing V4A drivers.

    Thanks!

    1. Hi Skythian. I am glad you were able to get it up and running on your OP7 Pro. Actually, I tried the same and it failed for me both on my Pixel 3 XL and Pixel 2 XL.

      Since it’s a “trick”, I think some users might be able to get it running without a reboot, while others would need to reboot. Anyhow, I have still added a note after the instructions for others to try. May be this will help them get it working. Thanks for sharing the tip!

  13. Didn’t work on my Moto G5+ running HavocOS 3.0 (Android 10) on the latest build, I followed the steps and after Viper does it’s first automatic reboot. My logo.bin showed up, then immediately crashed to bootloader.

    Therefore, straight up flashed Magisk Uninstaller (using Magisk 20.1), rebooted to check all was okay. Was fine, then installed Magisk Manager + Magisk + Modules, put back all my app presets and all is okay.

    Just gonna have to wait for an official release. In the meantime, non-rooted equalisers with Kernel Auditor’s volume control will have to do.

    Hope this helps if you have a similar issue. – Josh

    1. Hi Josh. I am glad you took all the time to provide a very decent explanation and an alternative to other users.

      As for you Josh, you can also uninstall the culprit modules with TWRP, without having to uninstall Magisk completely and repeat the whole installation again.

    2. You don’t need to uninstall whole of magisk,just boot to recovery>advanced>file manager>data>adb>magisk>modules & delete viper4android or any other module that might be causing issues with booting.
      Hope that helps!

    3. Hi Gulshan. Thank you so much for taking the time to comment here and assist others.

      I have prepared a post on removing Magisk modules via TWRP and have linked the same towards the end of the instructions, for users who might end up with a bootloop.

  14. Hi will this method work with the OnePlus 7T Pro? I’ve tried to install it with other method on XDA forum with no success I get stuck in a bootloop. I’ve already had to unbrick my phone 6 times and go through process of rerroting and installing all my apps. Don’t want the same thing to happen with this process. Thank you

    1. Hi Martin. Yes, it should work. I don’t have the 7T Pro. But I did saw users with the same device succeed with this method.

      If you face a bootloop again for some reason, then you can try uninstalling the AML and V4A Magisk modules directly via TWRP recovery to fix it. So, you will no more need to flash the stock ROM to fix the bootloop. The instructions for uninstalling Magisk Modules via TWRP can be found here.

    1. Hi Allan. Thank you so much for the confirmation! Enjoy V4A on your K20 Pro now.

  15. Very very thanks bro! Ur writing and screenshot make it so much easier for installing viper fx! thank you!

Post a Comment

Comment Policy: We welcome relevant and respectable comments. Only input your real first name and valid email address if you want your comment to appear. Read our comment policy fully before posting a comment.