How to Sideload OTA Updates on Nexus Devices
Want to manually install an OTA update on your device? This simple tutorial will guide you on how to Sideload OTA Updates on Nexus Devices (And Pixel).

On this page
Want to manually install an OTA update on your device? This simple tutorial will guide you on how to Sideload OTA Updates on Nexus Devices (And Pixel).
The most phenomenal thing about the Nexus smartphones and tablets is that they are the bearer of regular and latest updates. These updates are delivered to the end user in three ways - complete factory images, full system OTAs, and regular Over-The-Air updates. Most people prefer updating over-the-air, since it preserves all the device data, and updates the phone or tablet to the latest software. But it is also a situation where you will have to wait until the OTA update finally reaches your device.
Now, if you’re having problems while receiving or installing the updates, or somehow not getting any update notifications, you’re not left with many choices. The best way to deal with this situation is to sideload OTA updates on your Nexus devices, using the stock recovery.
The process of sideloading works through the Android Debug Bridge interface. The benefit of sideloading is that you will not need to transfer the bulk update zip to your device and delete it later.
How to Sideload OTA Updates on Nexus and Pixel
Prerequisites
- Charge your device to at least 60% battery life to avoid any sudden shutdown during the process.
- The first thing to do is to back up your Nexus device completely (Including storage, messages, contacts, etc). This will safeguard the situation in case you accidentally wipe the device or lose the data for any other reason for that matter.
- Enable USB debugging and setup ADB access between your PC and device: Tutorial
- Sideloading the OTA requires your device to be completely stock. So no custom recovery, kernel, or root. However, it doesn’t matter if your device’s bootloader is locked or unlocked.
Read - How to Enable Instant Apps on Android
Instructions
- The first step is to download the OTA zip file for your device and current Android version. Google itself does not provide the links, but a few users at XDA-Developer forums have managed to grab the official links. You can always search Google (I prefer XDA-Developer forum) for the update zip files, and download them.
- Since the full OTA images have now been made available by Google, you can download (Link) and flash them. These are full system images just like factory images and will install without wiping any device data.
- Power off your Nexus completely, and boot into recovery mode — Press and hold the Volume Down and Power keys simultaneously, until you see the bootloader screen. It would look somewhat like the image below (depicting bootloader mode on the Nexus 6P).
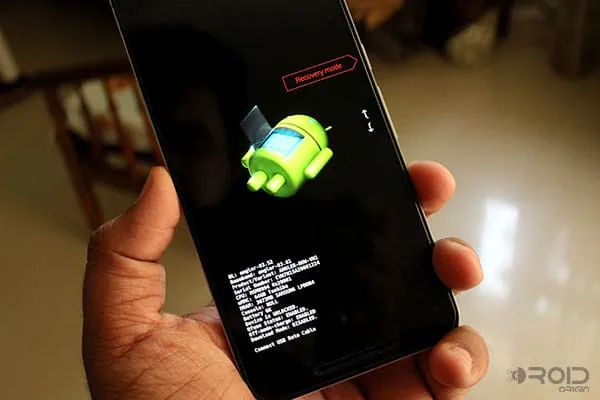
Now, tap the volume up or down keys until you see Recovery mode. Press the power key to select and boot into stock recovery mode. 4. NOTE: If you are not aware of the key combination for your Nexus device to boot into bootloader mode. You can simply use the following command to directly reboot into recovery mode.
adb reboot recovery
- You will now see a screen with Android bot and warning sign. While on this screen, press and hold the Power button, and tap the Volume Up key once.
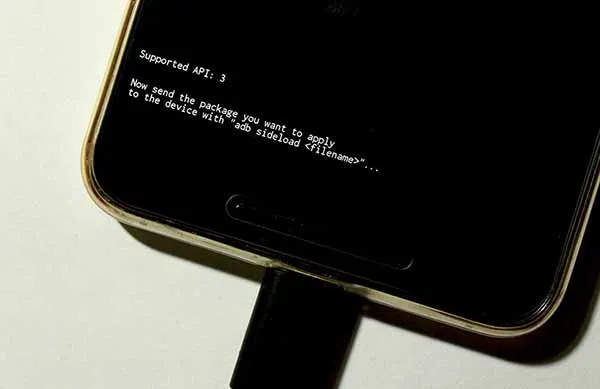
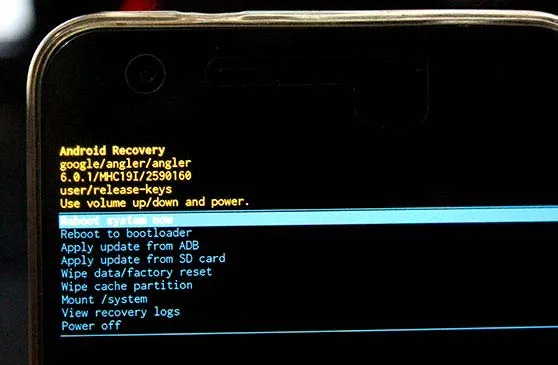
- Your phone will now enter stock recovery mode. Now, connect your Nexus device to the PC using the USB cable. Highlight Apply update from ADB using the volume keys and select it using the power button.
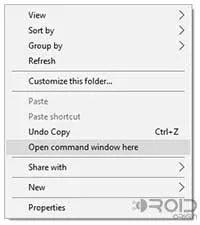
- Now, open the folder where the OTA update zip file has been downloaded (In my case, it would be C:\Users\Dhananjay\Downloads). Press SHIFT key and right-click on a space inside the very same folder. Select Open command window here from the menu that pops up.
-
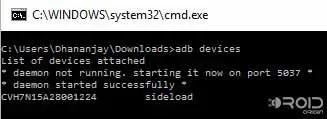
A new command-prompt window will open. To confirm that your device has been detected successfully, enter the following command and press ENTER.
adb devices
The command should output a device ID, along with the mode - sideload. If you don’t get any output, make sure that ADB is installed. If you still can’t get it to work, let us know, and we will try to help you.
-
Time to sideload the OTA update zip file, so enter the following command:
adb sideload <ota-zip-filename.zip>
For example, in my case:
adb sideload f88e387b48ced18c104947e355f40ad86f723605.signed-signed-angler-ota-2673096.zip
-
The sideloading process might take a few minutes depending upon the size of the update.
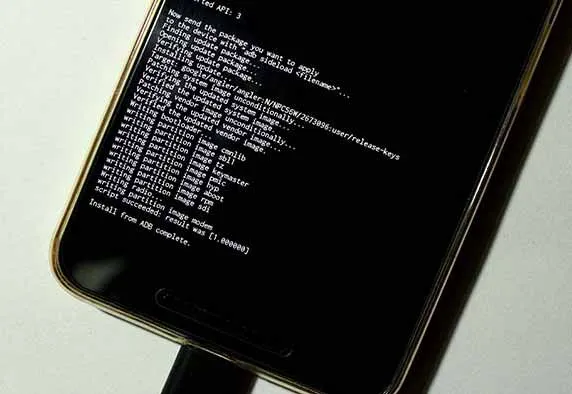
- When the process is complete, your device will go back to the recovery main-screen. Select Wipe cache partition, to wipe the overall device cache. While this step is not mandatory but is considered a fairly good practice when updating manually.
- And once it is done, you can select Reboot system now.
Read - How to Change DPI Density on Android (Root and No-Root)
That’s it! You have been successful to sideload OTA updates on Nexus and Pixel. The process was pretty easy and could be used for any Nexus smartphone or tablet. Please make sure to use the OTA zip files, meant for your device and Android version only. Flashing the wrong file may lead to bootloops.
If you come across any issues during or after updating, let us know through the comments.
Comments
Comments are moderated, and published only if they are relevant to the topic and add value in a constructive way. If you disagree with something, please be polite and respectful. We suggest you read our comment policy before commenting.