How to Change DPI Density on Android (Root and No-Root)
The steps below will help you easily Change DPI Density on Android with both root or no-root permissions.

On this page
The steps below will help you easily Change DPI Density on Android with both root or no-root permissions.
Android is an operating system with seamless possibilities. What I have realized over the years, with every new Android version, is that slowly all the custom ROM features that we used to cherish are coming back at us. Well, this is a good thing, right? Google is finally realizing the significance of these small yet efficient features and implementing them onto the official release. Android Nougat came along one such feature that has always been of prime importance for people with
With Android Nougat, came along one such feature that has always been of prime importance for people with devices having small screens (Back in the old days). Yes, I am talking about changing DPI density of Android display. Well, it’s not exactly called that, but something similar - “Display Size”.
What is DPI? - DPI stands for “dots per inch” and is a measure of digital screen pixel density.
So without much further ado, let us hop on to the instructions on how to Change DPI Density on Android device with and without root.
Steps to Change DPI Density on Android

For Non-Rooted Users
These two methods will only work for devices running Android Nougat or Android Oreo. If your OS version is anything lower than that, then you will have to root your device and follow the steps for rooted users.
#Method 1
If your Android device is running on Nougat or Oreo, then you can simply modify DPI Density directly from device settings.
- Go to the app drawer and open the Settings.
- Scroll down and select “Display”.
- Now if you scroll down a little, you will notice a “Display size” setting.
- By default, the value is automatically set according to your device’s screen resolution.
- You can either reduce the size of the elements by swiping the slider to the left (Small).

- Or, you can swipe to the right from “Default” to “Large”, “Larger”, or “Largest”. This will make the elements on the display bigger.
- Once you have chosen your desired setting, you can just roll back from the settings and it will save automatically.
#Method 2
There’s another method that could help you set DPI density to even extreme low or high levels.
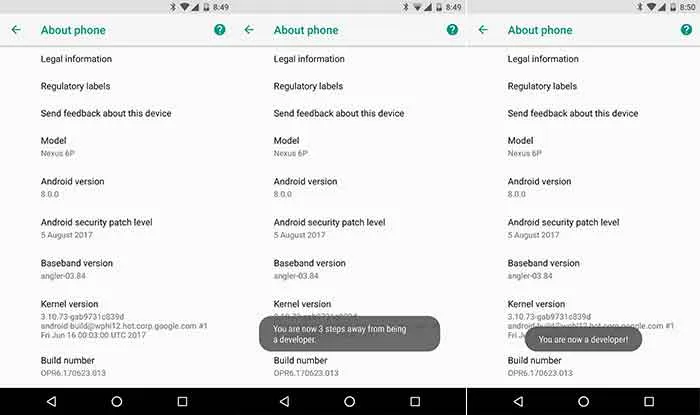
- In order to access the setting, you must first enable Developer options on your device. So go to “Settings” > “About phone” and start tapping continuously on the “Build number” until you see the “You’re a developer now” toast notification.
- Now that you have enabled Developer options, you can access them by going to Settings > Developer Options (Nougat) or Settings > System > Developer Options.
- Scroll down the list until you find the “Smallest width” setting under the “Drawing” section.
- Now you will be shown the default DPI value for your device. Note it down somewhere, so that you can always restore it back.
- Edit this value and enter the custom value according to your choice. The bigger the value; the smaller the UI elements will get, and vice-versa.
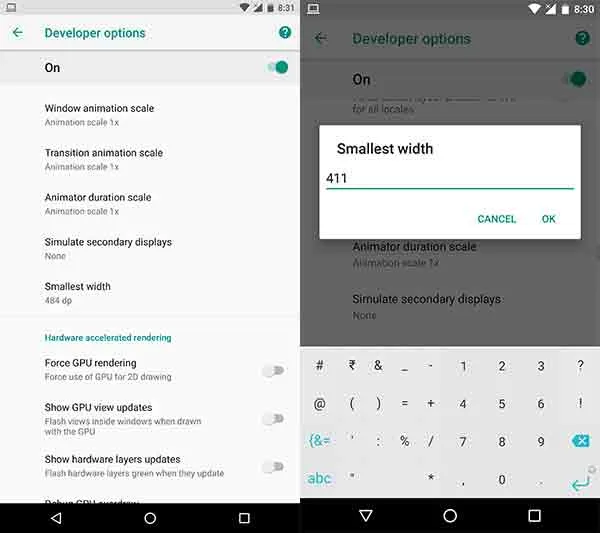
- For my Nexus 6P, the current value is 411 dp. So if I change it to 320 dp, the content grows larger. While if I change it to 484 dp, the content scales down to a smaller size.
- Note that the value you enter will always be changed to the closest safe DPI value for your device. So if you open this setting again, don’t be surprised if you see the value a little different than you entered.
Also read: How to Change Android SMS Limit without Root
Rooted Users
In case you don’t have Nougat or Oreo running on your device, you can still modify DPI density on your rooted device.
- Make sure that your device is rooted using SuperSU or Magisk.
- Next, in order to change DPI density on your rooted Android, you will have to edit the build.prop file. So download the BuildProp Editor to assist you with it.
- Once the app has been installed, open it and grant root permissions when prompted.
- The app by default opens up the build.prop, so scroll through it until you find “ro.sf.lcd_density” under “BUILD INFO” section.
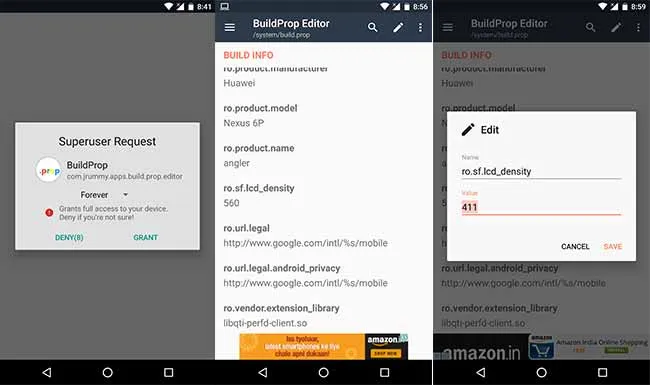
- Tap on it to edit. You can change the default value to anything of your choice, but just make sure that you don’t deviate the value extremely to either end.
- Finally, tap on SAVE and reboot your device for the changes to take effect.
So now you have been successful to change DPI density on your Android device. In the first place, why did you change it? We would love to hear the reason behind it. Drop a comment below.
More for you:
Comments
Comments are moderated, and published only if they are relevant to the topic and add value in a constructive way. If you disagree with something, please be polite and respectful. We suggest you read our comment policy before commenting.