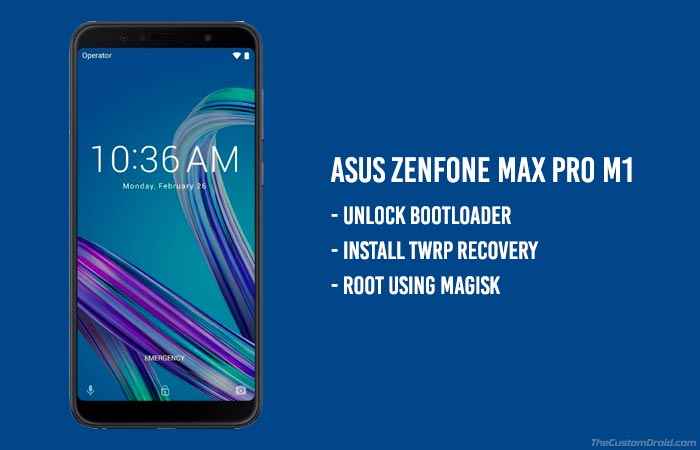
In this article, we will show you how to unlock bootloader on Asus Zenfone Max Pro M1. An unlocked bootloader will help you further install TWRP recovery and root Asus Zenfone Max Pro M1 (ZB601KL). This guide supports both Android Pie and Oreo.
Advertisement
The current budget smartphone market is flooded with phones from several manufacturers including Huawei, Oppo, Vivo, Xiaomi, Motorola, Samsung, and more. Now, there’s one more manufacturer that has been added to the list, whom we have rarely seen focusing on its budget segment. We are talking about the Asus Zenfone Max Pro M1, that was served through rumors until it was finally announced last month. The phone packs in decent hardware, along with the trending fullscreen display and latest software.
If you’ve already got your hands on the phone and happen to be a fan of custom ROMs/mods, then we have got you covered. The instructions below will allow you to easily unlock bootloader on Asus Zenfone Max Pro M1. An unlocked bootloader will open the gateways to customize the device beyond the limitations set by the manufacturer. Which means you can then further install TWRP recovery and root Asus Zenfone Max Pro M1 using Magisk.
Advertisement
Page Contents
How to Unlock Bootloader, Install TWRP, and Root Asus Zenfone Max Pro M1
Asus is not an Android OEM that has received due attention in the smartphone market. But with the new phone, the manufacturer finally seems to be digging in the right direction. The Zenfone Max Pro M1 is powered by the Qualcomm Snapdragon 636 chipset, the same that you would have seen on the Redmi Note 5 Pro. Even the 5.99-inches FullView display ought to be similar, along with the screen-to-body ratio. It is also backed with a high-capacity 5000 mAh powerhouse.
One major aspect where the new Asus phone outranks the competition is the support for the latest Android version out-of-the-box. Yes! The Asus Zenfone Max Pro M1 comes with Android 8.1 Oreo. Even if you think that the software is a big plus, it still would be limited to what the manufacturer chooses to deliver. But if you really want to get past that and enhance the software experience by rooting the phone or install a custom ROM on it altogether.
Advertisement
The process to root Asus Zenfone Max Pro M1 is pretty straightforward. You’d have to start by unlocking the phone’s bootloader, followed by installing a custom recovery (TWRP). Once all that is done, you can root the phone by flashing Magisk. If it still sounds confusing at first, the steps below will cover the complete procedure in detail. Our sincere thanks to XDA recognized contributor Sudeep Duhoon for providing a script that would help you unlock the bootloader with ease and also to KrasCGQ for building and providing the latest TWRP 3.3.1-0.
Requirements
- We strongly recommend that you take a full backup of your personal data, including the internal storage. The phone will be wiped off completely, so be prepared for it. You can also follow our Android backup guide for the same.
- Charge the Asus phone to a sufficient battery level to avoid any sudden shutdowns during the process.
- Install the latest version of WinRAR on your PC. You will need it to successfully extract the provided ‘unlock.rar’ file provided below.
Please make sure to fulfill all the requirements before you follow the steps below.
Unlock Bootloader on Asus Zenfone Max Pro M1
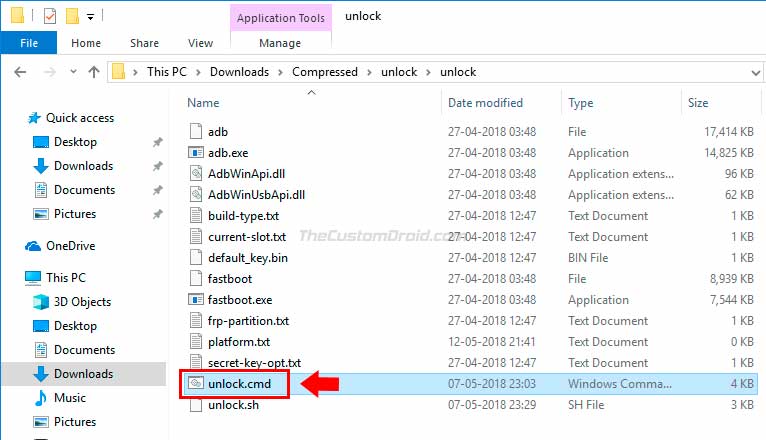
- Download the unlock script and drivers: unlock.rar
- Extract the file on the PC using an archive tool such as WinRAR or 7Zip.
- There should be two different folders – (1) ASUS_Android_USB_drivers_for_Windows and (2) unlock.
- Open the first one and install the USB drivers on the PC.
- Once installed, power off the phone completely.
- Hold the Volume Up and Power button simultaneously to enter Fastboot Mode.
- Connect the phone to the PC using the USB cable.
- Go to the ‘unlock’ folder and double-click on the ‘unlock.cmd’ file to unlock bootloader on Asus Zenfone Max Pro M1.
Now that the bootloader has been unlocked, the next step is to flash TWRP recovery on Asus Zenfone Max Pro M1.
Advertisement
Install TWRP Recovery on Asus Zenfone Max Pro M1
Before you head over to the steps below, note that you should always download the latest version of the TWRP recovery image available in order for it to properly decrypt the /data partition.
- Download the TWRP recovery image file: twrp-3.3.1-0-X00T-android9_2019-11.img (Check the latest TWRP recovery image)
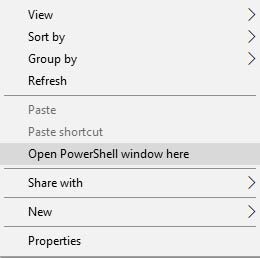
- Copy the downloaded file to the ‘unlock’ folder extracted earlier.
- Hold the SHIFT key and right-click on an empty space inside the folder.
- Select ‘Open PowerShell window here’.
- Power off the phone completely.
- Hold the Volume Up and Power button simultaneously to enter Fastboot Mode.
- Connect the phone to the PC using the USB cable.
- Enter the following command to install TWRP recovery on Asus Zenfone Max Pro M1:
fastboot flash recovery twrp-3.3.1-0-X00T-android9_2019-11.img
- Once flashed, boot into TWRP recovery mode.
- To do so, enter the following command while holding the Volume Down key:
fastboot reboot
So, you have successfully installed and booted into TWRP. The next and final step is to root Asus Zenfone Max Pro M1 using Magisk.
Advertisement
Root Asus Zenfone Max Pro M1
In order to root, TWRP must be able to decrypt the /data partition first. If you’re using the latest TWRP on Pie, it should be able to decrypt the partition. In that case, you wouldn’t need to format /data partition or flash the decrypt.zip file. You can simply flash Magisk installer zip to root the phone.
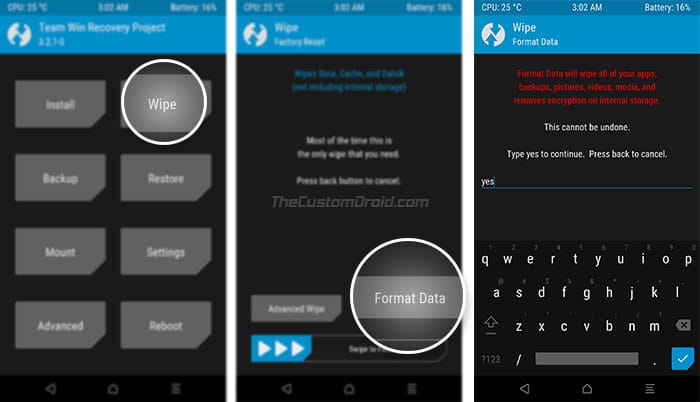
However, if you’re running Android Oreo, you must follow all the steps below, format the /data partition in TWRP, then flash the ‘decrypt.zip’ and Magisk zip files for root.
- In TWRP, go to ‘Wipe’ > ‘Format Data’.
- Enter ‘Yes’ in the provided field to format the data partition and decrypt the storage.
- Next, go to the ‘Mount’ menu and tap on the ‘Enable MTP’ button.
- Connect the phone to the PC.
- Download the ‘decrypt.zip‘ and ‘Magisk-v20.1.zip‘ files.
- Copy both the files to the internal storage.
- Once copied, disconnect the phone and go back to the main TWRP screen.
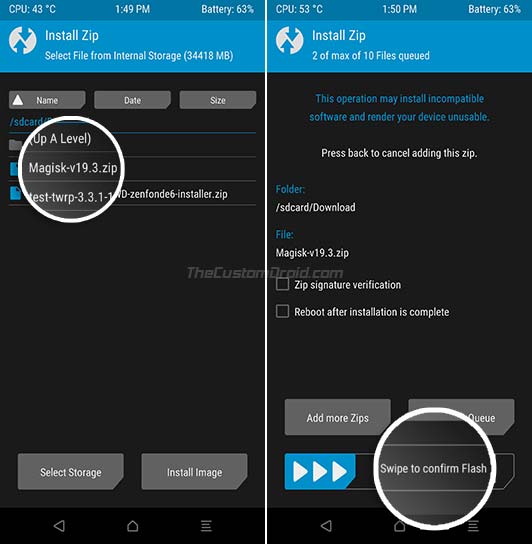
- Tap on the ‘Install’ button and select the ‘decrypt.zip’ file.
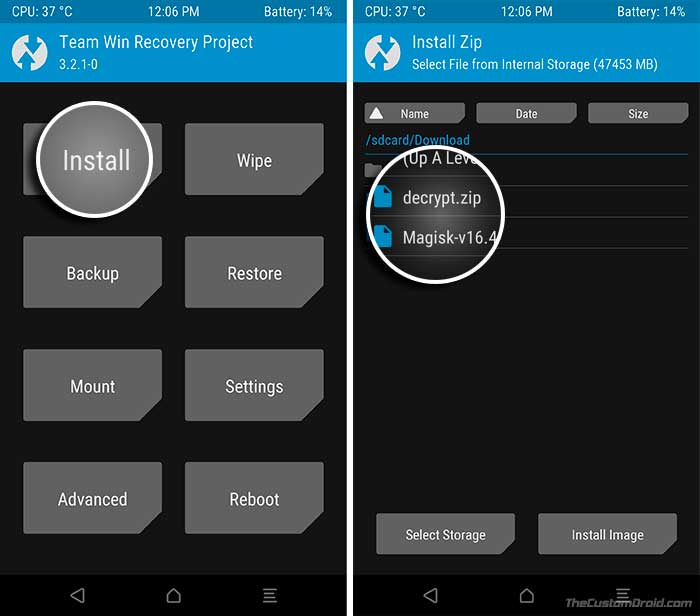
- Then press the ‘Add more Zips’ button and select the ‘Magisk-v19.3.zip’ file.
- Finally, swipe the button on the screen to root Asus Zenfone Max Pro M1 using Magisk.
The flashing process would take a few seconds. Once it is complete, press the ‘Reboot System’ button. The phone should instantly boot into the rooted OS. You can then install mods like ViPER4Android and Dolby Atmos. You can also use Magisk Modules to inject additional features into the device. There are a lot of things that you could do with a rooted phone. Also, keep a check on XDA forums for latest ROMs and mods for the device.
So, this was our guide on how to unlock bootloader, install TWRP recovery and root Asus Zenfone Max Pro M1. If you have any questions regarding the procedure, then let us know via the comments.
TWRP Source: XDA
Comments 8 Comments
Comments are moderated, and published only if they are relevant to the topic and add value in a constructive way. If you disagree with something, please be polite and respectful. We suggest you read our comment policy before commenting.
Hello, I got into fastboot mode, but then I’m trying to use unlock.cmd, only this shows on screen and nothing progresses.
————————
Begin fastboot flashall
————————
Earse Data: Yes
Support All device
Can’t unlock bootloader if I’m stuck here 🙁
Seems like the unofficial method is not working anymore.
So, I would suggest trying the official method. Just download the official unlock tool for the Zenfone Max Pro M1 from this link. Then install the APK and launch the unlock app. Simply follow the on-screen instructions to unlock the bootloader.
Sir, when i open unlock.cmd it instantly closes what did i do wrong ?
Hi Luke. When you launch the unlock.cmd file, make sure that your Zenfone Max Pro M1 is connected to the PC in fastboot mode.
One more thing, while the phone is connected in Fastboot mode, make sure to check Control Panel > Device Manager to confirm that it is properly being detected.
I am able to install up to twrp in my asuz zenfone max pro m1. however i am not able to see the GUI as show here.why? pls help me
Hi Mehul. Is your PC using an AMD processor? If yes, then try using Intel.
If you’re already using an Intel-based PC, I suggest you try executing the unlock script while your phone is connected to the PC’s USB 2.0 port. USB 3.0/3.1 ports are also known to cause issues when working with fastboot.
How this method can working to asus zenfone max pro m1 ZB602KL..?
Hi, Andrie. Is your phone branded to a carrier? If no, then yes this method shall work for you as well.