If your Android device rooted with Magisk doesn’t pass the SafetyNet check anymore, it could be because of the new hardware-backed attestation and CTS Profile updates introduced by Google. This could prevent you from using some of your favorite apps/games on your rooted device.
Advertisement
In this guide, I will show you how to fix SafetyNet’s Hardware Attestation and force Basic Attestation on rooted devices using the ‘Universal SafetyNet Fix’ Magisk module.
Before we move ahead, let us take a step back and take a brief look at what Google’s new SafetyNet hardware attestation is and how it affects devices rooted with Magisk.
Yes, I know you’d be eager to jump straight to the instructions, but knowing more about the issue itself is equally important. It will allow you to get an idea of how the new attestation method works and subsequently how the fix is implemented.
Advertisement
Page Contents
Recap: Google’s New Hardware Attestation for SafetyNet
I have already covered a detailed post on SafetyNet’s hardware-backed attestation with all the technical details and explanations. So, I will spare you all of that and just share the important bits and pieces here.
Back in May 2020, Google introduced a new way of verifying the integrity of Android devices using hardware-backed keys. This new attestation method sends out device-specific Keystore certificate to SafetyNet servers to verify if Verified Boot is enabled or not. That is, the device’s bootloader is locked or unlocked.
Moreover, on January 12, Google further made some major new updates to how the CTS profile validation is done. This further makes it extremely hard to pass SafetyNet.
This was a major change to SafetyNet in the years since it was implemented and quite a good one from a security standpoint. But how does it affect those who have willingly unlock the bootloader and root their device with Magisk? Let’s see.
Magisk can hide root, but not bootloader status
Before this change was implemented, MagiskHide would create an isolated environment to hide root and bootloader status and thus pass SafetyNet.
But that won’t be possible anymore if the new hardware attestation has been enforced on a device. So, Magisk Hide will no longer be able to spoof the verified boot status.
Although, if an app only checks for Root or other modifications in the userspace, Magisk will be able to hide them pretty much the same way as before. But if it checks for the bootloader status, there’s nothing it could actually do out-of-the-box.
Check if SafetyNet’s hardware-backed attestation is active
This new attestation method isn’t something that’s rolled out to the devices via a software update, but rather a server-side change is done by Google. Moreover, at this point, not all Android devices have hardware attention enforced on them. The change is being rolled out slowly and in a random manner, irrespective of factors like the device model, region, Android version, etc.
To check if hardware attestation is active on your Android device, launch the Magisk Manager app and press the ‘Check SafetyNet’ button.
The results should include the new evalType field with one of the following values:
BASIC: If the typical signals and reference data is used for evaluationHARDWARE: If hardware-backed key attestation is used for SafetyNet evaluation
To reflect key attestation in SafetyNet responses, a new parameter, known as evaluationTypehas been added. According to Google, It basically “provides information about the types of measurements used to compute fields like ctsProfileMatch and basicIntegrity for a particular response”.
That’s exactly what Magisk Manager uses to check and show whether the hardware-based attestation is active on a device or not. So, if the results show HARDWARE, it means that hardware-backed attestation for SafetyNet is enforced on your device.
Note: This new attestation method is only valid for devices launched with Android 8.0 and above. Legacy devices lack a proper isolated secure environment and thus could not utilize this new attestation method. If you are operating such a device, then you will be able to pass SafetyNet without any problems.
Universal SafetyNet Fix allows you to Bypass Hardware Attestation
So, how can you deal with the new hardware attestation on your device rooted with Magisk? It can be done by using the recently-released ‘Universal SafetyNet Fix‘ module. This solution is brought to us by developer Danny Lin, who is more commonly known as kdragon on XDA-Developers and Github.
He is also the creator of Tipatch, a useful app that patches TWRP to backup the contents of the device’s internal storage.
How does the ‘Universal SafetyNet Fix’ work?
According to the developer, Google made some major changes to the CTS Profile, which now uses hardware attestation at all times. And while the response from the servers would report that the basic attestation was used, but hardware attestation is still used under-the-hood. In turn, the SafetyNet results fail as TrustZone reports an unlocked bootloader. That is, Android Verified Boot (AVB) is disabled.
If the key attestation fails to run, it will fall back to basic attestation by design. In such a case, the Keystore reports the “not implemented” error code. This is generally what happens with legacy devices that launched with Android Nougat and below.
The Universal SafetyNet Fix takes advantage of the same behavior to block Google Mobile Services from using key attestation at the framework level (A pretty ingenious idea I must say!).
Compatability & Tested Devices
This module supports any device running Android 8.0/8.1 Oreo, Android 9 Pie, Android 10 (Q), and Android 11 (R).
Advertisement
Following is the list of some devices on which the Universal SafetyNet Fix module is tested and was successfully able to bypass the hardware attestation. The confirmations for the same were provided by the respective members of the XDA-Developers community. Kudos to them.
- Asus Zenfone Max Pro M1 (Android 9 Pie)
- Google Pixel 3 XL, Pixel 3a, Pixel 4 XL, Pixel 4a, Pixel 4a 5G, and Pixel 5 (Android 11 stock firmware)
- Huawei Mediapad M5
- Motorola Moto Z Play (Android 9 stock firmware)
- OnePlus 8 (OOS 11.0.3.3 / Android 11)
- OnePlus 8 Pro
- Poco F1 (Android 11 – MIUI V12.0.3.0)
- Poco F2 Pro (Android 11 – One OS ROM)
- Poco X3 (MIUI V12.0.7.0)
- Realme 6
- Samsung Galaxy A20 and Galaxy A40
- Samsung Galaxy S9 (Android 10 – Devbase-ROM)
- Samsung Galaxy S10 (Android 10 – One UI 2.5)
- Samsung Galaxy S20+ and Galaxy S20 FE 5G (Android 11 – One UI 3.0)
- Samsung Galaxy Tab A7 10.4 (Android 10 – One UI 2.5)
- Xiaomi Mi 9 and Mi 9T Pro (Android 11 – MIUI 12)
- Xiaomi Mi Mix 3 5G (Android 9 Pie – MIUI)
- Xiaomi Mi Note 10 Lite (
- Xiaomi Redmi Note 9 Pro (MIUI V12.0.3.0)
- Xiaomi Redmi Note 9s
The developer does mention that “Heavy OEM skins are not officially supported”. From what we could gather, most issues were observed with Samsung Galaxy devices running One UI firmware, leading to the biometrics not working.
However, it may work depending on the ROM itself. So, feel free to try. And if it works, consider reporting it over the XDA thread and share with us if you can so that we can update the compatibility list.
How to Fix SafetyNet’s Hardware Attestation using Universal SafetyNet Fix
Now, let me show you how to bypass SafetyNet’s hardware attention on rooted devices using the Universal SafetyNet Fix module.
Step 1: Enable MagiskHide and Pass Basic Attestation
The first thing you’ll need is to pass basicIntergrity attestation on your rooted device. This could generally be achieved by activating MagiskHide in Magisk Manager.
If you have just rooted your Android device and there’s a very high chance it won’t pass SafetyNet basic attestation initially. That’s because the MagiskHide feature is disabled out-of-the-box on new installations.
So, open the Magisk Manager application on your device and press the cog icon on the top-right to access the Settings menu. Then scroll down to the ‘Magisk’ section and turn ON the ‘MagiskHide’ toggle.
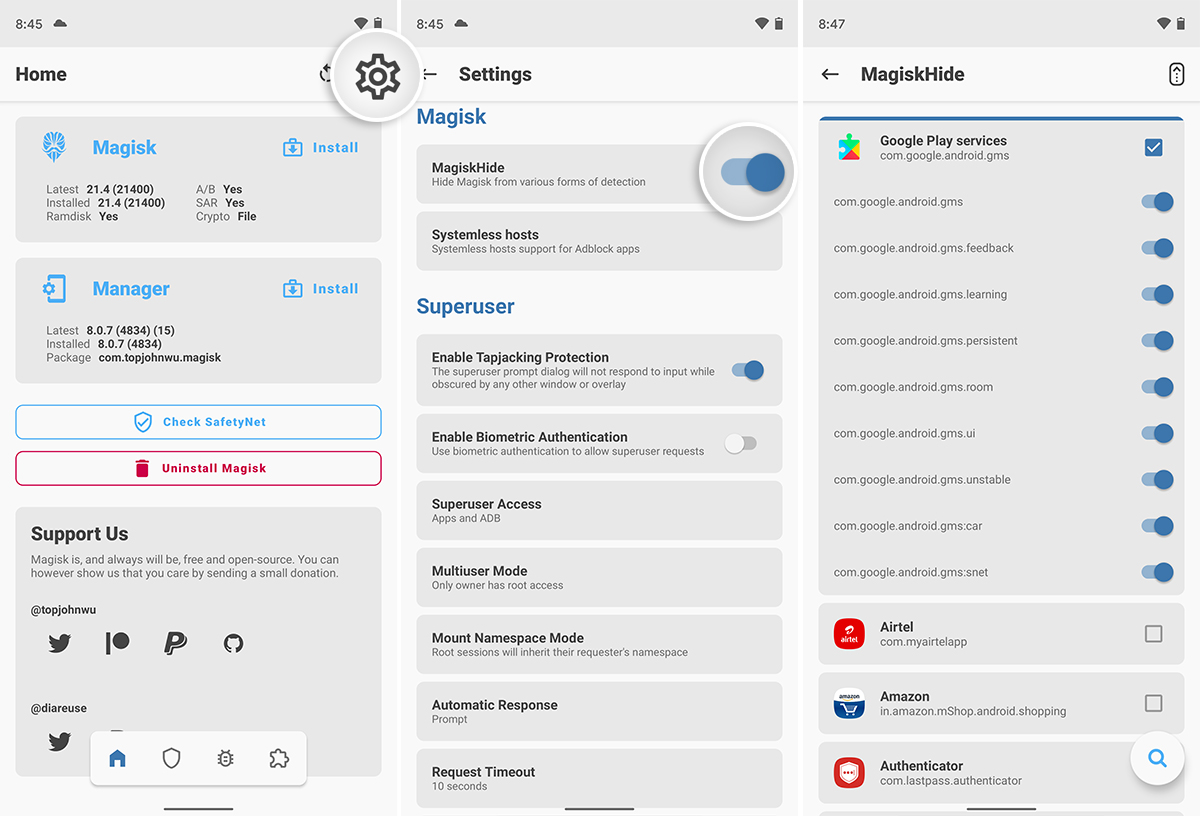
Once enabled, MagiskHide will automatically hide root and other userspace modifications from the most common Google services. But to be extra sure, you could turn on MagiskHide for all the services listed under ‘Google Play Services’.
After the above is done, press ‘Check SafetyNet’ in Magisk Manager and verify that your device passes the basic attestation.
Advertisement

Note: If your device is running a custom ROM and could not pass basic SafetyNet attestation, you might want to switch to another ROM.
Step 2: Install Universal SafetyNet Fix Module on your device
Once you have ensured that your device passed the basic attestation, the next step is to install the Universal SafetyNet Fix module on it.
The module itself hasn’t been merged into the official module repository. So, you will need to download and install it manually. If you’re experienced with that, you’ll know exactly what to do in this step. If not, read ahead.
First, download the latest version of the Universal SafetyNet Fix Magisk module directly to your device from the official Github releases page. For documentation purposes, we are posting the direct links for all the versions of this module, including the latest version at the time of publishing this guide.
- safetynet-fix-v1.1.1.zip (Latest)
- safetynet-fix-v1.1.0.zip
- safetynet-fix-v1.0.2.zip
- safetynet-fix-v1.0.1.zip
- safetynet-fix-v1.0.0.zip (Initial release)
Once downloaded, launch the Magisk Manager app and go to the ‘Modules’ section (the last icon in the bottom navbar). Press the ‘Install from Storage’ button to open the file selection window. Then navigate the device storage and select the module’s ZIP file (e.g. safetynet-fix-v1.1.1.zip).
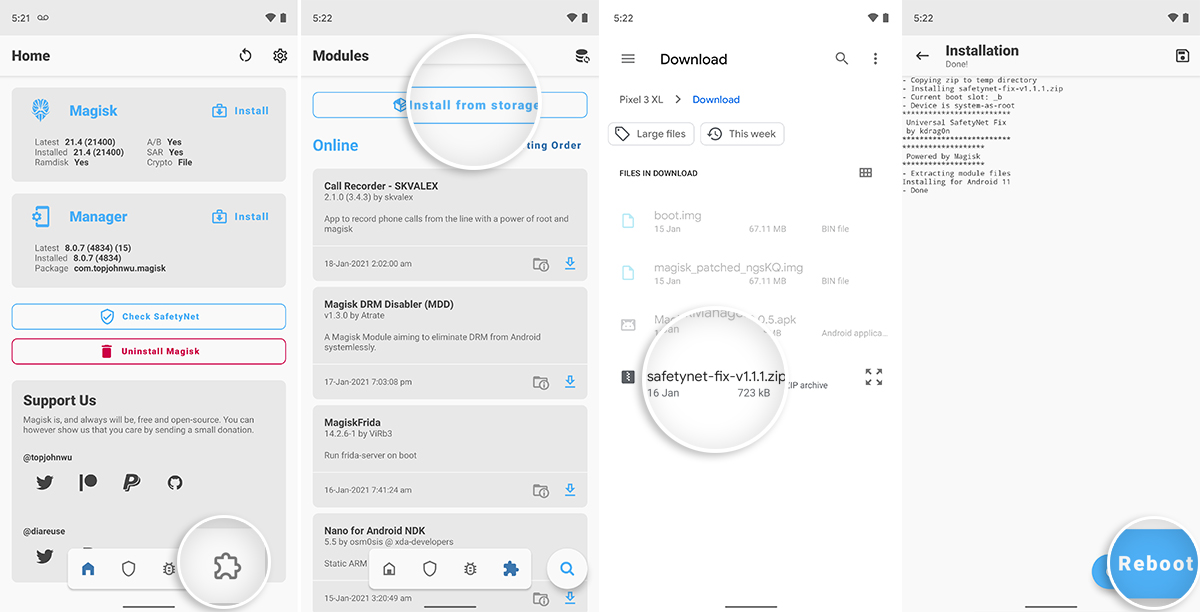
Magisk Manager will instantly start installing the Universal SafetyNet Fix module on your device. Once the installation is successful, press the ‘Reboot’ button located at the bottom of the screen.
The module works in an install-and-forget manner, so there’s no configuration you’ll need to do on your end. After the reboot, re-check SafetyNet in the Magisk Manager app.
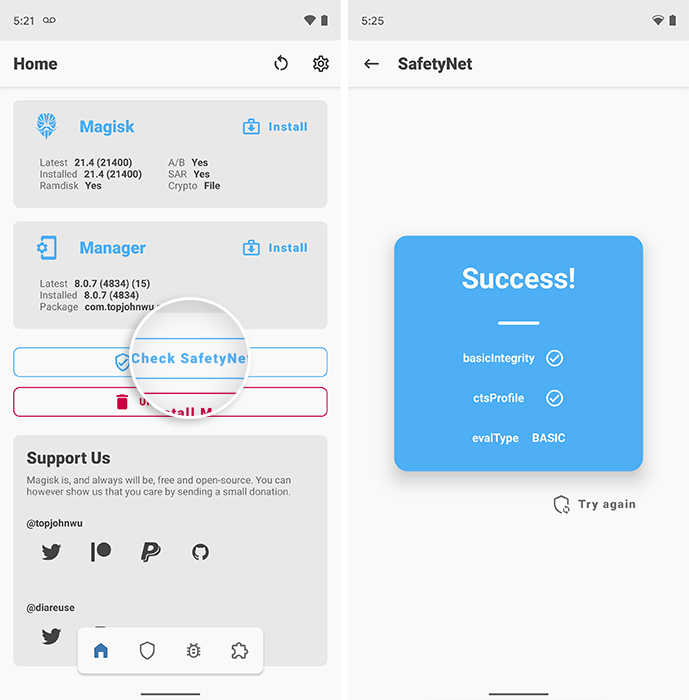
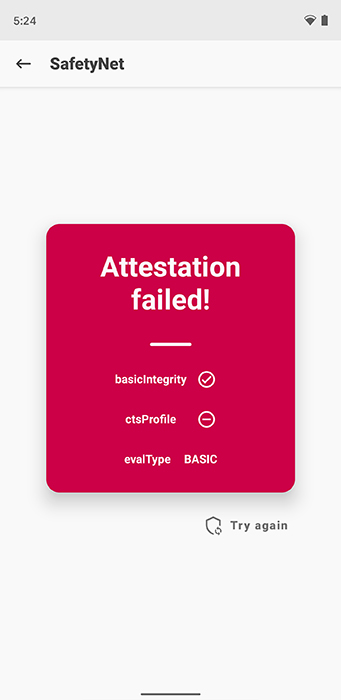
Your rooted Android device should now pass both basicIntegrity and ctsProfile parameters, and shows evalType BASIC. This means you have successfully fixed SafetyNet’s hardware attestation on your device.
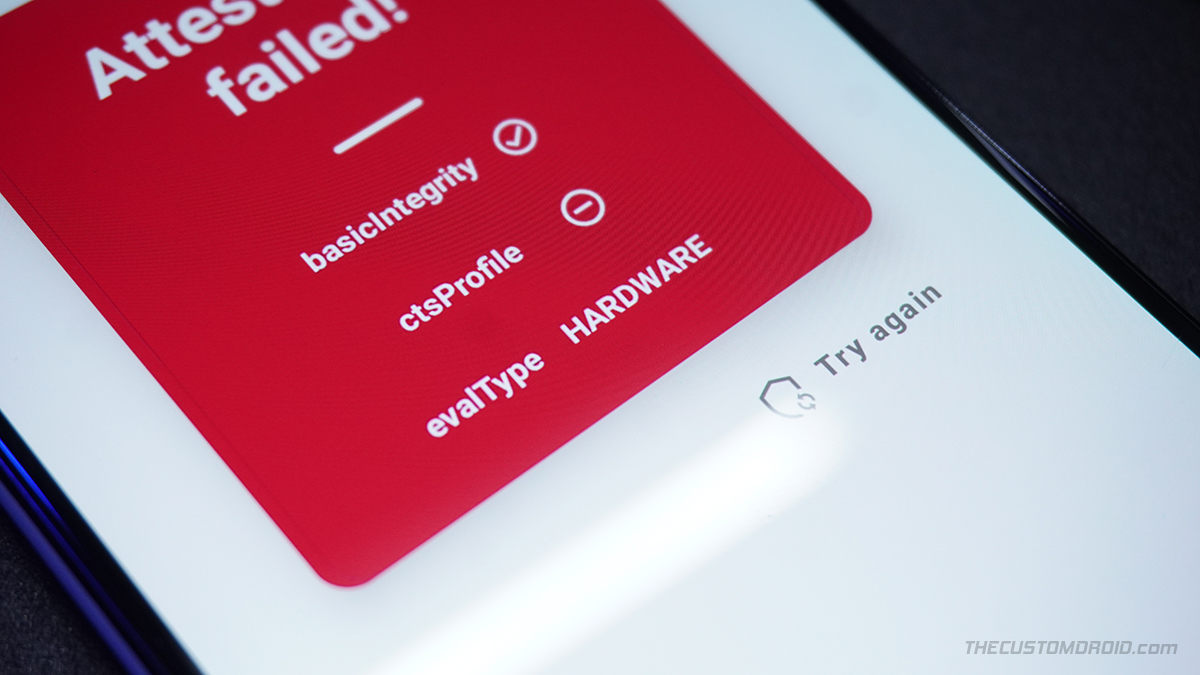
If the CTS profile still doesn’t pass and the attestation fails as shown in the image below, then go through the third and last step.
Advertisement
Step 3: Install MagiskHide Props Config to Pass CTS Profile (if required)
On certain devices and ROMs, you might further need to use the MagiskHide Props Config module in conjunction with the Universal SafetyNet Fix to pass the CTS profile. The developer further mentions in the latest release notes that – “Altering the CTS profile is no longer in scope for this module as it breaks more devices than it fixes“.
So, begin by going to Magisk Manager > Modules and search for the ‘MagiskHide Props Config‘ module. Press the blue-colored download icon and hit ‘Install‘ to install the module on your device. Once the module is installed, hit the ‘Reboot‘ button.

After the reboot, you will need to download a Terminal emulator like Termux and spoof your device’s fingerprint to one that can pass the CTS profile. The Pixel 3a’s profile is more commonly used and has better chances of success, as reported by various users over the XDA community.
Using the MagiskHide Props Config module is out of the scope for this guide. I am already working on a separate tutorial for that and will update his post with the link once it’s live. In the meantime, you can start by visiting the module’s official documentation on Github or check the official XDA thread.
After configuring the module, check SafetyNet and verify that it passes CTS profile now.
Verdict
So by now, you have learned how to fix SafetyNet’s hardware-backed attestation and force basic attestation on rooted devices using the ‘Universal SafetyNet Fix module. This one-of-a-kind module is clearly a simple solution (for the users) to fix a big problem that the modding community has faced since the last year. For the same reason, the project has gained immense popularity over at XDA.
It was pretty exceptional for Danny Lin (kdrag0n) to come up with the idea and bring the module to life for all of us to use. If you liked his work and the module helped you, then you could consider donating to him by using the details provided on the Github repository.
If you’re a developer, you can also contribute to the project by creating a pull request on Github (check the source link below). The developer has also laid down instructions for developers so that they can integrate this SafetyNet fix into their ROMs.
Let us know if the module works for your particular device and ROM combination, and fixes the hardware attestation issue. If you have any doubts regarding the instructions or the module itself, drop a comment.
Source: Github | Via: XDA-Developers Forum
Comments 14 Comments
Comments are moderated, and published only if they are relevant to the topic and add value in a constructive way. If you disagree with something, please be polite and respectful. We suggest you read our comment policy before commenting.
worked like a charm 🙂 Samsung A51 & elementaryOS (beta) kudos to developer and this clear guide author!
Thanks !! Now my redmi note 10 emui 12.0.2.0 successful passed safetynet check !! Good job buddy
Nidhas, all thanks to the developer who came up with the idea and the module! Kudos on passing SafetyNet btw. It it really getting challenging every year for the modding community.
worked for galaxy tab a7
Grazie,grazie,grazie!
Funziona sul mio Xiaomi MI 9T Pro
nigol
Translation (by Moderator): Thanks thanks thanks! It works on my Xiaomi MI 9T Pro nigol.
Good to know it worked! And thank you for the confirmation. May I know the MIUI version (or the ROM) you’re using on Mi 9T Pro?
Funciona muy bien, en redmi note 9 pro , Android 10 , Miui 12 , muchas gracias.
Translation (by Moderator): It works very well, on redmi note 9 pro, Android 10, Miui 12, thank you very much.
My pleasure, Christian. And thank you for the confirmation.
Thanks Dhananjay,
you explain in simple language which a layman also can perform these steps and got the desired results.
My pleasure, Kamal. And thank you for the compliment.
Update: Please ignore my previous post. I did get rid of Magisk props, and all other modules, and I’ve re-installed Universal SafetyNet Fix, and finally, SafetyNet passed!
Thanks!!
Han, it’s good to know it worked without using MagiskHide Props to spoof the device’s fingerprint.
And you’re welcome!
Yes, here is what it looks like:
basicintegrity ☑
ctsProfile 🛇
evalType: Hardware
It seems as if you will need to go the extra step of using the MagiskHide Props module to pass ctsProfile first.
This module did provide certain ways to fix ctsProfile initially, but according to the release notes of the latest version “Altering the CTS profile is no longer in scope for this module as it breaks more devices than it fixes.”
I faced the same issue on my Pixel 3 XL lately. Here’s what worked for me and you could try the same if it helps.
1) Uninstall Universal SafetyNet Fix module and reboot
2) Install MagiskHide Props module and reboot
3) Re-install the USF module and then do a final reboot.
Let me know how it goes.