How to Install Google Assistant on Lollipop (No Root)
Installing Google Assistant on Lollipop is now possible and you don't need root for it! Nougat brought some really fine goodies with it, including the all new

Installing Google Assistant on Lollipop is now possible and you don’t need root for it!
Nougat brought some really fine goodies with it, including the all new AI-powered personal assistant. While initially Google Assistant was only limited to the Pixel phones, the support soon expanded to other devices running Nougat and Marshmallow. During this whole scenario, Google probably overlooked the Lollipop users, that still runs on 30.8% of total Android devices worldwide. That’s not a small number and we believe that those users should be given the chance to enjoy a better personal assistant too.
Not just us, XDA members like Nikhilkumar038 shared the same belief and came up with a neat and successful trick to launch Google Assistant on Lollipop based devices without root. The method required the user to launch a specific hidden Google activity using a dedicated app like the Nova Launcher or Activity Launcher. While the trick proved successful, it was still limited to the use of a specific launcher.

The problem is now finally sorted as XDA member Jovic77 has created an app that allows you to easily launch Google Assistant on Lollipop devices. It is known as “Google Assistant Launcher” and is solely based on the method by Nikhilkumar038. The best part about the app is that it does not require root, as it did earlier before the official support.
Do not confuse yourself with the name, it is not literally a complete launcher application. It doesn’t rely on an Activity launcher anymore. It rather makes use of Assist Intent to launch Google Assistant on Lollipop and upper versions. The app will now work with any installed launcher application of your choice.
Also see**:** Secure Android Devices: Top 10 Tips & Tricks for better Privacy & Security
Get Google Assistant on Lollipop
You can enable it pretty easily. But before you proceed ahead, go to Settings > Security on your Android device and enable the “Unknown sources” option.
- Download the Google Assistant Launcher APK - Link
- It’s great if you have downloaded it to your phone. If not, transfer the APK to your device storage.
- Using a file explorer, browse the storage and tap on the downloaded APK ( E.g - GoogleAssistantLauncher_1.0.2_SDK21+_HyDevs.apk).
- Android package installer will launch, so follow the on-screen instructions and install the app.
- Once you have it installed, go back to the homescreen and long-press the Home button. Choose “Google Assistant” as the default action and set it to “ALWAYS”. If you are installing it on Marshmallow or Nougat, select “Google App” as default.
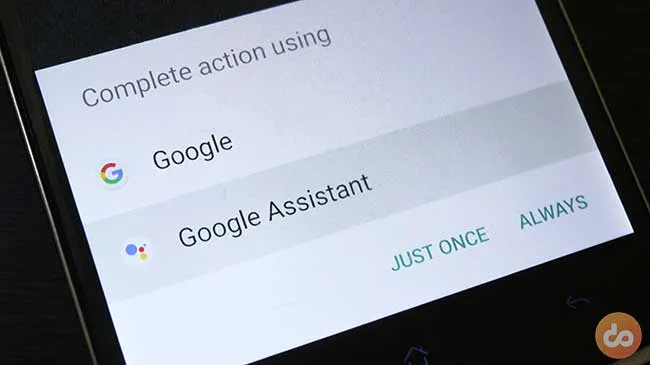
- Now to launch Google Assistant, simply long-press the home button and it shall unleash itself.
Now that you have enabled Google Assistant on Lollipop, click the link below for some cool tips and tricks.
» Google Assistant Tips & Tricks: 10 cool things to do with it
Don’t forget to share this article on your social media profile and let your friends know about it.
Comments
Comments are moderated, and published only if they are relevant to the topic and add value in a constructive way. If you disagree with something, please be polite and respectful. We suggest you read our comment policy before commenting.