
On this page
OnePlus’ OxygenOS 11 update brought quite a lot of design language changes to the OnePlus 8 series including the all-new ‘OnePlus Sans’ font. If you like the font, you’d happy to know that you can easily ditch your phone’s default font and replace it with OnePlus Sans throughout the OS.
In this tutorial, I will show you how to install the OnePlus Sans Font on any Android device systemless-ly, using the “OnePlus Sans Systemlessly” Magisk module.
Fonts (or technically “typefaces”) have a very deep impact on how our mind perceives and process the presented information. According to an article published by MDG Advertising – “Typefaces can affect the way people read, comprehend, and view information”.
While their article was published years ago, the same fundamentals apply today nonetheless. If you have never changed the default font on your phone, you’d be amazed by how much of a drastic difference it could make.
Back in 2017, OnePlus introduced the OnePlus Slate font, which a lot of us liked compared to Google’s good old Roboto typeface. OnePlus Sans is a spiritual successor to the same and blends in very well with the new user interface changes implemented by OnePlus in OxygenOS 11.
How to Install OnePlus Sans Font on Any Android Device
This new system font from OnePlus is exclusively available for the OnePlus 8, OnePlus 8 Pro, and OnePlus 8T running OxygenOS 11.
But thanks to the XDA-Developers community, it is now possible to get the OnePlus Sans font on any OEM Android device, regardless of the Android version installed. This is done through a Magisk module developed by community member Venky.
Of course, since it’s a Magisk module, the only requirement is that your phone must be rooted with Magisk. If you’re familiar with using modules, you could simply grab it directly from the original XDA thread and install it. But if you’re new to it and need some guidance, just follow the steps below to get the OnePlus Sans font on your Android device.
Step 1: Download the ‘OnePlus Sans Systemlessly’ Module
The first step is to download the Magisk Module itself. So, click on the link below and download the module’s zip file to your phone.
If you’re going to download the module on your computer, make sure to transfer it to your phone’s internal storage. You can place it anywhere as long as you can easily locate it.
Step 2: Install the Module using Magisk Manager
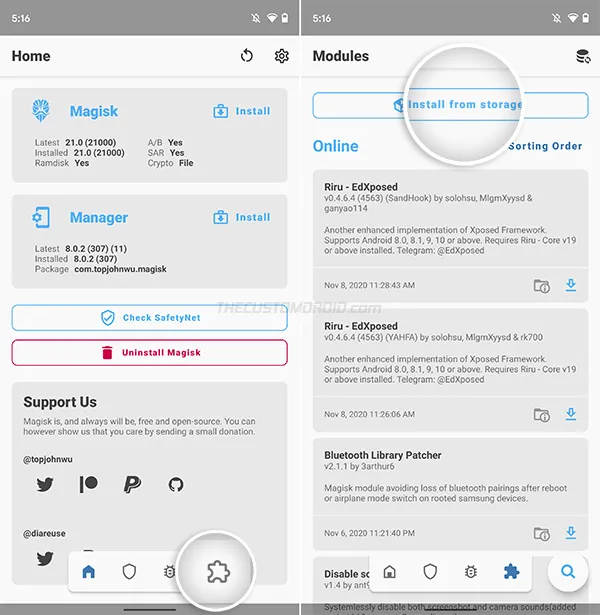
The module itself hasn’t been submitted to the official Magisk repository and so, you’d need to manually install it. To do this, first launch the Magisk Manager application on your phone. Then, press the “Modules” icon on the bottom navbar (the one to the extreme right) and select the “Install from Storage” option.
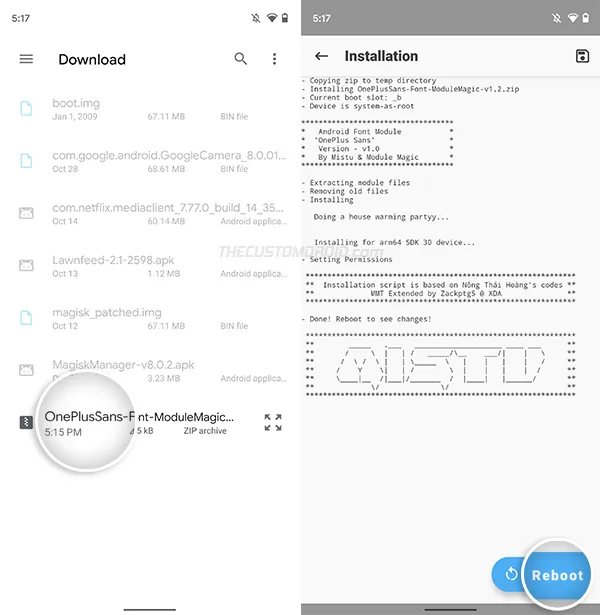
The file selection window will open up and display the downloaded files on your phone. If you have put the module somewhere else on the storage, then navigate to the location. The window will automatically grey out the files that are not in a compatible format (not .zip files).
Simply select the “OnePlusSans-Font-ModuleMagic-v1.2.zip” file to begin the module’s installation. This could take a few seconds to finish, so hold back. After the installation finishes, press the “Reboot” button on the bottom right.
Step 3: Enjoy OnePlus Sans Font on your phone now
That it! The module works in an “Install & forget” way. So you do not need to configure any settings/options and it should automatically change the default font on your phone system-wide after the reboot.
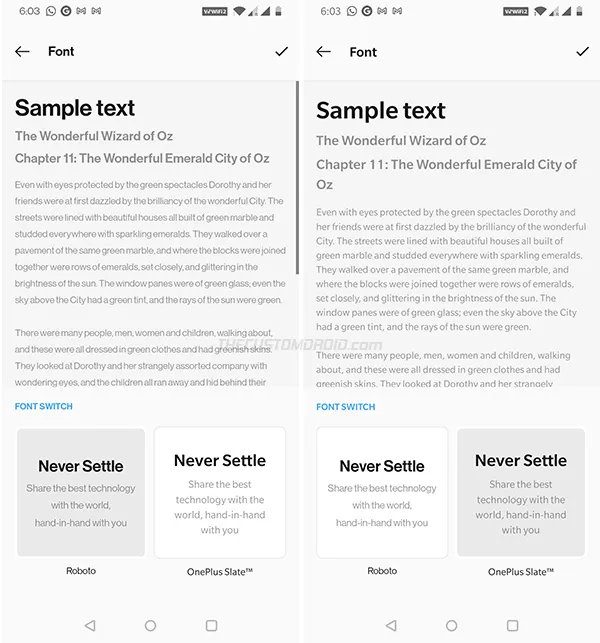
Here’s how the new OnePlus Sans font looks on my Pixel 3 XL when compared to the default Roboto font. How does it look? Something different for a change in my opinion.
On other OnePlus phones, like the OnePlus Nord, OnePlus 7 series, or OnePlus 6/6T, this module will replace the default ‘OnePlus Slate’ font (internally) with ‘OnePlus Sans’. So you will easily be able to switch between fonts by going to ‘Settings’ → ‘Customization’ → ‘Font’.
It’s worth mentioning that the module can automatically detect the custom font implementations in MIUI, so you can install it on Xiaomi, Redmi, and POCO devices as well.
If you ever wish to revert back to the original system font, go to ‘Magisk Manager’ → ‘Modules’ and find the ‘OnePlusSans By Module Magic’ module from the list of installed modules. Then press the “Remove” button. The module will automatically be disabled and removed on the next reboot. So just reboot your phone.
Also check: How to get Google Sans font on any Android device
Via: XDA-Developers
Comments
Comments are moderated, and published only if they are relevant to the topic and add value in a constructive way. If you disagree with something, please be polite and respectful. We suggest you read our comment policy before commenting.