
In this guide, I will show you how to install ViPER4Android on the OnePlus 8, OnePlus 8 Pro, and OnePlus 8T. It is compatible with both Android 11 and Android 10, on the stock OxygenOS software as well as custom ROMs.
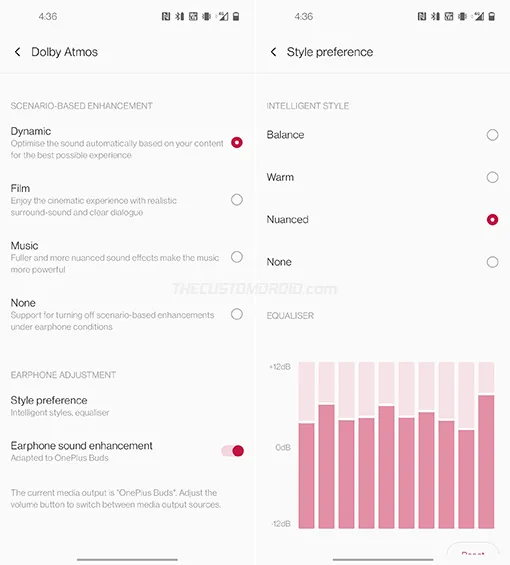
The OnePlus 8 series already packs Dolby Atmos audio enhancement in the stock OxygenOS software out-of-the-box. Dolby Atmos does work well and also offers an integrated equalizer when your phone is connected to earphones, but that’s it. There are no options to enhance the audio output via speakers or Bluetooth. And that’s where ViPER4Android drops in.
What is ViPER4Android?
ViPER4Android (abbreviated as “V4A”) is the most prominent audio modification tool for Android that allows you to modify and tweak your phone’s sound output for an improved audio experience. It was released for Android devices back in 2013 as an all-in-one audio enhancement solution. Ever since then, it has grown to be the most popular audio mod for rooted users.
Apart from a super-powerful 7-stage equalizer, ViPER4Android also offers quite a prolific amount of audio modification features, such as:
- Playback Gain Control: Makes the sound output louder or softer even when the device is at its max volume
- FET Compressor: Simulates the operation of FET circuits
- ViPER-DDC: Helps correct your headphones to produce a more balanced audio output
- Spectrum Extension: Encodes the higher sound frequencies differently than the lower part for lossless audio
- Convolver: Allows usage of Input Response Samples (IRS) through convolution to playback the characteristics of the sample in real-time
- Differential surround: Creates a fake sound depth effect (HAAS effect) by delaying the sound
- ViPER bass: Tweak the audio bass frequency and gain with three different bass modes (Natural, Pure bass+, Subwoofer).
And these are just a few to name. V4A includes a number of other audio modification features that you can tweak. The best part? You can modify the output through different audio channels including physical speakers, Bluetooth, earphones, and even USB.
Now without any further ado, let us get to the instructions. The only requirement is that your OnePlus 8 device must be rooted with Magisk. If it isn’t already, you can refer to the rooting guide linked below for your device.
How to Install ViPER4Android on OnePlus 8, OnePlus 8 Pro, and OnePlus 8T
Installing ViPER4Android on the OnePlus 8 series is extremely simple. You wouldn’t need to flash any ZIP file via TWRP or install any Magisk Modules. All you have to do is download and install the APK file, and then configure the drivers using the app.
The steps below will guide you through the complete installation.
Step 1: To begin, you first need to download the latest ViPER4Android v2.7.2.1 APK file on your OnePlus 8 device. You can download it directly from the official XDA Labs page.
Step 2: After downloading, open the File Manager app and navigate to the ‘Download’ directory where the APK was downloaded.
Step 3: Tap on the APK file to launch Android’s in-built package installer. Then press the ‘Install’ button to install the app on your phone.
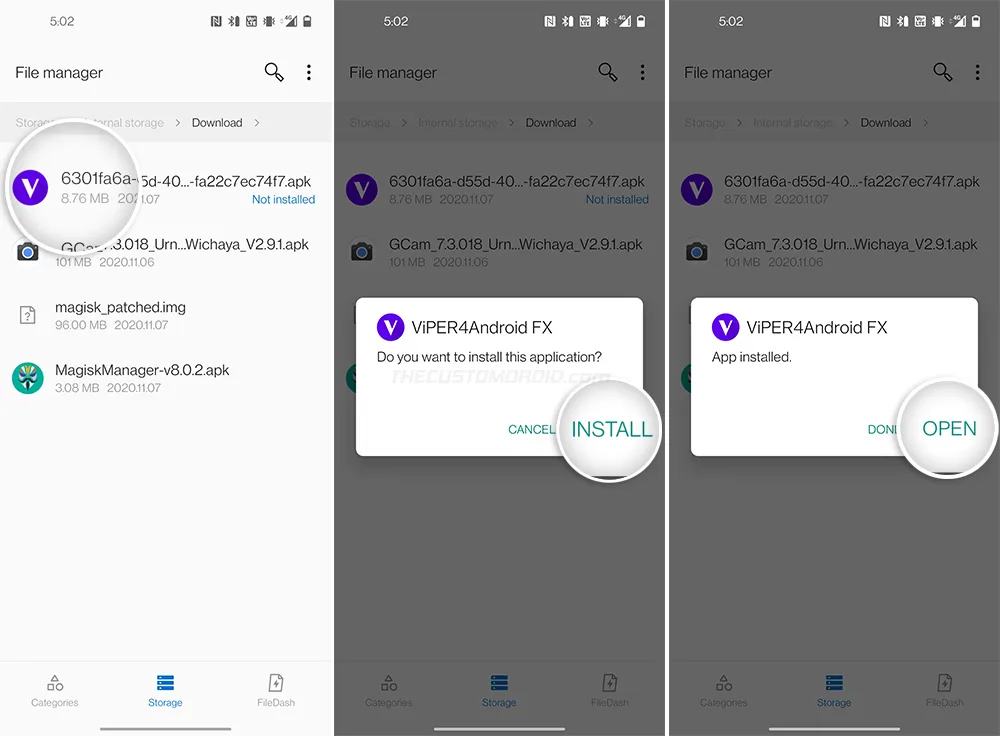
Step 4: Once installed, go to the app drawer and launch the ViPER4Android app.
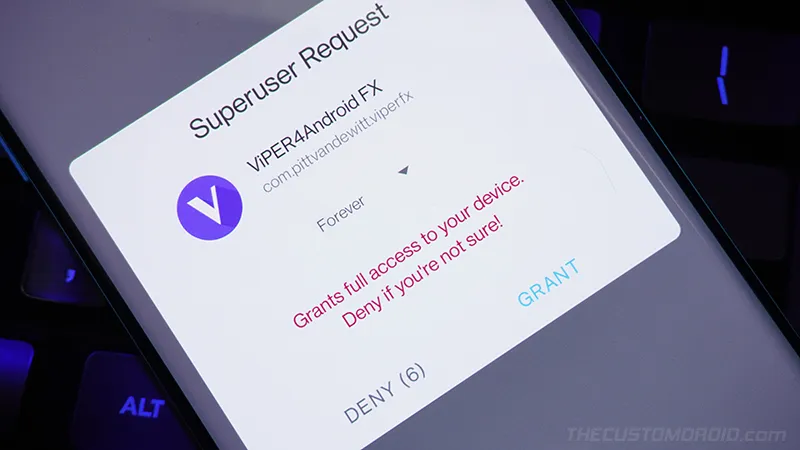
Step 5: As soon as it is launched, the app will request superuser access. Tap ‘GRANT’ to grant the root permissions.
Step 6: The app should now show the “No driver found” message and ask you if you wish to install the drivers.
Step 7: Finally, press “OK” to configure the required drivers and finally install ViPER4Android on your OnePlus 8/8 Pro/8T.
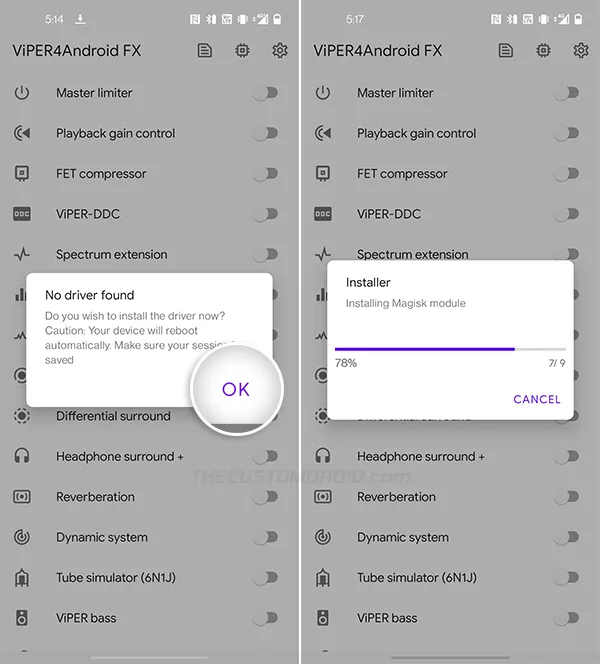
Your phone will instantly reboot now.
Once your OnePlus 8 boots into the OS, go to the app drawer and launch the ViPER4Android app.
Now turn ON the ‘Master limiter’ and start playing some audio through your favorite music player or music streaming service. ViPER4Android should automatically start processing the audio through the current output channel (earphones, speakers, Bluetooth, or USB).
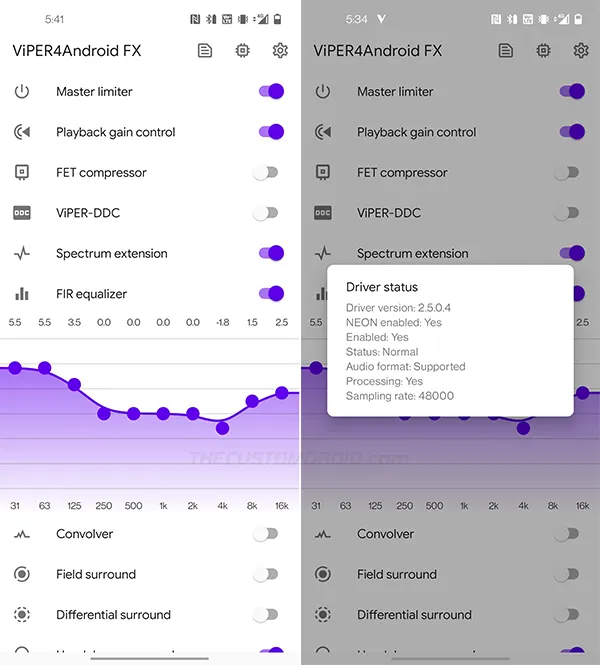
You can also confirm the driver status by pressing the icon right next to the cogwheel. It should display the driver version, if it’s enabled or not, and if V4A is processing the audio at the moment or not.
A Few Important Notes
Before you leave, there are a few key things you should note when using ViPER4Android.
- After enabling the ‘Master limiter’ for the first time and playing audio, you might need to wait for a few seconds for V4A to start processing.
- The driver status screen will only say “Processing: Yes” if audio is currently being played, or else it should say “No”. This is the default behavior. Additionally, ensure that you have enabled master power first.
- ViPER4Android may not process audio on apps like YouTube, Netflix, Pandora, etc out-of-the-box. If you’re facing this problem, try installing the Audio Modification Library and Audio Compatibility Patch modules in Magisk.
- On some custom ROMs, V4A may prompt you to re-install the drivers even though you have installed them before. To fix this, you could try installing ViPER4Android using the method discussed in this tutorial.
There you go! By now you have downloaded and installed ViPER4Android on your OnePlus 8, OnePlus 8 Pro, or OnePlus 8T. If you have any questions regarding the audio mod or face any difficulties installing it on your phone, feel free to let me know.
Comments
Comments are moderated, and published only if they are relevant to the topic and add value in a constructive way. If you disagree with something, please be polite and respectful. We suggest you read our comment policy before commenting.