Install TWRP Recovery and Root Moto G5S Plus (sanders)
This guide will cover the instructions on how to install TWRP Recovery and Root Moto G5S Plus. Rooting your phone will allow you to attain privileged access

On this page
This guide will cover the instructions on how to install TWRP Recovery and Root Moto G5S Plus. Rooting your phone will allow you to attain privileged access over the software so that you can customize it to your own needs and liking.
Rooting your Moto G5S Plus further has additional benefits like you’ll be able to install root apps, tweak the kernel to extract better performance/battery life, make modifications to the UI, and much more. On the other hand, with a custom recovery such as TWRP installed on your phone, you can easily flash custom ROMs, kernels, mods, etc.
Prerequisites
Make sure that you meet the requirements listed below before you get to the instructions.
- The process will wipe your device data, so it is wise to take a complete backup if anything goes unplanned. Again, take a backup first if you do not want to risk your personal data!
- Make certain that your phone has at least 50-60% billed to stop the accidental shut down in-between the procedure.
- The guide will require you to execute ADB and fastboot commands to flash TWRP, so make sure that you have enabled USB debugging on your device, setup ADB access, and have the Command Prompt/Terminal window open for the job. To do this, follow the instructions on this page.
- In order to install TWRP or root, you must first unlock the bootloader on your Moto G5S Plus. Note that unlocking bootloader will erase all the data stored on your device. So again, make sure to take a complete backup first.
Downloads
- Unofficial TWRP Recovery for Moto G5S Plus (source): twrp-sanders-pie.img
- Latest Magisk flashable ZIP: Github releases page
Install TWRP Recovery on Moto G5S Plus
Flashing/install TWRP is quite an easy task. Just follow the instructions listed below.
-
First, download the latest TWRP recovery image for your Moto G5S Plus.
-
Move the downloaded file (twrp-sanders-pie.img) inside the ‘platform-tools’ folder on your PC. This is the folder where the ADB and Fastboot tools are installed.
-
Now, hold the SHIFT key of your keyboard and right-click on any empty space inside this folder.
-
Select ‘Open PowerShell window here’ from the contextual menu. This will launch the Windows PowerShell inside the same folder.
-
Now connect your Moto G5S Plus to the PC using a USB cable and ensure that USB debugging is enabled on your phone.
-
Enter the following ADB command in the PowerShell to boot your phone into Bootloader Mode.
.\adb reboot bootloader
-
If you’re prompted to allow USB debugging on your phone, press “Allow”.
-
Now, issue the following fastboot command to flash and install TWRP recovery on your Moto G5S Plus.
.\fastboot flash recovery twrp-sanders-pie.img
That’s it! You have successfully installed TWRP on your phone.
Boot into TWRP Recovery & Format Data Partition
Now, boot your Moto G5S Plus into TWRP recovery mode. This could be done in two different ways. Either you can use the .\fastboot boot twrp-sanders-pie.img command. Or, tap the volume keys in Bootloader Mode until “Recovery” shows up and hit the power key to confirm.
Before you can flash Magisk and root, it is important to format the data partition using TWRP to decrypt it. Without this, TWRP won’t be able to read your phone’s internal storage, which is required to flash files.
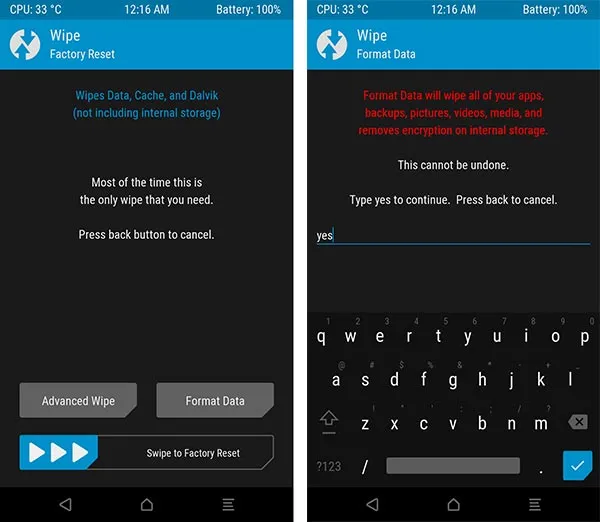
To do this, go to ‘Wipe’ > ‘Format Data’ from the TWRP main screen. Then input ‘yes’ in the provided field and hit enter. Once the data partition has been formatted, go to the ‘Reboot’ menu and press ‘Recovery’. This will reboot your phone back into TWRP and allow it to recognize the internal storage.
Root Moto G5S Plus using Magisk
So you have successfully flashed TWRP and formatted data partition. Now how do you root your Moto G5S Plus? It’s quite simple. Just download the latest Magisk ZIP file and flash it through TWRP. Follow the step-by-step instructions below.
- Download the latest Magisk flashable ZIP file to your PC.
- Connect your Moto G5S Plus to the PC. Then, go to the ‘Mount’ menu in TWRP and press the ‘Enable MTP’ button.
- Transfer the Magisk ZIP file from your PC over to your phone’s internal storage.
- Once the file has been successfully copied, disconnect the phone and go back to the TWRP main screen.
- Tap on the “Install” button and select the Magisk ZIP file (e.g. Magisk-v20.4.zip).
- Finally, swipe the button on the screen to flash Magisk and root your Moto G5S Plus.
- Once the flashing process finishes press the ‘Reboot System’ button.
Your Moto G5S Plus should now boot into the OS and rooted with Magisk. You can go to the app drawer and launch the Magisk Manager app to verify this.
With root permissions, you can now use root applications like Titanium Backup or audio mods such as ViPER4Android. You can also try flashing custom ROMs such as LineageOS, Pixel Experience, Havoc-OS using TWRP. For the complete list of custom ROMs available for the Moto G5S Plus, please visit this XDA forums section.
If you have any questions regarding the rooting process, please feel free to ask us through the comments section below.
Comments
Comments are moderated, and published only if they are relevant to the topic and add value in a constructive way. If you disagree with something, please be polite and respectful. We suggest you read our comment policy before commenting.