How to Install TWRP and Root Nextbit Robin
People or users may not deviate from their regular Android smartphone choices, like Samsung or Nexus, but phones like Nextbit's Robin are definitely worth

On this page
People or users may not deviate from their regular Android smartphone choices, like Samsung or Nexus, but phones like Nextbit’s Robin are definitely worth slinging an eye on. Today, we are going to help you, to unlock the bootloader, Install TWRP, and Root Nextbit Robin.
Nextbit is a new Android device manufacturer in the market, which is believed to bring uniqueness to the platform. Nextbit’s first and latest piece of goodness - Robin, is all about storage and space. The phone is designed to never run out of space, by merging the 32 GB onboard storage with 100 GB of integrated cloud storage.
Robin is designed a manner different from the regular Android smartphones, it is built with hardened plastic with a flat outlook, with the power button (which is also a fingerprint sensor) placed on the side. The phone runs on a Snapdragon 808 processor, with Adreno 418 GPU, and 3 GB RAM. The display is full-HD IPS LCD, running 5.2-inches diagonally. USB Type-C is supported, with two front-facing stereo speakers, just like the Nexus 6P. The overall performance of the Nextbit Robin is pretty good, compared to other phones within the same price-line.

The big thing about Robin? You can unlock the bootloader, install custom ROMs or recovery, and the phone will still be under official support/warranty.
Now, TWRP didn’t take much time to officially support the device, starting from v3.0.0-0, the latest version available yet is v3.0.1-0. Flashing TWRP via fastboot would first require unlocking the phone’s bootloader, and later you can root Nextbit Robin using Chainfire’s SuperSU.
Prerequisites
- Backup your device completely, including internal storage, messages, logs, contacts, etc.
- Charge your Robin to at least 60% battery level, to avoid any disturbances during the process.
- Enable USB debugging on your Nextbit Robin.
- For ADB and Fastboot access, either install the Android SDK on your PC, or use 15 seconds ADB Installer, for ADB and fastboot access.
- Download TWRP Recovery for Robin (codename: ether): Download Link
- Download SuperSU flashable zip package from here
Once you have achieved everything listed above, you can move on to the instructions below.
Unlock Bootloader and Install TWRP
The process follows easily unlocking through fastboot commands.
- Connect your Robin to the PC, and make sure USB debugging is enabled.
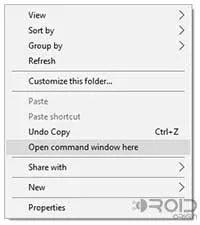
- Once it has been connected, go to the folder where the TWRP image was download. Now, press SHIFT key and right-click on a space inside the same folder. Select Open command window here, from the pop-up menu that appears.
-
In the command-line window that just opened, enter the command to reboot your device into fastboot mode:
adb reboot bootloader
-
Now, that the device is in fastboot mode, enter the command to unlock the bootloader:
fastboot oem unlock
-
The device bootloader shall now be unlocked and everything will be wiped inside of it. If you’re prompted with any messages, confirm to them by agreeing.
-
Do not reboot your device yet, flash the TWRP recovery now, using the command below:
fastboot flash recovery twrp-3.1.1-0-ether.img
-
Now that TWRP has been flashed, reboot your Robin:
fastboot reboot
So, you have just unlocked the bootloader and flashed TWRP recovery on the Nextbit Robin.
Root Nextbit Robin
-
Now that your phone is booted in OS, connect it to the PC using USB cable.
-
Open a command-line window on your PC, and enter the following command to boot Robin into recovery mode.
adb reboot recovery
-
Your phone will shut down now, and reboot into TWRP recovery.
-
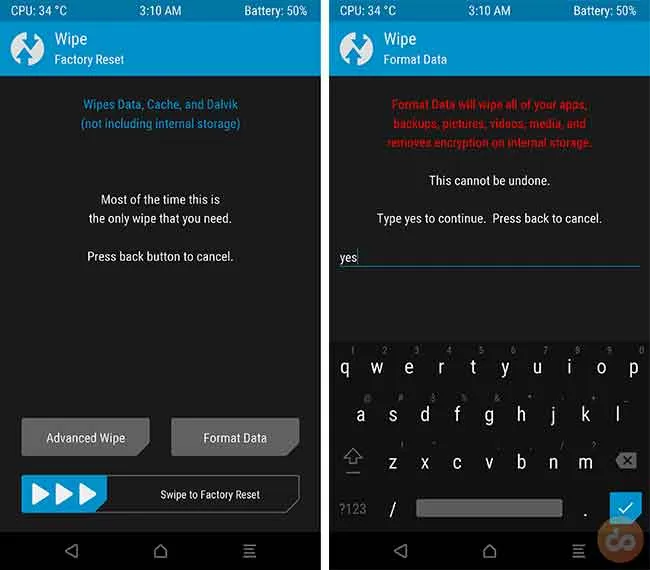
Before you root, you will need to disable encryption (Decrypt) on your Robin. It is simple, just go to Wipe > Format Data, and type in ‘yes’ in the provided space. Hit the ‘tick’ icon on the bottom right of the keyboard. The process may take a few seconds, to a minute, depending upon the amount of data on your storage.
- Now that encryption has been disabled, go to Mount and tap on Enable MTP. Connect your phone once again to the PC.
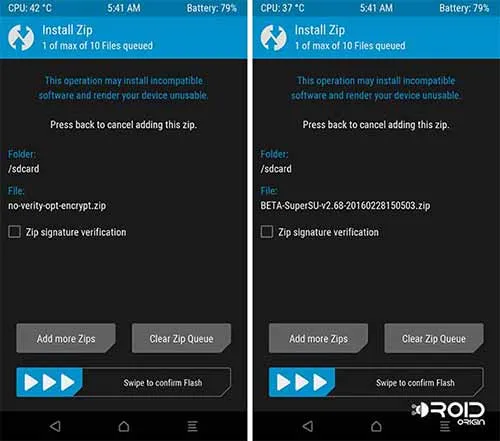
- Transfer the downloaded “SuperSU-v2.82-201705271822.zip” file to the internal storage.
- Once you see the TWRP main screen, go to Install. Now, browse the internal storage and select the root package you transferred.
- Swipe the “Swipe to confirm Flash” button at the bottom of the screen.
- The flashing process will finish in a matter of seconds, and once it is done, tap on Reboot System.
You can now install custom ROMs like CyanogenMod, or use root-requiring apps on your Nexbit Robin. If you face any issues during the process, let us know through the comments.
Comments
Comments are moderated, and published only if they are relevant to the topic and add value in a constructive way. If you disagree with something, please be polite and respectful. We suggest you read our comment policy before commenting.