Disable Forced Encryption and Decrypt Nexus 6P
So I was there at XDA-Developers, and a few users were going crazy since they couldn't decrypt their 6P's storage after installing the latest Developer Preview.

On this page
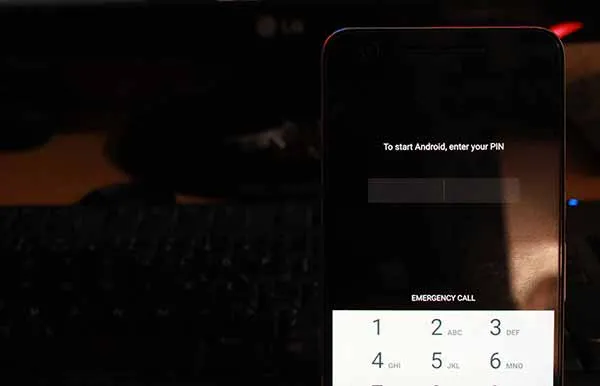
So I was there at XDA-Developers, and a few users were going crazy since they couldn’t decrypt their 6P’s storage after installing the latest Developer Preview. The solution is no biggie, you just need to understand what’s going on and deal with it. We are here to help you disable forced encryption and finally decrypt Nexus 6P. This tutorial will cover any 6P running Android N Developer Preview, or latest Android Marshmallow build.
Android N Features – What We Know So Far
What Is Forced Encryption?
Google wanted its users to have their data secured, and so they forced encryption on the Nexus 6P, to render a better sense of security. ‘Forced’ in irony, that encryption will be enforced on the 6P at its first boot, and also that Google forced its own decision to the users. Like in the previous versions of Android, Google should have left this choice to the users, and saved all the trouble.
You will need to disable forced-encryption in order to make permanent changes to the device’s filesystem, like flashing mods, tweaks, etc. Until you disable forced-encryption, and decrypt your 6P, you would not be able to perform any such functions.
Forced-encryption is implemented on your device, through the kernel. So, if you would like to disable forced encryption on Nexus 6P, and decrypt it, you will first need to flash a kernel that has Verity Check disabled. Most custom kernels have this disabled, but it is always advised to head up first with the stock kernel, with Verity Check disabled.
After flashing the custom kernel (boot.img), it is imperative that you erase the complete device storage, so that all of the encrypted data and protocols could be removed.
Now, that you know what forced encryption is and how it works, you can begin with the process below.
Disable Forced Encryption And Decrypt Nexus 6P
Thanks to XDA Recognized Contributor - Tigerstown, for delivering modified kernel (boot.img) with Verity Check disabled, for Android N Developer Preview. The guy has also provided decrypted boot.img for the latest Android Marshmallow MCH19I and MMB29V builds. If you’re running MM, you can likely use the provided boot image, to disable forced encryption on your Nexus 6P.
Before you begin, you must install Android SDK and set-up, for ADB and fastboot access. Alternatively, you can also use 15 Seconds ADB Installer. Also, make sure to backup your complete internal storage. The process will wipe your device completely.
Download the kernel corresponding to your Android version and build number:
- Marshmallow
- N Developer Preview
- Nougat
- NRD90U: Link | Mirror
Instructions
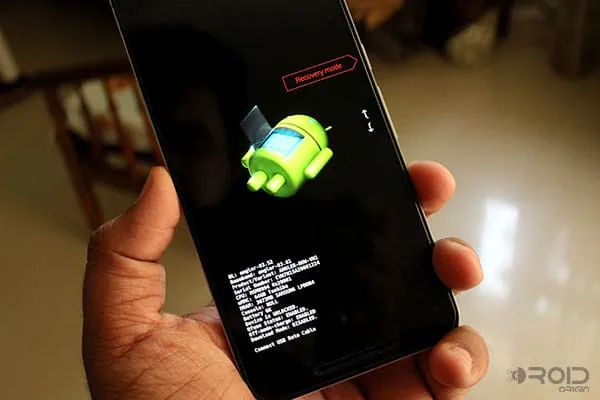
- Downloading the modified boot image is where we start. And when that is done, you are ready to flash it on your 6P using fastboot. Power off your 6P completely. When it is off, press and hold the Volume Down and Power keys, until you see the bootloader screen (refer to the image below).
- Connect your 6P to the PC while it is in boootloader mode.
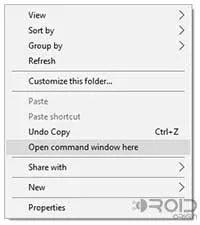
- Open the folder where the modified ‘boot.img’ file was downloaded. Press SHIFT key and right-click on a space inside this folder. Select Open command window here, from the menu that appears.
-
Enter the following command:
fastboot devices
The command should return a device ID. In case it doesn’t, make sure that the device has been connected properly in bootloader mode.
-
Enter the following command in the CMD window that just opened:
fastboot flash boot boot.img
-
By following the step above, you have ensured that the device would not encrypt the storage on boot. It is time to decrypt the device:
fastboot format userdata
fastboot format cache
-
Finally, reboot your 6P:
fastboot reboot
You have successfully disabled forced encryption and decrypted your Nexus 6P. Further, you can go ahead and root your device running Android N Developer Preview.
If you have faced any issue during the process, let us know through the comments.
Comments
Comments are moderated, and published only if they are relevant to the topic and add value in a constructive way. If you disagree with something, please be polite and respectful. We suggest you read our comment policy before commenting.