How to Install TWRP and Root HTC One A9
If you're willing to go custom on your One A9, you will first need a head start with TWRP. Now that TeamWin is officially supporting the device, we will help

On this page
If you’re willing to go custom on your One A9, you will first need a head start with TWRP. Now that TeamWin is officially supporting the device, we will help you install TWRP and root HTC One A9. Post that, you can use it to flash ROMs, image (.img files), Backup and Restore, Mount and Wipe partitions, etc.

Huge thanks to the TeamWin, and Captain_Throwback for supporting HTC One A9.
HTC’s latest flagship killer - The One A9, is a high end-range Android smartphone, with power-packed hardware and latest Sense software. The phone was announced during September 2015, the same time when Android Marshmallow was released. It supports a Qualcomm Snapdragon 617 Octa-core chipset, with a 5.0-inches full-HD AMOLED display. The camera on the A9 is 13 MP, with Optical-Image-Stabilization technology, and dual-LED flash. The phone also has a fingerprint sensor, to work best with Android Pay, on Android Marshmallow. Overall, the device is worth the money and beats several high-end smartphones currently available in the market.
The 16 GB variant of the A9 supports 2 GB of RAM, while the 32 GB supports 3 GB. So, you will not only be spending your bucks for upgrading the storage, but also an extra 1 GB RAM. The phone is also believed to support Qualcomm Quick Charge™ 3.0 module in the future, as claimed by HTC.
Without further delay, let us get to the procedure.
Before You Begin
- Download and install HTC USB Drivers.
- Install Android SDK, for ADB and fastboot access. You can also use 15 Seconds ADB Installer, alternatively.
- Enable USB debugging on your HTC One A9.
- Backup your device completely, including the internal storage, messages, contacts, etc.
- Charge your HTC One A9 to at least 60% battery level to avoid any uncertain shutdowns during the process.
- Unlock your One A9’s bootloader using HTCDev — www.htcdev.com/bootloader
- Download latest TWRP Recovery for HTC One A9: Download Link
- Download SuperSU flashable zip package: Download Link
Install TWRP Recovery
The first step would be to install TWRP using fastboot, and using the later to flash Chainfire’s SuperSU, to achieve root.
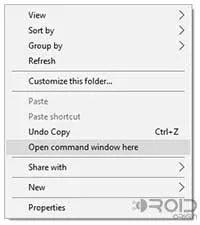
- Open the folder where the TWRP image file has been downloaded. While in this folder, press SHIFT key, and right-click on a space inside it. Select ‘Open command window here’, from the menu that appears. A new command-prompt/CMD window will open up.
-
Boot your HTC One A9 into fastboot mode — Press the power button and power off your device. Once all the lights are out, and the device has shut down completely, press and hold the Volume Down, and Power keys for about 5-6 seconds until you see the fastboot screen.Or, you can also use the following ADB command, making sure that USB debugging is enabled on your A9.
adb reboot bootloader
-
Now that your device is in fastboot mode, connect it to the PC using an appropriate USB cable.
-
Enter the command below, to confirm that the device has been connected properly, and being detected by fastboot.
fastboot devices
The command should return a device ID. In case it doesn’t make sure that you are using a good quality cable. You can also try switching it to a different port on your PC.
-
Finally, flash TWRP on your A9 using the following command:
fastboot flash recovery twrp-3.4.0-0-hiae.img
-
When the recovery has been flashed, type in the command below to reboot your phone back to OS.
fastboot reboot
Root HTC One A9
Next, you will root HTC One A9, by flashing SuperSU through TWRP recovery. In order to do that, you will first need to disable forced-encryption and decrypt your device.
-
Connect your phone to the PC using USB cable.
-
Open a command prompt/CMD window on your PC, and enter the command below to reboot into TWRP recovery.
adb reboot recovery
-
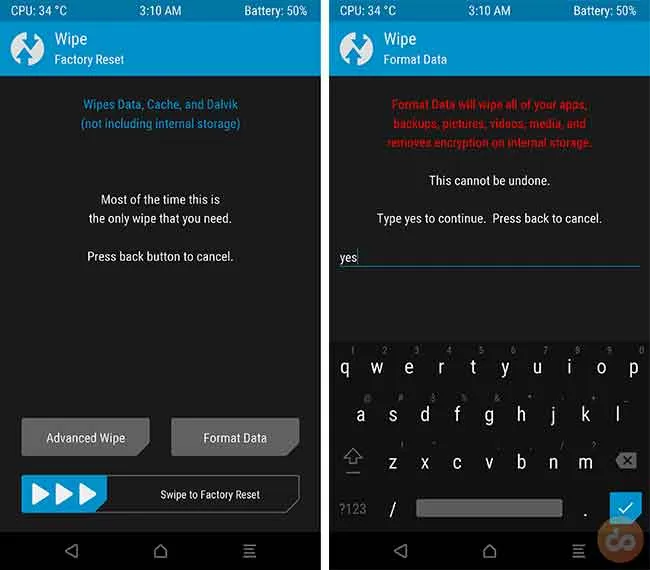
Once your A9 enters TWRP, go to Wipe. Now, tap on Format Data, and enter ‘yes’ in the provided field. This will wipe off your complete storage, so make sure that you have a backup.
- When the wiping is done, go back to the main-screen and tap on Mount > Enable MTP.
- Now, transfer the download SuperSU file to your phone’s storage.
- Disconnect your A9 from the PC, and go to Install from the TWRP main-screen. Browse your device’s storage, and select “SuperSU-v2.82-201705271822.zip”.

- Swipe the ‘Swipe to confirm Flash’ button on the bottom of the screen.
- When the flashing process is complete, you can tap on Reboot System to finally reboot your HTC One A9 into the rooted firmware.
That’s it! You have just successfully installed TWRP and rooted your One A9. Go ahead, and install custom ROMs/Kernels, or mods like Xposed Framework, it’s your call.
If you have issues during or post this process, let us know through the comments.
Comments
Comments are moderated, and published only if they are relevant to the topic and add value in a constructive way. If you disagree with something, please be polite and respectful. We suggest you read our comment policy before commenting.