How to Install TWRP and Root Samsung Galaxy S7 / S7 Edge
Through this guide, you will learn how to install TWRP recovery, disable forced-encryption, and root your Samsung Galaxy S7 / S7 Edge using Magisk.

On this page
Through this guide, you will learn how to install TWRP recovery, disable forced-encryption, and root your Samsung Galaxy S7 / S7 Edge using Magisk. The provided files and instructions are compatible with any Exynos variant of the S7 or S7 Edge.
The Samsung Galaxy S7 comes with a powerful hardware configuration and impeccable software functionality. It features the Qualcomm 820 Exynos Octa-core processor, Adreno 530 GPU, 4 GB RAM, 5.5-inches super-AMOLED curved display, 12 MP camera with OIS, fingerprint support. Unfortunately, the phone doesn’t offer USB Type-C support, instead, it embeds a Micro USB 2.0 port.

It has been a matter of days, until XDA member — jcadduono (Also, the official maintainer of TWRP), used his knowledge to compile a fresh build of the latest TWRP recovery for the S7 Edge. Not only that, but he also went ahead with a simple mod that could disable forced encryption, and finally let you root your Galaxy S7/S7 Edge.
Installing TWRP will help you with a lot of upcoming things, like custom ROMs, kernels, and other mods. By rooting your S7 Edge, you will have the privilege to run root-requiring apps like Kernel managers, root file explorers, etc. Apart from all of this, this method will also help you disable forced encryption on your device, making the device partitions writable.
Supported Models/Variants
The following Exynos S7 Edge models are supported:
- SM-G935
- SM-G935F
- SM-G935FD
- SM-G935X
- SM-G935W8
- SM-G935S
- SM-G935K
- SM-G935L
Before You Begin
- Backup your device completely. Disabling forced encryption requires you to completely wipe your phone’s internal storage, apps, and related data.
- Download and install Samsung USB drivers.
- Charge your S7 Edge to at least 60% battery level, to avoid any power off during the process.
- Enable OEM unlock, under Settings > Developer options.
- Download the latest version of the Odin Flash Tool from here and extract it to a suitable location, using 7-Zip or WinRAR.
- Download the latest TWRP recovery:
- Samsung Galaxy S7: Download Link
- Samsung Galaxy S7 Edge: Download Link
- Download latest Chainfire’s SuperSU flash-able zip: Link
- DM-verity and forced encryption disabler: Link
Install TWRP Recovery on Galaxy S7/S7 Edge
- Launch the Odin Flash Tool on your PC by double-clicking the “Odin3 v3.14.4.exe” executable file.
- Now boot your Galaxy S7 Edge into Download Mode — Power off your phone completely. Press and hold the Volume Down, Home, and Power buttons altogether until a blue-colored warning screen shows up. Press the Volume Up key now. Your S7 Edge should be in download mode now.
- Connect your phone to the PC using a USB cable.
- The Odin program will now detect the phone and display the corresponding “ID:COM” port. In case it doesn’t, try restarting Odin, and make sure that the drivers have been properly installed.
- In Odin window, under Options, make sure F.Reset Time and Auto-Reboot are checked. Everything else should be unchecked.
- Now, click on the AP button. Browse and select the TWRP recovery TAR file (“twrp-3.4.0-0-herolte.img.tar” for S7 or”twrp-3.4.0-0-hero2lte.img.tar” for S7 Edge).
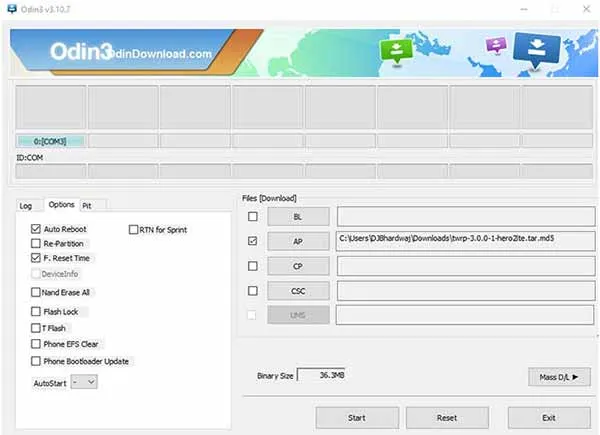
- Once all is done, click on the Start button.
- The process will take a few seconds. Once you see that it is about to finish, hold down the Volume up and Home buttons. So now your S7 Edge will directly boot into TWRP recovery mode. You can release the buttons once you see the TWRP screen.
Disable Forced Encryption and Root Samsung Galaxy S7/S7 Edge
- The first step will be to disable encryption. So, In TWRP, go to Wipe > Format Data. Enter the keyword “yes” in the provided space. This will wipe the complete internal storage and disable encryption.
- Once the process is complete, reboot back into recovery by going to Reboot > Recovery.
- When the recovery has rebooted, connect your S7 Edge to the PC. Now, go to Mount, from the main TWRP screen and tap on Enable MTP.
- Transfer the downloaded “no-verity-opt-encrypt-5.1.zip” and “SR3-SuperSU-v2.79-SR3-20170114223742.zip” to your phone’s internal storage.
- Disconnect the device now and go back to the TWRP main screen.
- Tap on Install. Now, navigate your phone’s storage and select “no-verity-opt-encrypt-5.1.zip”. Once selected, swipe the button on the bottom of the screen.
- The flashing process will merely take a few seconds, so wait till it is complete.
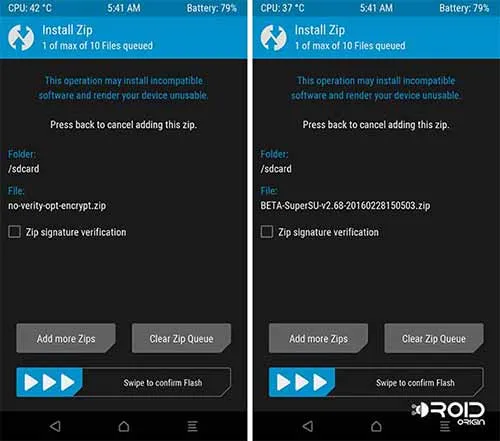
- Now, in order to root Samsung Galaxy S7 Edge, follow the same drill to flash the SuperSU root package – “SR3-SuperSU-v2.79-SR3-20170114223742.zip”.
- When all is done, go to Reboot and tap on System.
The first boot may take a bit of time, so don’t hassle and let it boot. Once booted, you can use apps like Root Explorer, Titanium Backup, Flashify, etc. You can also use TWRP to install custom ROMs, kernels, and mods.
Take some time to give the developer — jcadduono, a thumbs up for his efforts.
Now that’s how you easily root Samsung Galaxy S7 Edge. If you have any doubts or face any issues during the process, let us know through the comments.
Comments
Comments are moderated, and published only if they are relevant to the topic and add value in a constructive way. If you disagree with something, please be polite and respectful. We suggest you read our comment policy before commenting.