Redmi K20 (Pro) Guide: Unlock Bootloader, Install TWRP Recovery, and Root using Magisk
In this guide, you will learn how to unlock the bootloader, install TWRP recovery, and root Redmi K20 / Redmi K20 Pro using Magisk.

On this page
In this guide, you will learn how to unlock the bootloader, install TWRP recovery, and root Redmi K20 / Redmi K20 Pro using Magisk. This same guide is also applicable to the Xiaomi Mi 9T and Mi 9T Pro, which are global variants of the said phones.
If you’re thinking of tweaking the software on your Redmi K20 or K20 Pro to your needs and liking, then TWRP and Magisk root are two tools that you should have in your arsenal.
The former is a custom recovery that can be used to flash ZIP files, like those of custom ROMs, kernels, and mods. It could also be used to take NANDroid backups of the complete system (OS) that could come in really handy when switching ROMs. On the other hand, Magisk is a tool you could use not only to root your phone, but also to supervise root permissions, install modules to modify your phone’s software systemless-ly, and more.
Both the Redmi K20 and K20 Pro, as well as their global counterparts (Mi 9T and 9T Pro) have received a decent amount of attention from the Android custom development community over at XDA. Developer mauronofrio has been successful in compiling and providing unofficial and official builds of TWRP recovery for the Redmi K20 and K20 Pro. With that installed, you can easily flash the Magisk ZIP file to root your phone.
This guide will take you through the complete process in a step-by-step manner, from unlocking the phone’s bootloader, all the way to rooting it.
Prerequisites
Ensure that you fulfill all the requirements stable below before you head over to the instructions.
- It is extremely important to have a backup of your entire device. Unlocking the phone’s bootloader will erase all your data stored on the phone. This includes messages, contacts, photos, music, documents, and everything stored on the internal storage of the phone. So, take a complete backup beforehand to safeguard it. If you need help, you may also refer to our guide on how to create a full backup of your data on Android devices.
- In order to avoid any sudden shutdowns, make sure to keep your device charged to at least 50% battery.
- Download and install the latest version of the Xiaomi USB drivers on your PC.
- You will be using ADB and Fastboot tools to flash files to your phone. So, download the latest Android SDK platform-tools package from here and install them on your PC using this guide.
- When asked to launch the command-line window on your PC, do the following:
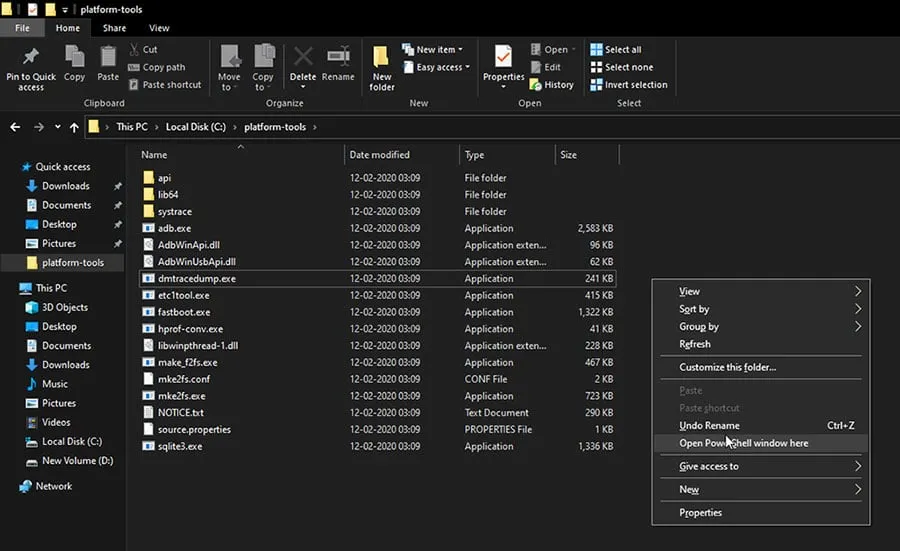
- On Windows PC: Open the folder where the Android platform-tools are installed (e.g. C:\platform-tools). Then hold the SHIFT key of the keyboard and right-click on an empty space inside this folder. Select the ‘Open PowerShell window here’ option.
-
On macOS/Linux PC: Open the ‘Terminal’ and change its directory to the folder where the Android platform-tools are installed. For example, if the tools are installed to /Documents/platform-tools, then enter the following command:
cd Documents/platform-tools

Downloads
Below, you will find the links to download all the files you’ll need while performing the instructions.
Both official and unofficial builds of TWRP recovery are available for the Redmi K20 devices, thanks to XDA Senior Member mauronofrio. According to the developer, the available builds are fully stable. All features including /data partition decryption, MTP, Nandroid backups, etc work too. The recovery supports both Android 10 and Android 9 Pie.
Note: It’s strongly recommended to use the unofficial version as they are more constantly updated and receive better support from the developer.
- Unofficial TWRP Recovery:
- For Redmi K20 (Mi 9T): twrp-3.3.1-12-davinci-mauronofrio.img
- For Redmi K20 Pro (Mi 9T Pro): twrp-3.3.1-32-raphael-raphaelin-mauronofrio.img
- Official TWRP Recovery:
- For Redmi K20 (Mi 9T): twrp-3.3.1-0-davinci.img
- For Redmi K20 Pro (Mi 9T Pro): twrp-3.3.1-0-raphael.img
- VBMeta Patcher: OF_avb_patcher_mauronofrio.zip
- Magisk Installer zip: Magisk-v20.4.zip (Or check for the latest version on Github).
Instructions
For your convenience and easy understanding, we have split this guide and its instructions into three major steps.
In brief, the first step is to unlock the bootloader of your Redmi K20/k20 Pro, which is a prerequisite to install TWRP, root, or perform any sort of modification to the software. Then the second step is to flash TWRP recovery on your phone through a fastboot command and then boot directly into it. This is followed by the third and final step, which is to flash the VBMeta Patcher and Magisk ZIP files to prevent bootloops and simultaneously root your Redmi K20/K20 Pro using Magisk.
Now without any ado, let us start with the instructions.
Step 1: Unlock the Bootloader
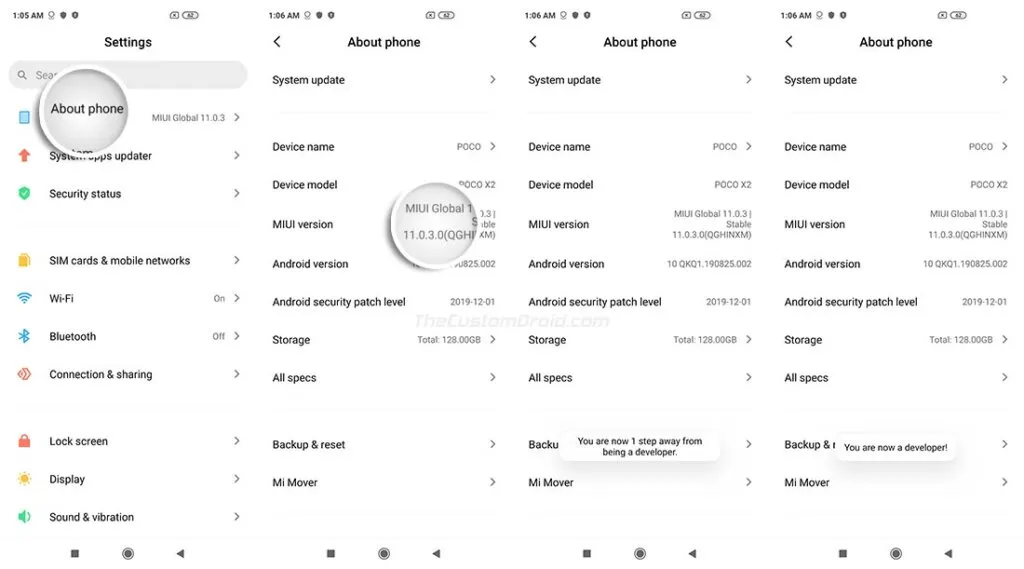
In order to unlock the bootloader of your phone, you must first enable OEM unlocking and properly bind your Mi account. So start off by going to ‘Settings’ → ‘About phone’ on your Redmi K20 and continuously tap on the ‘MIUI version’ until you see the ‘You’re now a developer!’ message on the screen.
Then go to ‘Settings’ → ‘Additional settings’ → ‘Developer options’ and enable the ‘OEM unlocking’ toggle in there. Once you have enabled it, access the ‘Mi Unlock Status’ menu within ‘Developer options’ and bind your Mi account to the phone by following the on-screen instructions.

Once the account is properly bound to your Redmi K20, you should see the ‘Added successfully. Mi account is associated with this device now*.*’ message on the screen.
You’re now ready to unlock the bootloader. To do this, first power off your phone and boot it into Fastboot Mode by holding the Volume Down and Power keys together. Once in Fastboot Mode, connect the phone to your PC via a USB cable.

Now download the latest version of the Mi Unlock tool to your PC from this page. Once downloaded, extracted the ZIP file and run the ‘miflash_unlock.exe’ executable to launch the Mi Unlock Tool. When the tool’s GUI appears on your PC’s screen, log into it with your Mi account. The tool will perform the required verifications and then show the ‘Phone connected’ message.
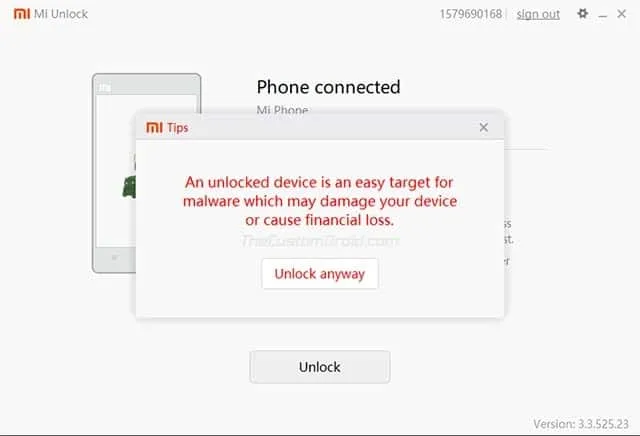
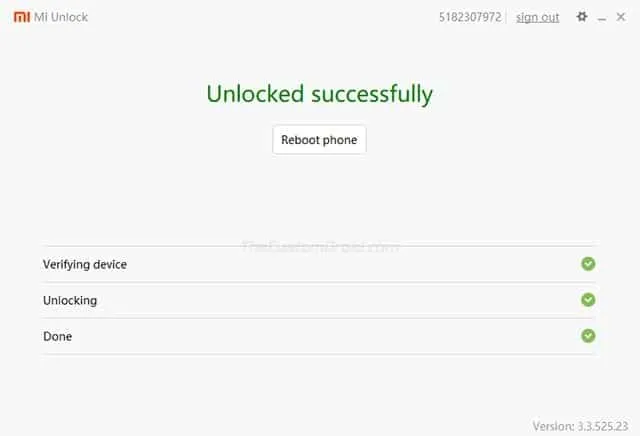
Click the ‘Unlock’ button in the tool’s window and select ‘Unlock anyway’ to finally unlock the bootloader on your Redmi K20/K20 Pro. Once the process finishes, you should the ‘Unlocked successfully’ message and can now click on ‘Reboot phone’.
Step 2: Install TWRP Recovery
With the bootloader unlocked, you can now install TWRP recovery on your Redmi K20. To begin, download the IMG file of the latest TWRP recovery from the ‘Downloads’ section to your PC.
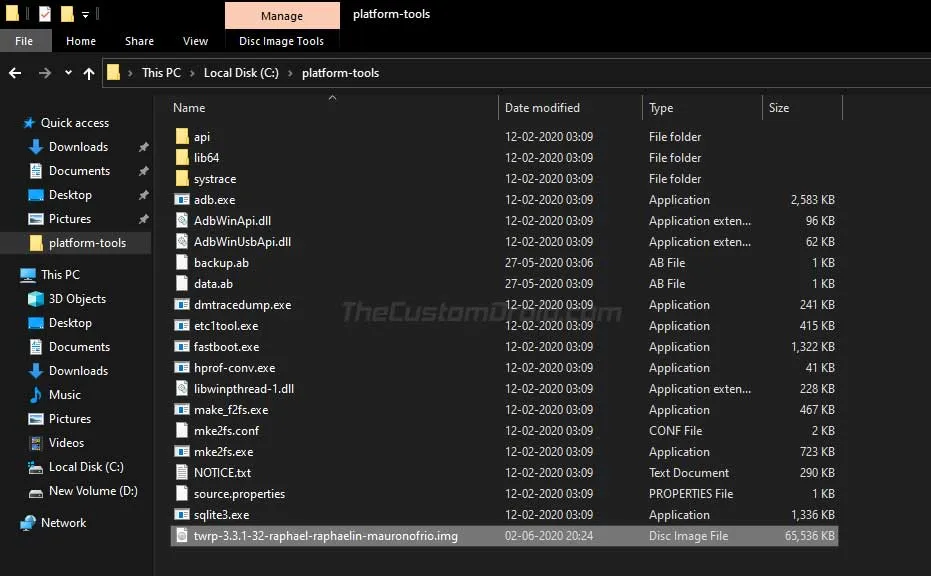
Next, move the downloaded TWRP IMG file to the folder where the Android SDK platform-tools are installed (e.g. C:\platform-tools on Windows, or Documents/platform-tools on macOS/Linux). Then launch the command-line window on your PC (Refer to pointer #5 in ‘Prerequisites’).
Note: All the commands below are to be preceded with “.\” (dot and backward slash) when using PowerShell on a Windows PC, or with “./” (dot and a forward slash) when using Terminal on a macOS/Linux PC.
With everything now ready on your computer, boot your Redmi K20 device into Fastboot Mode using the Volume Down and Power button combination while the phone is powered off. Once in Fastboot Mode, connect the phone to the PC via a USB cable.
Now, enter the following command in the PowerShell/Terminal window to ensure that your PC can identify the phone over fastboot:
fastboot devices
This command should return a unique device ID along with the ‘fastboot’ message. In case it doesn’t, then it means that the proper USB drivers for your phone are missing. To fix this, simply download the latest drivers from here, install them, and reboot your PC.
Finally, enter the following command to flash/install TWRP recovery on your phone:
fastboot flash recovery twrp-filename.img
Here, ‘twrp-filename.img’ should be replaced with the actual filename of the TWRP IMG you have downloaded for your phone. For example, if you have downloaded the latest recovery for the Redmi K20 Pro, the command should look like the following:
fastboot flash recovery twrp-3.3.1-32-raphael-raphaelin-mauronofrio.img

Important Information!
Once you have flashed TWRP, it is extremely important that you boot your phone directly into TWRP recovery mode. If the phone tries to enter the system (OS), TWRP will automatically be replaced by the MIUI stock recovery and you’d need to re-flash it.
To force-reboot into TWRP mode, hold the Power button to exit Fastboot Mode. As soon your phone’s screen turns off, quickly press and hold the Volume Up and Power buttons together. Upon doing this, your Redmi K20 should now be in the TWRP recovery mode.
Step 3: Flash VBMETA Patcher and Magisk ZIP to Root Redmi K20/K20 Pro
With TWRP now properly installed, you can now flash Magisk to root your phone. However, before you do this, you must first patch the VBMeta of your phone. VBMeta is basically responsible for verifying the integrity of the boot, system, and other partitions of your phone. The stock vbmeta on your Redmi K20 wouldn’t allow the phone to boot after flashing Magisk.
To do this, you just have to flash the provided VBMeta Patcher via TWRP recovery. Once patched, you can continue to flash the Magisk ZIP file to finally root your Redmi K20/K20 Pro. To do all this, follow the instructions listed below:
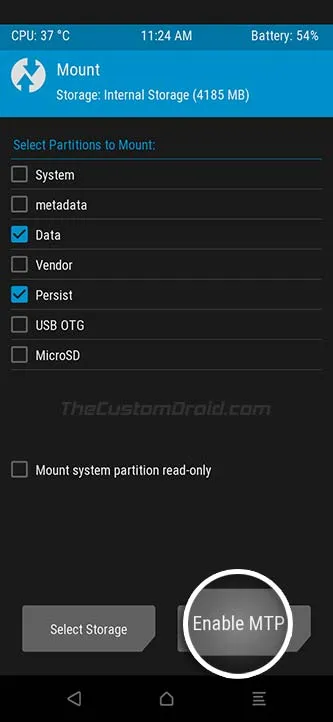
- Go to the ‘Mount’ menu in TWRP and press the ‘Enable MTP’ button.
- Connect your phone to the PC via a USB cable.
- Download the VBMeta Patcher and Magisk ZIP files on your PC.
- Transfer all the three downloaded ZIP files to the internal storage of your phone.
- Once transferred, disconnect your phone from the PC and go back to the TWRP main menu.
- Press the ‘Install’ button in TWRP and navigate to the location where the files were transferred earlier.
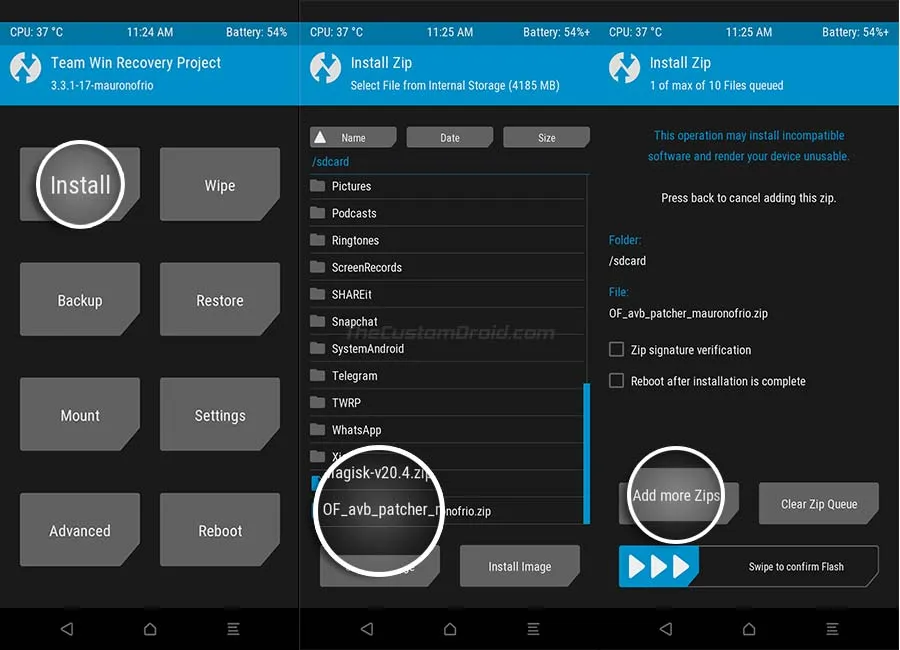
- Select the VBMeta Patcher file (OF_avb_patcher_mauronofrio.zip) first and then tap on the ‘Add more Zips’ button.
- Next, select the Magisk ZIP file (Magisk-v20.4.zip) to add it to the flashing queue. At this point, you have all the files added to TWRP’s flashing queue.
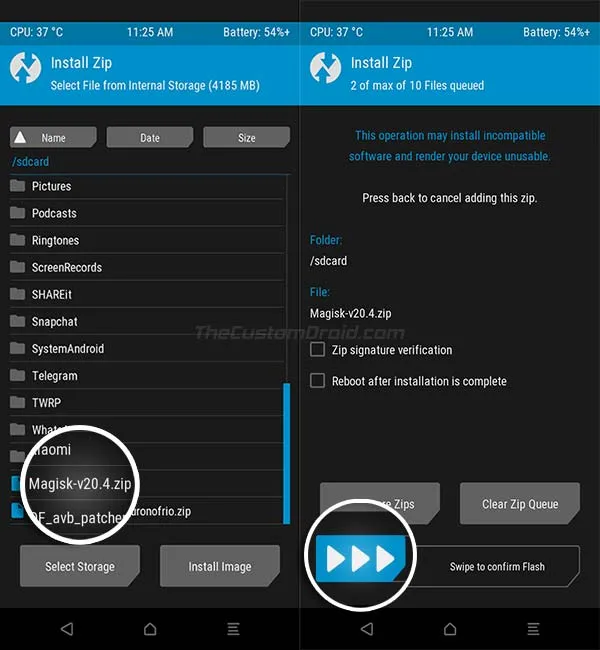
- Finally, swipe the button at the bottom of the screen to flash all the files and finally root your Redmi K20/Redmi K20 Pro.
Once the flashing process finishes press the ‘Reboot System’ button.
Your phone will now boot into the system (OS) and should be rooted with Magisk. To verify this, you can launch the Magisk Manager application and it should show that Magisk is installed on your phone.
You can now go ahead and start using root apps or use Magisk Hide to hide root from other apps that might stop working if root is detected. You can also install Magisk Modules to make modifications to your phone’s software systemless-ly, or install audio mods like ViPER4Android for boosting the sound quality.
You can also use TWRP recovery to flash custom ROMs should you like. There are plenty of these available for the Redmi K20 devices on the XDA forums.
Also Read: Download Google Camera Port for Redmi K20 (Pro) and Xiaomi Mi 9T (Pro)
So there you go! You have just learned how to root the Redmi K20 (Mi 9T) and Redmi K20 Pro (Mi 9T Pro) using Magisk and install TWRP recovery on it. If you have any questions regarding the process or the instructions in this post, then feel free to ask us.
Comments
Comments are moderated, and published only if they are relevant to the topic and add value in a constructive way. If you disagree with something, please be polite and respectful. We suggest you read our comment policy before commenting.