
On this page
Not liking the new two-row/6-Tile QS toggles in Android 11? If your phone is rooted, there’s an easy fix for that. In this guide, we will show you how to get back the 9-Tiles Quick Settings in Android 11. This could be easily done by installing and activating a Magisk Module.
Android 11 Trims Down QS Toggles to Two Rows
Last month Google launched Android 11, and though it brings quite a lot of new features/changes, it also brought a couple of regressions with it. Well, the one that we particularly want to talk about today is a very subtle change that Android 11 has introduced in the Quick Settings menu (The ones you slide down from the top and use to toggle things like WiFi, Mobile Data, etc).
So what about it? Well, if you happen to own a Google Pixel phone and have installed the Android 11 update on it, you’d have noticed that the 3-row/9-tile Quick Settings (as seen on Android 10 and below) has been downsized to two-rows/6-tiles.
Is it a bug? No. So why did this happen? To accommodate the new media player controls in the Quick Settings menu. When reported as a bug by a user to the official issue tracker, a Google employee responded – “Showing two rows on fully expanding the quick settings is working as intended in Android 11, to reserve space for the new media player that appears in this space.”
The new media controls in the Quick Settings are in-fact great and blend in seamlessly, so no grudges there. However, if no media is being played and the controls are absent, the Quick Settings menu looks “comically small and cut off, like it’s missing more content”, as pointed by Android Police. It seems like the Quick Settings doesn’t fully utilize the full space available to it.

That’s not it, the fact that we now have fewer toggles available at our hands is also a limiting factor. Users could already access 6 toggles by pulling down the notification shade once.
How to Enable 3-Row/9-Tile Quick Settings in Android 11
It would be great if you could get back the good old 3-row/9-tile Quick Settings in Android 11, right? Well, there’s a proven way to enable it. But the downside is that your phone must be rooted.
XDA Recognized Contributor Tulsadiver has come up with a Magisk Module that can enable the 3-Row QS layout pretty easily. The best part is that 3-Rows are only shown when the media controls are absent. The layout is rolled back to 2 rows again when the media controls are enabled, as originally intended in Android 11. This behavior is something we hope Google would consider in future updates.
If you’re familiar with using Magisk Modules, you could simply grab the module from the original thread and install it. But if you’re new or need some guidance, just follow the steps below to enable 3-row/9-tile Quick Settings on your phone running Android 11.
Note: This module has only been tested to work with Android 11 on Google Pixel phones. We have already tried it on our OnePlus 8 running Android 11 Beta, but it didn’t work. If you’re anyway going to try it on a non-Pixel phone, and it causes a boot loop, then you can easily fix it by following the instructions on this page.
Step 1: Download the 9 Tiles Magisk Module
The first step is to download the Magisk Module itself. So, click on the link below and download the zip file of the 9-Tiles module to your phone.
- Download 9 Tiles Magisk module (9tiles.zip)
This module is also baked into the developer’s nifty collection of the clock and navbar mods for Google Pixel devices. You can check out these mods here.
Step 2: Install the Module using Magisk Manager
The module itself hasn’t been submitted to the official Magisk repository and so, you’d need to manually install it. To do this, first launch the Magisk Manager application on your phone. Then, press the “Modules” icon on the bottom navbar (the one to the extreme right) and select “Install from Storage”.
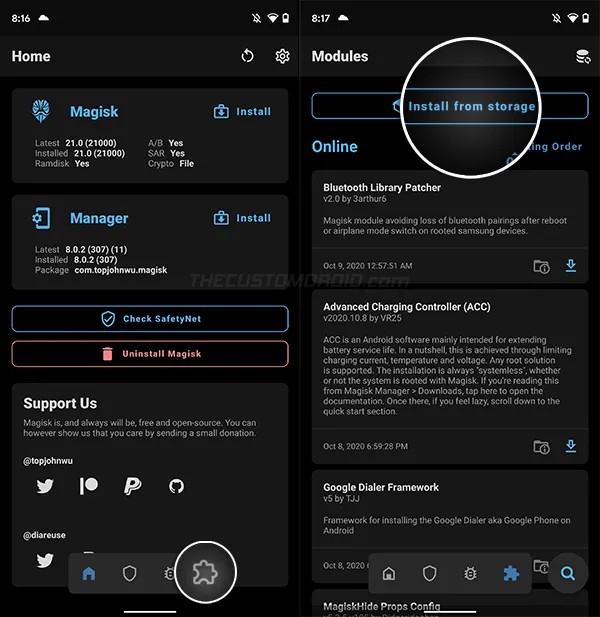
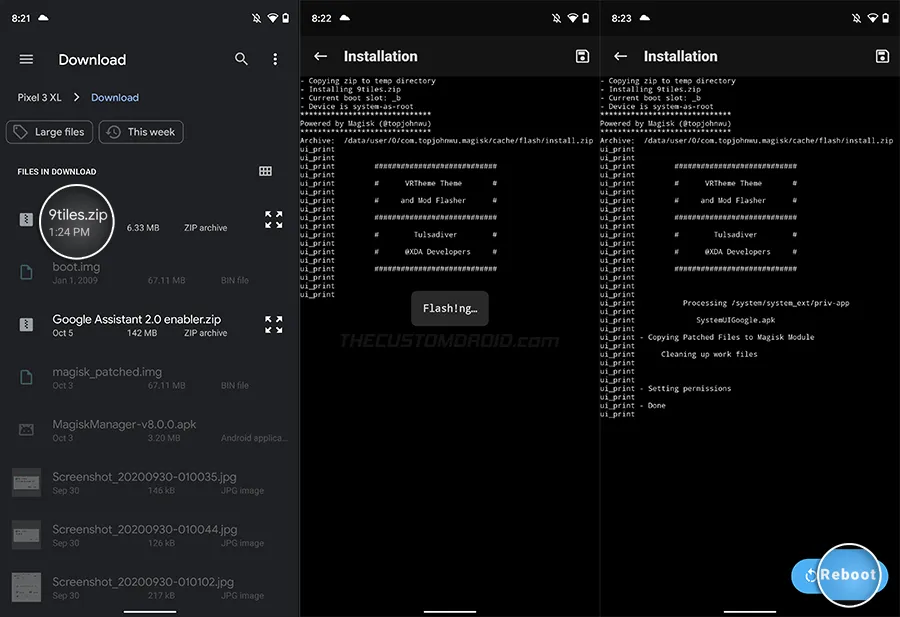
The file selection window will open up and display the downloaded files on your phone. The window will automatically grey out the files that are not in a compatible format (not .zip files). Simply select the “9tiles.zip” to begin the module’s installation. This could take a few seconds to finish, so hold back. After the installation finishes, press the “Reboot” button on the bottom right.
Step 3: Enjoy Quick Settings with 3 Rows now
That it! The module works in an “install & forget” way. So you do not need to configure any settings/options and it should automatically start working after the phone boots. To verify, simply swipe down twice on the notification shade to open the Quick Settings panel and voila! You should see 3 rows and 9 toggles available there for you to use.
It’s worth mentioning again that the Quick Settings layout will be rolled back to 2 rows when media controls are enabled. So, you wouldn’t be missing out on that awesome feature either. The panel now expands to three rows and doesn’t look quite lacking when the embedded media controls are disabled. Personally, this is how we think Google could have implemented QS in Android 11.
If you ever wish to go back to the 2-row layout, go to ‘Magisk Manager’ > ‘Modules’ and find the ‘Tulsadiver Increased Tiles to 9’ module from the list of installed modules. Then press the “Remove” button. The module will automatically be disabled and removed on the next reboot. So just reboot your phone.
We would like to thank Gadget Hacks for discovering this useful module and sharing it.
Comments
Comments are moderated, and published only if they are relevant to the topic and add value in a constructive way. If you disagree with something, please be polite and respectful. We suggest you read our comment policy before commenting.