Download and Install Stable Android 11 Update on Google Pixel Devices [Guide]
Google is finally rolling out the stable Android 11 update, starting with its own Google Pixel phones.

On this page
Google is finally rolling out the stable Android 11 update, starting with its own Google Pixel phones. In this guide, we will show you how to download and manually install the stable Android 11 update on Google Pixel 4/4 XL, Pixel 4a, Pixel 3a/3a XL, Pixel 3/3 XL, and Pixel 2/2 XL. This could be done by flashing the Android 11 factory image through Fastboot, sideloading the Android 11 full OTA package through stock recovery, or by using the official Android Flash Tool.
As you’d know, Google began beta testing Android 11 back in mid-February this year. After 3 early developer previews, 3 beta updates, and continuous testing and improvement through these 11 weeks (#11WeeksOfAndroid), Google has finally delivered the next major Android version upgrade as “Android 11”.
The stable update is already being pushed to all supported Pixel phones as an Over-the-Air (OTA) update. Being a major upgrade over Android 10, the update weighs just around 1.48 GB (varies with device) and also carries the latest September 2020 security patch. To check if your phone has received this update, you can go to ‘Settings’ > ‘System’ > ‘System updates’. Since the rollout is staged, chances are that it might not be available yet for your phone and there’s no way to tell exactly when it would be.
The instructions in this guide will help you install the stable Android 11 update on your Google Pixel phone right away, without having to wait anymore. But before you get there, take a few minutes to explore the major new changes and features of Android 11, especially if you didn’t test the beta updates.
What’s new in Android 11?
As you’d expect from any major Android release, Android 11 also packs a huge heap of new features for both users and developers. In this article, we will keep our focus on the former and list some of the major features of Android 11 below.
- Conversation Notifications: A dedicated section at the top of the notification shade that allows users to manage their conversations through a variety of available actions like creating a conversation shortcut on the homescreen, opening the conversation as a bubble, setting a notification reminder, and much more.
- Bubbles: Similar to Facebook chat heads, Bubbles in Android 11 allow users to easily multitask while keeping their conversation in the view, in form of an expandable bubble. Messaging and chat apps can use this new feature by adopting the API. Apps like Google Messages for Android and Telegram already support Android 11 bubble chat heads.
- Device Controls: Android 11’s power-menu now presents itself as a hub to control all your connected devices through one screen. This makes it a lot easier for users to manage the smart home devices their phone is connected to. App developers can leverage this API to show controls for their apps on the Device Controls screen.
- Media Controls: The new Media Controls screen in Android 11 enables users to quickly switch between media (audio or video) outputs and also control their independent volume levels.
- One-time Permissions: Users can now grant one-time permissions to apps for location, camera, and microphones. This in turn will make the app prompt for the said permissions again when being used.
- Background Location Permissions: Probably one of the most misused permissions on Android, background location could easily evade privacy. With Android 11, apps now need to first ask for foreground permissions and then background permissions (if required and allowed).
- Permissions Auto-reset: If a particular app isn’t used by a user for a specific period, this latest version of Android will then reset all the permissions back to default. This is extremely helpful since users tend to “install-and-forget” apps sometimes.
- Screen Recording: Something every Android user might have wanted, Android 11 now includes an in-built screen recording feature. This feature further extends to recording audio as well as showing screen touches while recording the phone’s screen. Overall, pretty neat and convenient.
These were just a few features to name. As we said, Android 11 comes with a plethora of features, and several UI tweaks as well. We’ll cover more on this in another article. For the time being, we suggest you visit the official website to know more.
Tip: Get Back 3-row Quick Settings Toggles in Android 11
Now without any further ado, let’s show you how to install the stable Android 11 update on your Google Pixel phone right now.
Supported Devices
The stable Android 11 update is only available for Google Pixel phones. This guide, the provided files, and instructions will only work for the list of devices mentioned below.
- Google Pixel 4a
- Google Pixel 4 and Google Pixel 4 XL
- Google Pixel 3a and Google Pixel 3a XL
- Google Pixel 3 and Google Pixel 3 XL
- Google Pixel 2 and Google Pixel 2 XL
If you have a non-Pixel phone, check with the manufacturer to know about the availability. Once the update is available for different OEM devices, we will cover separate guides for that.
Prerequisites
Before you begin, ensure that the requirements listed below are fully met.
- First and foremost, take a complete backup of all your important data stored on the phone. Installing the Android 11 update by flashing the factory image (Method 3) will erase all the data and reset your phone to its factory state. Even if you choose to follow the other methods, it’s still strongly recommended that you perform a backup to safeguard your data.
- Charge your Google Pixel phone to at least 40-50% battery level. This shall help prevent the phone from powering off in the middle of the update process.
- To flash the Android 11 factory image (Method 3), your phone’s bootloader must be unlocked. If you need help doing that, please refer to this tutorial.
- ADB and Fastboot tools are integral parts of the manual upgrade process, for Method 1 and Method 3. So, download the latest Android platform-tools package from this page and install it on your PC (instructions here).
- When asked to launch the command-line window during the instructions, perform the following depending upon your computer’s operating system.
- On Windows: Hold the SHIFT key of the keyboard and right-click on any empty space inside the ‘platform-tools’ folder. Then select the ‘Open PowerShell window here’ option.
- On macOS/Linux: Launch the Terminal and change its directory to the ‘platform-tools’ folder using the ‘cd’ command. For instance, if ADB is installed to “/Documents/platform-tools”, then the command should be like so: cd Documents/platform-tools
- If you’re operating on a Windows PC and your Pixel phone isn’t automatically recognized over a USB connection, then download and install the required USB drivers.
Stable Android 11 Update Download Links
Below, you will find the links to download the Android 11 factory images, full OTA packages, and Android Flash Tool links for the supported Google Pixel devices. When asked to download the firmware during the instructions, come back here to download it.
Google Pixel 4a (sunfish)
- Build Number: RP1A.200720.011
- Factory Image: sunfish-rp1a.200720.011-factory-1a38c5a6.zip
- Full OTA: sunfish-ota-rp1a.200720.011-eb7690e4.zip
- Android Flash Tool: Link
Google Pixel 4 XL (coral)
- Build Number: RP1A.200720.009
- Factory Image: coral-rp1a.200720.009-factory-dac149ce.zip
- Full OTA: coral-ota-rp1a.200720.009-b447daff.zip
- Android Flash Tool: Link
Google Pixel 4 (flame)
- Build Number: RP1A.200720.009
- Factory Image: flame-rp1a.200720.009-factory-1c9d4fcf.zip
- Full OTA: flame-ota-rp1a.200720.009-6dde3195.zip
- Android Flash Tool: Link
Google Pixel 3a XL (bonito)
- Build Number: RP1A.200720.009
- Factory Image: bonito-rp1a.200720.009-factory-2a8679c5.zip
- Full OTA: bonito-ota-rp1a.200720.009-3a9b48a5.zip
- Android Flash Tool: Link
Google Pixel 3a (sargo)
- Build Number: RP1A.200720.009
- Factory Image: sargo-rp1a.200720.009-factory-a39fea10.zip
- Full OTA: sargo-ota-rp1a.200720.009-1b6d1efa.zip
- Android Flash Tool: Link
Google Pixel 3 XL (crosshatch)
- Build Number: RP1A.200720.009
- Factory Image: crosshatch-rp1a.200720.009-factory-33d2acea.zip
- Full OTA: crosshatch-ota-rp1a.200720.009-b3ff473a.zip
- Android Flash Tool: Link
Google Pixel 3 (blueline)
- Build Number: RP1A.200720.009
- Factory Image: blueline-rp1a.200720.009-factory-145e4cc4.zip
- Full OTA: blueline-ota-rp1a.200720.009-f38bd98d.zip
- Android Flash Tool: Link
Google Pixel 2 XL (taimen)
- Build Number: RP1A.200720.009
- Factory Image: taimen-rp1a.200720.009-factory-f2d162ef.zip
- Full OTA: taimen-ota-rp1a.200720.009-a5a90702.zip
- Android Flash Tool: Link
Google Pixel 2 (walleye)
- Build Number: RP1A.200720.009
- Factory Image: walleye-rp1a.200720.009-factory-55e6ce7b.zip
- Full OTA: walleye-ota-rp1a.200720.009-90cc52a4.zip
- Android Flash Tool: Link
How to Manually Install Stable Android 11 Update on Google Pixel?
Manually upgrading your Google Pixel phone to Android 11 is quite simple and doesn’t require any sort of expertise. In this guide, we are sharing all the three different ways through which you can manually install the Android 11 update. These are:
- By sideloading the Android 11 full OTA package in stock recovery
- By installing the Android 11 build using Android Flash Tool
- By flashing the Android 11 factory image using Fastboot
The first method is the easiest, wherein you just have to use an ADB command to sideload the OTA directly to your phone. The two biggest advantages of using this method are - (1) It does not erase any data stored on your phone, and (2) It doesn’t require an unlocked bootloader like the rest of the methods.
Both the second and third methods are functionally similar on the core and require your Google Pixel phone’s bootloader to be unlocked. The key differences are that the Android Flash Tool method automates the complete flashing process for you, and doesn’t erase any data in the process. While in the third method, you need to manually run the flash script from your local machine (PC) and all the data on your phone will be erased,
The third method is generally used to restore the phone’s software back to its factory state after applying modifications such as TWRP, Magisk root, etc. But it could also come in handy if you just want to start with a fresh install of Android on your phone.
So, choose the method which best suits your device state.
Method #1: Sideloading Android 11 Full OTA Package in Stock Recovery
Sideloading an OTA update on Android is very easy and to do this, follow the instructions listed below.
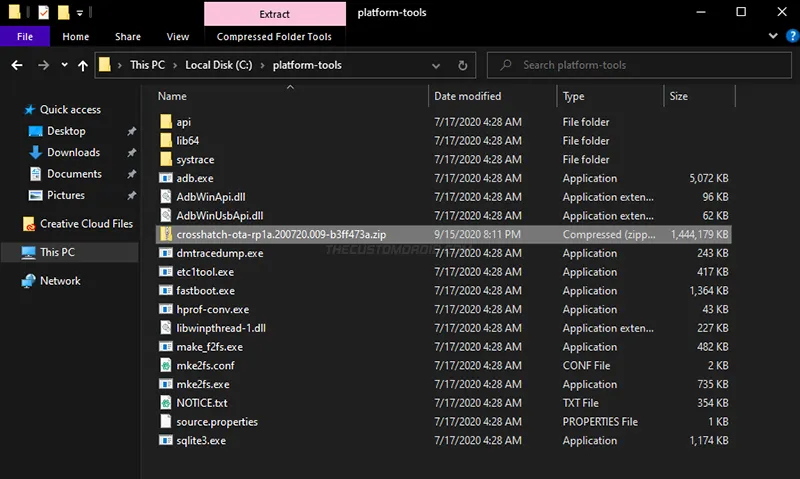
- First, download the stable Android 11 full OTA package for your Google Pixel device.
- Copy the download OTA ZIP package inside the ‘platform-tools’ folder on your PC, where the ADB tool is installed.
-
Now launch the command-line window on your computer inside the same folder (Refer to pointer #5 of the ‘Prerequisites’ section).
-
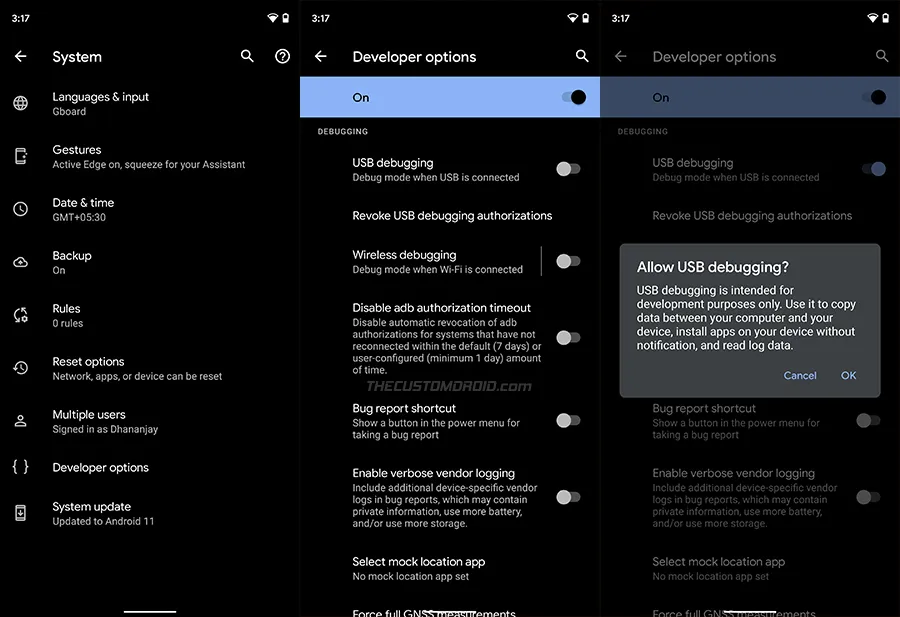
Enable USB debugging on your Pixel phone and then connect it to the PC using a USB cable.
-
Enter the following command to ensure that your PC can communicate with the phone over ADB.
-
In Windows PowerShell:
.\adb devices
-
In macOS/Linux Terminal:
./adb devices
-
-
The command should return your phone’s unique ID. If this is the first time you’re using ADB, a prompt will now show up on your phone’s screen to allow USB debugging. Simply tap “Allow”.
-
Next, execute the following ADB command to reboot your Google Pixel phone into stock recovery mode.
-
In Windows PowerShell:
.\adb reboot recovery
-
In macOS/Linux Terminal:
./adb reboot recovery
-
-
Your phone should now automatically reboot and show an Android bot along with the ‘No Command’ text on the screen. This is how the stock recovery menu on Android initializes and is completely normal.
- To proceed further and enter the stock recovery, simply hold the Power key and tap the Volume Up key once.
- Use the Volume keys of your phone to move the selector to “Apply update from ADB” and then press the Power key to confirm the selection. Your phone is now ready to accept the OTA.
-
Enter the following command to sideload the OTA package and install Android 11 on your Google Pixel phone.
-
In Windows PowerShell:
.\adb sideload ota-filename.zip
-
In macOS/Linux Terminal:
./adb sideload ota-filename.zip
-
-
In the command above, you have to replace “ota-filename.zip” with the full filename of the OTA package you’re using.
The OTA installation could take a few minutes, so hold back and do not disturb the USB connection. Once the update is installed, select the ‘Reboot system now’ option to boot your phone into the updated Android 11 operating system.
Method #2: Flashing Android 11 Build using Android Flash Tool
The second way through which you could manually upgrade your phone is by using the Android Flash Tool. The tool itself is browser-based (supports Google Chrome and Edge 79+) and uses the WebUSB API to communicate with the device over USB.
The added advantage of using this method is that you won’t need to install or setup ADB or Fastboot on your PC. Although, do note that this method requires your phone to have an unlocked bootloader.
To install the stable Android 11 update on your Google Pixel phone using the Android Flash Tool, follow the steps listed below.
- First, turn on Developer Options and enable USB Debugging on your phone.
- Connect your Google Pixel device to the PC using a USB cable.
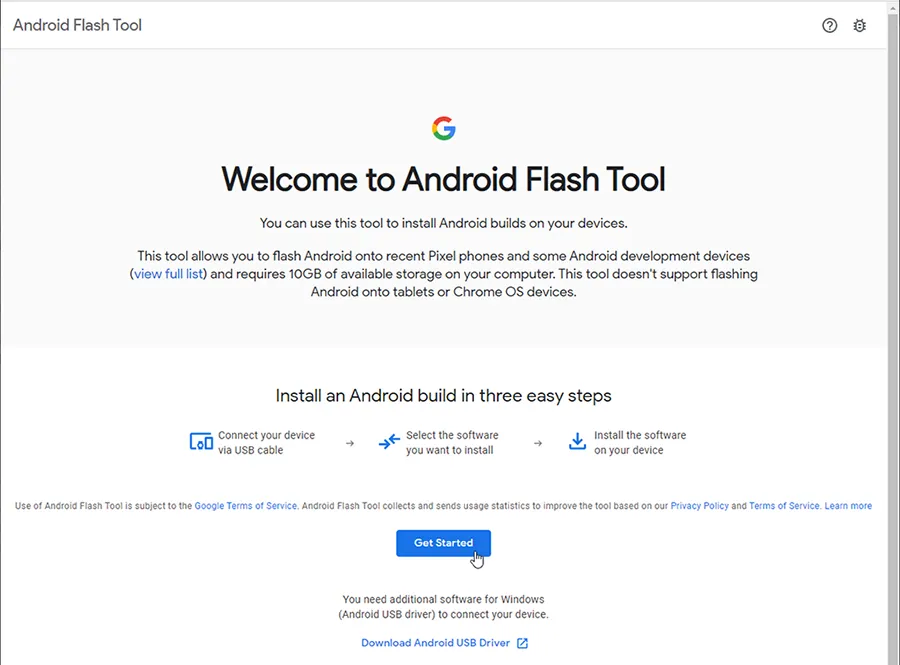
- Launch the Android Flash Tool on your computer (in Chrome/Edge browser) by clicking the link for your specific device.
- Select ‘Get Started’ on the flash tool window.
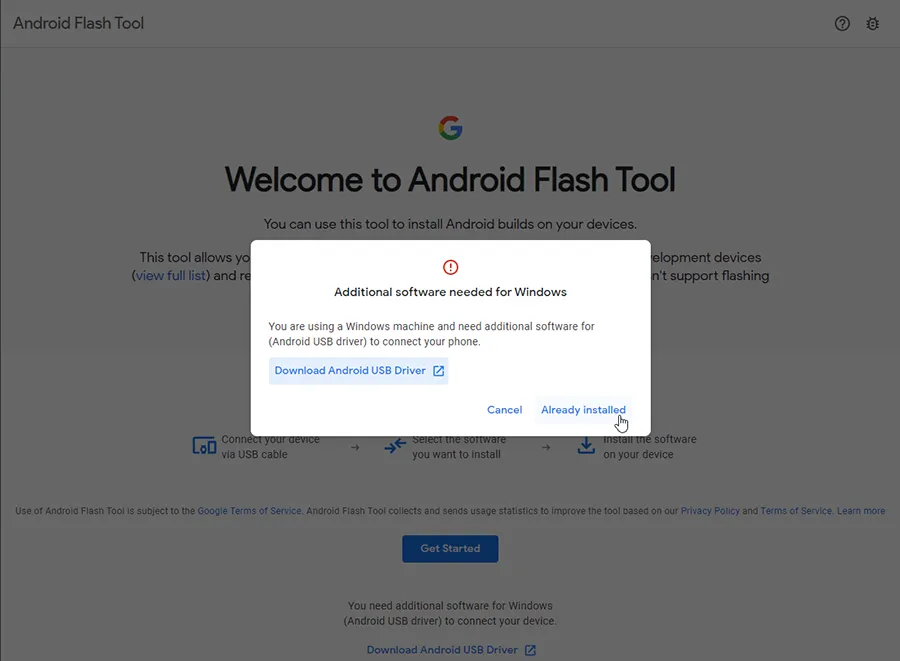
- Select ‘Already installed’ in the USB driver pop-up message.
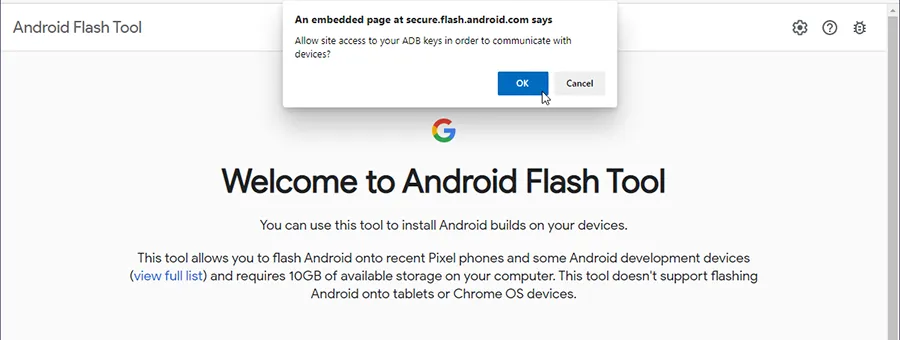
- Next, click ‘Ok’ when prompted to “Allow site access to your ADB keys in order to communicate with devices”.
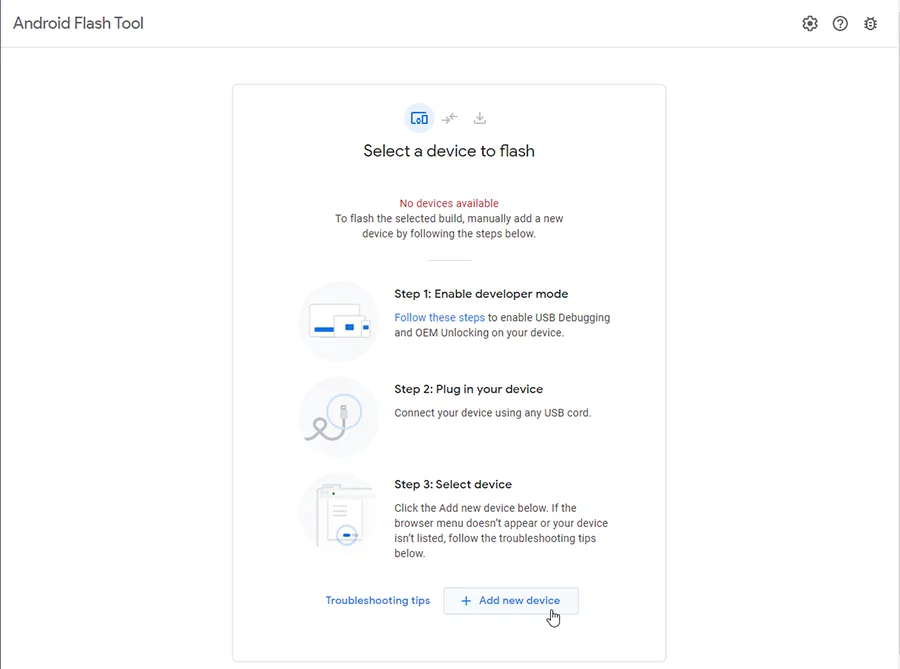
- Select ‘Add new device’ on the device selection screen.
- Select your Pixel device from the list and select ‘Connect’.
- Your phone’s screen will now show a prompt to allow the USB debugging connection with your PC. Simply, select ‘Always allow from this computer’ and click ‘OK’.
- Your device is now connected and ready to be flash. So, select your connected Pixel device.
- On the next screen, you will see your selected device as well as the selected build (latest Android 11 build in this case). If you also wish to wipe your device and lock the bootloader after flashing, just click the selected build and check the required options.
- Note: Do not change any ‘Advanced options’, especially if you’re not experienced with the shown options.
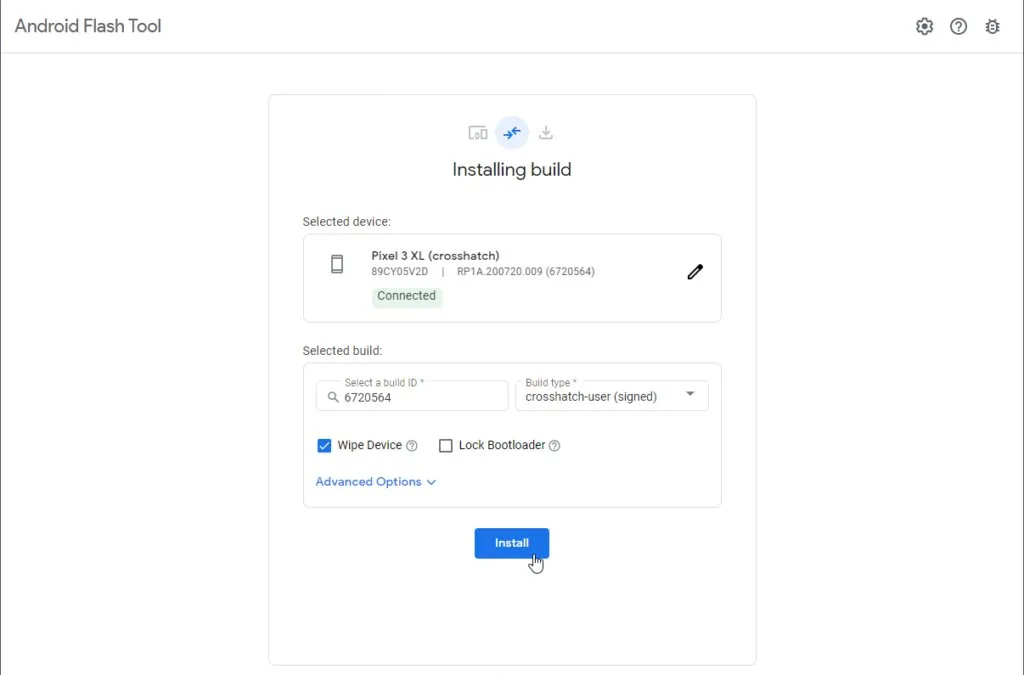
- Once you have verified everything, select ‘Install’ and then ‘Confirm’ to install the latest Android 11 build on your Google Pixel device.
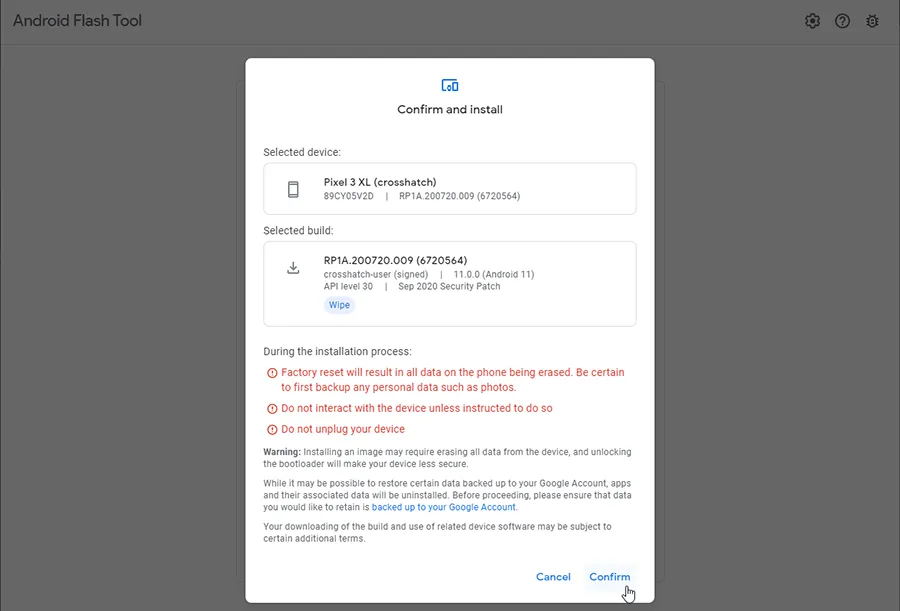
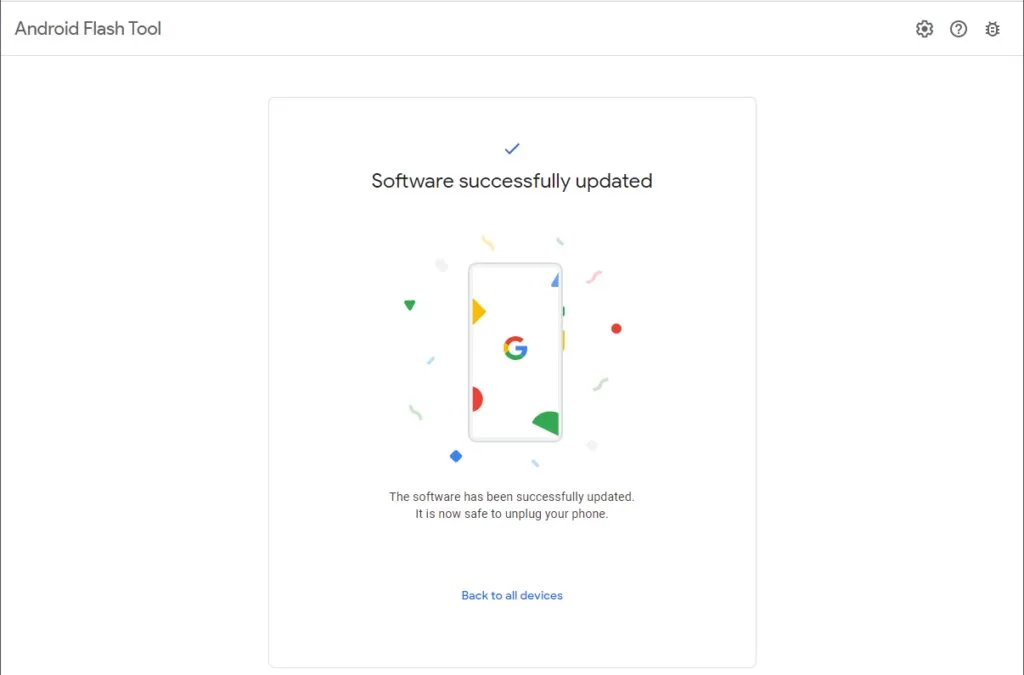
The flashing process will begin and might take a few minutes or longer to complete. During this time, your device may reboot multiple times. Make sure that you do no interact with the device, unplug it, or close the browser window unless asked to do so by the tool.
Once the flashing finishes, your Pixel phone will automatically reboot and should be running Android 11.
Method #3: Flashing Android 11 Factory Image using Fastboot
The third and last way to install the stable Android 11 update on your Pixel phone is by flashing the factory image using the Fastboot tool. To do so, follow the steps listed below.
- First, download the Android 11 factory image for your Google Pixel device.
- Extract the downloaded factory image on the PC using an archive tool like 7Zip. The extracted files should include the flash scripts, flash-able image files of the bootloader and radio partitions, as well as a ZIP file that contains all the necessary partition images.
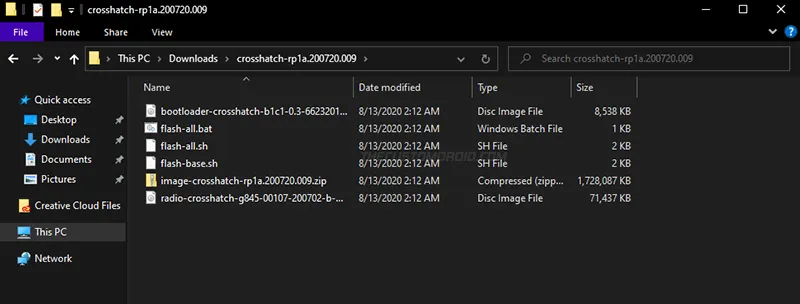
- Move all the extracted files to the ‘platform-tools’ folder. This is the folder on your PC where the Android platform-tools are installed. For example: ‘C:\platform-tools’ on a Windows PC or ‘/Documents/platform-tools’ on a macOS/Linux PC.

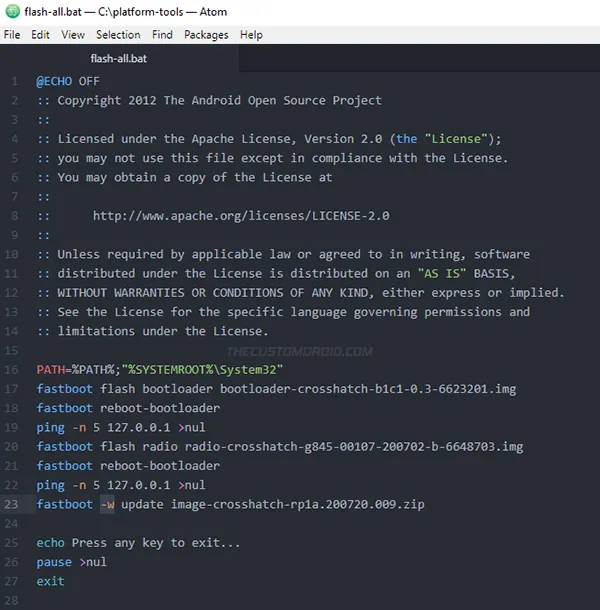
- Optional: If you do not wish to erase the data, simply edit the flash script (flash-all.bat or flash-all.sh) using a text-editor and remove the “-w” flag from the “fastboot -w update” line (Refer to the figure below). Then save the file and move on to the next step.
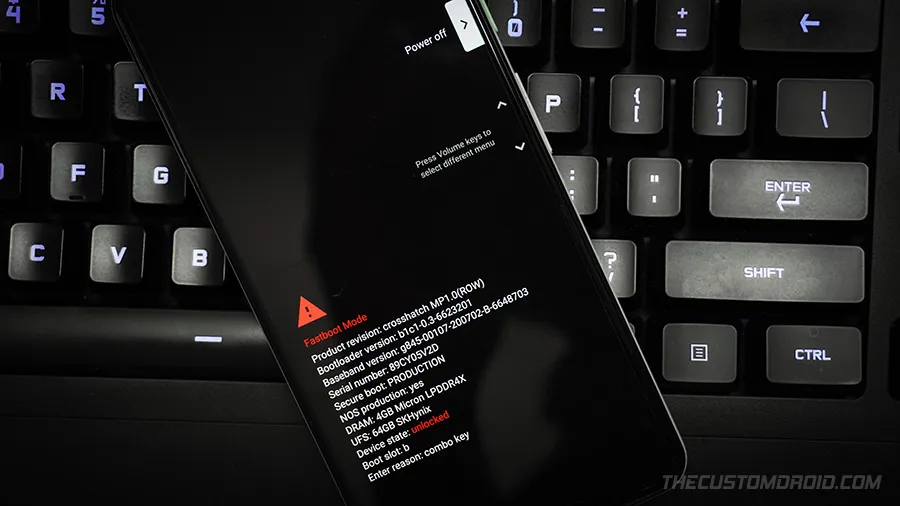
- Now power off your phone and then hold the Volume Down and Power keys together until the device enters the ‘Fastboot Mode’. Connect the phone to your PC using the USB cable.
- Now to finally flash the factory image and install Android 11 update on your Google Pixel:
-
Windows: Double-click the ‘flash-all.bat’ file on your Windows PC.
-
macOS/Linux: Launch the Terminal inside the ‘platform-tools’ folder (Refer to pointer #5 of ‘Prerequisites’) and then execute the following command:
./flash-all.sh
-
The flashing process can take a few minutes to finish and the progress will be shown in the PowerShell/Terminal window. During this time, your phone may reboot a couple of times, so don’t worry and leave the USB connection uninterrupted.
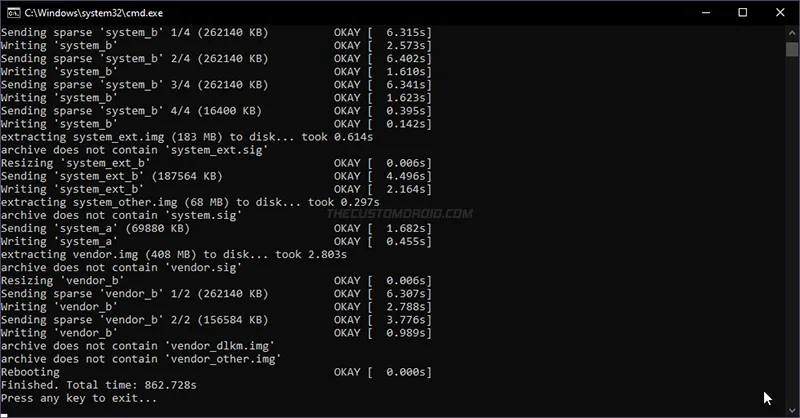
That’s it! Once the flashing process finishes, your Pixel phone should be running the latest stable Android 11 OS, along with the September 2020 security patch. You can now go ahead and check out all the new features.
Conclusion
So by now, you have learned how to manually install the stable Android 11 update on any Google Pixel 4a, Pixel 4/4 XL, Pixel 3a/3a XL, Pixel 3/3 XL, or Pixel 2/2 XL.
Along with the features we mentioned above and the ones shared by Google, there are some significant changes to the overall user interface as well. Like the revamped share menu, bigger app windows in the Recent Apps screen, and much more. If you’re interested in such changes, we suggest you take a look at the Feature Spotlight posted on AndroidPolice.com. We also covered a guide to get the Android 11 Screen Recording feature in Android 10, which was experimental. With Android 11, this feature is fully stable.
In short, there are a lot more under-the-hood changes in Android 11 than you’d be expecting. Don’t forget to let us know which one of the Android 11 features you like the most and why. If you have any questions regarding this guide and the shared methods, let us know.
Also, if you ever feel like returning to the stable Android 10 OS, then just follow the instructions in this guide to downgrade your Google Pixel.
Comments
Comments are moderated, and published only if they are relevant to the topic and add value in a constructive way. If you disagree with something, please be polite and respectful. We suggest you read our comment policy before commenting.