How to Remove Bloatware from Samsung Galaxy Tab A7 10.4 without Root
Seeing a lot of pre-installed apps on your Galaxy Tab A7 that you don't even use? You might want to remove them.

On this page
Seeing a lot of pre-installed apps on your Galaxy Tab A7 that you don’t even use? You might want to remove them. Getting rid of the preinstalled system apps from your Android device often requires root, but not anymore. In this guide, I will show you how to easily uninstall the pre-installed system apps and remove bloatware from Samsung Galaxy Tab A7 10.4 (2020) without root.
Introduction
Samsung has indeed come a long way since Samsung Experience and moved on to One UI as the default UI skin on all its phones and tablets. No doubt, One UI is great, fast, a bit more pleasing to the eyes, and much improved in terms of overall user-experience.
Even with One UI, there’s something in particular that Samsung hasn’t been able to completely get rid of. Yes, we are talking about the system apps that come preinstalled on the Galaxy Tab A7, and every other Samsung Galaxy device for that matter.
Samsung forces certain apps at a system-level on its devices
Despite all the improvements in One UI, the OEM still forcibly delivers apps to its device users that are often useless to end-users. These are what we call “Bloatware”.
These preinstalled system apps not only acquire space in the device’s storage but may also sometimes include services that might run in the background. And thus hog the system memory and affect the battery life.
Microsoft’s Office, OneDrive, Outlook, and Netflix are a few examples of these pre-installed system applications. Of course, it’s completely subjective to what is actually considered as bloatware and what is not.
Although there is an option to individually disable such apps in the Settings, that doesn’t stop the specific app(s) from using the storage space. In this tutorial, we will be using ADB to completely remove bloatware from Samsung Galaxy Tab A7 10.4 without root.
List of Package Names of Preinstalled System Apps on the Galaxy Tab A7 10.4
Below, you will find the complete list of package names for the majority of system apps that come pre-installed on the Galaxy Tab A7. The following list shall act as a reference for the system apps that you want to uninstall using the instructions in the next section.
A few things to note
- While these apps are safe to remove, don’t go uninstalling every other system app you see.
- Another thing worth noting is that you must have an alternative launcher app (like Lawnchair, Nova Launcher, etc) installed on your tablet before you attempt to remove the One UI Launcher. If not and the stock launcher is removed, the system will have nothing to fall back to and you wouldn’t be able to browse through the home screen and app drawer.
Bixby
com.samsung.android.app.settings.bixby
com.samsung.android.bixby.service
General System Services
com.android.egg (Android Easter Egg)
com.sec.android.app.launcher (Samsung One UI Launcher)
com.sec.android.easyMover.Agent
com.samsung.android.app.watchmanagerstub
com.sec.android.daemonapp (Unified Daemon)
com.samsung.android.app.social
Microsoft Office, Outlook, and OneDrive
com.microsoft.office.officehubrow
com.microsoft.office.outlook
com.microsoft.skydrive
Netflix
com.netflix.mediaclient
com.netflix.partner.activation
Printing Service
com.android.bips
com.google.android.printservice.recommendation
com.android.printspooler
Samsung Browser
com.sec.android.app.sbrowser
Samsung Game Launcher
com.samsung.android.game.gamehome
com.samsung.android.game.gos
Samsung Kids
com.sec.android.app.kidshome
com.samsung.android.kidsinstaller
Samsung Members
com.samsung.android.voc
Samsung Pass & Samsung Pay
com.samsung.android.samsungpassautofill
com.samsung.android.authfw
com.samsung.android.samsungpass
com.samsung.android.spay
com.samsung.android.spayfw
If you couldn’t find the package name for a specific app you want to remove in the list above, then don’t worry. The instruction below has some alternative ways that you could use to get the package names.
How to Remove Bloatware from Galaxy Tab A7 10.4 without Root
Uninstalling system apps through ADB is quite easy. The trick isn’t new, I have personally been using ADB to remove bloatware from different OEM devices for years. To help you easily understand the process, I have the instructions broken down into a few simple steps.
Let’s start.
Step 1: Enable USB Debugging on the Tablet
The first step is to enable USB debugging on your Galaxy Tab A7. It’s a special debug mode on all Android devices that needs to be enabled in order to work for your computer to recognize your tab and execute ADB commands.
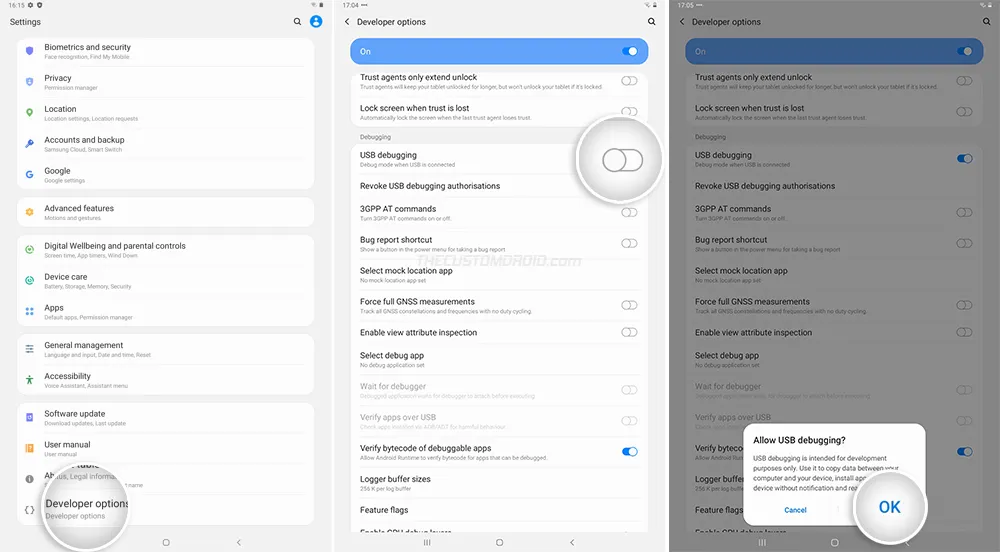
The USB Debugging option resides inside the ‘Developer Options’ menu in the Settings. This menu is by-default hidden to prevent accidental access. The tutorial linked below will walk you through the process of enabling USB debugging in a step-by-step manner.
Step 2: Install ADB on your Computer
Now, you need to manually install the ADB tool on your computer. While you might find yourself inclined towards using one-click ADB installers like Minimal ADB and Fastboot, I wouldn’t advise that. That’s because these installers may contain outdated binaries of the tool which might not work on the latest Android versions.
Don’t worry, the manual installation is quite easy. To begin, download the latest Android Platform-tools package for your computer using the links below.
Extract the downloaded ZIP package to get the “platform-tool” folder. This folder should contain the binary files of the ADB tool, along with the rest of the Android platform-tools.
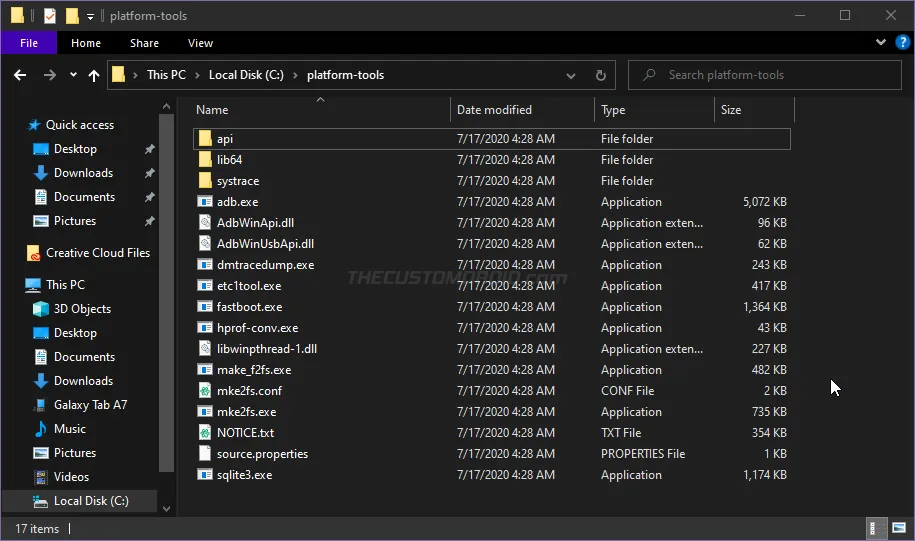
For easier access, I suggest you move the “platform-tools” folder to the root of the C:\ drive if you’re using a Windows computer, or inside the “Documents” directory if you’re using a macOS/Linux PC.
Step 3: Launch the command-line inside the ‘platform-tools’ folder
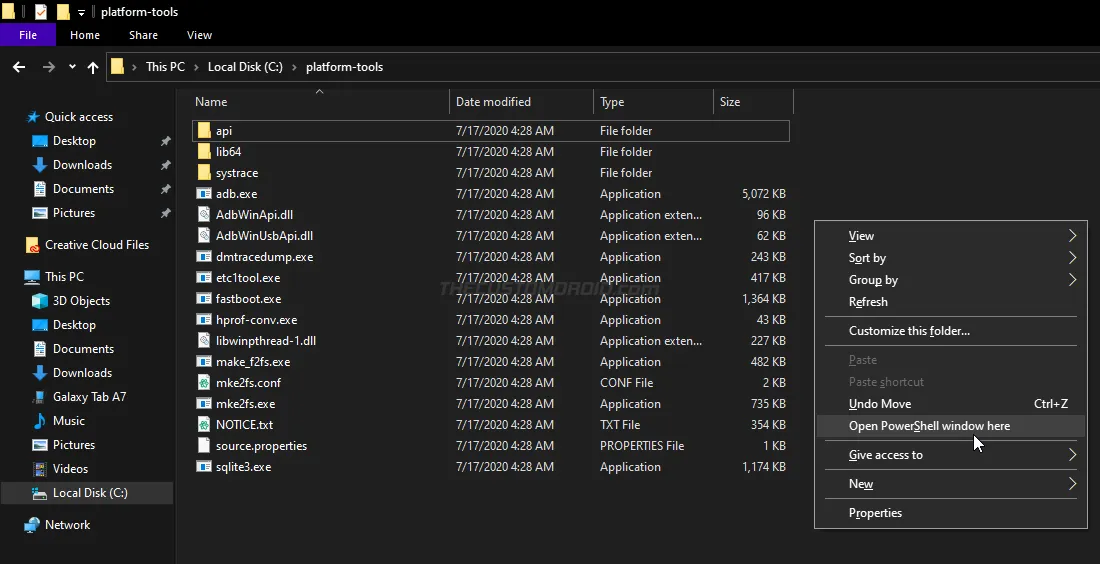
Now that ADB is installed on your computer, the next step is to launch the command-line window inside the working directory (That is, the ‘platform-tools’ folder). If you’re experienced with using the command-line, you could alternatively add the platform-tools to your computer’s PATH.
- Launching PowerShell on Windows: Go to C:\platform-tools. Hold the SHIFT key on the keyboard and right-click on any empty space inside the folder. Then select the “Open PowerShell window here” option.
- Launching Terminal on macOS/Linux: Launch the Terminal and use the cd command to change its directory to the “platform-tools” folder. For example: If you moved the folder inside the “Documents” directory, then the command should be:
cd Document/platform-tools
Command-line Usage:
When entering the command(s) in PowerShell on a Windows computer, make sure to precede them with a dot and backslash [.\]. In macOS/Linux Terminal, these commands should be preceded with and a dot and forward slash [./].
Step 4: Verify the connection over ADB
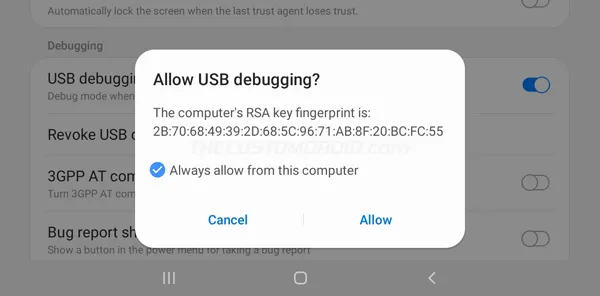
Now that everything is ready, connect your Galaxy Tab A7 to your computer using the USB cable. Your PC will automatically recognize the tablet over the ADB interface. To verify the connection, enter the following command in the PowerShell/Terminal:
adb devices
As soon as you enter the above command, you will be instantly prompted to allow USB Debugging on your Tab A7. Check the “Always allow from this computer” option and press “Allow”.
The command-line should return your tab’s unique ID like so:

Step 5: Get Package Name for the App you Want to Uninstall
Before you could start removing the bloatware, you have to get the package names for the system apps you want to uninstall. You could simply refer to the list we shared above for package names of the most common system apps.
If you could not find the package name for a particular app in the list above, there are a couple of ways to get it.
- The easiest way is to install and use the ‘App Inspector’ application on your tablet. It basically lists all the user-installed and system apps installed on the device. You just have to browse through the list, select the app you wish to uninstall and copy over its package name.
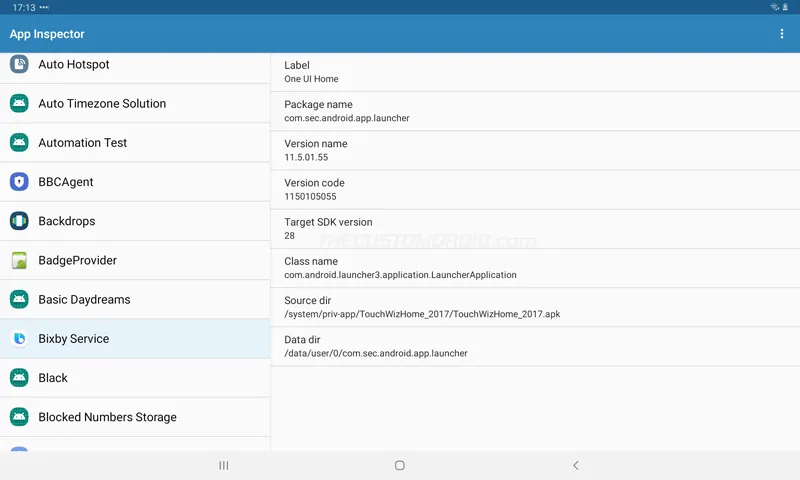
-
The second way is to use the following ADB shell command:
adb shell pm list packages -f app-name
You have to replace the “app-name” in the command above with the app you want to remove. For example, the following command will display package names of all the apps associated with bixby that are pre-installed on your Galaxy Tab:
adb shell pm list packages -f bixby

Step 6: Uninstall Preinstalled System Apps using ADB
Once you have the package names for the system apps you want to remove, it’s time to uninstall them using ADB.
To do this, initate the ADB shell on your computer using the following command first:
adb shell
Now, enter the following command to uninstall the preinstalled system app and remove the bloatware from your Samsung Galaxy Tab A7:
pm uninstall -k —user 0 <app-package-name>
“<app-package-name>” in the above command should be replaced with the actual package name of the app you’re trying to remove. For example, if you’re trying to remove Bixby, the commands should be:
pm uninstall -k —user 0 com.samsung.android.app.settings.bixby pm uninstall -k —user 0 com.samsung.android.bixby.service

As soon as the command is entered, ADB will uninstall the app and show a “Success” message in the command-line window.
You will need to repeat the commands for different package names corresponding to the apps that you want to uninstall. To verify that the commands worked and the apps were uninstalled completely, go to
That’s it!
Wrapping Up
Generally, users often think that removing bloatware and getting rid of the preinstalled system apps could only be done through root access. Removing bloatware via root is rather an extreme measure and should definitely not be the primary reason for you to root your Galaxy Tab A7. In that case, getting back the removed system app could only be done by re-flashing the stock firmware.
But with ADB there is a very good possibility of reverting the change easily. So if you accidentally removed a package that you didn’t mean to, or if the removal caused any errors, you can easily restore the app by using the following command:
adb shell cmd package install-existing <app-package-name>
Again, you should replace “<app-package-name>” with the actual name of the package you want to reinstall.

So by now, you have learned how to properly uninstall system apps and remove bloatware from the Galaxy Tab A7 without root, using ADB. The process was fairly simple and shouldn’t take more than a couple of minutes. If you have any questions or find yourself in a difficult position while performing the instructions, let us know.
Comments
Comments are moderated, and published only if they are relevant to the topic and add value in a constructive way. If you disagree with something, please be polite and respectful. We suggest you read our comment policy before commenting.