How to Hide Private Photos in Google Photos App on Android
Google Photos is now the primary gallery/photo app on the majority of Android devices. You can now easily hide private photos in the Google Photos app.

On this page
Google Photos is now the primary gallery/photo app on the majority of Android devices. You can now easily hide private photos in the Google Photos app.
Indeed, there’s no doubt that Google apps offer a much-refined experience than many other third-party apps for performing different tasks on Android devices. Let’s take the Google Photos app as an example, it is probably one of the most efficient apps to manage viewable media like photos and videos on any device (Android or iOS).
Not just to view media files, but the Google Photos app also allows you to back up that media on the cloud against the data quota allotted for your Google account.The service syncs your photos and videos across all your devices, has an inbuilt editor, and also allows you to share your selective albums or complete photo library with other users. Here today, we will be discussing yet another feature and how to use it to hide private photos from the default feed in the Google Photos app.
Hiding Private Photos in the Google Photos App
Before we proceed ahead, let me clear up the air first. Google Photos doesn’t allow you to lock your private photos with a password or PIN. It rather offers a more upfront way to hide the photos from the default feed (that’s the screen you see when you launch the app) and move them to a different location. If you’re concerned about securing your media with a passcode, you may head to the Play Store and download an app locker app.
Google has introduced an archive feature in the Photos app. And it seems like not everybody is making the most out of it. The feature could not only be used to make your feed clutter-free, but it could also be efficiently used to hide your personal images by archiving them. So, you can use the Archive feature of the Google Photos app to hide private photos from the main feed pretty easily.
Before you begin, it is important that you install the latest version of Google Photos on your device. The archive feature was introduced in Google Photos v2.15 and if by any chance you have a lower version than that, then simply go the Play Store and update the app. Or, you can also download the APK file of the latest version of the Google Photos App from here and install the APK on your device.
Once done, you can move forward and follow the steps laid below. Further, we will also show you how you can easily access archived photos once you have hidden them.
1. Steps to Archive Private Photos in Google Photos App
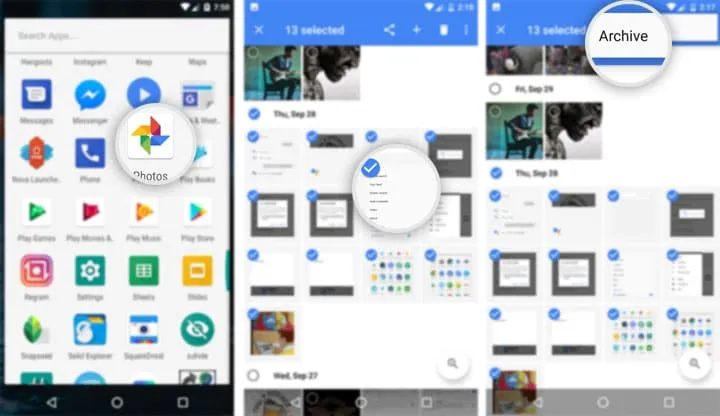
- Go to your phone’s app drawer and open the Google Photos app.
- Tap on the “Photos” icon present in the bottom navigation menu.
- You will now be able to see your photos mainstream, where all your on-device and synced photos will be displayed.
- Scroll through them and long-press on the photo that you want to hide. Then keep tapping on different photos that would like to include.
- Once you selected all the photos that you want to hide/archive, tap on the 3-dot overflow menu on the top-right.
- Select the “Archive” button.
There you go! You have successfully hidden your private photos in the Google Photos app. These photos are archived and will not be visible in the app’s main feed, not even on your synced devices.
2. How to View Hidden/Archived Photos in Google Photos
If you want to view and access the archived photos, follow the steps listed below.
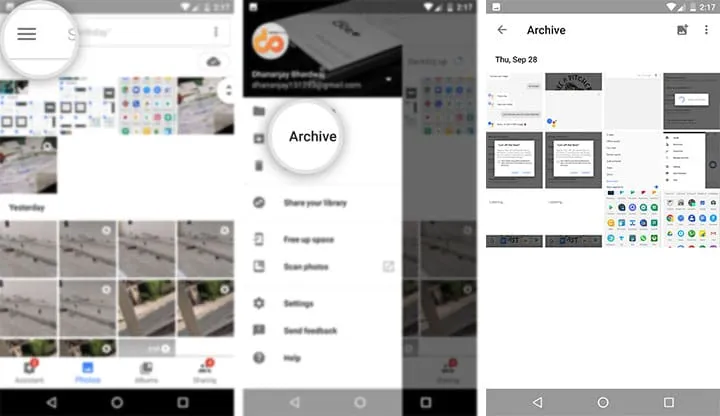
- Go the app drawer and launch the Google Photos app.
- Tap on the hamburger menu icon on the top-left (Three horizontal lines). Or, can also swipe out from the left edge of the app screen.
- Select “Archive”.
- Your archived/hidden photos will be present there.
- If you wish, you can also select the photos and unarchive them. And, you can also tap the Add to archive button in the top menu to further archive/hide more photos.
There you go! You have just learned about the Archive feature in Google Photos and how to use it to hide your private photos. If you have any questions regarding the steps, feel free to leave a comment below.
Comments
Comments are moderated, and published only if they are relevant to the topic and add value in a constructive way. If you disagree with something, please be polite and respectful. We suggest you read our comment policy before commenting.