This tutorial will help you easily install ADB and launch it on your Windows, Linux, or macOS machine.
Advertisement
What is ADB? – Android Debug Bridge is a command-line tool that has been a part of Android SDK and development tools for a long long time. The tool allows your PC to communicate with your Android device and perform several actions. Some common adb commands include adb devices, adb reboot, etc. We will come to them later in this article.

A list of few tutorials that require you to install ADB and Fastboot on your PC:
Advertisement
- How to Increase Galaxy Edge Screen Size without Root
- How to Install Custom Themes on Android Oreo without Root
- Get ‘Turn on Wi-Fi Automatically’ Option for Nexus 6P/5X on Android Oreo
- How to Change Android SMS Limit without Root
- Find If Project Treble Supports Your Android Oreo Device
Page Contents
Install ADB on Windows, Linux, and macOS
When we or most other out there say that “You need to install ADB on your PC“, we generally mean all the major platform tools that are part of the Android SDK. However, we consider ADB for the fact that it is one of the tools that is of paramount importance, not only for developers but also for advanced users who would want to tweak their Android. So that’s what we are here for. To help you install ADB and Fastboot, or install Android SDK tools or setup platform tools, you may call it by different ways, but the process that follows is the same all around.
Now, to install ADB on your computer is just the first half of the story. The next chunk is to be carried on your Android device to make it work. Rubbish? No. It is equally important to adjust the settings on your device to make the connection successful between the PC and device. So we will have it all covered below.
Advertisement
Make Your Android Device Ready
In order to install ADB and use it, your device must first have the USB debugging option enabled. If you already have it or know how to do it, then you may skip this section and move on to the next.
- Go to the device ‘Settings’ and scroll down until you see ‘About phone’ (Up to Android 7.0 Nougat) or ‘System’ -> ‘About Phone’ (Android 8.0 Oreo or above).

- Find the “Build number” field and start tapping on it continuously for 7 times until you see the “You are now a developer!” toast notification on the screen.
- Now go back to settings and access “Developer options”. On Android Oreo and above, you will find it in ‘Settings’ -> ‘System’.
- Scroll down until you find the “USB debugging” option and switch ON the toggle. When prompted, select “OK“.
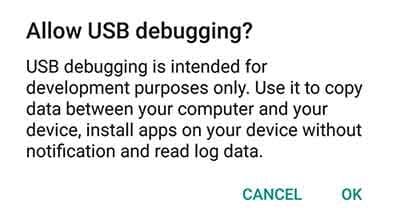
- That’s it, you have just enabled USB debugging on your Android. Now head over to install ADB and establish a connection between your device and PC.
Install ADB on Windows
- Download the platform-tools package for Windows: Link
- We are going to need a location on the PC where the files could remain untouched, yet easily accessible. So extract the content of the downloaded “platform-tools-latest-windows.zip” file to C:\adb.
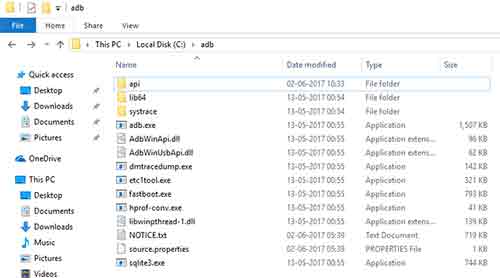
- So when you view this folder, you will see something like in the image above.
- Go to the folder where the files are present (Example: C:\adb).
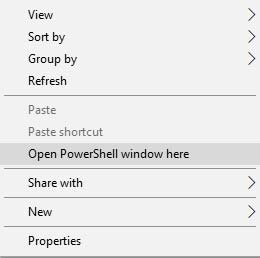
- On an empty space inside this folder, press the SHIFT key and right-click. Select “Open command window here” or “Open PowerShell window here” from the menu that appears.
- Now, connect your Android device to the PC using USB cable and enter the following command to initiate the ADB connection.
adb devices
- Just as you enter the command, your phone will be prompted by a message to allow a USB debugging connection.
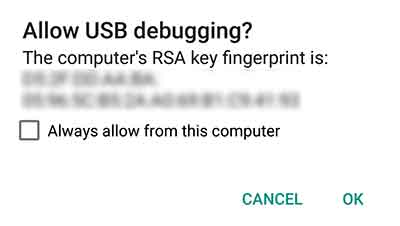
- Also, during this time, the command prompt will return the device serial number with “unauthorized” message. Once you agree to the prompt, you are good to go. You may also select the “Always allow from this computer” option so that you will not have to go through this process again.
- Finally, you should enter the “adb devices” command again and you will have instant ADB connection between your PC and device.
You have now been able to install ADB on Windows PC and have also established a successful connection between your PC and device.
Advertisement
Install ADB on Linux
- Download the platform tools package for Linux: Link
- Extract the content of the downloaded “platform-tools-latest-linux.zip” file to a suitable location of your choice. We prefer the Desktop.
- So open a Terminal window and direct it to the folder where the ADB and other binaries are present.
cd /location/to/the/folder/
- Example:
cd /Desktop/adb/
- Now connect your Android device to the PC via USB cable and enter the following command in the Terminal window:
./adb devices
- The first time you enter this command, the Terminal window will return the device serial along with the “unauthorized” message.
- You shall also instantly see a message prompt on your device screen asking to allow USB debugging connection with the PC. So just allow it.
- Finally, enter the “./adb devices” command again and you will be able to establish a successful connection between your PC and device over ADB.
You have now been able to install ADB on Linux.
Install ADB on macOS
- Download the platform tools package for macOS: Link
- Extract the content of the downloaded “platform-tools-latest-darwin.zip” file to an easily accessible location on your PC, inside a folder named “adb” (For ease of access).
- We prefer to have it on Desktop. So now, all the platform tools package content i.e. the binaries will be present in “/Desktop/adb/”.
- Go to the Launchpad and open Terminal.
- You will now need to direct it to the location where ADB and other binary files are present. So enter the following command:
cd /location/to/the/folder/
- Example:
cd /Desktop/adb/
- Now that your Terminal is directed to use this location, you can connect your device to the PC via USB cable.
- Enter the following command to initiate an ADB connection with your Android device.
./adb devices
- As soon as you enter the command, the device will be prompted with a message to allow USB debugging. The Terminal will also display the device serial along with an “unauthorized” message.
- So agree to the message and allow the connection. Then enter the “adb devices” command again to have a successful connection between your PC and device over ADB.
There you go! You have been successful to install ADB on macOS. Now that you’re done with installing, follow our tutorial on how to use ADB and Fastboot from any directory on your PC.
We make use of ADB and Fastboot in a lot of our day-to-day tutorials. So if the next time there is one that requires this, then you will already have your device and PC ready for the job.
Advertisement
You may now proceed to use other commands as well. If you want to get yourself familiar with other ADB commands, kindly read the documentation. That’s it, you have been successful to install ADB on your Windows, macOS, or Linux PC. You also have your device now having a perfect connection with your PC over ADB.
Was it helpful? Let us know through the comments.
Comments 8 Comments
Comments are moderated, and published only if they are relevant to the topic and add value in a constructive way. If you disagree with something, please be polite and respectful. We suggest you read our comment policy before commenting.
Still waiting for the message to prompt ” allow a USB debugging connection. ”
I’m on the Mi A3 ( 6/128 ) version, what to do ? …
You might not be getting the mentioned prompt for the following reasons:
1) USB Debugging isn’t enabled
2) Or, your computer could not recognize the phone. To confirm, go to the ‘Control Panel’ > ‘Device Manager’ and check if there’s a error sign in front of the device name.
When i run adb devices or fastboot devices it does nothing and device is not recognized probably.
I used the 15 seconds adb setup on win 7 64 bit.
I want to enable camera2api on Zenfone Max Pro and would like to get help from you in doing so..
Hi Aman, you can simply download and extract the platform tools to C:\ADB on your PC.
Once done, you can follow our guide on how to enable Camera2 API on Zenfone Max Pro M1.
Before everything, please ensure that you completely remove 15 seconds ADB installer completely.
Hi Friend,
I get the below quote in my cmd window,
adb server version (31) doesn’t match this client (39); killing…
List of devices attached
adb server version (31) doesn’t match this client (39); killing…
* daemon started successfully
************* device
is this an error “adb server version (31) doesn’t match this client (39); killing…”
?
Hi Fahad, it seems like the ADB binaries on your PC are old. The device you’re trying to make the connection with, requires the latest updated Android SDK tool binaries to function properly.
There could also be another reason for this error. Did you previously install ADB/Fastboot using another method on the PC such as minimal ADB/Fastboot? If that’s the case, then the PC is recognizing two different versions of the tool and thus the mismatch error that you’re seeing.
Solution:
1) Make sure that there is only one ADB/Fastboot installation on the PC. Check the PATH entries on your Windows PC.
2) If you’re sure that there is only one, then make sure to update the tools to the latest package.
For some reason, my Windows Powershell can not find the linux file I extracted to my Desktop.
Hi Cassie. First, make sure that you’re using the Windows tools package and not Linux. Then, you will also have to make sure that you have changed the PowerShell directory to the folder where the Windows tools ZIP file was extracted.
If it still confuses you, then just follow the Windows-specific instructions above. And ping back here.