How to Install TWRP and Root Galaxy Tab S3 (T820/T825)
Customization on Android is limited by the barricades laid down by the manufacturers. But you can get past those by a simple trick, known as "Rooting" - a term

On this page
Customization on Android is limited by the barricades laid down by the manufacturers. But you can get past those by a simple trick, known as “Rooting” - a term that any advanced user will be familiar with. It will allow you to customize your device’s software according to your will, and thus enhance its performance, battery life, and other aspects to get the most out of it. Through this guide, we will show you how to root Galaxy Tab S3 and install TWRP recovery on it.
Once your device is rooted, you will have complete access to your Android system. You will also be able to tweak the kernel for better performance and battery life and use root apps & mods to make the most out of your device.
As of now, the simplest way to root Galaxy Tab S3 is by using Chainfire’s SuperSU. In order to flash SuperSU, you require to have a custom recovery installed on your device. An unofficial port of TWRP is already available for the device, thanks to XDA Contributor - ashyx. We appreciate him for his work and contribution towards the Galaxy Tab S3 community. The tutorial also involves decrypting the storage (data partition), which will allow you to access the internal storage, to flash files via TWRP.
Let’s not wait for any further and move on to the instructions.
Prerequisites
- Backup your device completely including storage, contacts, messages, apps, and everything else that is important to you.
- Charge your tab to at least 60% battery level to avoid any sudden shutdowns during the process.
- From Android 5.1.1 onwards, you will need to enable “OEM Unlocking” in Settings > Developer options. Read this tutorial on on how to do it.
- Install Samsung USB drivers on your PC. You can download the latest version of these drivers from this page.
- Download the latest version of the Samsung Odin program from here and extract it to an easily accessible location on your PC.
Install TWRP Recovery on Galaxy Tab S3
- Download the latest available TWRP recovery for your Tab S3: XDA
- Reboot your Tab S3 into Download Mode –
- First, power off your device completely.
- Press and hold the Volume Down, Home, and Power buttons altogether, until you see the screen light up.
- You shall then see a warning message on the screen, so press the Volume Up key to accept it and enter Download Mode.
- Connect your tab to the PC using USB cable.
- Open the folder where the Odin3_v3.14.4.zip file was extracted and run the Odin3 v3.14.4.exe.
- The Odin window will open up and the ID:COM slot will be lighted up for your device. In case there’s no allotted port, make sure that you have installed the correct USB drivers.
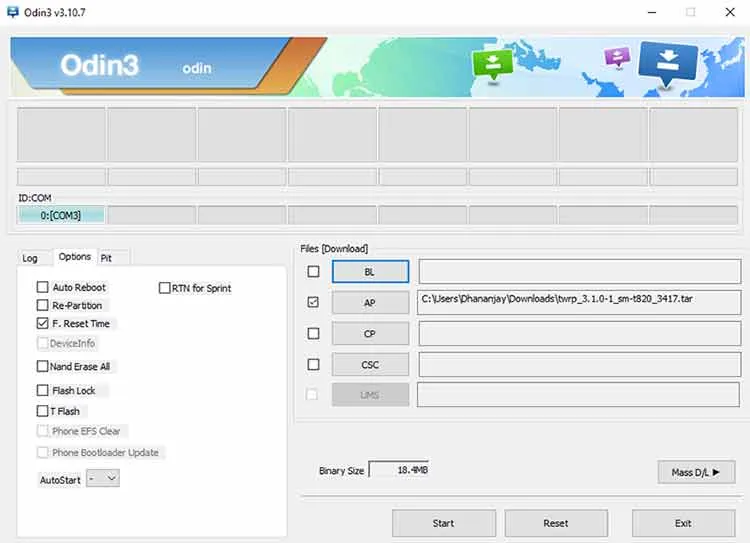
- Now click on the AP button. Browse and select the “twrp_3.2.1-1_T820_28518.tar” or “twrp_3.1.0-1_sm-t825_5417.tar” file corresponding to your tablet’s model number (T820 or T825).
- In the Options tab, make sure that you uncheck the “Auto Reboot” box.
- Finally, click on Start to begin the flashing process. Once it is complete, disconnect the device, but DO NOT REBOOT it yet.
- Now boot into TWRP recovery mode – Hold the Volume Down, Home, and Power keys. As soon as the screen goes off, release the Volume Down key and hold the Volume Up key, while still pressing the Home and Power buttons.
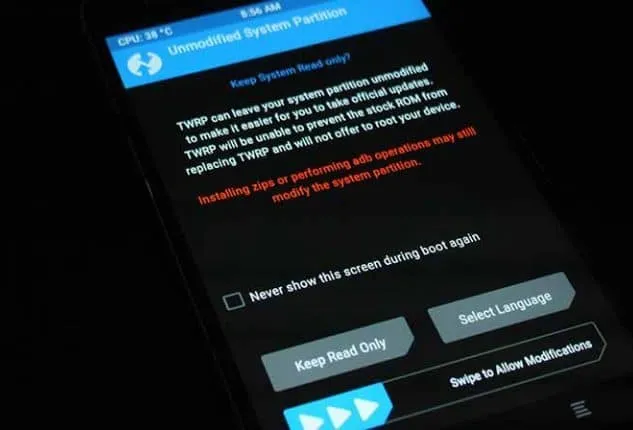
Your Tab S3 will now be in TWRP recovery mode. When you boot into TWRP for the first time, you shall be prompted with an “Unmodified System Partition” warning. It is advised to allow modifications by swiping the button, or you will need to flash TWRP again.
Now that you have TWRP, it is advised to take a complete Nandroid backup of your current ROM. You can simply take a backup over ADB using our tutorial.
Decrypt & Root Galaxy Tab S3
It is necessary for you to decrypt your device in order to gain access to the internal storage and flash files from it. The process will wipe your device completely, which also includes the data on the internal storage. So, make sure that you take a complete backup of everything before heading any further.
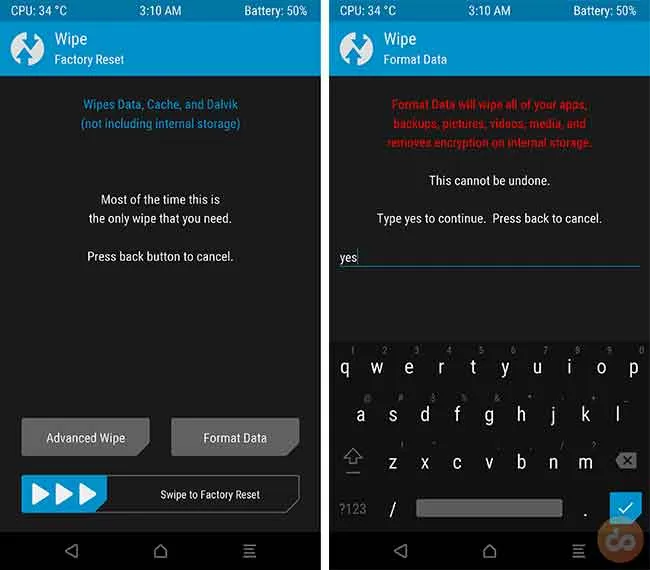
- Now that your Tab S3 is in TWRP mode, go to Wipe > Format Data and enter “Yes” in the provided field. The wiping process shouldn’t take more than a few seconds, and once it is done, go to Reboot > Recovery.
- When your device has rebooted back into TWRP, connect it to the PC using the USB cable. Go to Mount and tap on the Enable MTP button.
- Your device’s internal storage should now show up on the PC.
- Download the required files and transfer them to your Tab S3: Tabs3_oreo_forced encryption_disabler.zip and Magisk-v20.4.zip
- Once transferred, tap on Disable MTP and disconnect your tab from the PC.
- Now go to the Install tab. Browse the internal storage for no-verity-no-encrypt_ashyx.zip file and select it. Then swipe the button to flash the file.
- In the same manner, flash the root package (Magisk-v20.4.zip) too.
- Once all the flashing is done, you can go to Reboot > System to boot your device back into the OS.
That’s it! You have successfully rooted your Samsung Galaxy Tab S3 now. Even if you’re a newbie, it shouldn’t take more than 10 minutes for you to understand and execute everything in this tutorial. If you have any questions, drop a comment below and let us know.
Comments
Comments are moderated, and published only if they are relevant to the topic and add value in a constructive way. If you disagree with something, please be polite and respectful. We suggest you read our comment policy before commenting.