If you want to install TWRP, flash custom ROMs, gain root permissions, or apply any sorts of software modifications, you’ll first need to unlock your phone’s bootloader.
Advertisement
In this guide, we will show you how to easily unlock the bootloader on OnePlus Nord, using nothing more than a bunch of Fastboot commands. Further, in the next half of this tutorial, we will also guide you on how to relock the bootloader after unlocking it, in case you ever wish to revert your OnePlus Nord to its factory state.
Page Contents
Introduction
Before we begin with the instructions, take a quick minute to understand what a bootloader is and why/when would you need to unlock it. It’s considered good practice to understand these things and how they work before you actually apply them to your OnePlus phone.
What is Bootloader?
The bootloader is a part of the core Android system that brings up the kernel and is responsible for booting up your phone. Apart from that, it also guards the device state and verifies the boot and recovery partitions to ensure the integrity of your device. You might just consider it as a gatekeeper to the software on your phone.
Advertisement
Most Android devices, including the OnePlus Nord, come with a locked bootloader that prevents users from flashing the bootloader or other device partitions. The locked state of the bootloader is further aided by the “OEM unlocking” toggle under “Developer options” so that no one could unlock the bootloader without having full access to the device, especially in case of thefts.
The Need for Unlocking the Bootloader
This brings us down to the next question – Why and when would you need to unlock the bootloader?
Things like gaining root access, installing a custom recovery (TWRP), custom ROMs, etc involve flashing certain device partitions like system, boot, recovery, vendor, etc. And like we mentioned, a locked bootloader does not allow flashing the device partitions at all. So, if you wish to do any of the said modifications, you’d need to unlock your OnePlus Nord’s bootloader first. Moreover, an unlocked bootloader is also required while unbricking your phone by restoring the stock OxygenOS firmware through Fastboot.
With that out of the way, let us now show you how to unlock the bootloader on your OnePlus Nord. The only things you will require is your phone, a Windows/Mac/Linux computer, and a compatible USB-C cable.
Before You Begin
Let us take a look at a few things you’ll need to do before you start following the instructions.
1. Take a Backup
The first and foremost thing you should do is take a complete backup of all your important data stored on the phone. Unlocking the bootloader, as well as relocking it, will perform a factory reset and completely erase all the data, including installed apps, messages, contacts, and everything stored in the internal storage.
You could also take a look at our article here on backing up different types of data stored on Android devices.
2. Install Required USB Drivers
Most of the time, your Windows PC will automatically install the required USB drivers for your OnePlus phone. That’s not always the case though, especially when working with things like ADB and Fastboot. So, if you’re operating on a Windows machine, you might want to download and install the official OnePlus USB drivers provided on this page.
If you’re using a macOS/Linux PC, you shouldn’t need any additional drivers at all.
3. Charge your OnePlus phone
If you’re new to things like bootloader unlocking, we strongly suggest that you take your time to understand what each step does.
Having a sufficient battery charge in your OnePlus Nord will ensure that it doesn’t power off while you’re following the instructions and performing them. We suggest charging your phone to a minimum of 40-50% battery level.
How to Unlock the Bootloader on OnePlus Nord
To make it easier for you to understand the whole bootloader unlocking process, we have split the instructions into six (6) major steps. We tried to make the tutorial as comprehensive as possible so that it would be easy to follow by every user, from a novice to a veteran in the field of software modding.
Now, follow the steps below to unlock the bootloader on your OnePlus Nord.
Step 1: Enable OEM Unlocking
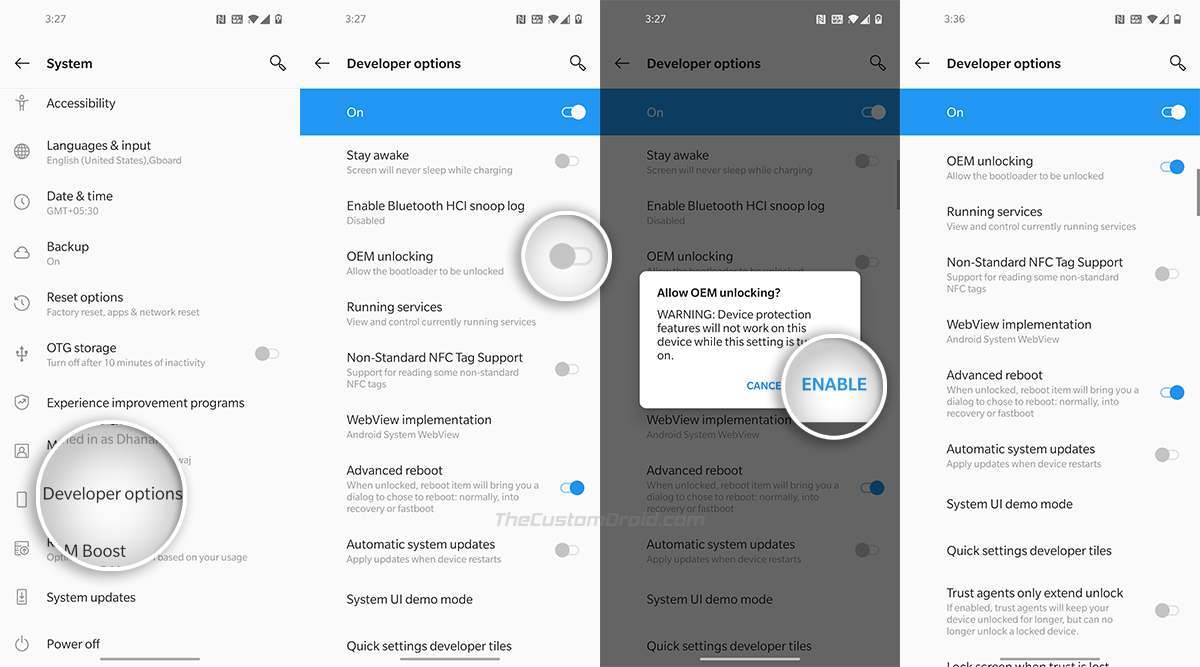
The first step of the process is to enable the OEM Unlocking toggle on your phone. Without enabling this option, the bootloader will reject the unlock commands. If you’re interested in knowing what the OEM Unlocking option is and what it does, please refer to the information here.
This option could be located inside the Developer Options screen of your phone. So to begin, enable the hidden Developer Options first. Then go to ‘Settings‘ → ‘System‘ → ‘Developer options‘ and turn ON the toggle next to “OEM Unlocking“. Finally, select “Enable” when prompted to enable OEM Unlocking on your OnePlus Nord.
Advertisement
- Tip: If OEM unlock is missing or greyed out, make sure that you have logged into your Google account and connected your phone to the internet via WiFi or mobile data.
Step 2: Boot your OnePlus Nord into Fastboot Mode
The Fastboot tool can only interact with your phone for bootloader unlocking or flashing device partitions when it is in a special boot mode known as “Fastboot Mode”.
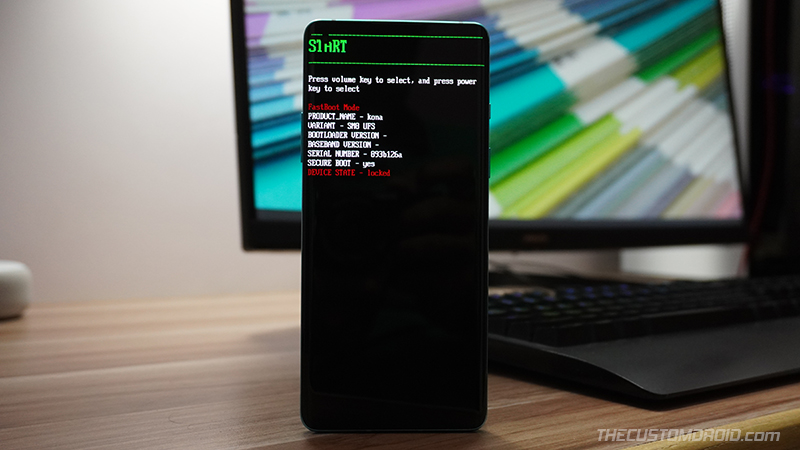
So, the second step is to boot your OnePlus Nord into Fastboot Mode. To do this, first, hold the power key of your phone to bring up the Power menu and then select “Power” to completely turn off your phone. Then hold the Volume Up, Volume Down, and Power keys together to enter Fastboot Mode.
Step 3: Set Up Android Platform-tools on your Computer
In order to use the Fastboot tool for unlocking your phone’s bootloader, you must set up the Android SDK platform-tools on your computer.
While you could use one-click ADB/Fastboot installers like Minimal ADB and Fastboot, we recommended doing it the manual way as shown below. This is because one-click installers often include outdated platform-tools binaries, which may cause unusual errors during usage.
So, start by downloading the latest tools package according to your PC’s operating system:
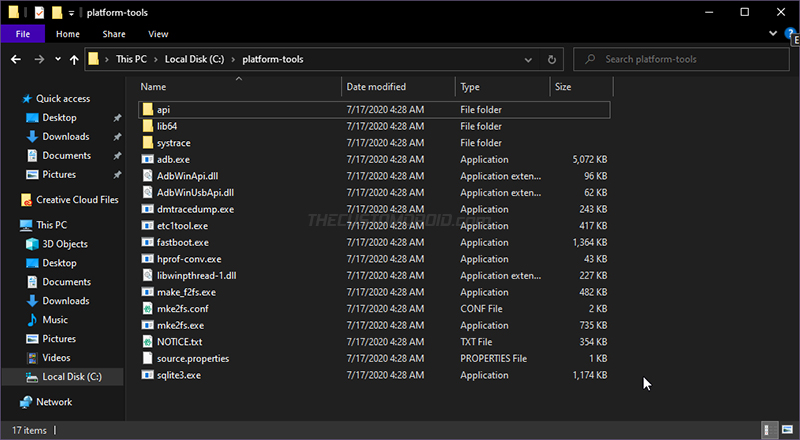
Once you have downloaded the tools, extract the ZIP package to get the “platform-tools” folder. This folder should contain the binary files of the required tools, such as ADB and Fastboot.
For easier access, we suggest you move the “platform-tools” folder to the root of the C:\ drive if you’re using a Windows computer, or inside the “Documents” directory if you’re using a macOS/Linux PC.
Advertisement
Step 4: Launch the Command-line Window
Now that you have the required tools set up, the fourth step is to launch the command-line window inside the working directory (the ‘platform-tools’ folder). If you’re experienced with using the command-line, you could alternatively add the platform-tools to your computer’s PATH.
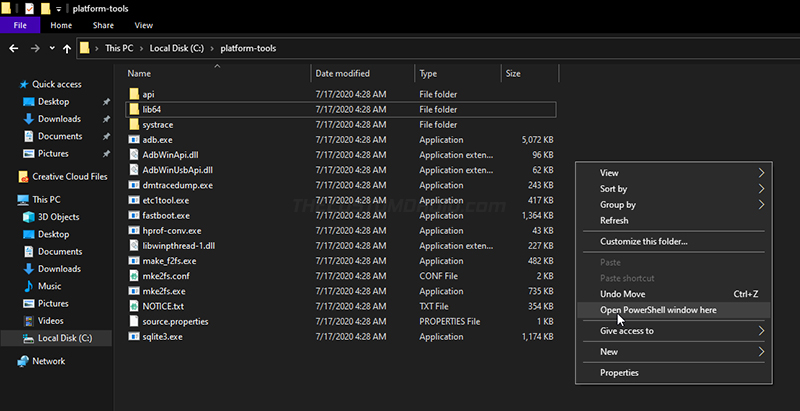
- Launch PowerShell in Windows: Go to C:\platform-tools. Hold the SHIFT key on the keyboard and right-click on any empty space inside the folder. Then select the “Open PowerShell window here” option.
- Launch Terminal in Linux/Mac: Launch the Terminal and use the cd command to change its directory to the “platform-tools” folder. For example: If you moved the folder inside the “Documents” directory, then the command should be:
cd Document/platform-tools
Step 5: Connect your phone to the PC and verify the connection
Now that everything is set up properly, your OnePlus Nord is fully ready for bootloader unlocking. To start, connect your phone (while it is in Fastboot Mode) to your computer using a compatible USB-C cable.
Your PC will automatically recognize the phone over the bootloader interface. To verify the connection, enter the following command in the PowerShell/Terminal:
fastboot devices
The command should return your phone’s unique identifier string and the “fastboot” message as shown in the figure below.
In case it returns a blank output, it means that your computer is not able to detect your phone. This generally happens on Windows, when the computer fails to install the required USB drivers for your OnePlus device. In that case, you would need to download and manually install the OnePlus USB drivers on your Windows PC.
Once you have installed the drivers, restart your PC and issue the Fastboot devices command again. This time, it should identify the phone and return the device ID, as shown in the figure above.
Step 6: Unlock OnePlus Nord’s Bootloader using Fastboot Command
Now, it’s time to finally unlock the bootloader on your OnePlus Nord. To initiate the unlocking process, enter the following Fastboot command:
fastboot flashing unlock
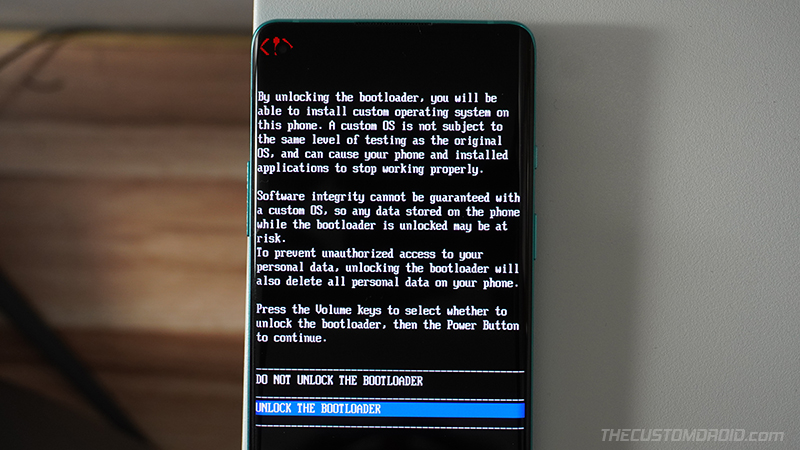
As soon as the above command is executed, the phone should display a prompt on the screen. Simply press the Volume keys to move the selector to “UNLOCK THE BOOTLOADER” and press the power key to confirm.
Advertisement
That’s it! Your OnePlus Nord’s bootloader is now fully unlocked and it should automatically boot into the OS. From hereon, you can follow our tutorial on how to root your OnePlus Nord using Magisk.
You will also see the unlocked bootloader warning message during the initial boot process. This is a mandatory warning and completely normal. Do note that the only way to get rid of this warning message is by relocking the bootloader, which is not something you would want to do if you plan on installing TWRP, custom ROMs, rooting the phone, etc.
Relocking the Bootloader on OnePlus Nord
While things like custom ROMs and rooting are great, there are times you may feel like reverting your OnePlus Nord to its factory state by unrooting and installing the stock OxygenOS software. After doing so, you would want to go ahead and also relock your phone’s bootloader.
Locking the bootloader again will ensure the software’s integrity and prevent unauthorized flashing of the software in case it is ever lost or stolen.
If you’re unsure, we suggest you take a look at our stock firmware restoration guide.
Now, to relock your OnePlus Nord’s bootloader, follow the instructions below.
- First, power off your phone and boot it into Fastboot Mode.
- Connect it to your computer using the USB cable.
- Launch the command-line on your computer using the instructions under step #4 of the unlocking process.
- Enter the following Fastboot command to initiate the bootloader locking process:
fastboot flashing lock
- As soon as the command is executed, you should see a prompt on your phone’s screen. Use the Volume keys to select “LOCK THE BOOTLOADER” and press the power button to confirm and finally relock the bootloader on the OnePlus Nord.
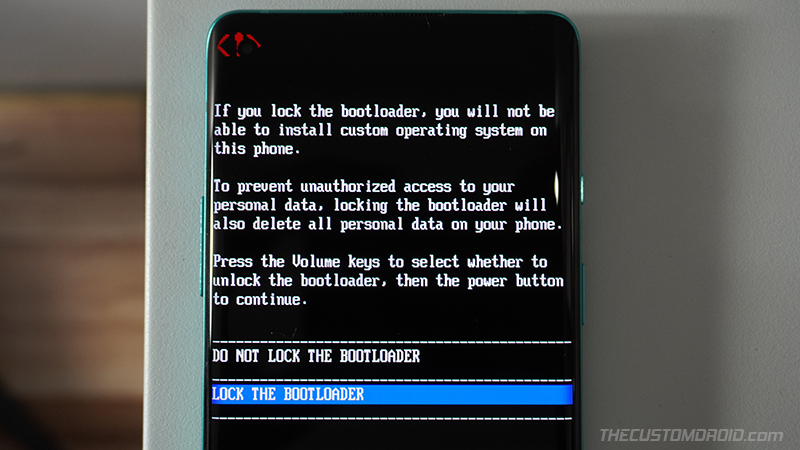
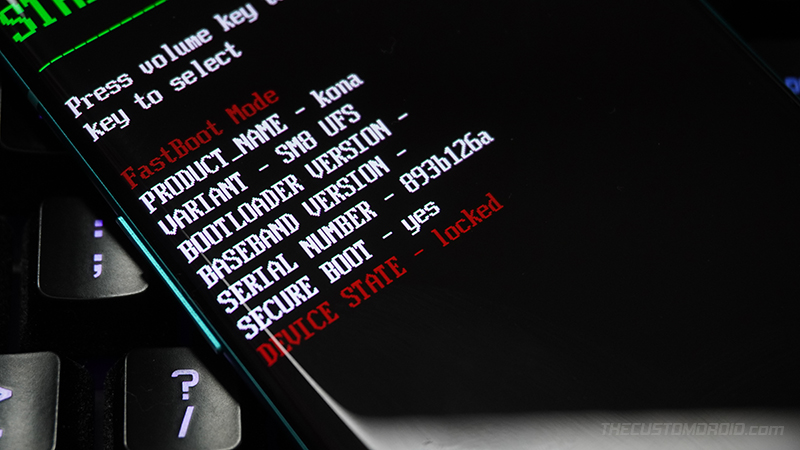
Your phone’s bootloader should now be locked again and it should reboot into the operating system. Since relocking the bootloader factory resets your phone, you will need to set it up again by following the initial setup instructions.
Wrapping Up
So by now, you have learned how to unlock and relock the bootloader on the OnePlus Nord. To quickly recap, an unlocked bootloader is essential if you wish to modify the software on your phone, that is, install a custom ROM, a custom recovery such as TWRP, or root it. On the other hand, relocking your phone’s bootloader should be extremely helpful when restoring the stock OxygenOS software and returning your phone to its factory state.
If you have any questions regarding the bootloader on your OnePlus Nord, the process of unlocking or relocking it, feel free to ask us.
*Certain images on this page are of the OnePlus 8. These should be used for reference only.



Comments 1 Comment
Comments are moderated, and published only if they are relevant to the topic and add value in a constructive way. If you disagree with something, please be polite and respectful. We suggest you read our comment policy before commenting.
Thank you so much for the wonderful tutorial. Everything worked perfectly for me