How to Boot Poco X2 into Fastboot Mode and Recovery Mode
If you own the Poco X2 and are into the Android customization/development scene, then you might need to enter Fastboot Mode or Recovery Mode on your phone at

On this page
If you own the Poco X2 and are into the Android customization/development scene, then you might need to enter Fastboot Mode or Recovery Mode on your phone at some point. Even for an average user, knowing about these boot-modes could come in handy if you want to restore the stock firmware or perform a factory reset on your phone. The instructions in this guide will show you how to easily boot Poco X2 into Fastboot Mode and Recovery Mode using two different methods, either by using the physical buttons combination or by using ADB commands.
If you’re new to this, it’s good to first understand what these boot-modes actually are and when you might need to boot into them. The following pointers will explain to you the same.
- What is Fastboot Mode? – In general “fastboot” is a part of the Android SDK Platform-tools, which can be used to modify (write, erase, or format) your Poco X2’s software partitions. When it comes to practicality, it allows you to flash the stock firmware, unlock the bootloader, custom recoveries like TWRP, or even custom binaries like Magisk-patched boot images to gain root. But in order to perform any of the said procedures, you will be required to enter Fastboot Mode on Poco X2 and then connect it to the PC.
- What is Recovery Mode? – Recovery in Android is a bootable partition on Android where the stock recovery console is pre-installed by the manufacturer (Reference: Android Central). Entering Recovery Mode on Poco X2 can help you perform a factory reset to fix software issues like bootloops, and even help you manually sideload OTA updates on your phone, and perform several other actions. In case you have a custom recovery installed (like TWRP), booting your Poco X2 into Recovery Mode could provide additional features like installing custom ROMs, kernels, mods, or root solutions like Magisk, etc.
Now that you know what both modes are and when you’d need to boot your phone into them, let us move onto the instructions.
In order to use the second method in each case, you must first install ADB on your PC and make sure that you have enabled USB debugging on your Poco X2. Also, ensure that you have the proper USB drivers for your Xiaomi device installed on your PC.
How to Enter Poco X2 Fastboot Mode

Booting your Poco X2 into Fastboot Mode could be done using two different methods – (1) By using the physical buttons combination, or (2) By using ADB commands. Both of the methods have been listed below. If you’re new to this, do not worry, the instructions are very easy and wouldn’t do any damage to your phone at all in any circumstances.
Method 1: Using Physical Buttons Combination
- First, hold the Power button of your Poco X2 until the power menu appears on the screen.
- Tap on “Power off” to shut down your phone.
- Wait for a few seconds to ensure that your phone is powered off completely.
- Now press and hold the Volume Down (Vol -) button.
- While holding the Volume Down button, press the Power button to finally boot your Poco X2 into Fastboot Mode.
Method 2: Using ADB
- Connect your Poco X2 to the PC using a USB cable.
- Go to the folder where ADB is installed (e.g. C:\platform-tools) on the PC.
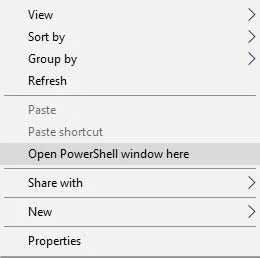
- Hold the “Shift” key on the keyboard and right-click on any empty space inside the folder.
- Select “Open PowerShell window here” from the contextual menu that appears.
-
If you’re using macOS or Linux, open the Terminal and simply “cd” to the folder where ADB is installed.
-
Now, enter and execute the following command in the command-line window to ensure that your phone is being correctly detected by ADB.
-
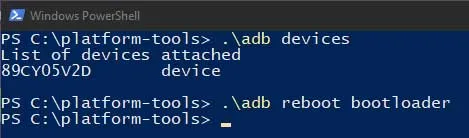
Windows PowerShell:
.\adb devices
-
Linux/macOS Terminal:
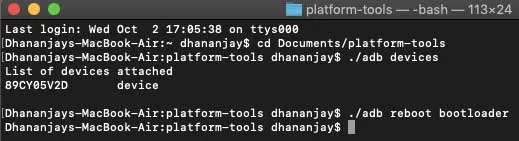
./adb devices
-
-
If you see a prompt on the phone’s screen to allow USB debugging, simply press “Allow”.
-
Finally, enter the following ADB command to boot your Poco X2 into Fastboot Mode:
-
Windows PowerShell:
.\adb reboot bootloader
-
-
Linux/macOS Terminal:
./adb reboot bootloader
Your phone should now be in Fastboot Mode with the Mi bunny and “FASTBOOT” text shown on the screen. You can now connect your Poco X2 to the PC and flash it using fastboot. To exit Fastboot Mode, simply hold the Power button of your Poco X2 for a few seconds.
How to Enter Poco X2 Recovery Mode
Just like in the case of fastboot mode above, booting Poco X2 into Recovery Mode could be done via two methods – (1) Either by using the physical buttons combination, or (2) By using ADB commands. It doesn’t matter if you have the stock recovery installed on your phone or TWRP, the method(s) to boot into Recovery Mode stays the same.
Method 1: Using Physical Buttons Combination
- Press and hold the Power button of your Poco X2 until the power menu appears.
- Tap on “Power off” to shut down your phone.
- Wait for a few seconds to ensure that your phone is powered off completely.
- Now press and hold the Volume Up (Vol +) button of your Poco X2.
- Press and hold the Power button while holding the Volume Up button for about 3-5 seconds.
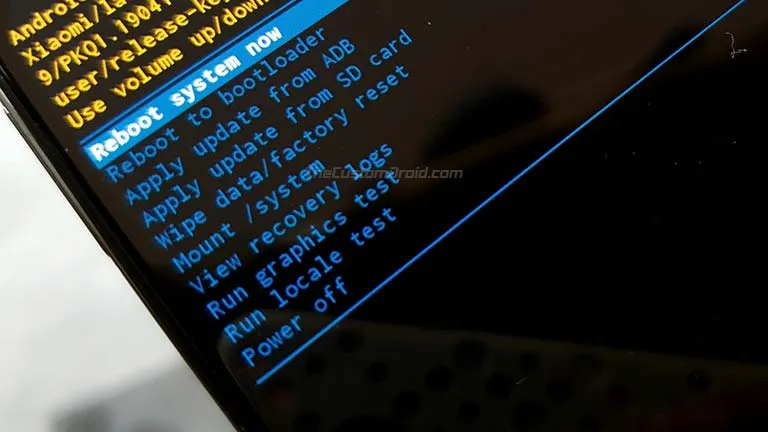
- You shall now see a screen with a warning sign and “No Command” text.
- Note: In case if you have TWRP installed, then you shall not see the “No command” screen and your phone will directly boot into TWRP.

- At this point, press and hold the Power button.
- Finally, tap the Volume Up (+) button while holding the Power button to enter Recovery Mode on your Poco X2.
Method 2: Using ADB
- Connect your Poco X2 to the PC using the USB cable.
- Go to the folder where ADB is installed (e.g. C:\platform-tools) on the PC
- Hold the “Shift” key on the keyboard and right-click on any empty space inside the folder.
- Select “Open PowerShell window here” from the contextual menu that appears.
-
If you’re using macOS or Linux, open the Terminal and simply “cd” to the folder where ADB is installed.
-
Now, enter and execute the following command in the command-line window to ensure that your Poco X2 is being correctly detected by ADB.
-
Windows PowerShell:
.\adb devices
-
Linux/macOS Terminal:
./adb devices
-
-
If you see a prompt on the phone’s screen to allow USB debugging, simply press “Allow”.
-
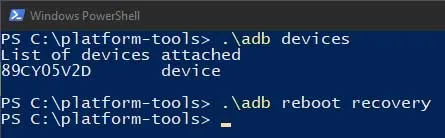
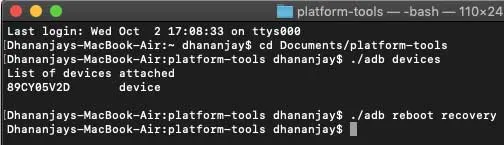
Finally, enter the below command to boot your Poco X2 into Recovery Mode:
-
Windows PowerShell:
.\adb reboot recovery
-
-
Linux/macOS Terminal:
./adb reboot recovery
Your phone should now be in Recovery Mode (Stock or TWRP, whichever you may have installed). You can now go ahead and use it to perform various actions, like a factory reset or manually installing an OTA update in stock recovery. Or, if you have TWRP installed, you can use it to install custom ROMs, kernels, mods, backup/restore your firmware, and even Magisk installer zip file to root your phone.
To exit Recovery Mode on Poco X2, simply select ‘Reboot system now’ in the stock recovery, or ‘Reboot’ > ‘System’ if using TWRP.
More on Poco X2:
There you go! You have just learned how to boot Poco X2 into Fastboot Mode and Recovery Mode using two different methods. It was easy, wasn’t it? If you still face any issues regarding the instructions or have any other questions about the phone, please ask us by posting a comment.
Comments
Comments are moderated, and published only if they are relevant to the topic and add value in a constructive way. If you disagree with something, please be polite and respectful. We suggest you read our comment policy before commenting.