WebADB - How to Run ADB from Web Browser (A Complete Guide)
A complete guide to use WebADB to run ADB from web browsers that support the WebUSB API like Chrome, Edge, etc. Learn more about the tool and its features.

On this page
Finding it difficult to set up and run ADB locally? Not to worry. WebADB lets you run ADB from any web browser that supports the WebUSB API. In this article, we will discuss what WebADB is and the features it offers. Further, I will also show you how to use WebADB to run ADB from the web browser on your computer.
A Quick Rundown on ADB: ADB (or Android Debug Bridge) is a command-line tool that allows you to communicate with an Android device to perform various device actions (source: developers.android.com). These actions include app and software debugging, executing ADB commands to boot the device into Fastboot and Recovery Modes, taking logs, and more.
If you have been using Android for a while, there’s a strong chance that you might already have heard of ADB or used it. Especially if you’re into development and software modding (unlocking bootloader, rooting, etc).
We already have a tutorial on how to install ADB locally on Windows, macOS, and Linux computers. And as simple as it is to set up ADB, you might find yourself in a difficult situation. Sometimes because you used the old binaries that are not compatible with new/latest devices or Android versions. And other times because you used one-click installers to set up ADB.
Don’t worry, those are some common pitfalls and I have been there too. While it’s generally more convenient to have ADB installed locally on your machine (and it’s easy), there are times you would want to use something that’s quick for some basic ADB work.
What is WebADB?
WebADB is a tool/library that allows you to use ADB directly from your computer’s web browser, without having to set it up locally. It uses the WebUSB API to communicate with your Android device over a USB connection from any supported web browser.
By far, all latest Chromium-based browsers including Google Chrome, Microsoft Edge, and Opera support the WebUSB API (source). This means you can use WebADB on all these browsers.
Features
Following is the list of features currently offered by WebADB:
- Device information
- Enable ADB over WiFi
- Interactive ADB Shell
- File Manager
- Install APK
- Screen Capture
- Scrcpy
The tool is fully open-source and its source code is available on Github. If you’re experienced with development and programming, you can also contribute to the project.
The developer also has an online implementation of WebADB, which can be accessed on the following URL: https://yume-chan.github.io/ya-webadb/
WebADB.com - An Alternative
WebADB came into existence back in September, this year. And more recently, XDA member steeltoe introduced a website that’s an alternative online implementation (Web App) of the original library.
While it does work well functionally, it’s worth noting that this alternative website/web app isn’t open-source, compared to the original implementation.
When using WebADB, you’re essentially giving the webpage full control over your device. Since it’s not possible to verify what’s running in the background, it is wise to be precautions. A user over at the XDA thread also expressed concern about the website using an unskippable ad, which could be bad for the user experience.
Security Concerns
Malicious apps could abuse the WebUSB API to access the information on your device or perform certain actions, which is harmful. This is part of the reason why Mozilla didn’t implement the API in Firefox (See here).
However, there are a few things the developer had to say regarding this and as I quote:
- “Web apps, unlike native apps, can’t connect to your devices silently. Web apps must first get your permission through a browser-controlled UI, which it can’t alter.”
- “Web apps can be updated at any time, but native apps can also do this. So I consider this a tie.”
- “Only minimal and trust-worthy dependencies are used by this website, to minimize the possibility of supply chain attacks.”
Furthermore, the online WebADB website by the original developer is completely open-source, transparent, and free of ads with its source code available on Github. If you’re an experienced programmer, you could easily verify it. Further, you could also compile the code and build it yourself to use.
TL;DR: Be careful and only grant permissions to apps that are trusted and verified.
A Chat with WebADB’s Developer, Simon Chan
WebADB is developed by Simon Chan, a web developer based in China. I had the privilege to have a conversation with him and chat a bit about WebADB. It was interesting to know more about him, the project, as well as his opinion on the alternative website.
Here’s how it went.
[Dhananjay]: Can you introduce yourself to me and our audience? We’d surely love to know the mind behind WebADB.
[Simon]: I’m from China, and I think I’m just a normal web developer. WebADB starts as a hobby project and I never thought it would become such well known. Also, I’m not the first one to make an ADB client for web browsers.
[Dhananjay]: So, how exactly did WebADB come into existence?
[Simon]: I like trying new things, so when I saw the WebUSB API that can make browsers connect to USB devices, I want to make something with it. Looking around I found my Android phone, and I thought that’s it.
[Dhananjay]: By “I’m not the first one to make an ADB client for web browsers”, are you referring to webadb.com?
[Simon]: By “I’m not the first one”, I mean actually somebody else has already tried this idea: a more complete ADB implementation on browsers, but maybe my project is more full-featured and stable.
Webadb.com used my code. My code is open-sourced on GitHub. One day I got an issue asking for the license I used, several days after comes https://webadb.com. In fact, I’m not sure if these two things are related, but thanks to it my project got attention worldwide.
[Dhananjay]: XDA RD Humpie expressed some concern regarding webadb.com.
[Simon]: That’s a totally valid concern. Although web apps can’t silently connect to your devices, because browsers always try their best to protect users, thus requires users’ confirmation before the connection, web apps can update themselves at any time to turn a useful and harmless site into an evil one.
Like the comment says, one should build it from source code to ensure it’s safe because someone can still add their own secret sauce into the source code before publishing the executables. But with a transparent building process, you can trust the published site will be exactly the same as building it yourself, eliminating this part of the concern.
I believe that one was made by someone pretty famous on XDA, so maybe his/her name can assure its safety.
[Dhananjay]: Have you taken any specific measures to make sure that your online WebADB implementation/demo is more robust and secure?
[Simon]: For my demo, everything is transparent. The source code is on GitHub, even the building process, which compiles the source code into a working website, is also on GitHub, so everyone knows how to code and check themselves. However for normal users, I think it’s a trust problem, it’s not too different from downloading tools from XDA for example, so for them, my suggestion is not to try things from an unknown source, especially before someone with a good reputation and technical skill check it.
[Dhananjay]: One thing that I never liked about one-click ADB installers was that they were often not updated regularly with the latest binaries from Google. Which could cause users to run into issues when a new Android version is released. With your WebADB tool, I suppose you’re constantly updating it with the latest ADB binaries, right?
<div class=“css-1dbjc4n r-obd0qt r-1wbh5a2”><div class=“css-1dbjc4n r-173mn98 r-urgr8i r-zmljjp r-p1n3y5 r-1867qdf r-deolkf r-dnmrzs r-1ny4l3l r-1j3t67a r-1w50u8q r-o7ynqc r-6416eg” role=“presentation”><div class=“css-901oao r-jwli3a r-1qd0xha r-a023e6 r-16dba41 r-ad9z0x r-bcqeeo r-1udh08x r-bnwqim r-fdjqy7 r-qvutc0” dir=“auto”><span class=“css-901oao css-16my406 r-1qd0xha r-ad9z0x r-bcqeeo r-qvutc0”>Not that one-click installers or the WebUSB implementation are the same, but they do share a common ground, that’s the actual ADB tool being used.</span></div></div></div>
[Simon]: Except for new features, native ADB binaries also include bug fixes, because WebADB is a completely different implementation, the same bug may not happen. For the feature part, I haven’t made all features available on WebADB, so I’m still trying to catch up. Also, I don’t have access to many devices to guarantee compatibility, but everyone can report issues to my project page on GitHub, and everyone can try to fix them, that’s how open source works.
[Dhananjay]: So, the online website that you have shared, is it fully ready for usage by end-users?
[Simon]: I believe I tested every features pretty carefully, and at least it didn’t brick my phone :-)
[Dhananjay]: At last, are there any other projects that you have been working on (or worked on in the past) apart from WebADB?
[Simon]: Not much. Usually, I make small libraries or contribute to other projects for my projects at work. Doesn’t have something else close to WebADB’s scale or completion level.
Clearly, Simon’s spirit for open-source software and programming knowledge is commendable. WebADB should prove useful to a lot of users out there, especially those who are new to using ADB.
Now, let us show you how to connect your Android device and use WebADB to run ADB from a supported web browser on your computer.
Connect your Android Device to WebADB
WebADB tool uses the WebUSB API to connect and communicate with an Android device. So, the first thing you’ll need is a web browser that supports the WebUSB API. Like we mentioned earlier, all Chromium-based browsers like Google Chrome, Microsoft Edge, and Opera support it. So make sure that you install one of these browsers on your computer.
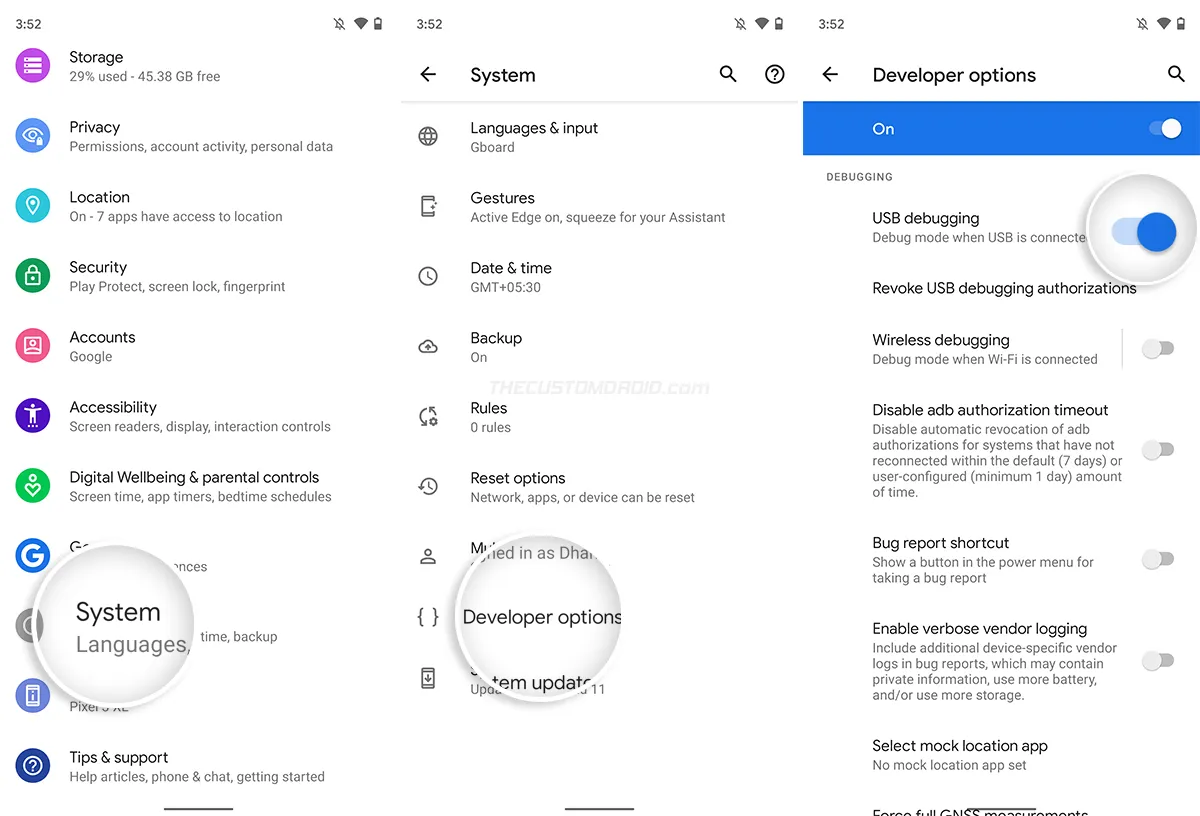
WebADB, or ADB in general, requires you to have USB Debugging enabled on your Android device. USB Debugging is located inside the ‘Developer Options’ menu in the Settings, which is hidden by default on almost every device. So, enable Developer Options and USB Debugging on your Android device.
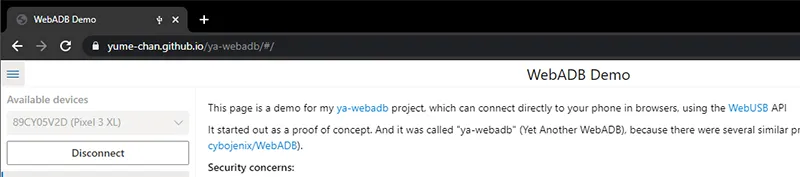
Once you’re done with the above, you can connect your Android device to WebADB pretty easily. To do this, first, connect your phone to the computer using a compatible USB cable. Then launch the web browser and visit the online WebADB application through the following address: https://yume-chan.github.io/ya-webadb/
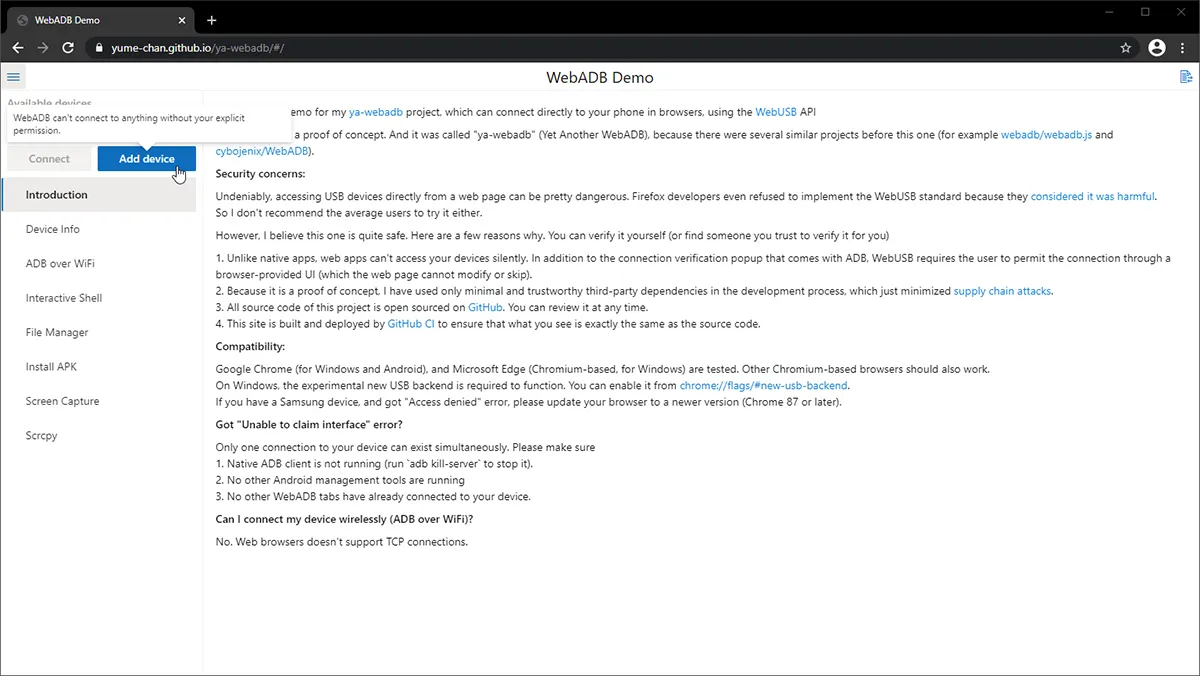
On the top left of the web app, you will find a section that says “Available devices”. You will need to begin by adding your own Android device there. This is To do this, click ‘Add device’ and the browser will prompt you to grant the web app access to your device. Select your Android device’s name and click ‘Connect’.

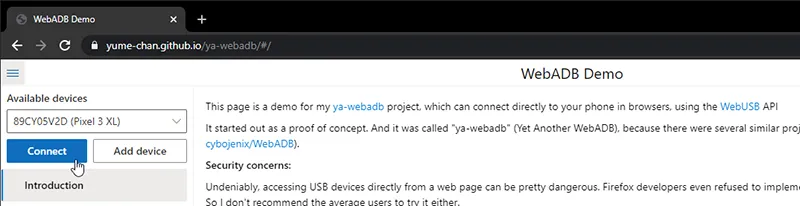
After doing this your device should be listed under the “Available devices” section and you should see the corresponding device identifier. Once the device is added, you can easily connect it to WebADB by clicking ‘Connect’.
The web app will begin establishing the ADB connection and prompt you to grant the permissions from your device. So, press ‘Allow’ on your Android device to allow USB debugging.
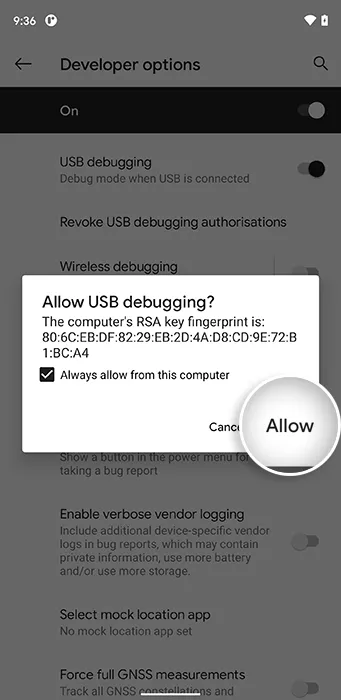
That’s it! Your Android device should be connected to WebADB now, like so:
Troubleshooting the Connection
I personally didn’t face any connection issues with WebADB using all three browsers. But if do you face trouble establishing a connection, there are a few things you could try to fix:
- If you’re using Google Chrome on Windows, update it to v87 or above. If you’re using an older version for some reason, you will need to enable the new USB backend flag by copying and pasting the following URL in your web browser:
chrome://flags/#new-usb-backend - If you’re using a Samsung Android device and get the ‘Access Denied’ error message, then you might be using an older version of Chrome. So, update your Chrome browser to the latest version. If you’re not sure how to do it, please read the official documentation by Google.
- If you see the ‘Unable to claim interface’ error, make sure that no other instance of WebADB is running on your computer.
How to Run ADB from Web Browser using WebADB
With your device now connected, you can now start using WebADB to run ADB from your computer’s web browser and perform various actions. Let me walk you through all the features.
Device Info
The first actionable tab in WebADB is ‘Device Info’. This feature allows you to view some specific information about the connected device.
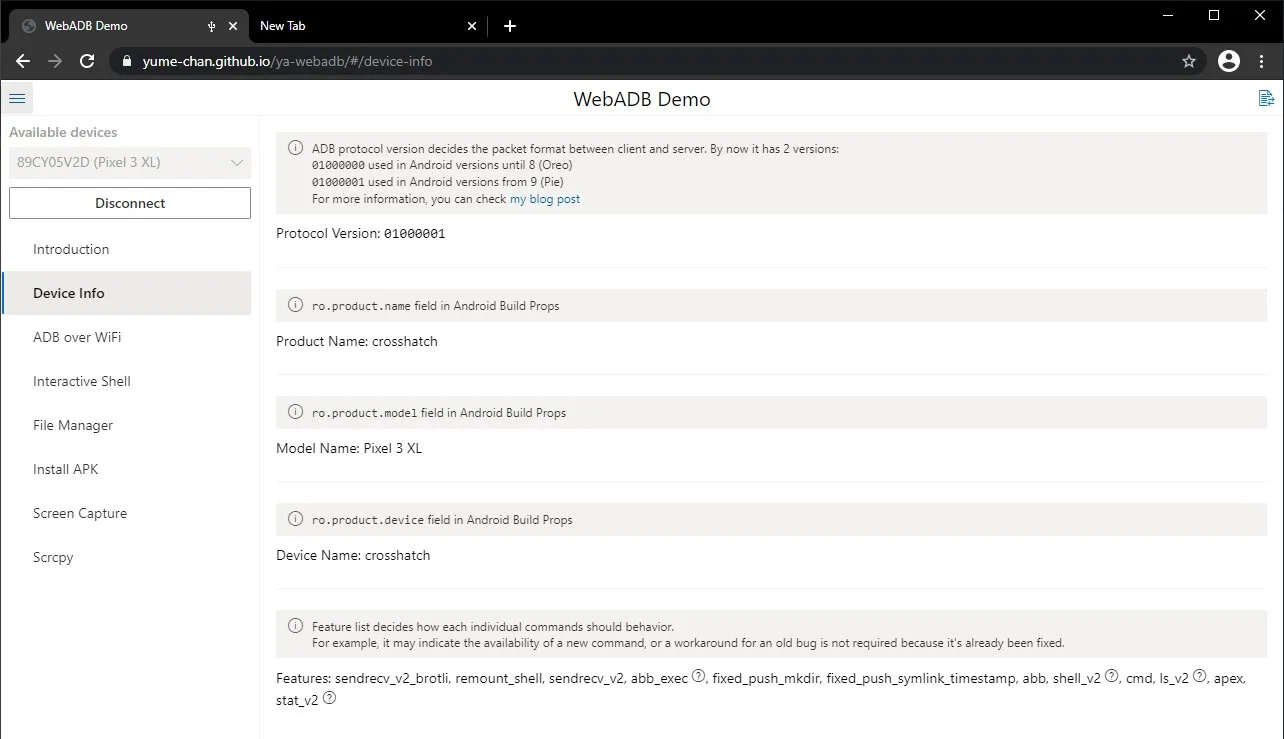
This information includes your device’s product name (the codename given by the OEM) and the model, which is nothing but the device’s actual name (like ‘Pixel 3 XL’ in my case).
Further, the web app also displays the ADB protocol version being used, as well as ‘Features’ that indicate “how some ADB commands should work”, according to the dev.
The provided information can come in handy if you’re providing technical feedback and/or are into software development and modding.
ADB over WiFi
If you didn’t know, it’s also possible to connect your device to ADB over WiFi. Since web browsers do not support TCP connections, it not possible to connect your device to WebADB wirelessly.
The ‘ADB over WiFi’ tab in WebADB allows you to set your Android device to listen for a TCP/IP connection on port 5555 (by default). Generally, this is achieved by running the adb tcpip 5555 command, but could be done from the web app with just a click.

You will still need to connect to your Android device over WiFi using the adb connect command locally. More information could be found in the documentation provided by Google.
Interactive Shell
This is where things actually get interesting. WebADB lets you initiate the ADB shell to send commands to your Android device from the computer.
To use this feature, click ‘Interactive Shell’ and you should see the command-line interface. You can then enter the command you wish to execute in the shell. Shell commands allow you to do various things, like using the package manager to remove bloatware, taking a screenshot, changing the DPI density, changing device properties, and more.
Google has also documented the available shell commands you could use.
As an example, the screenshot below shows the ADB command I used to take a screenshot on my Android device.
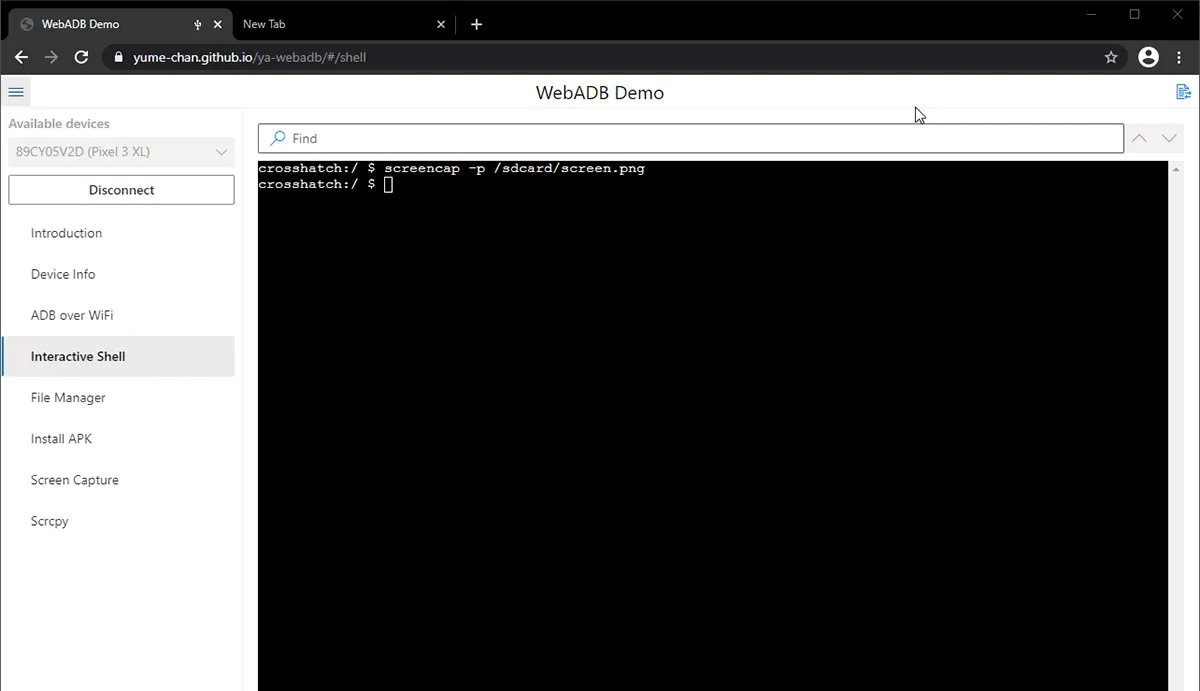
Contrary to regular ADB commands, shell commands do not include the word “adb” preceding them in the syntax.
File Manager
File Manager in WebADB allows you to explore your device’s storage to view and manage the files.
When you click the ‘File Manager’ tab, the web app will present you with the top-level/root directory of your device. To access your device’s internal storage, browse through the list, and select ‘sdcard’. You should then see all the files and folders on your device’s storage, along with the set permissions, file size, as well as the last-modified timestamp.
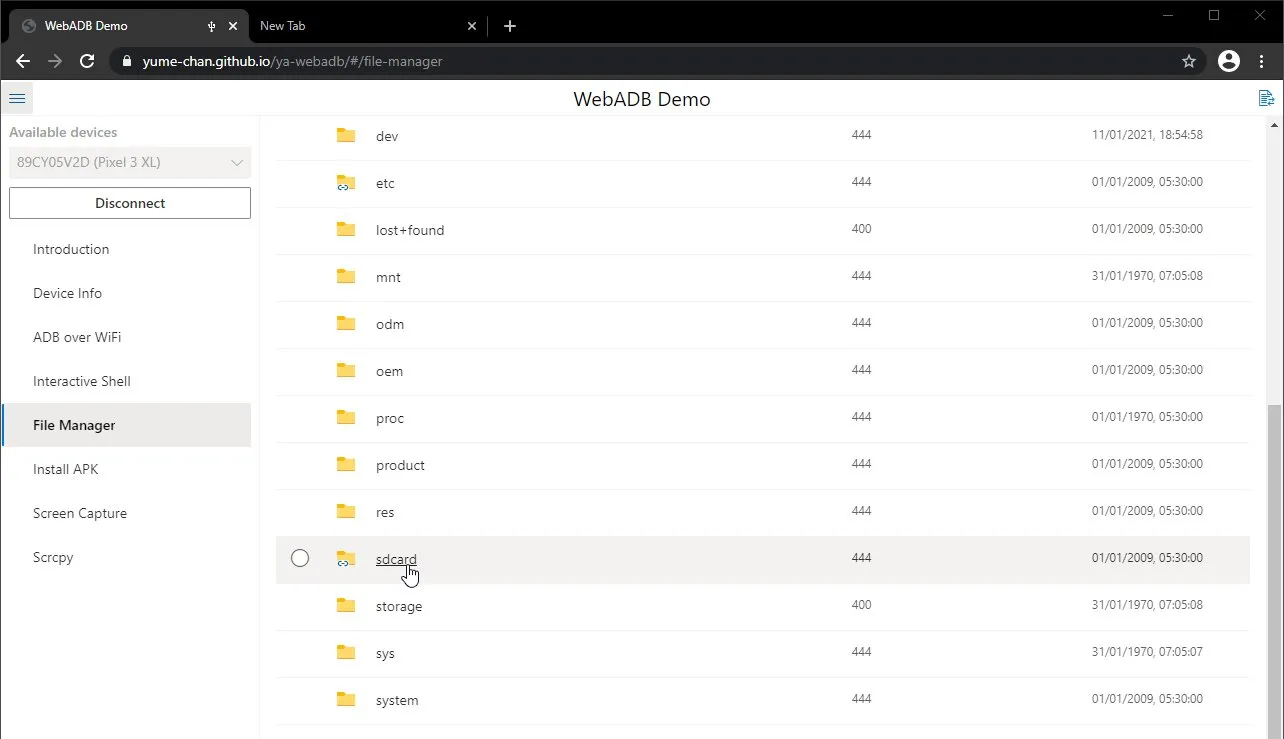
Although you can view the root directory, accessing the protected directories like ‘system’, ‘vendor’, etc require elevated root permissions and cannot be done via WebADB.
Now, if you wish to upload/transfer a file to your device, go to the directory you wish to upload it. Then click the ‘Upload’ button on the top of the interface to open the file selection window. You can then just select the file you want to transfer to your device.
You can also download files from your device to your computer, or delete them. To do this, just click the circular selector shown in front of the file, then click the ‘Download’ or ‘Delete’ button according to what you want to do.

The feature might not be a full-fledged replacement for regular file management done over MTP. Plus, there’s no way to copy, paste, or move files within the storage. But, it’s still a convenient way to transfer files to or from your Android device when you’re already working with WebADB.
Install APK
Manually installing an APK is generally useful if a certain app is not available in your region, or you’d want to force-upgrade an app to the latest version which isn’t available on the Play Store yet.
With WebADB, you can easily sideload an APK file to your device in a few clicks. Even better, you can also install an APK bundle with .apkm or .apks file format using a little trick.
The first thing you’ll need of course is an APK file of the application you wish to install. You can grab it from trusted sources like APKMirror, or F-Droid if you’re looking for open-source apps.
Next, head over to the ‘Install APK’ tab of the web app in the browser and click ‘Open’ to launch the file selection window. Then select the APK file and click ‘Open’ to install it on your Android device.
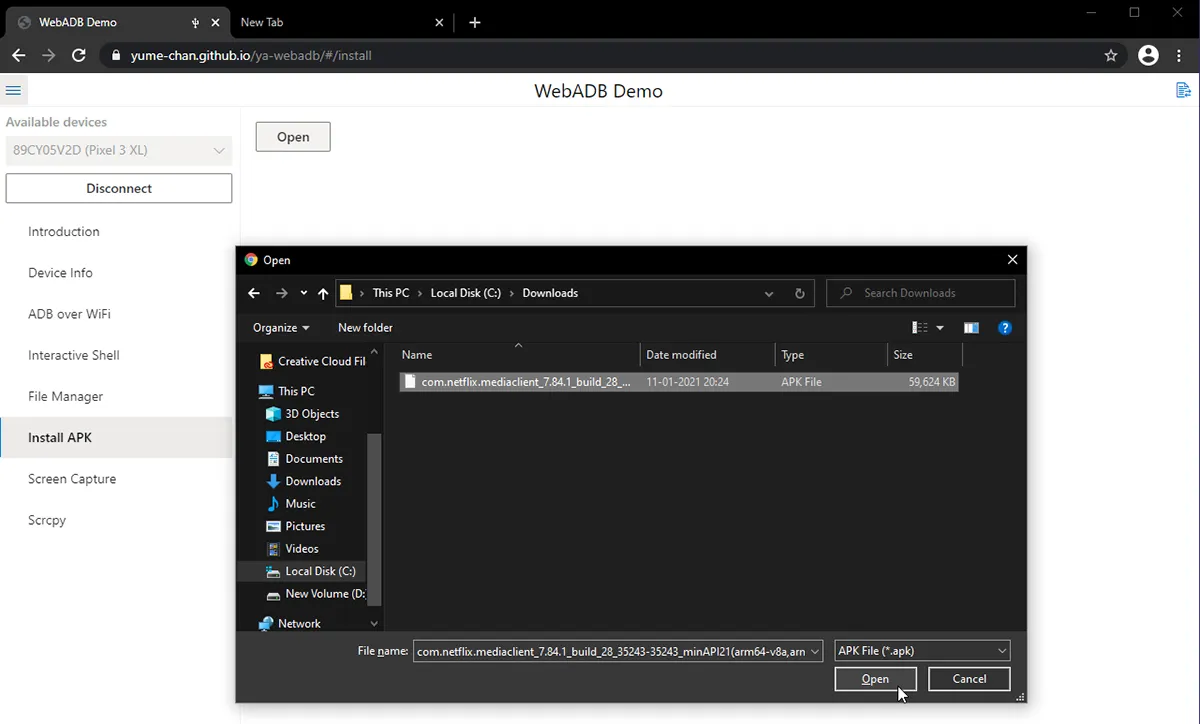
For installing an APK bundle, just change the file type in the selection window from ‘APK File (*.apk)’ to ‘All Files (*.*)’
The app’s interface will also display the installation progress and show when it’s finished.
Screen Capture
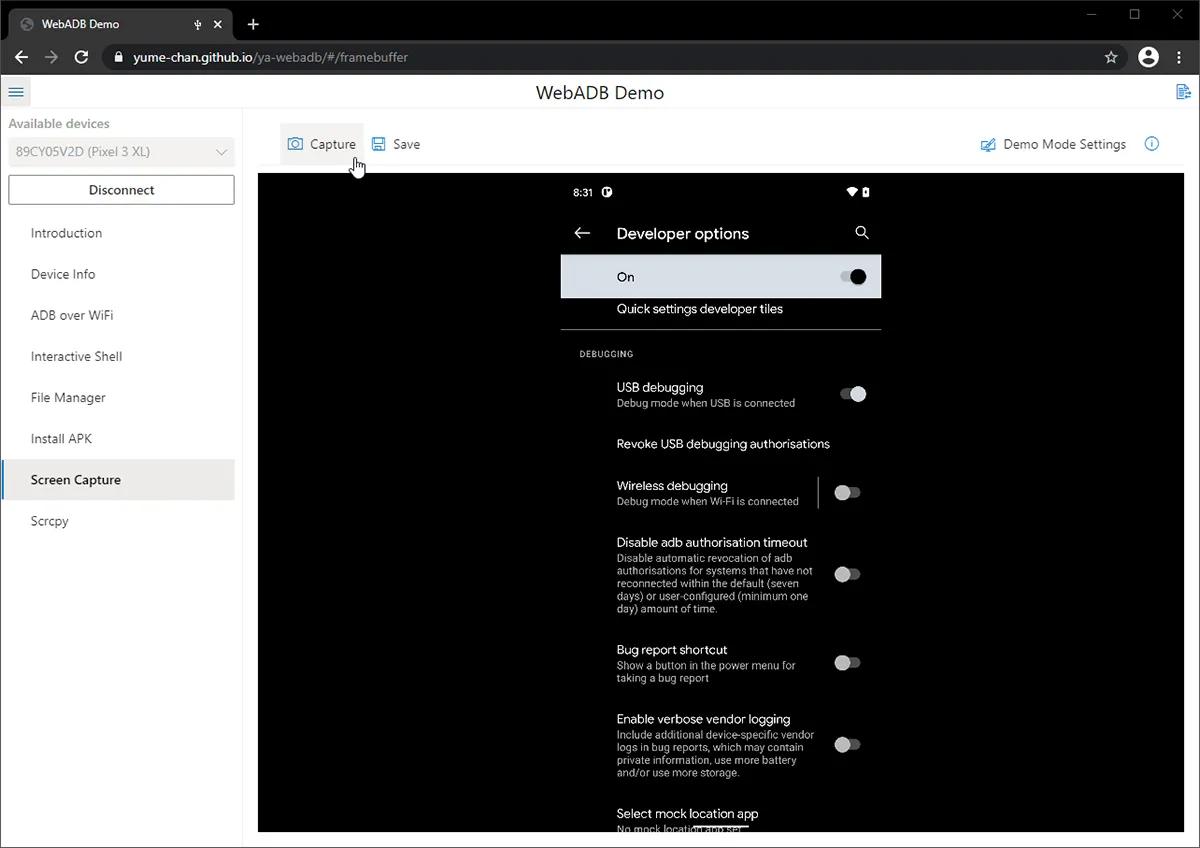
This tool allows you to easily take a screenshot of the current screen on your Android device. The tool cannot show a live preview of the screen that’s being capture. So, you will have to look over to your device’s screen to know exactly what you’re capturing.
Once it’s there, go to the ‘Screen Capture’ tab and hit the ‘Capture’ button. The captured screenshot will be shown and you can then save it to your computer by clicking the ‘Save’ button.
Note: You can only capture screenshots of apps/areas that are allowed. For instance, taking a screenshot of an Incognito tab in Google Chrome is not allowed.
As noted by Android Police, Chrome may allow screenshot capturing in future releases. However, other restricted areas such as the password prompt screen and security applications would still not allow this.
Scrcpy
“Scrcpy” is a handy little tool/application that allows you to mirror your Android device’s screen and control it from any Windows, macOS, or Linux computer. It is developed by Genymobile, the company behind the Genymotion Android emulator. The application is fully open-source with the source code published on Github.
It doesn’t require you to root your phone or install any external application. Just ADB and the plain ol’ USB cable.
WebADB also includes ‘scrcpy’, so you can use it to easily view and control your device’s screen directly from the web browser.
During our initial testing, I wasn’t able to get it to work as it showed the ‘No available encoder found’ error. I passed this on to the developer (Simon) and he fixed the problem quite quickly. Kudos to him for that!
To use this feature, click ‘Scrcpy’ in the web app and then click ‘Start’. The tool will then establish a connection with your device and show the current display quite instantly. You can then use the mouse pointer to control the display.
Here’s a quick demo of the feature:
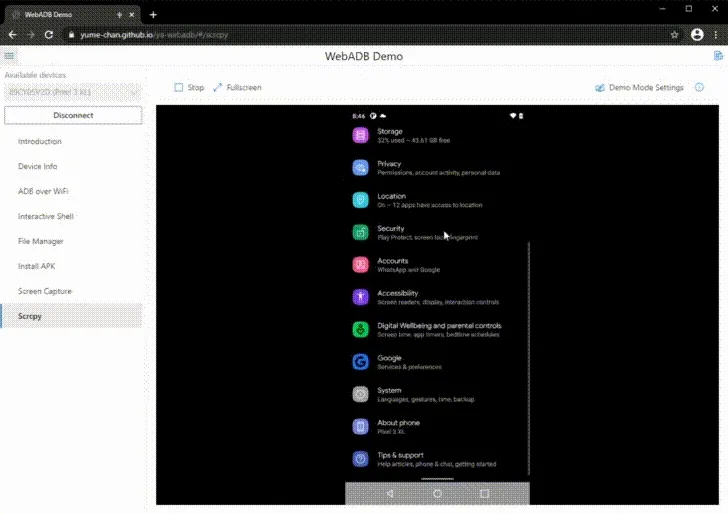
The interface also places an additional navigation bar at the bottom so it’s easy for you to navigate back to the previous screen, jump to the home screen, or open the Recents screen. This is especially very useful if you’ve gesture navigation enabled on your device.
The latency is also quite low, so you should encounter any delays or stuttering while controlling your device’s screen via WebADB.
The only thing I personally feel that’s missing is the ability to record the screen. I guess it would be a great feat.
Wrapping Up
WebADB is an amazing little tool for those who just want to use ADB without having to set it up locally on their computers. You can use it to quickly transfer files to/from your device, use the shell commands to remove bloatware or boot your device into Fastboot/Recovery modes, capture and save screenshots directly to your computer, and more.
There are certain parts of the tool that could be improved. For instance, having the ability to copy/paste/move the files in the File Manager would be a great addition. Also, I could get WebADB to install an APK bundle on my Android device. Adding the extension support in the file type dropdown would be great so that users can know that APK bundles could be installed as well.
Regardless, it’s a pretty handy tool. With the project getting more coverage and support, it’d be exciting to see new features being added and existing ones being polished/improved.
If you face any bugs or have any suggestions/feedback, you can submit them on Github. If you’re a developer and want to contribute to the project, you can create a pull request on Github as well.
A huge thanks to our friend Simon for coming up with the idea and bringing WebADB to life. And also for taking out the time to have a little chat with us.
Source: WebADB’s Github
Comments
Comments are moderated, and published only if they are relevant to the topic and add value in a constructive way. If you disagree with something, please be polite and respectful. We suggest you read our comment policy before commenting.