[How-To] Boot Samsung Galaxy S10 into Download Mode and Recovery Mode
Rooting, installing stock firmware using Odin, performing a factory reset, or manually sideloading OTA updates, all of these procedures will require you to

On this page
Rooting, installing stock firmware using Odin, performing a factory reset, or manually sideloading OTA updates, all of these procedures will require you to boot your Galaxy S10 into Download Mode or Recovery Mode at some point. In this guide today, we will show you how to boot Samsung Galaxy S10 into Download Mode and Recovery Mode when required. This guide supports all the three S10 series devices - Galaxy S10, Galaxy S10+, and Galaxy S10e.
Samsung released its Galaxy S10 lineup for 2019 back in February and the devices have proved to be the best Galaxy smartphones till date, offering the all-new infinite-O display with camera cutout, powerful hardware, and amazing features like WiFi PowerShare. The phones also come with One UI sitting atop Android Pie, probably offering the best software that Samsung has designed yet.
While following several of the tutorials, like rooting the Galaxy S10/S10+/S10e on our blog, you will be asked to boot your phone into certain pre-boot modes. When it comes to Samsung devices, these are known as “Download Mode” and “Recovery Mode”.
How to Boot Samsung Galaxy S10 into Download Mode?

Download Mode on Samsung Galaxy S10 is a pre-boot menu that allows you to flash firmware images or custom binaries like TWRP using a program called Odin. It is very similar to “Fastboot Mode” on a majority of other Android devices like the Google Pixel 3. So, if you ever want to restore the stock firmware, manually upgrade the software, or root your Galaxy S10, you will need to know how to enter Download Mode on Samsung Galaxy S10 device.
Simply follow the instructions below to boot Samsung Galaxy S10, Galaxy S10+, and Galaxy S10e into Download Mode. All you will need is a USB cable, your Samsung Galaxy S10 device, and a PC.
- Press and hold the power button of your Galaxy S10.
- Tap on ‘Power off’ and then again on ‘Power off’ to shut down the phone.
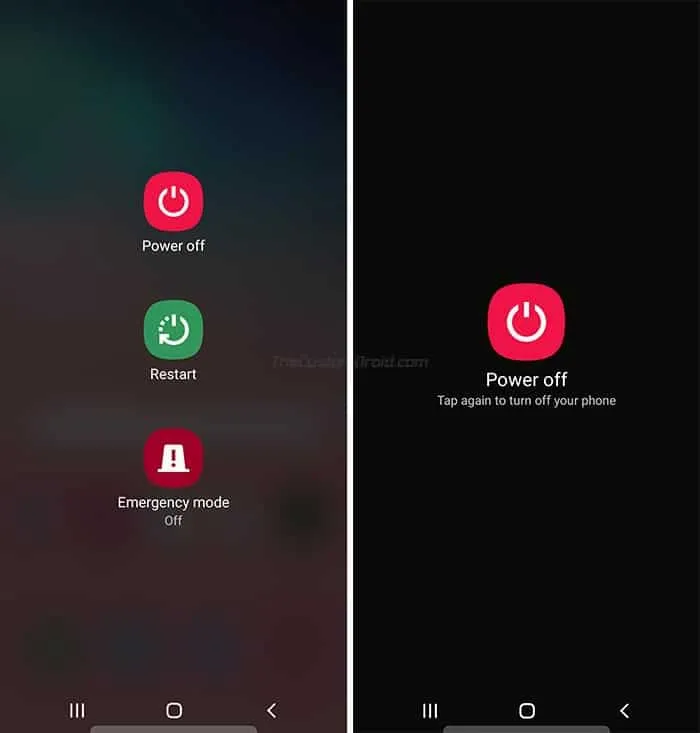
- Once the phone has been turned off, press and hold the Volume Down and Bixby buttons together.
- While holding the buttons, connect your Galaxy S10 to the PC using the USB cable.
- You should now see a ‘Warning’ message on your phone’s screen.

- Finally, tap the Volume Up button to enter Download Mode on your Samsung Galaxy S10/S10+/S10e.
Once your phone is in Download Mode, you can connect it to the PC and use the Odin Tool to flash firmware files and custom binaries like TWRP.
How to Boot Samsung Galaxy S10 into Recovery Mode?
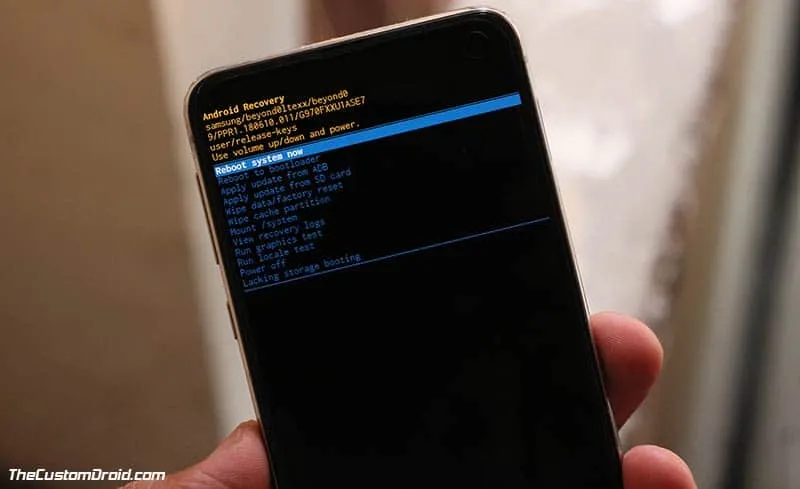
Recovery Mode on Samsung Galaxy S10 is a bootable partition where you can perform a factory reset, wipe cache partition, and sideload OTA updates manually. When we say recovery mode, it isn’t limited to the stock recovery that comes pre-installed on the device, but also custom recoveries like TWRP that you can use to flash custom ROMs, wipe/erase device partitions, take Nandroid backups and more.
Below are two different methods that you can follow to boot Samsung Galaxy S10/S10+/S10e into Recovery Mode, be it the stock recovery or custom recovery like TWRP.
Method 1: Using Physical Buttons Combination
- Press and hold the power button of your Galaxy S10 device.
- Once the power menu appears on the screen, tap on ‘Power off’.
- Then tap on ‘Power off’ again to shut down the phone completely.
- Press and hold the Volume Up, Bixby, and Power buttons together.
- Keep holding the buttons until you see the Recovery screen.
So, you have just been able to enter Recovery Mode on Samsung Galaxy S10/S10+/S10e.
Method 2: Using ADB
Whilst following tutorials that require you to use ADB, like sideloading OTA updates, you can also use ADB to boot your Samsung Galaxy S10 device into Recovery Mode. In order to use this method, you must first install ADB and Samsung USB drivers on your PC and also enabled USB debugging on your phone.
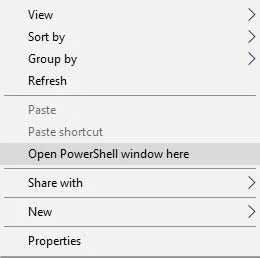
- Go to the folder on the PC where ADB has been installed (e.g. C:\ADB).
- While holding the SHIFT key on the keyboard, right-click on an empty space inside this folder.
- Select the ‘Open PowerShell window here’ option.
-
Now, connect your Samsung Galaxy S10 device to the PC using the USB cable.
-
Enter the following ADB command to ensure that your device is being detected properly:
adb devices
-
The command should return a device ID. In case it doesn’t, then make sure that you have properly installed the USB drivers and rebooted your PC.
-
Finally, enter the following command to boot your Samsung Galaxy S10/S10+/S10e into Recovery Mode:
adb reboot recovery
As soon as you enter the command, your device should reboot and enter the Stock or TWRP recovery mode (Whichever is installed).
So, through this guide, you have just learned how to boot Samsung Galaxy S10/S10+/S10e into Download Mode and Recovery Mode. During several of our Galaxy S10 tutorials, you shall be asked to boot your phone into these modes and that is where this guide will come in handy.
More on Galaxy S10:
If you have any questions regarding the instructions mentioned in this guide, feel free to drop a comment and let us know.
Comments
Comments are moderated, and published only if they are relevant to the topic and add value in a constructive way. If you disagree with something, please be polite and respectful. We suggest you read our comment policy before commenting.