How to Install TWRP Recovery and Root ASUS ZenFone 6/ASUS 6z
An unofficial TWRP recovery build is now available for the ASUS ZenFone 6 (2019). In this guide, we will show you how to Install TWRP Recovery and root ASUS

On this page
An unofficial TWRP recovery build is now available for the ASUS ZenFone 6 (2019). In this guide, we will show you how to Install TWRP Recovery and root ASUS Zenfone 6/ASUS 6z using Magisk.
ASUS Zenfone 6 (ZSK630KL), also known as the ‘ASUS 6z’ was released in May 2019. Carrying forward the tradition of other OEM flagship devices, it also chose to go after a completely bezel-less display. One of the major eye-catching features of this device includes 48 megapixels motorized flip camera and a whopping 5000mAh battery, something that one rarely finds in flagship devices of this stature. Another thing worth appreciating is the support of the Micro-SD card to further expand your storage capacity. Covering all the requirements in style, it is surely going to send ripples across the mid-range price segment.
If you’d like to root your ASUS Zenfone 6/ASUS 6z without TWRP, then you can follow this tutorial. Rooting without TWRP allows you to install OTA updates easily.
Update (26 June 2019): According to some of our readers (Thanks Egle and GRöder!), booting the TWRP image using the ‘fastboot boot’ command no longer works after the latest Asus Zenfone 6 software update. The same has also been confirmed over at the original TWRP thread at XDA. We’d be updating this post once a newer version of TWRP is available for the Zenfone 6 2019.
If you belong to the set of users who are in regular need of tweaking and modifying their device software then there is some good in store for you. An unofficial version of TWRP has been released for the device. So follow the below guide on how to install TWRP Recovery and Root ASUS ZenFone 6/ASUS 6z.
TWRP Recovery and Root for ASUS ZenFone /ASUS 6z (ZS630KL)
Asus Zenfone 6 zS630KL is the latest addition to the Zenfone 6 series. Although Asus wasn’t always known for being development-friendly, this notion has started to change with the launch of its latest device. Within weeks of launching the device, Asus has released the bootloader unlocking tool as well as the kernel source code for this device. It has also started sending the device to developers over the XDA, TWRP, Lineage OS among others.
With the frequent development going on, it was only a matter of days before one could hear about a custom recovery being released for this device. And a senior developer over at XDA (mauronofrio) has managed to do just that. He has released an unofficial, test version of the TWRP Recovery for the Asus Zenfone 6 (2019).
But as it is still in the testing phase, there are still some bugs that need to be ironed out. For instance, TWRP on the Zenfone 6 does not support data encryption. So it cannot decrypt the storage (/data storage). To access your internal storage and get root access, you need to format data partition. Until you do this, you won’t be able to install TWRP installer zip file, the Magisk installer zip or any other file for that matter from the internal storage. With that in mind, go through the guide below to install TWRP and then Root ASUS Zenfone 6/ASUS 6z (ZS630KL).
Warning:
- Once you unlock the bootloader of your device, you cannot revert it to the original ‘locked’ state.
- Also, the warranty of your device would be void.
- You will no longer be eligible to receive official software updates from Asus.
- At any stage, thecustomdroid.com or any of its members will not be held liable in case of your device getting soft-bricked or damaged. Proceed only if you know what you are doing.
Prerequisites
- Before beginning with the procedure, it is extremely important to backup all of your data. Unlocking the bootloader will completely wipe your data. You may also refer to the tutorial on how to backup data on Android Devices.
- Be sure to keep your device charged to at least 50% so that it doesn’t suddenly turn off during the process.
- It is mandatory to unlock the bootloader of your Asus ZenFone 6 (ZS630KL). Unlock it via the Version Unlock Tool. Download and transfer it to your device. Then install it and follow the on-screen instruction to unlock the bootloader.
- Enable USB Debugging and OEM Unlocking on your Asus Zenfone 6 (2019). You could do so by going to Settings and tapping on the Build Number 7 times. Then under Developer options, enable both the options mentioned above. You could also refer to our guide regarding the same.
- Download and install ADB and Fastboot Tool for entering fastboot commands.
- Download the USB Drivers for Asus ZenFone 6 (ZS630KL).
Downloads
- Unofficial TWRP Recovery v3.3.1-1 for Asus ZenFone 6 (ZS630KL):
- TWRP image: test-twrp-3.3.1-1-I01WD-zenfonde6.img
- TWRP installer zip: test-twrp-3.3.1-1-I01WD-zenfonde6-installer.zip
- Magisk Installer zip file: Magisk v19.3.zip (Check out the complete changelog for Magisk 19.3)
Guide to Install TWRP Recovery and Root ASUS Zenfone 6/ASUS 6z
For your convenience and better understanding, we have split the guide into three steps.
So, you will begin by temporarily booting the TWRP recovery image on the Asus Zenfone 6 (2019) via fastboot. Once booted, you will need to format the data partition to be able to access the internal storage in TWRP. Finally, you will be flashing the TWRP installer and Magisk installer zip files to permanently install TWRP and root Asus Zenfone 6 (ZS630KL).
Step 1: Boot TWRP Recovery Image via Fastboot
- Download the TWRP Recovery image file for ASUS Zenfone 6/ASUS 6z (ZS630KL).
- Connect your phone to the PC using the USB cable.
- Transfer the image file to the folder where ADB and Fastboot tools are installed (e.g. C:\adb)
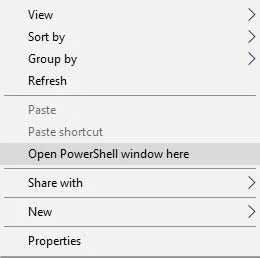
- Hold the SHIFT key and right-click in an empty area inside the same folder.
- Click on the ‘Open PowerShell window here’ option.
- Turn off your device.
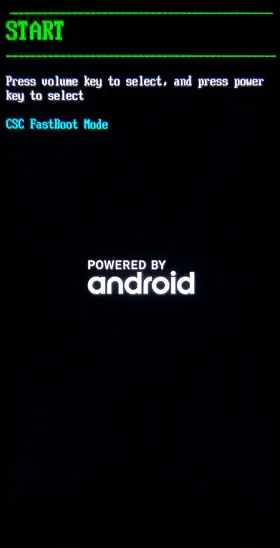
- Boot your Asus Zenfone 6 into Fastboot mode by holding the Volume Up and Power key together until the device vibrates.
- Then release the Power button but keep the Volume Up button pressed until you see the ‘Fastboot mode’screen.
-
Type in the following command to make sure that a successful connection between PC and device is established:
fastboot devices
If you don’t get a device ID, make sure that the Asus USB drivers are properly installed.
-
Now you need to temporary boot the TWRP recovery image on ASUS Zenfone 6/ASUS 6z. To do so, enter the below code:
fastboot boot twrp-image-filename.img
Replace the ‘twrp-image-filename’ with the actual name of the file. For eg, in this case, the code will look like:
fastboot boot test-twrp-3.3.1-1-I01WD-zenfonde6.img
-
As soon as the command is entered, your device will boot into TWRP Recovery.
Step 2: Format Data Partition in TWRP
To access the internal storage in TWRP, as well as for the normal booting of the device, you will now need to format data partition. To do that, follow the simple set of instructions below:
- Tap on the ‘Wipe’ option under the TWRP main menu.
- Tap on ‘Format data’.
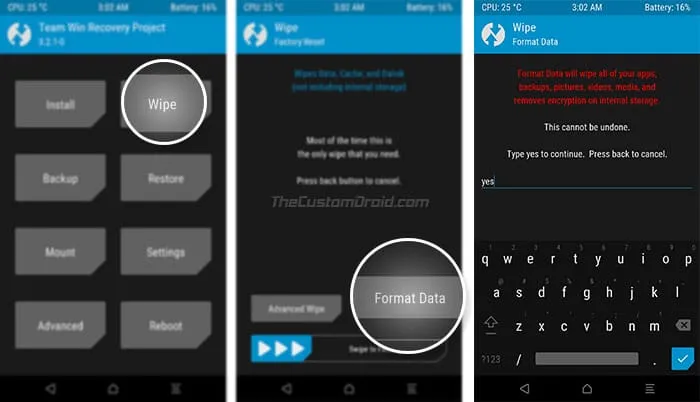
- Enter ‘yes’ in the provided field to format data partition on your ASUS ZenFone 6/ASUS 6z (ZS630KL).
Step 3: Flash TWRP and Magisk Installer ZIP to root ASUS Zenfone 6/ASUS 6z (2019)
- In TWRP, tap on ‘Mount’ and press the ‘Enable MTP’ button.

- Connect your Asus Zenfone 6 (2019) to the PC via the USB cable.
- Transfer both the files - TWRP installer as well as the Magisk installer zip to your device’s internal storage.
- Disconnect the device and go back to the TWRP main menu.
- Select the ‘Install’ option.
- Navigate the internal storage and select the TWRP installer zip (test-twrp-3.3.1-1-I01WD-zenfonde6-installer.zip) file.
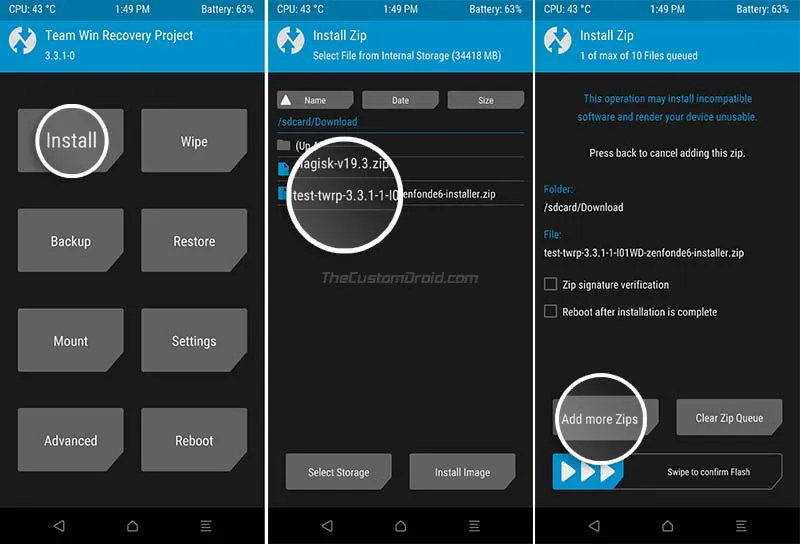
- Once selected, tap on ‘Add more Zips’ and select the Magisk 19.3 installer (Magisk-v19.3.zip) file.
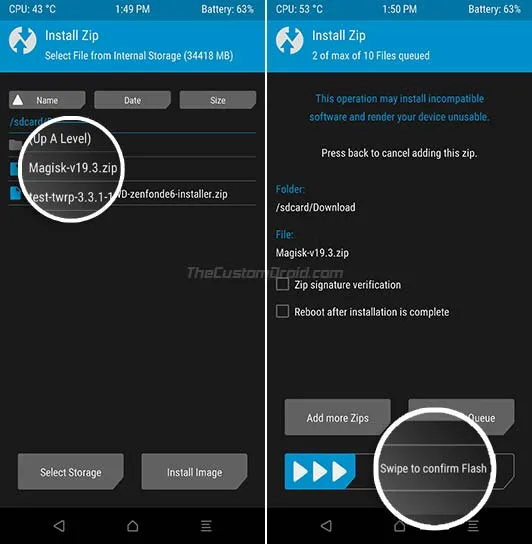
- Finally, swipe the button on the screen to permanently install TWRP and root ASUS Zenfone 6/ASUS 6z (ZS630KL) using Magisk.
Once the installation finishes, go to the ‘Reboot’ menu and tap on ‘System’ to boot your phone into the OS.
There you go, you have successfully installed TWRP recovery on ASUS Zenfone 6/ASUS 6z and rooted it via Magisk. Go ahead and install root-enabled apps of your choice, use MagiskHide to hide root from certain apps, or install audio mods like Dolby Atmos or ViPER4Android.
If you have any questions regarding the instructions or the process itself, feel free to drop a comment below.
Comments
Comments are moderated, and published only if they are relevant to the topic and add value in a constructive way. If you disagree with something, please be polite and respectful. We suggest you read our comment policy before commenting.